ASSEMBLY
| ASSEMBLY |
|
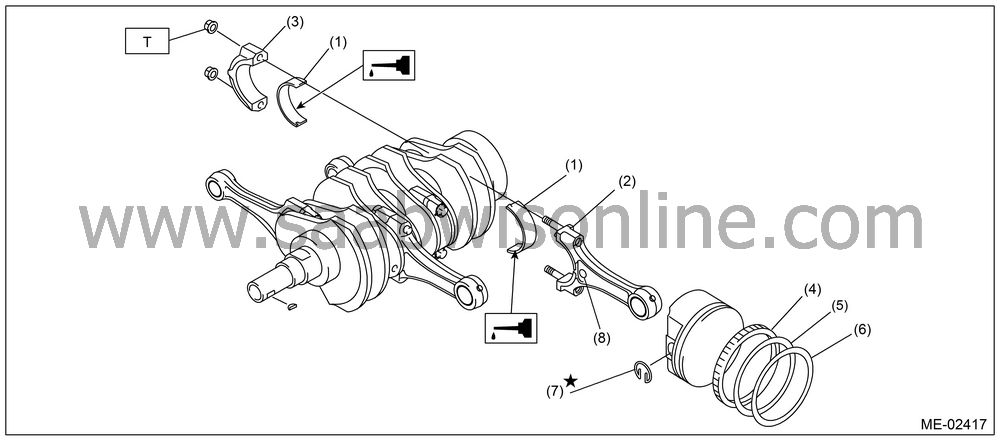
(1)
|
Connecting
rod bearing
|
(5)
|
Second
ring
|
Tightening torque: Nm (kgf-m, ft-lb)
|
|
|
(2)
|
Connecting
rod
|
(6)
|
Top ring
|
T:
|
45 (4.6, 33)
|
|
(3)
|
Connecting
rod cap
|
(7)
|
Snap ring
|
||
|
(4)
|
Oil ring
|
(8)
|
Side mark
|
||
Apply oil to the surfaces of the connecting rod bearings. Install the connecting rod bearings on connecting rods and connecting rod caps.
Install the connecting rod on crankshaft.
| Note | ||
|
Position each connecting rod with the side marked facing forward. |
Install the connecting rod cap with connecting rod nut.
Ensure the arrow on connecting rod cap faces the front during installation.
| Important | ||
| • |
Each connecting rod has its
own mating cap. Make sure that they are assembled correctly by checking
their matching number.
|
|
| • |
When tightening the connecting rod nuts, apply oil on
the threads.
|
|
Install the oil ring spacer, upper rail and lower rail in this order by hand. Then install the second ring and top ring with a piston ring expander.


