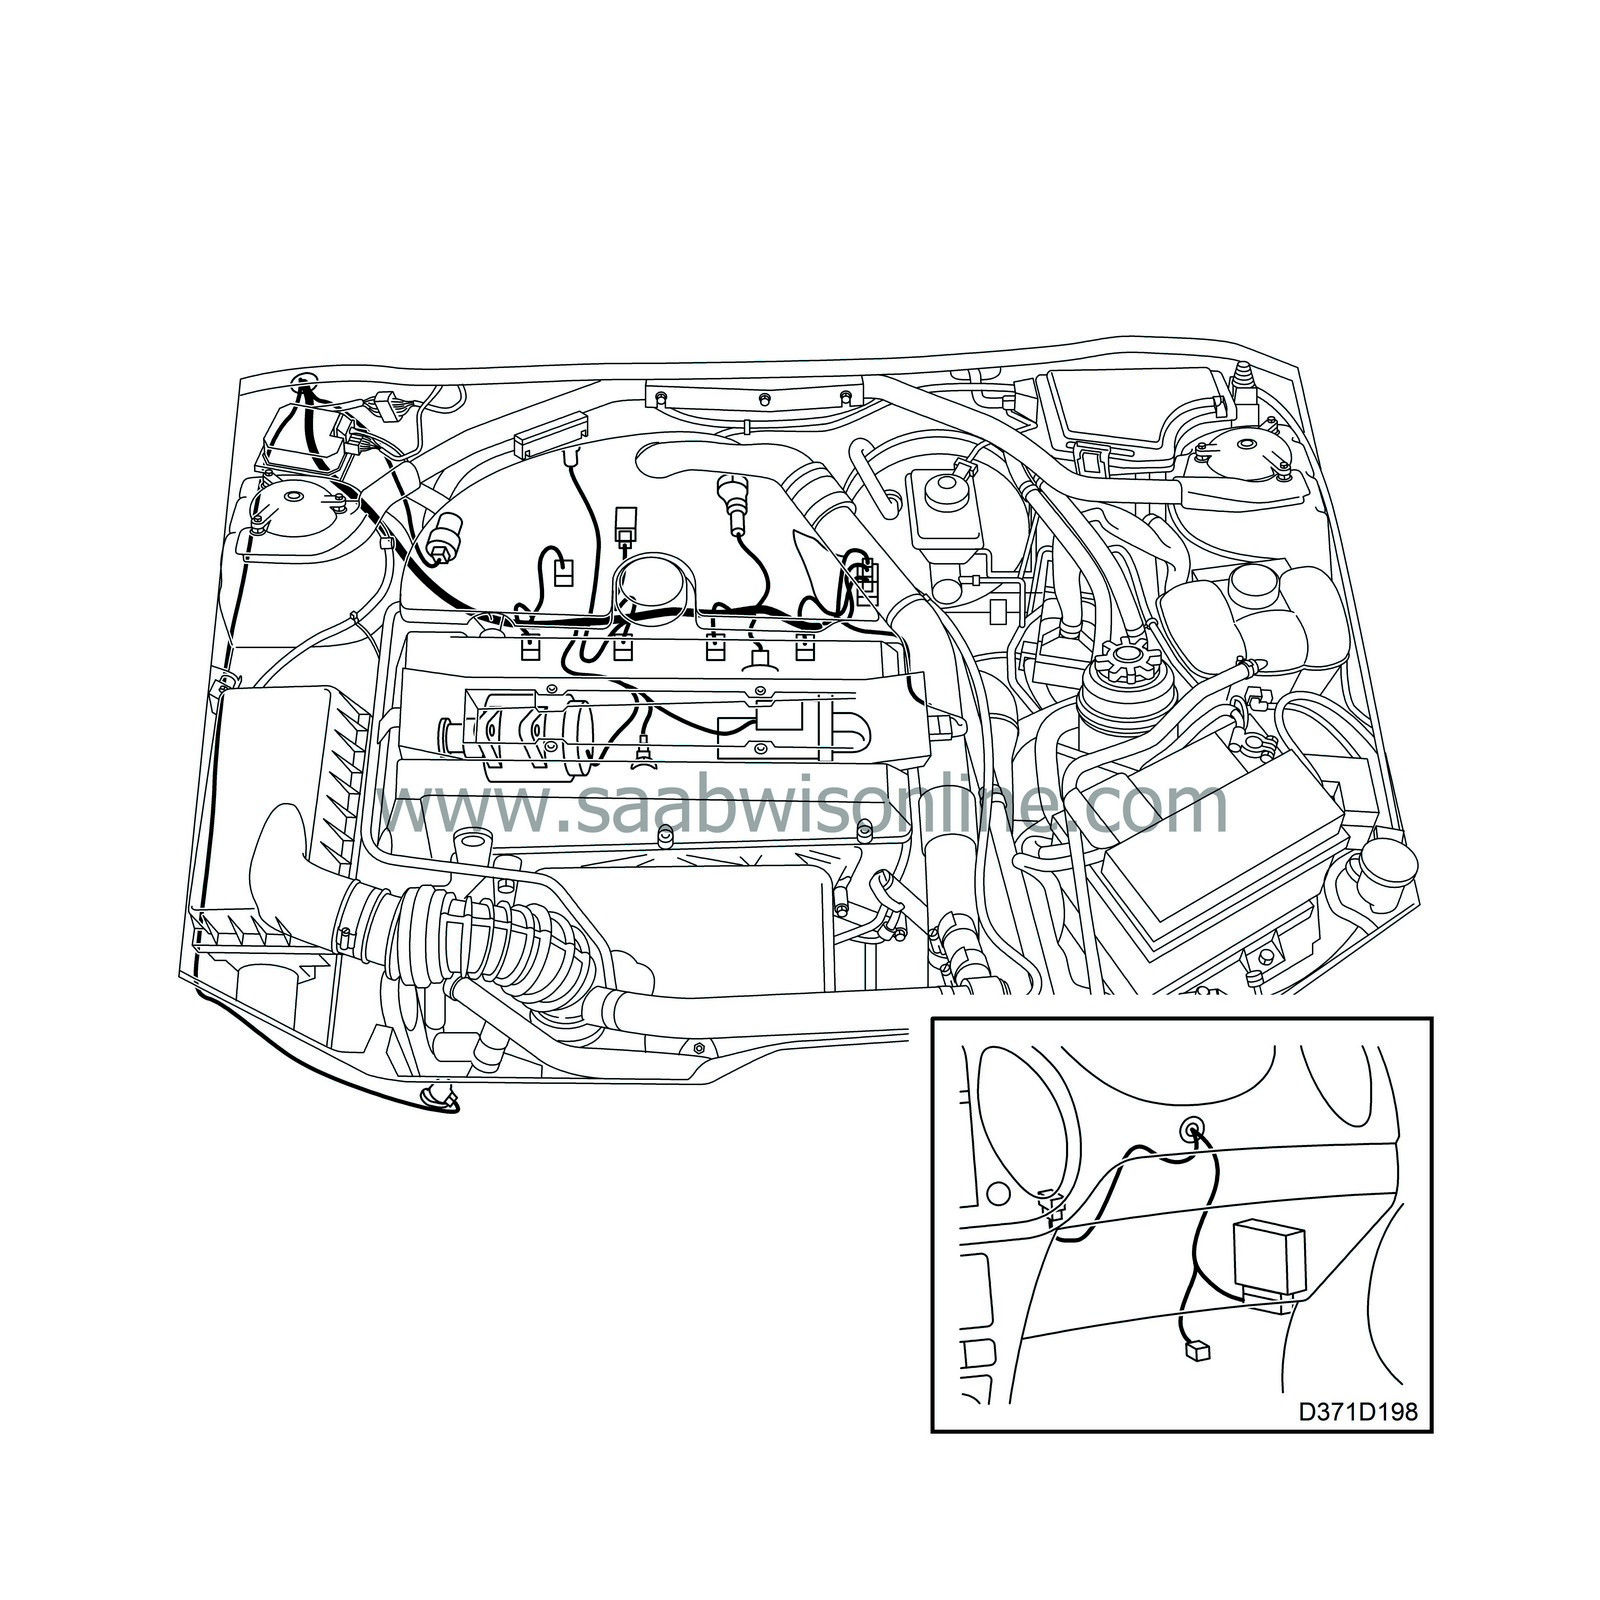
Wiring harness, power train
|
|
Wiring harness, power train
|
|
Note
|
|
If the car is fitted with a radio other than a Saab original radio, check that the customer has the radio code before you begin work.
|
|
1.
|
Disconnect the negative lead from the battery.
|
|
2.
|
Remove the cruise control module.
|
|
4.
|
Mark all connectors meticulously
before unplugging them from their components.
|
|
5.
|
Disconnect the leads to the grounding points on the intake manifold.
|
|
6.
|
Unplug the connectors to the other wiring harnesses.
|
|
7.
|
Cautiously detach the wiring harness so as not to spoil those cable ties, etc., that are to be re-used.
|
|
8.
|
Run the new wiring harness the same way as the old one and fasten it in the same manner. Make sure that all grommets seal properly.
|
|
9.
|
Plug the connectors to their components. In case of doubt, check against the wiring diagrams and component lists pertaining to the system you are working on.
|
|
10.
|
Plug the connectors back together.
|
|
11.
|
Connect the grounding leads.
|
|
12.
|
Re-fit the cruise control module.
|
|
13.
|
Re-fit the glove box.
|
|
14.
|
Connect the negative lead to the battery. Reset the clock and program in the radio code if there is one.
|
|
Important
|
|
Fasten the wiring harness correctly so that there is no risk of it scraping or rattling.
|
|
Check all rubber grommets to minimize the risk of leakage.
|
|
|
|
|
|
Note
|
|
Spray all the connectors with “Kontakt 61” to prevent corrosion; clean all the grounding points and apply vaseline.
|

|
Note
|
|
If the car is fitted with a radio other than a Saab original radio, check that the customer has the radio code before you begin work.
|
|
1.
|
Disconnect the negative lead from the battery.
|
|
2.
|
Remove the cruise control module.
|
|
4.
|
Mark all connectors meticulously
before unplugging them from their components.
|
|
5.
|
Disconnect the leads to the grounding points on the intake manifold.
|
|
6.
|
Unplug the connectors to the other wiring harnesses.
|
|
7.
|
Cautiously detach the wiring harness so as not to spoil those cable ties, etc., that are to be re-used.
|
|
8.
|
Run the new wiring harness the same way as the old one and fasten it in the same manner. Make sure that all grommets seal properly.
|
|
9.
|
Plug the connectors to their components. In case of doubt, check against the wiring diagrams and component lists pertaining to the system you are working on.
|
|
10.
|
Plug the connectors back together.
|
|
11.
|
Connect the grounding leads.
|
|
12.
|
Re-fit the cruise control module.
|
|
13.
|
Re-fit the glove box.
|
|
14.
|
Connect the negative lead to the battery. Reset the clock and program in the radio code if there is one.
|
|
Important
|
|
Fasten the wiring harness correctly so that there is no risk of it scraping or rattling.
|
|
Check all rubber grommets to minimize the risk of leakage.
|
|
|
|
|
|
Note
|
|
Spray all the connectors (not the oxygen sensor) with “Kontakt 61” to prevent corrosion; clean all the grounding points and apply vaseline.
|

|
Note
|
|
If the car is fitted with a radio other than a Saab original radio, check that the customer has the radio code before you begin work.
|
|
1.
|
Disconnect the negative lead from the battery.
|
|
2.
|
Remove the throttle position sensor.
|
|
4.
|
Mark all connectors meticulously
before unplugging them from their components.
|
|
5.
|
Disconnect the leads to the grounding points.
|
|
6.
|
Unplug the connectors to the other wiring harnesses.
|
|
7.
|
Cautiously detach the wiring harness so as not to spoil those cable ties, etc., that are to be re-used.
|
|
8.
|
Run the new wiring harness the same way as the old one and fasten it in the same manner. Make sure that all grommets seal properly.
|
|
9.
|
Plug the connectors to their components. In case of doubt, check against the wiring diagrams and component lists pertaining to the system you are working on.
|
|
10.
|
Plug the connectors back together.
|
|
11.
|
Connect the grounding leads.
|
|
12.
|
Re-fit the throttle position sensor.
|
|
13.
|
Re-fit the glove box.
|
|
14.
|
Connect the negative lead to the battery. Reset the clock and program in the radio code if there is one.
|
|
Important
|
|
Fasten the wiring harness correctly so that there is no risk of it scraping or rattling.
|
|
Check all rubber grommets to minimize the risk of leakage.
|
|
|
|
|
|
Note
|
|
Spray all the connectors with “Kontakt 61” to prevent corrosion. Clean all the grounding points and apply vaseline.
|


