Automatic gearbox assembly
|
|
Automatic gearbox assembly
|
|
Important
|
|
Cables, hoses, leads, etc., are secured with plastic cable ties. After being tightened, the excess part of the cable tie is cut off, resulting in more or less sharp ends remaining at the point of securement. Therefore, care must be taken to avoid injury.
|
|
|
|
1.
|
Place the car on a lift.
|
|
2.
|
Place covers over the wings to avoid damaging or dirtying the paintwork.
|
|
3.
|
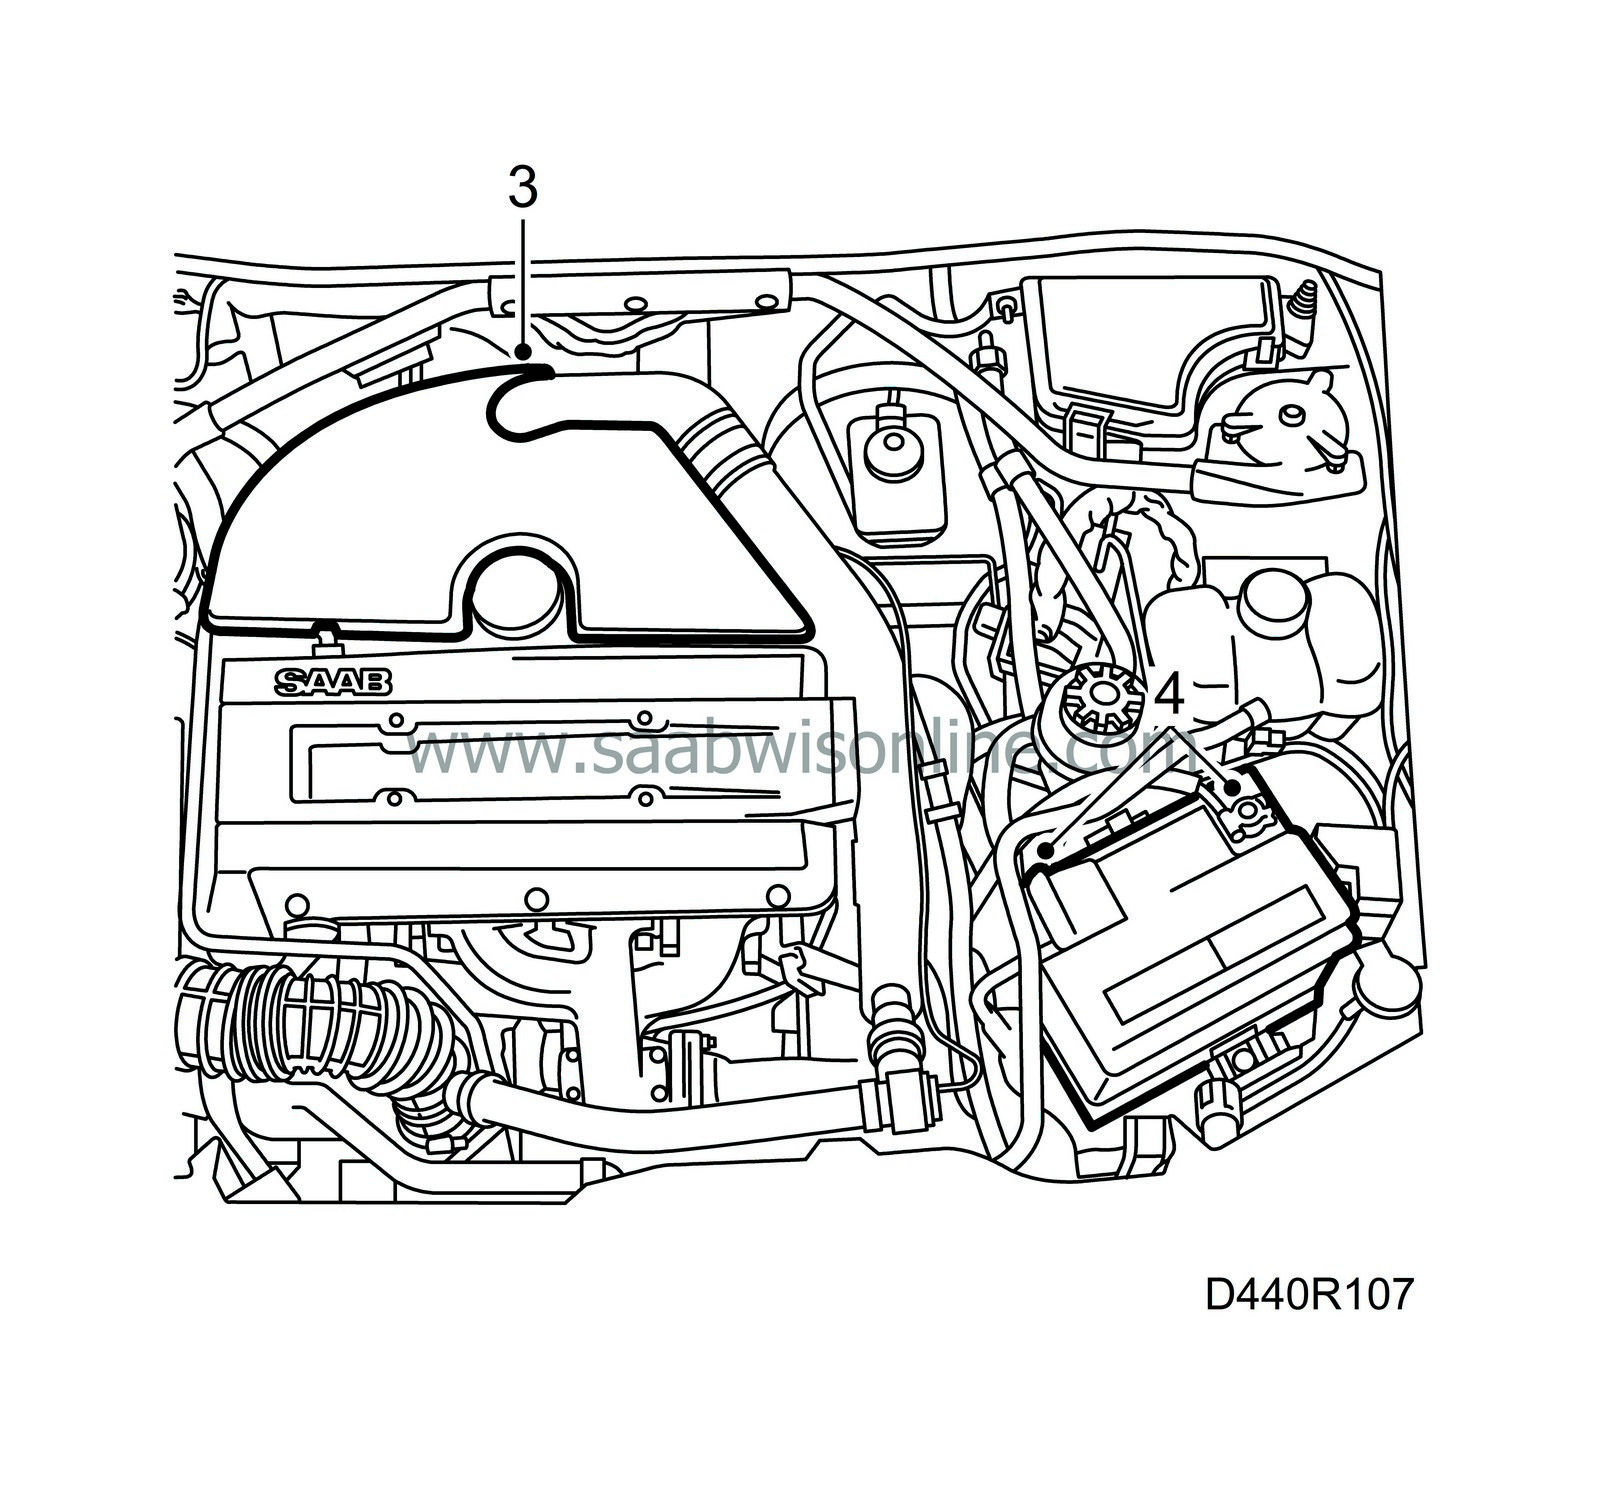
Remove the cover over the intake manifold, alternatively the resonator, together with hoses and mass air flow sensor.
|
|
4.
|
Detach the battery leads from the battery.
|
|
5.
|
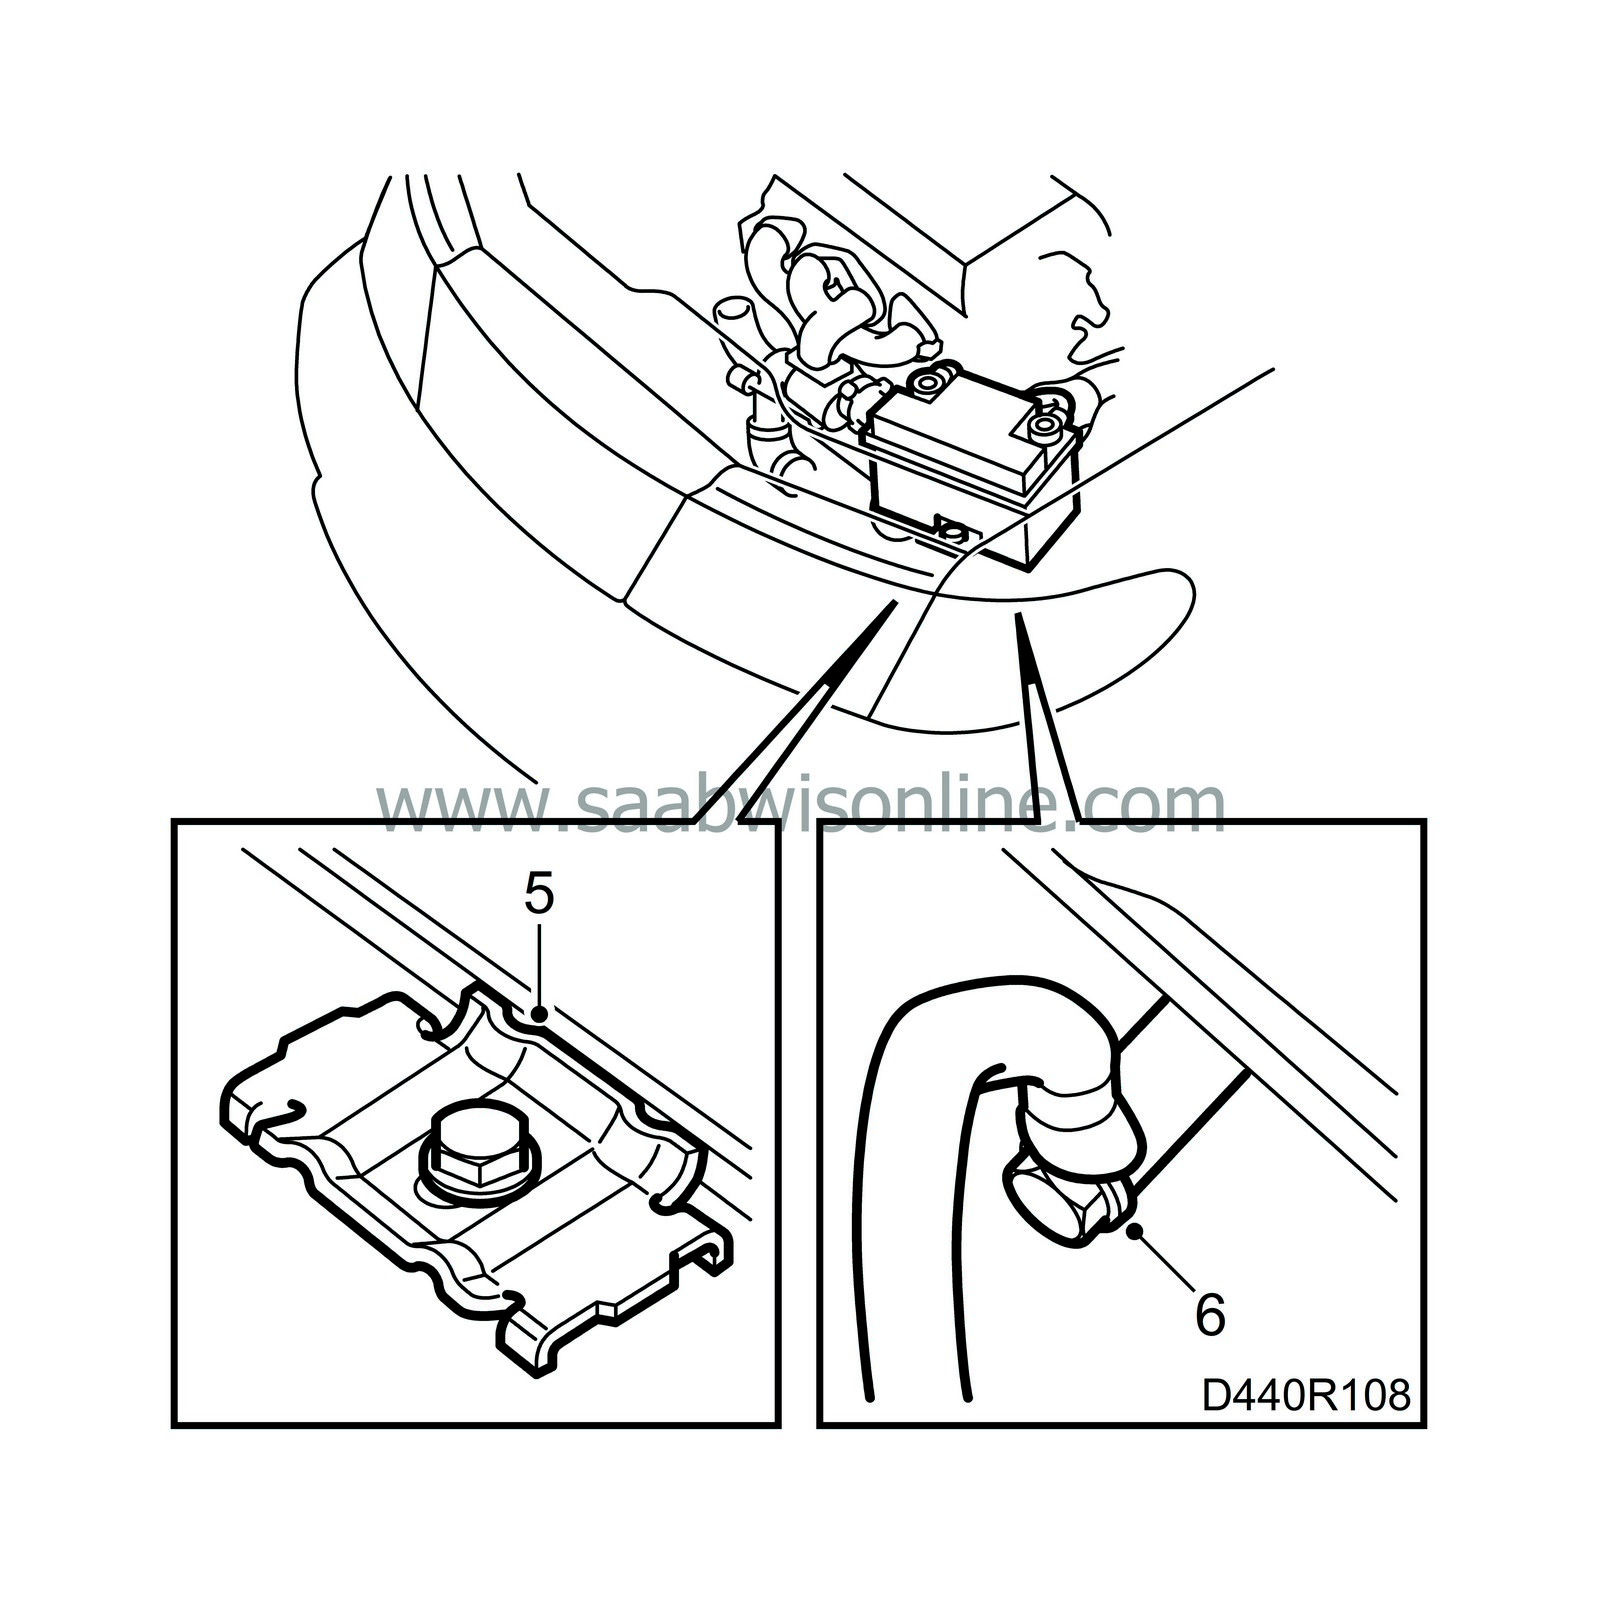
Remove the battery.
|
|
6.
|
Undo the battery negative lead on the gearbox.
|
|
7.
|
Clean around the dipstick pipe entrance in the gearbox.
|
|
8.
|
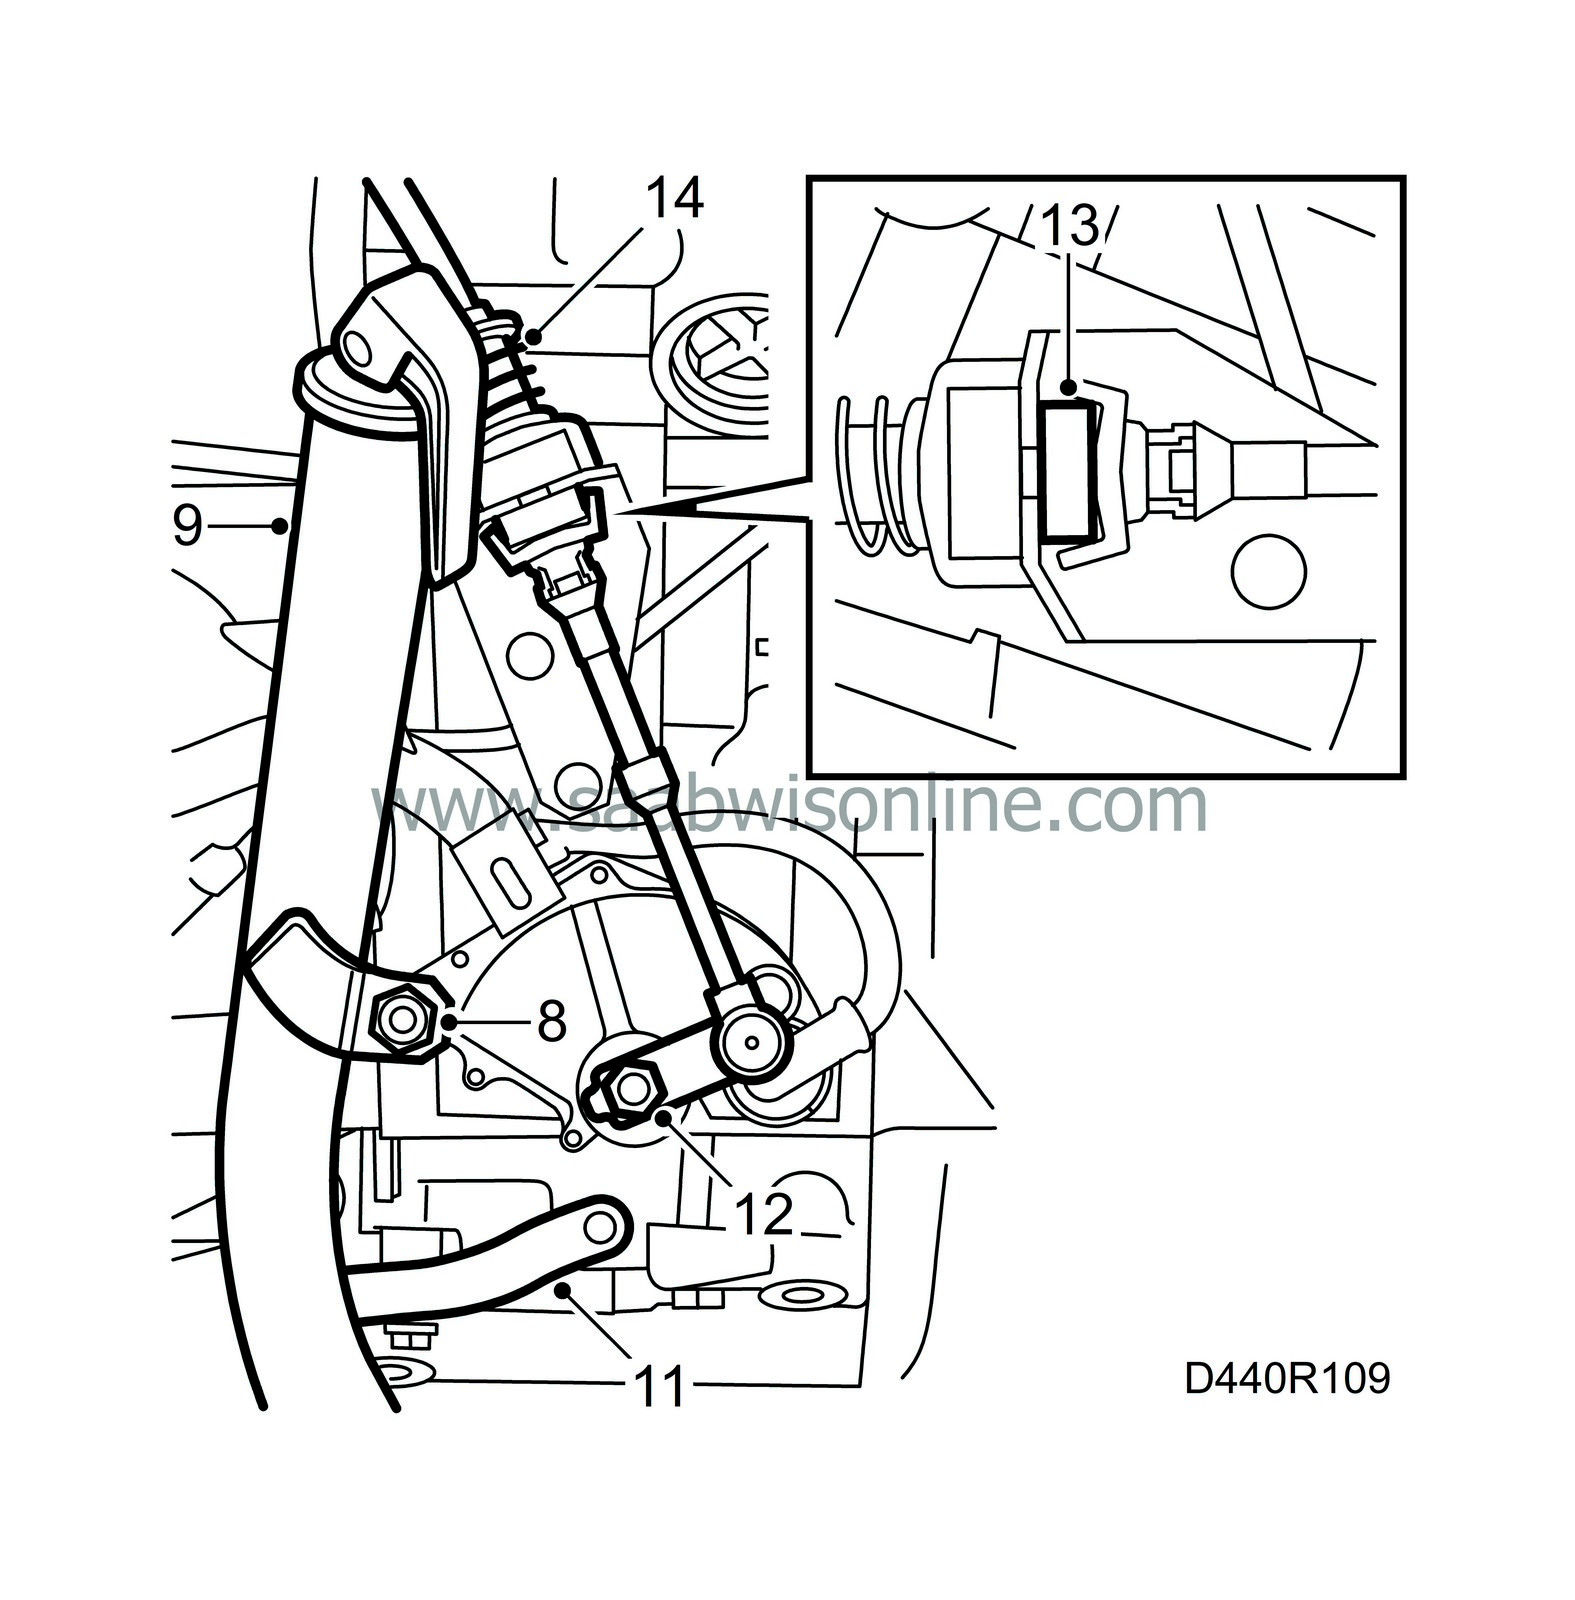
Remove the retaining nut and the cable mounting on the dipstick pipe.
|
|
9.
|
Pull the dipstick and pipe straight up.
|
|
10.
|
Plug the hole for the dipstick in the gearbox.
|
|
11.
|
Remove the breather hose from the gearbox.
|
|
12.
|
Remove the nut for the lever and lift the lever off the gearbox.
|
|
13.
|
Undo the lock clip on the cable fitting.
|
|
14.
|
Detach the cable ferrule from the fitting on the gearbox. Press in the locking catches with a screwdriver.
|
|
15.
|
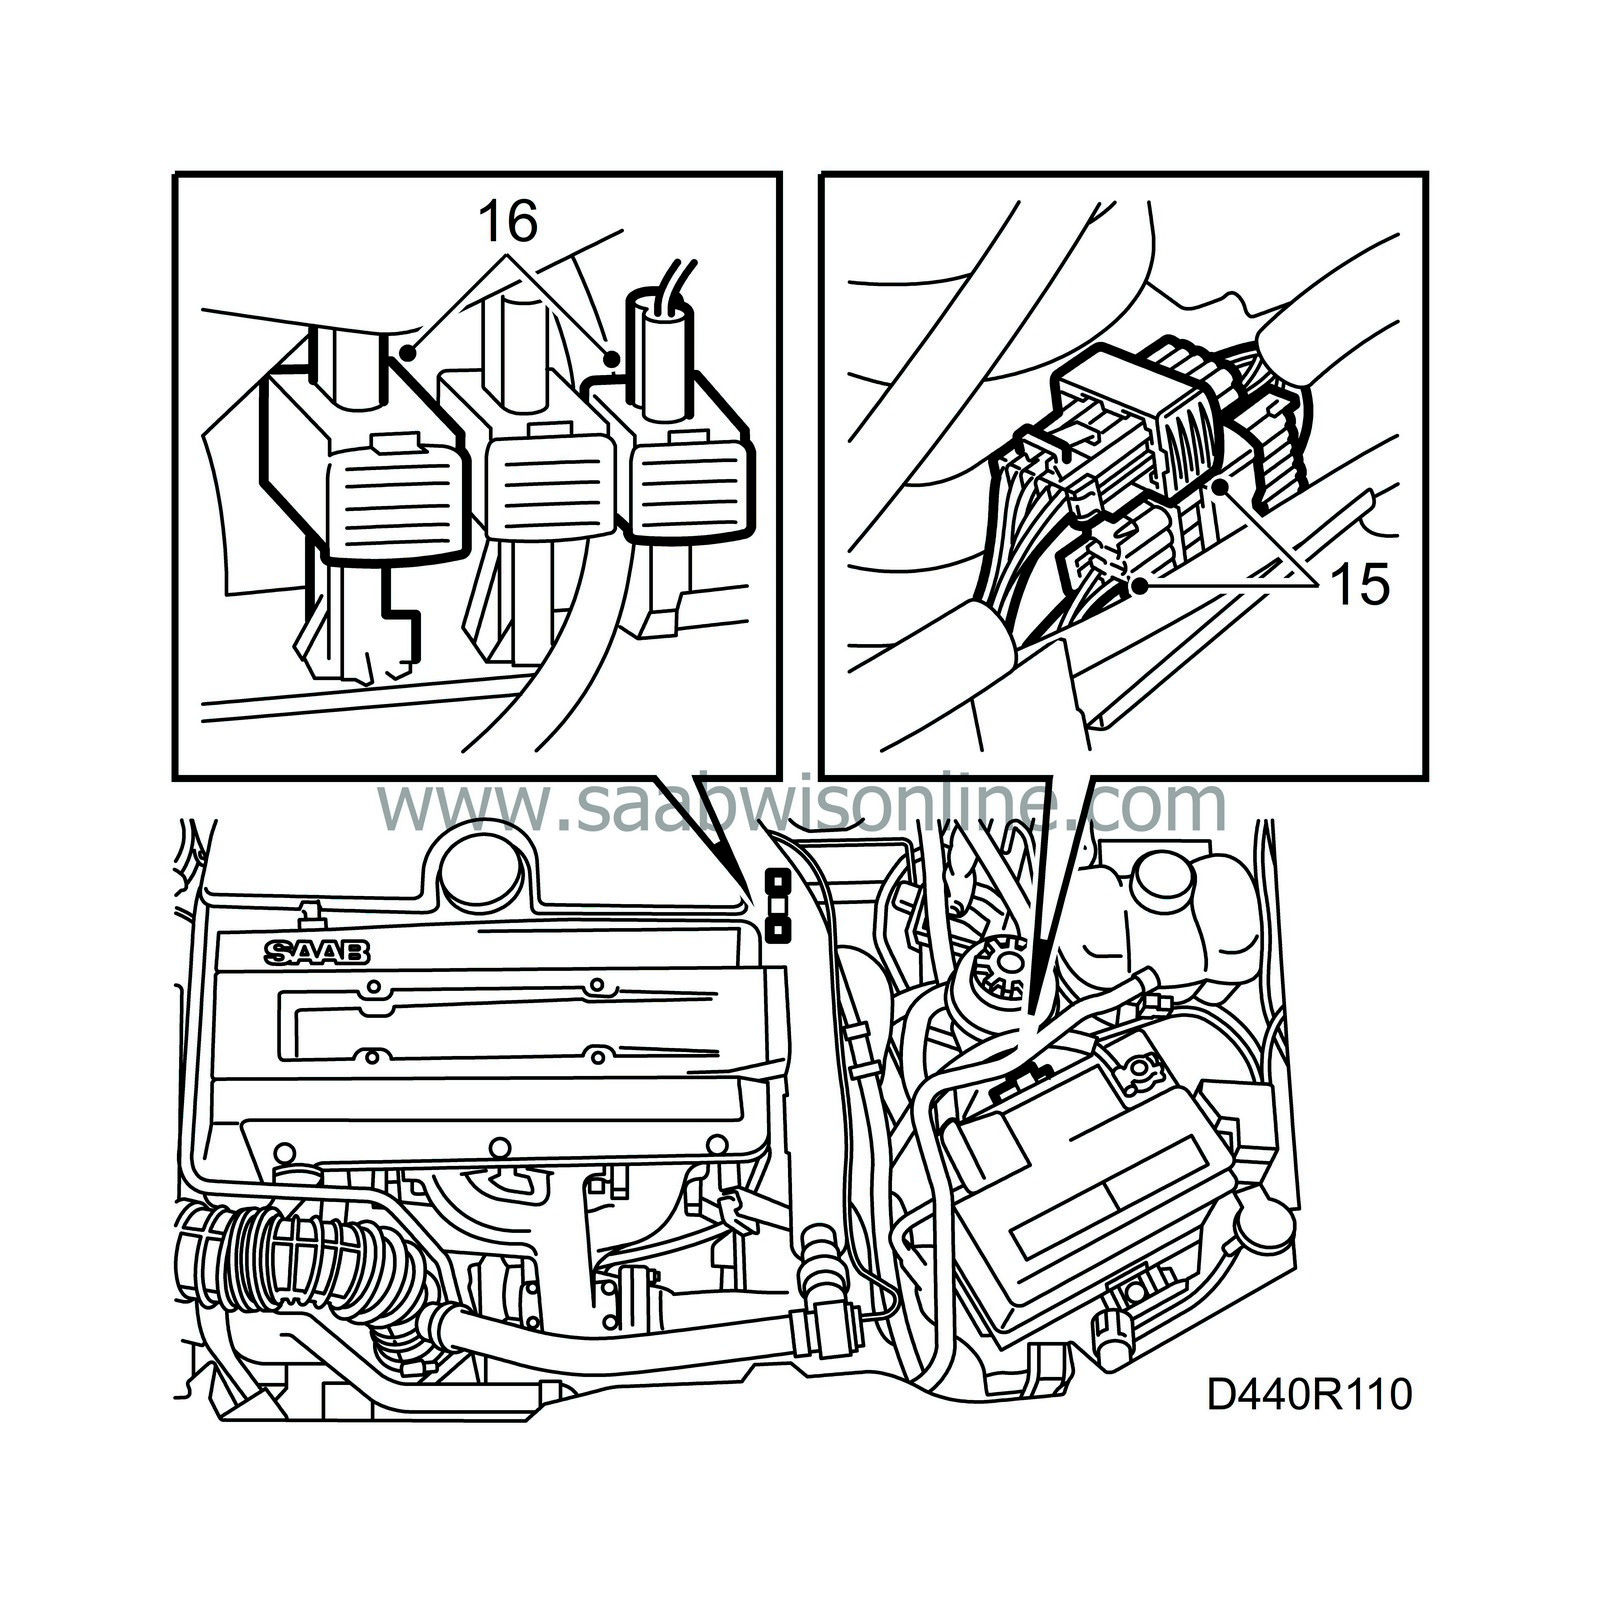
Unplug the electrical connections for the gearbox (located on a bracket behind the battery).
|
|
16.
|
Unplug the electrical connection or connections to the oxygen sensor/s and detach it/them from the clamps.
|
|
17.
|
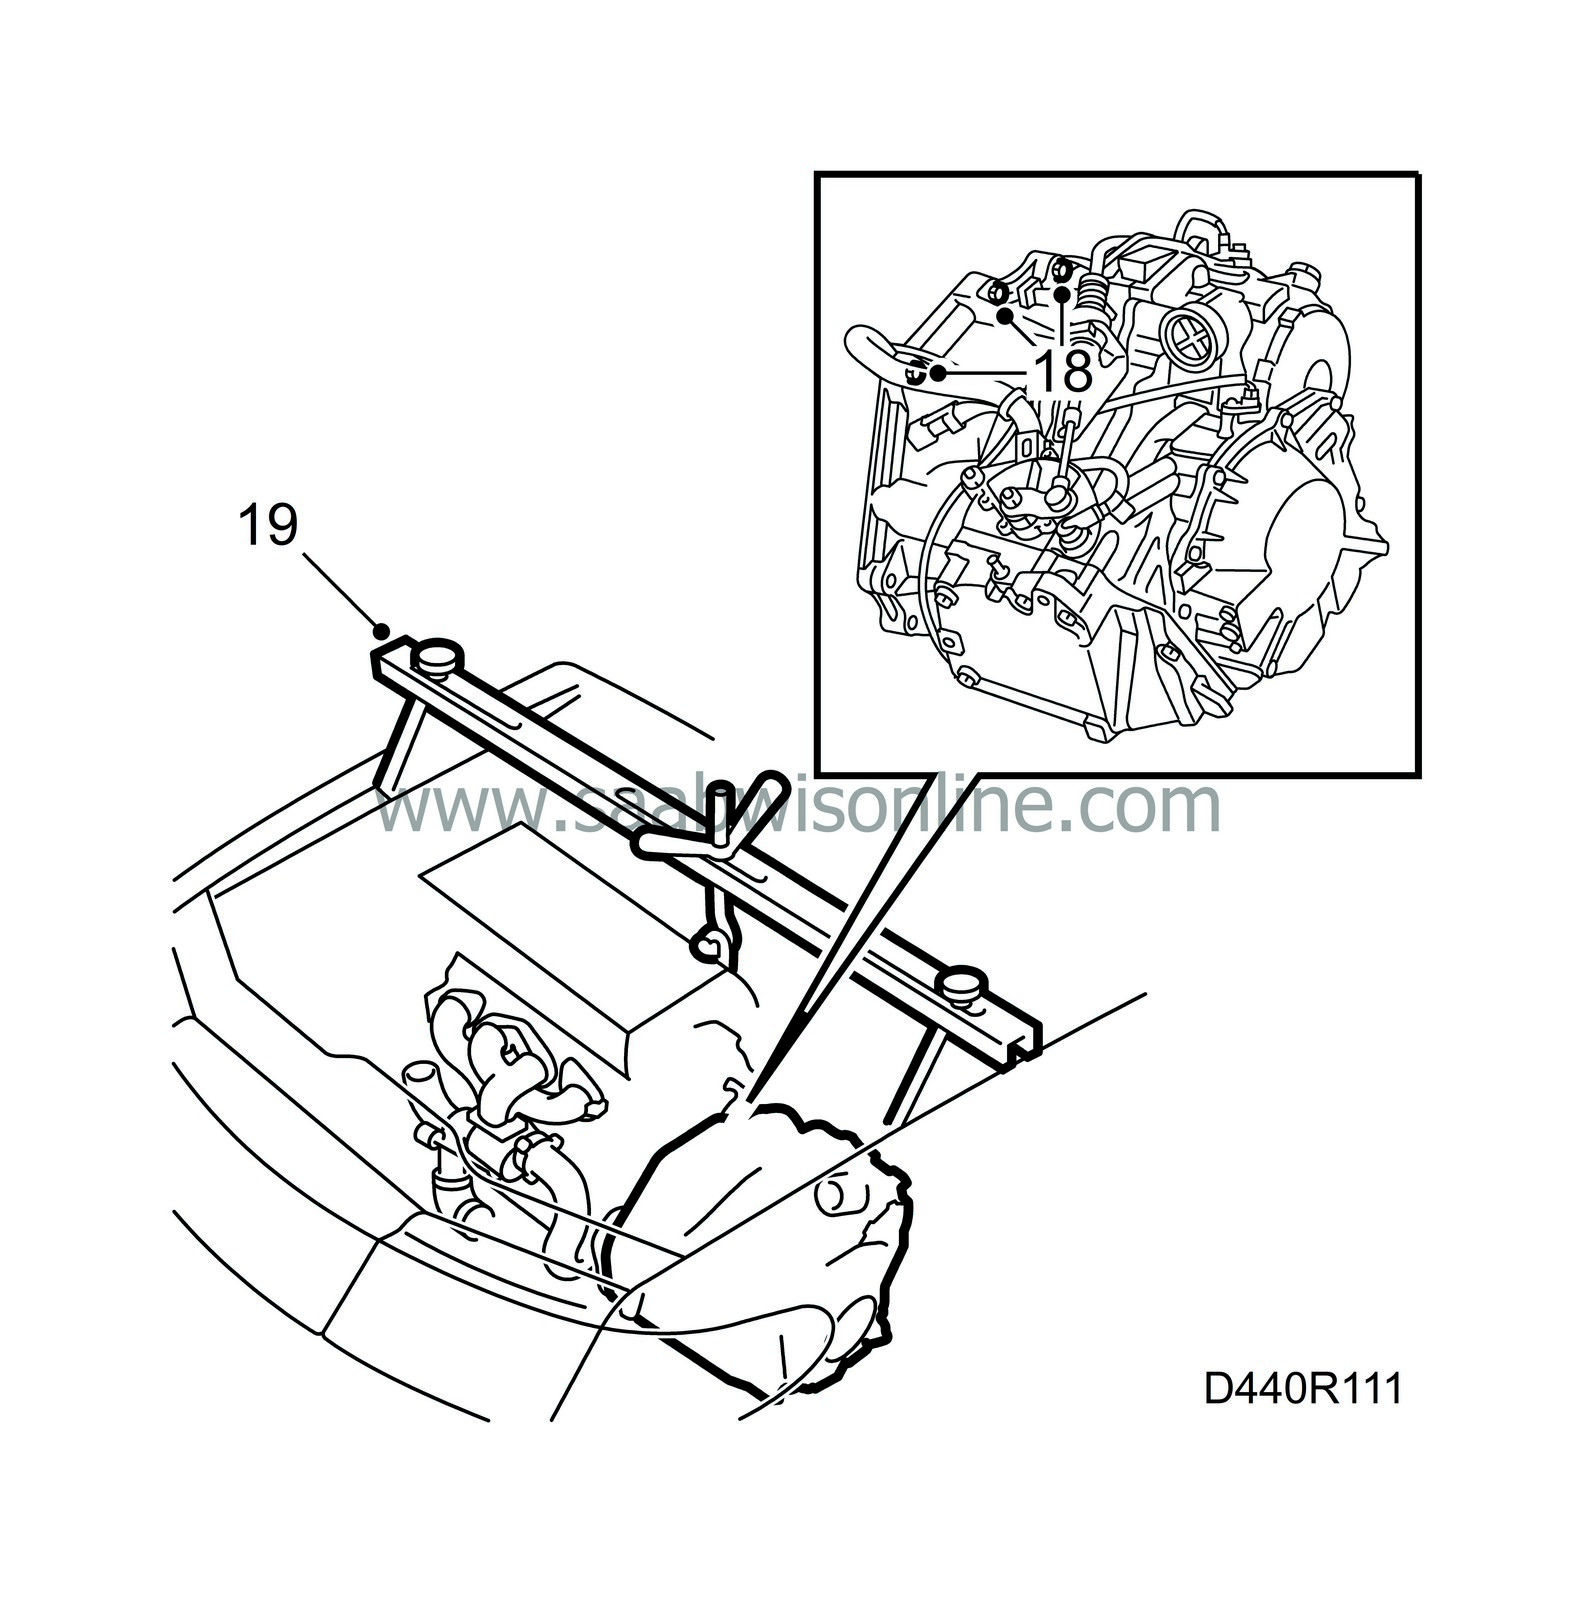
Disconnect the positive cable mounting on the engine.
|
|
19.
|
Take the strain off the engine and gearbox with lifting beam 83 94 850. Place the beam on the wheel housings so that it rests on the edges of the wings.
|
|
21.
|
Remove the front wheels.
|
|
22.
|
Remove any clips for the oxygen sensor cable.
|
|
23.
|
Remove the front exhaust system by first undoing the flange to the turbo and then undoing the rear mounting.
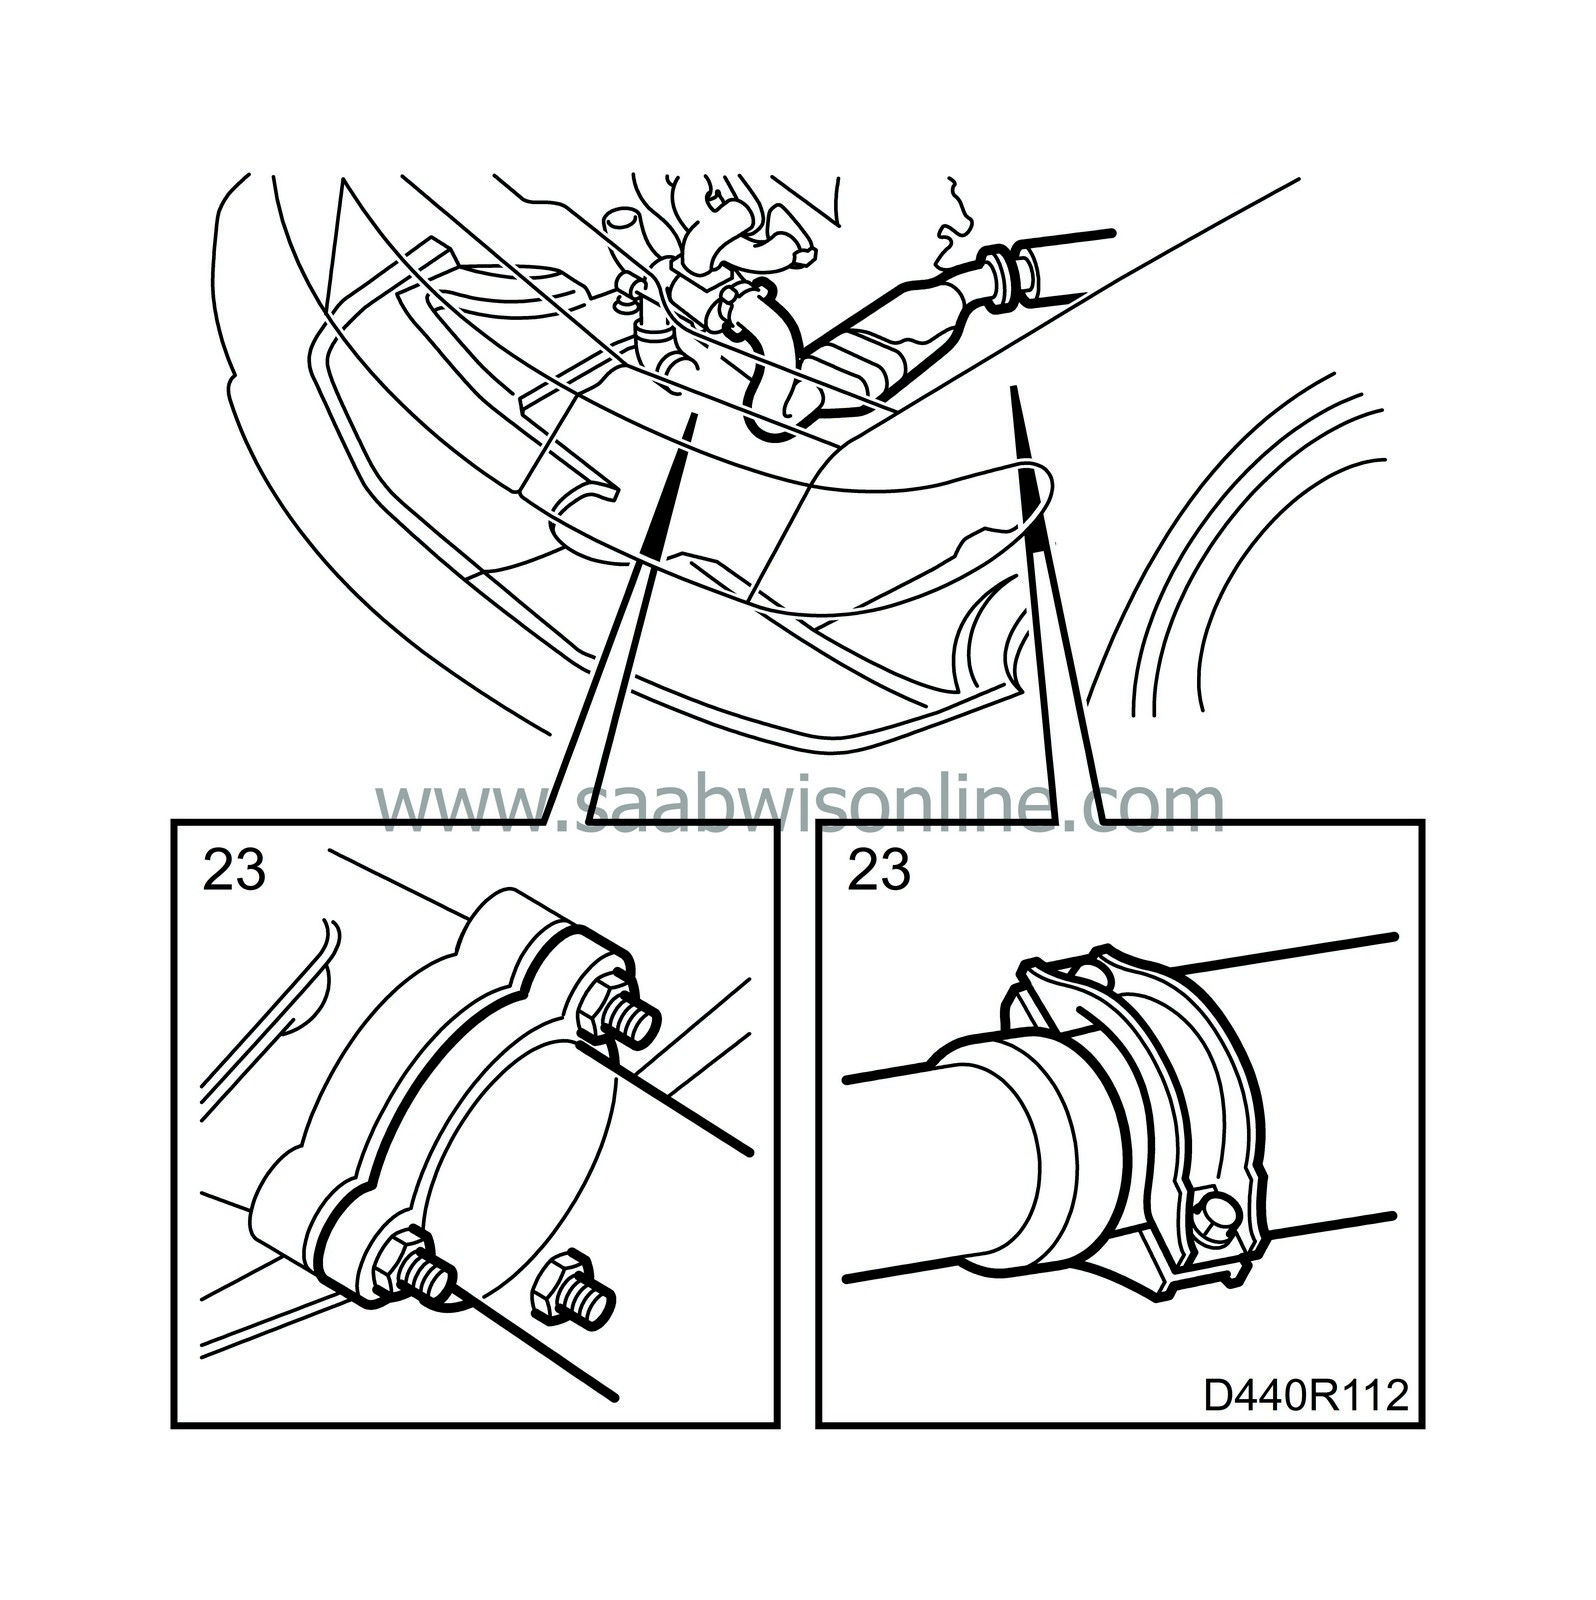
It is important that the exhaust system is dismantled in this way to prevent damaging the flexible pipe. Also, take care with the oxygen sensor/s.
|
|
24.
|
Drain the fluid from the gearbox and refit the drain plug.
Tightening torque: 40 Nm
|
|
25.
|
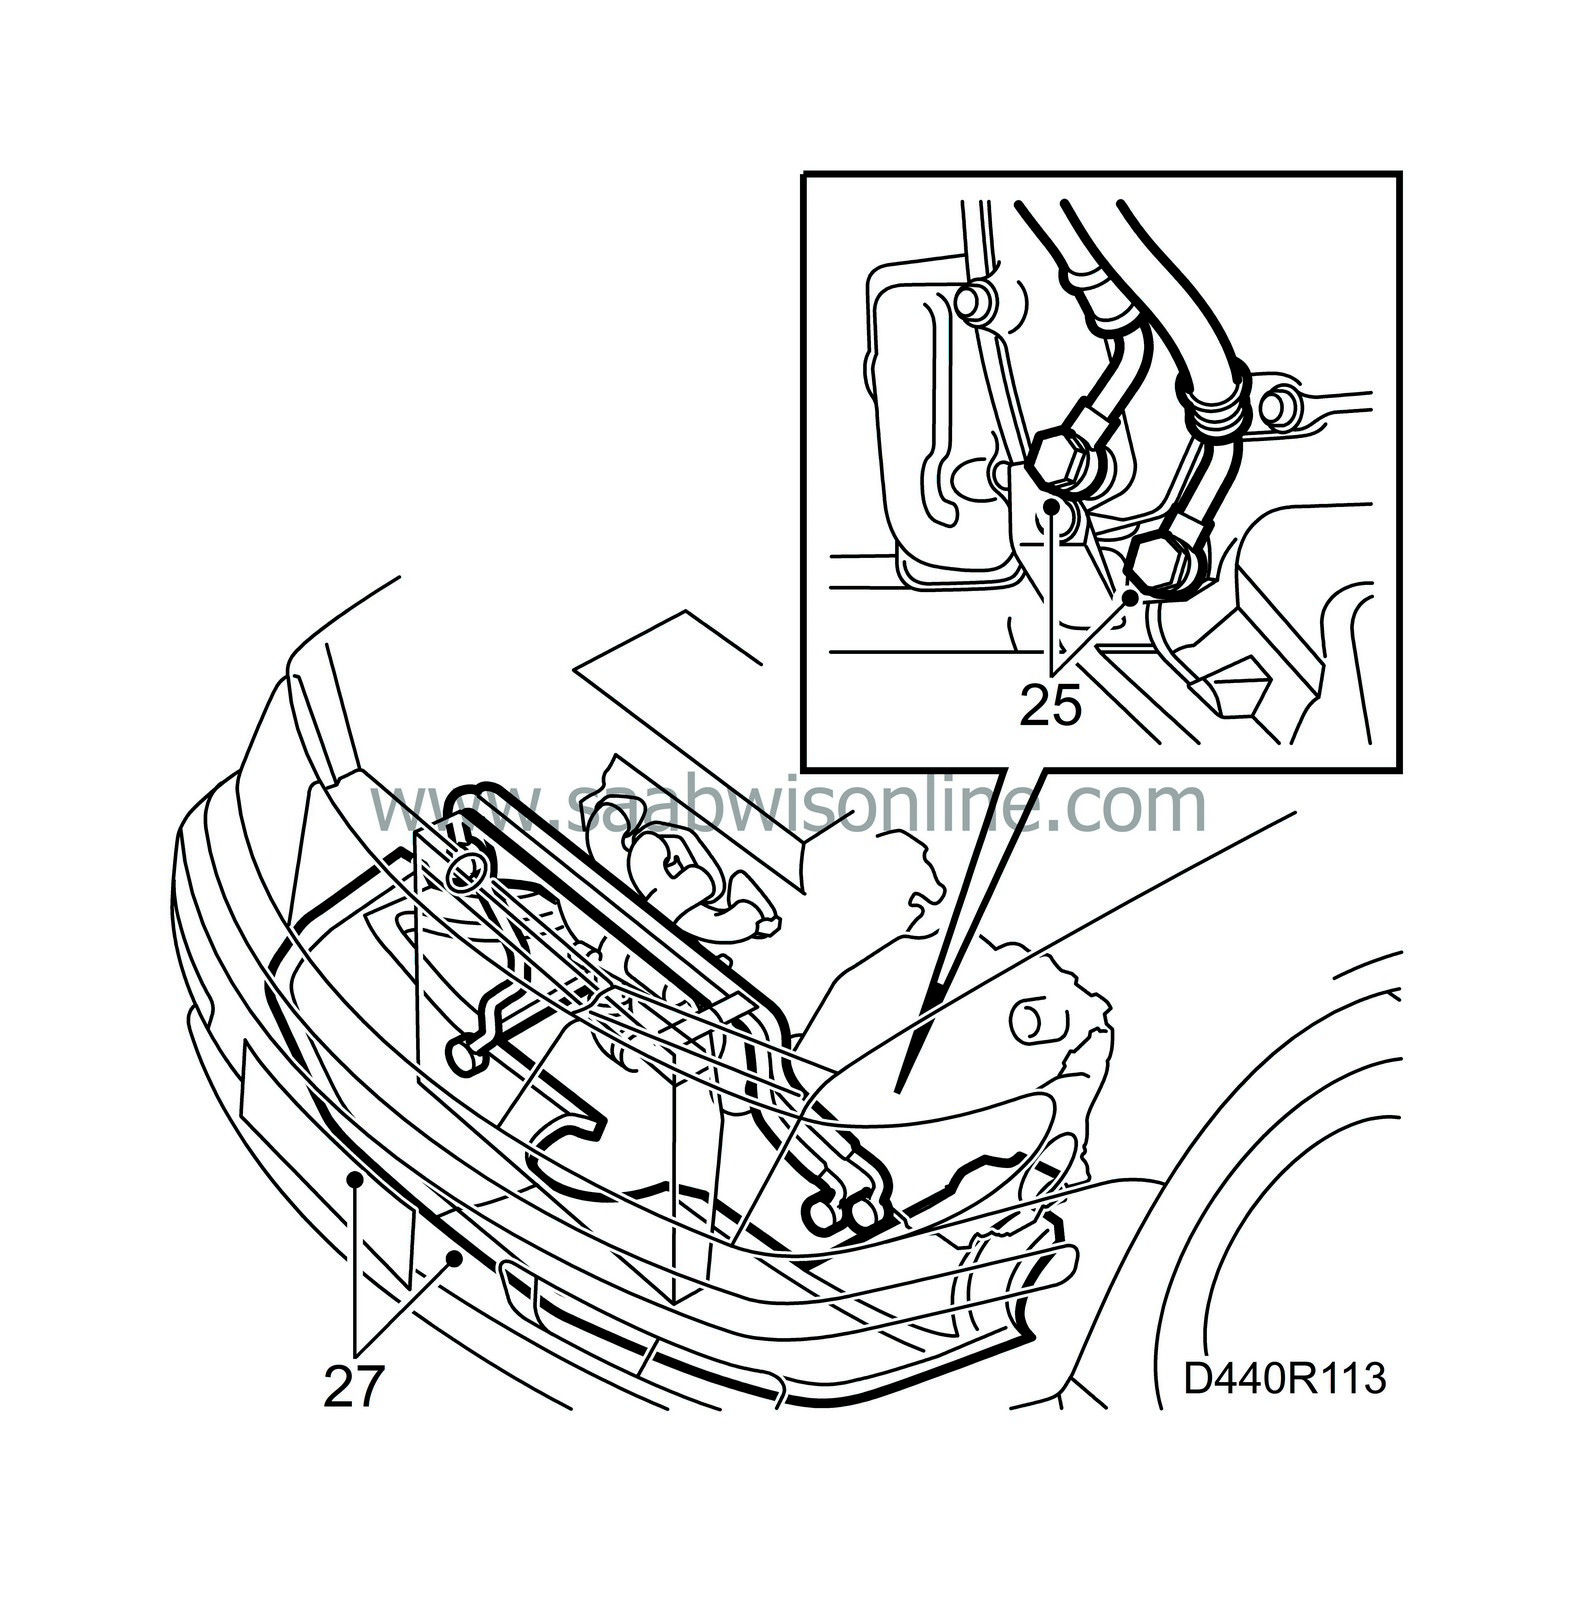
Disconnect the inlet and outlet hoses from the fluid cooler.
|
|
26.
|
Plug inlet and outlet channels on the gearbox. Also plug the hoses and bend them aside. Plug: (10) 91 32 929, Seal: (10) 91 32 937.
|
|
27.
|
Remove the air shields and cover in the right-hand wheel housing.
|
|
28.
|
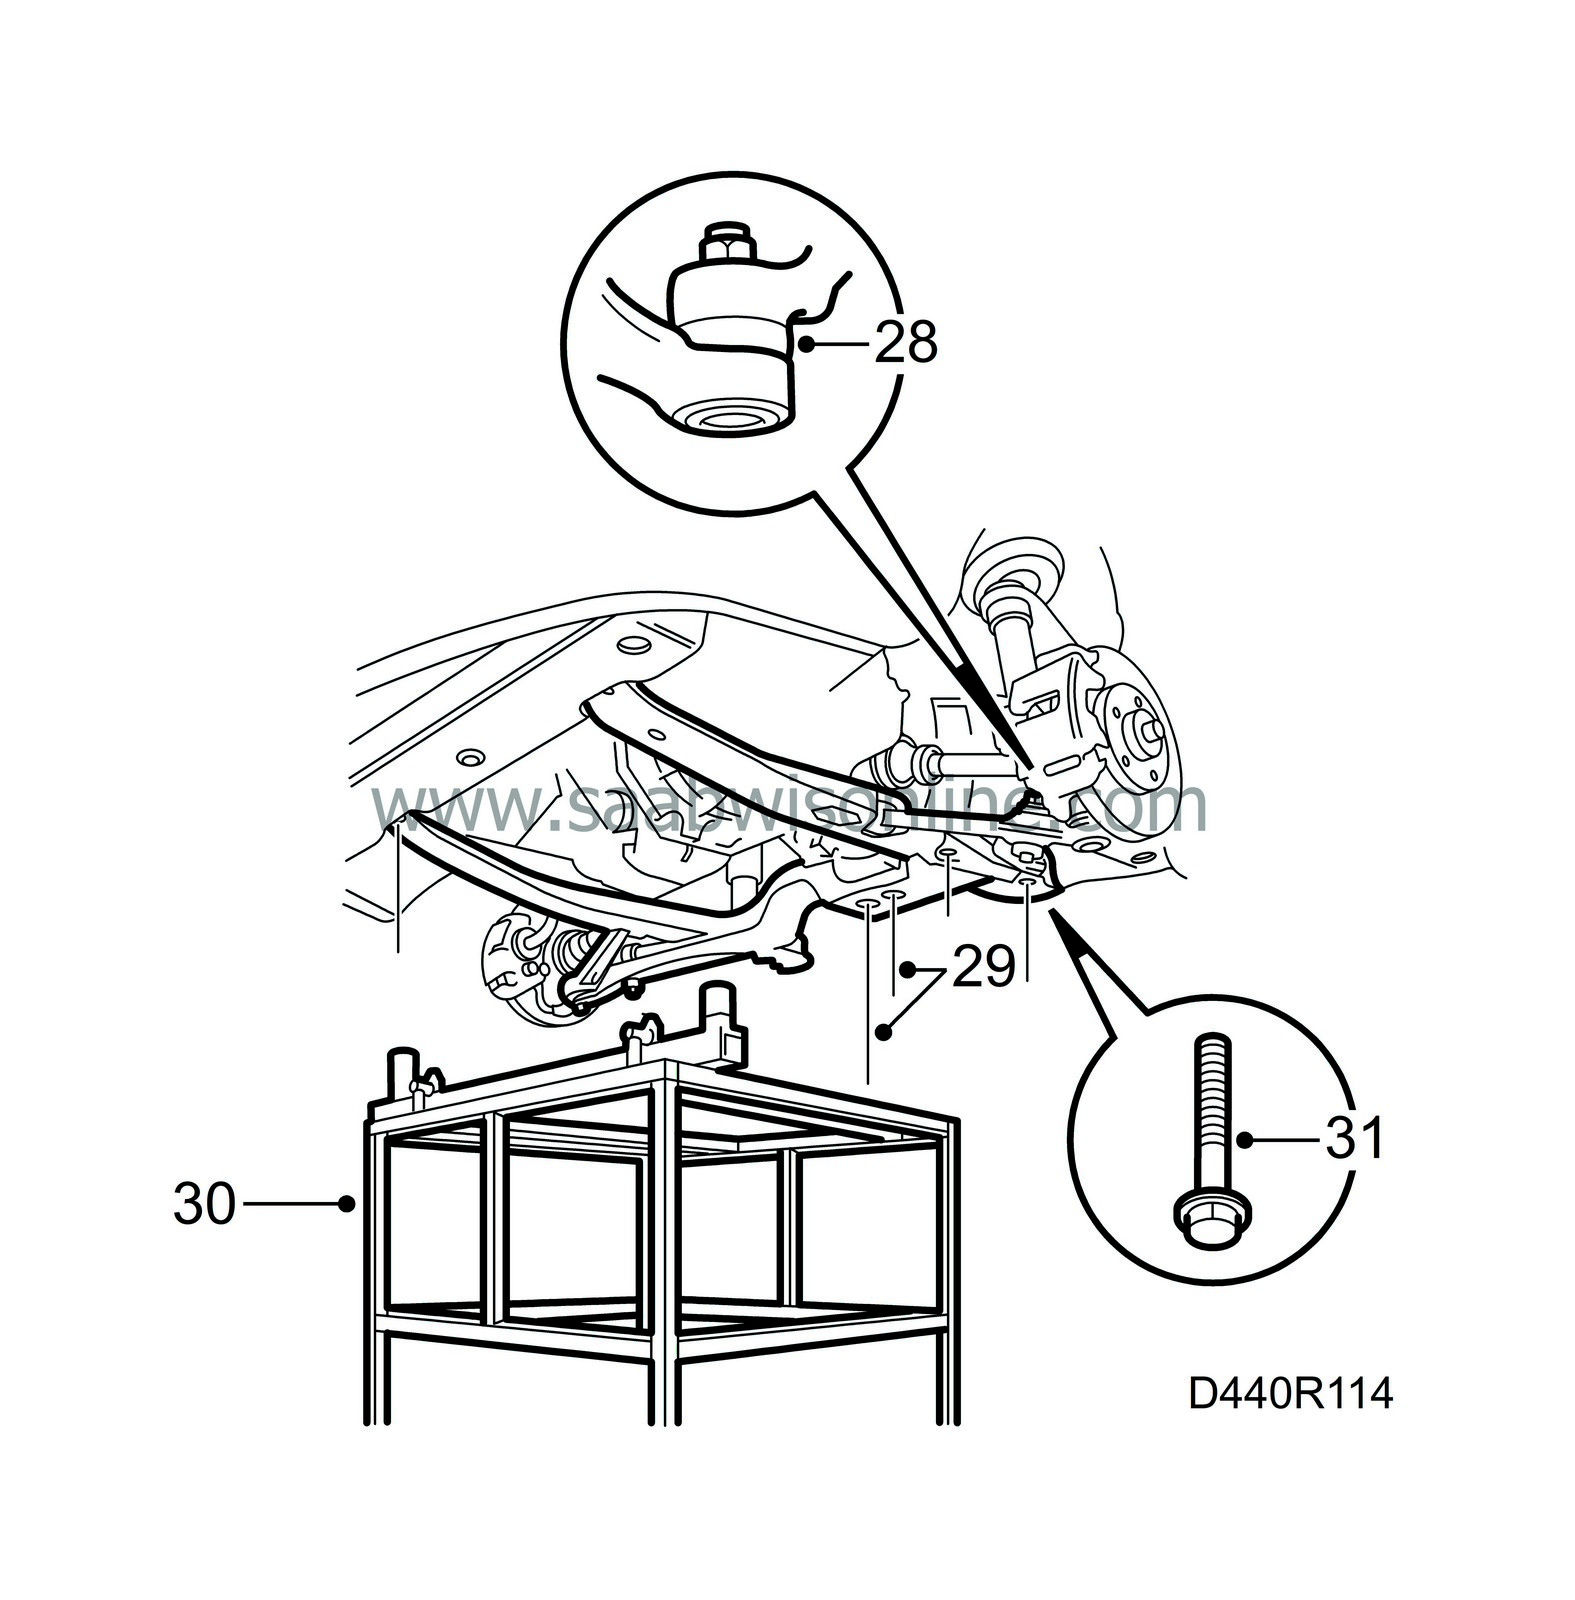
Detach the end pieces from the suspensions arms on both sides. Use tool 89 96 696.
|
|
29.
|
Remove the 2 nuts for the rear engine mounting and the two middle bolts for the subframe.
|
|
30.
|
Place the lifting trolley 83 94 793 with parent fixture 83 94 801, front holder 83 94 819 and rear holder 83 90 827 under the subframe and raise the lifting trolley against the subframe.
|
|
31.
|
Remove the remaining bolts securing the subframe. There are washers on the rear mountings, take care of them.
|
|
32.
|
Lower the lifting trolley and push it to one side.
|
|
33.
|
Detach the left-hand drive shaft from the gearbox by first releasing it from its splines and the carefully pulling it straight out by hand. Use tool 89 96 654.

|
|
34.
|
Suspend the drive shaft with a strap (83 95 212).
|
|
35.
|
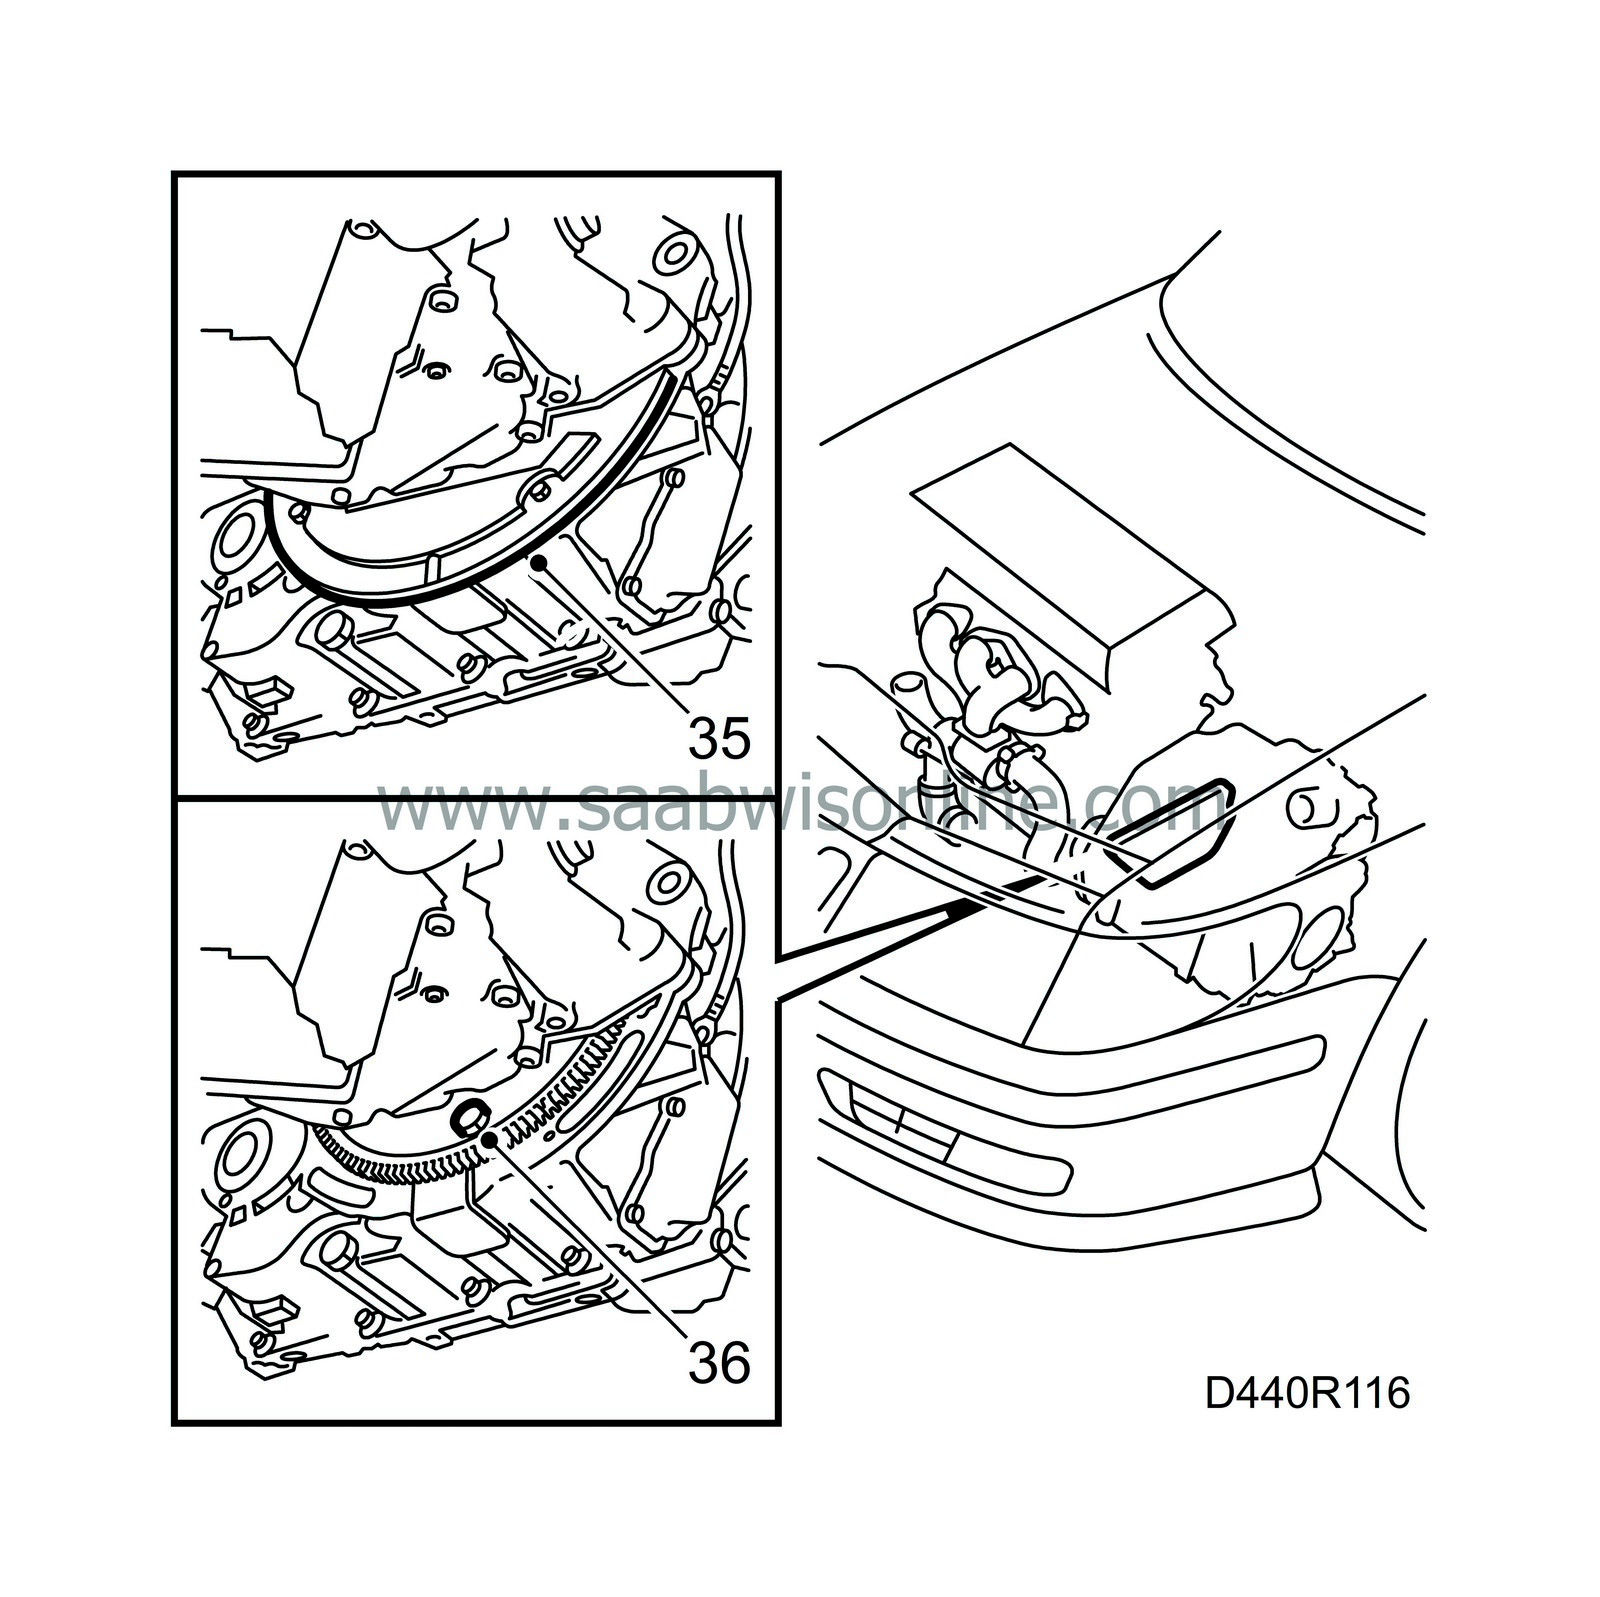
Remove the splash plate on the flywheel.
|
|
36.
|
Undo the 6 bolts securing the torque converter to the drive plate.
|
Note
|
|
The crankshaft must be turned to access all the bolts.
|
|
|
37.
|
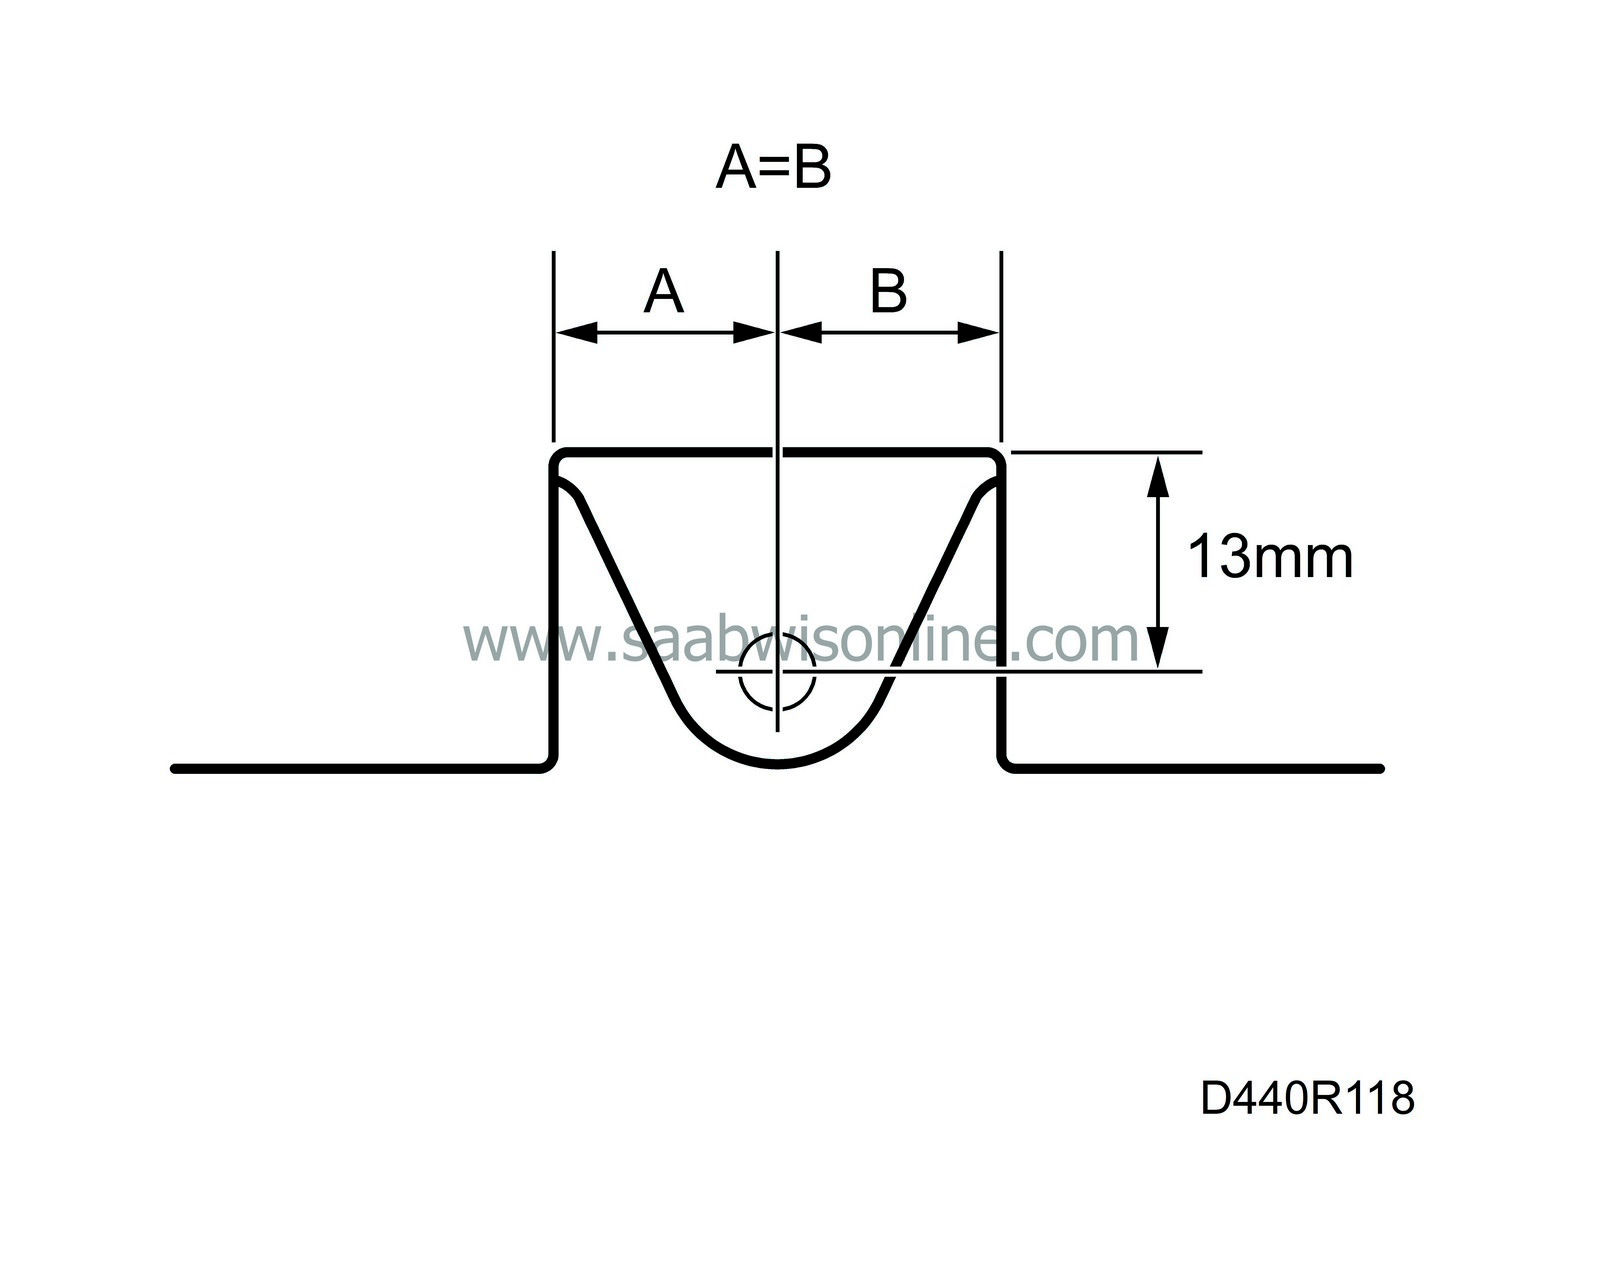
Remove the rubber plug and fit special tool 87 92 277 to secure the torque converter in position while removing the gearbox.

Certain gearboxes do not have a hole in which to fit the tool. Therefore, drill a 5 mm hole and thread it with an M6 tap.
|
|
38.
|
Unscrew the rear bolt in the mating surface engine/gearbox.
|
|
39.
|
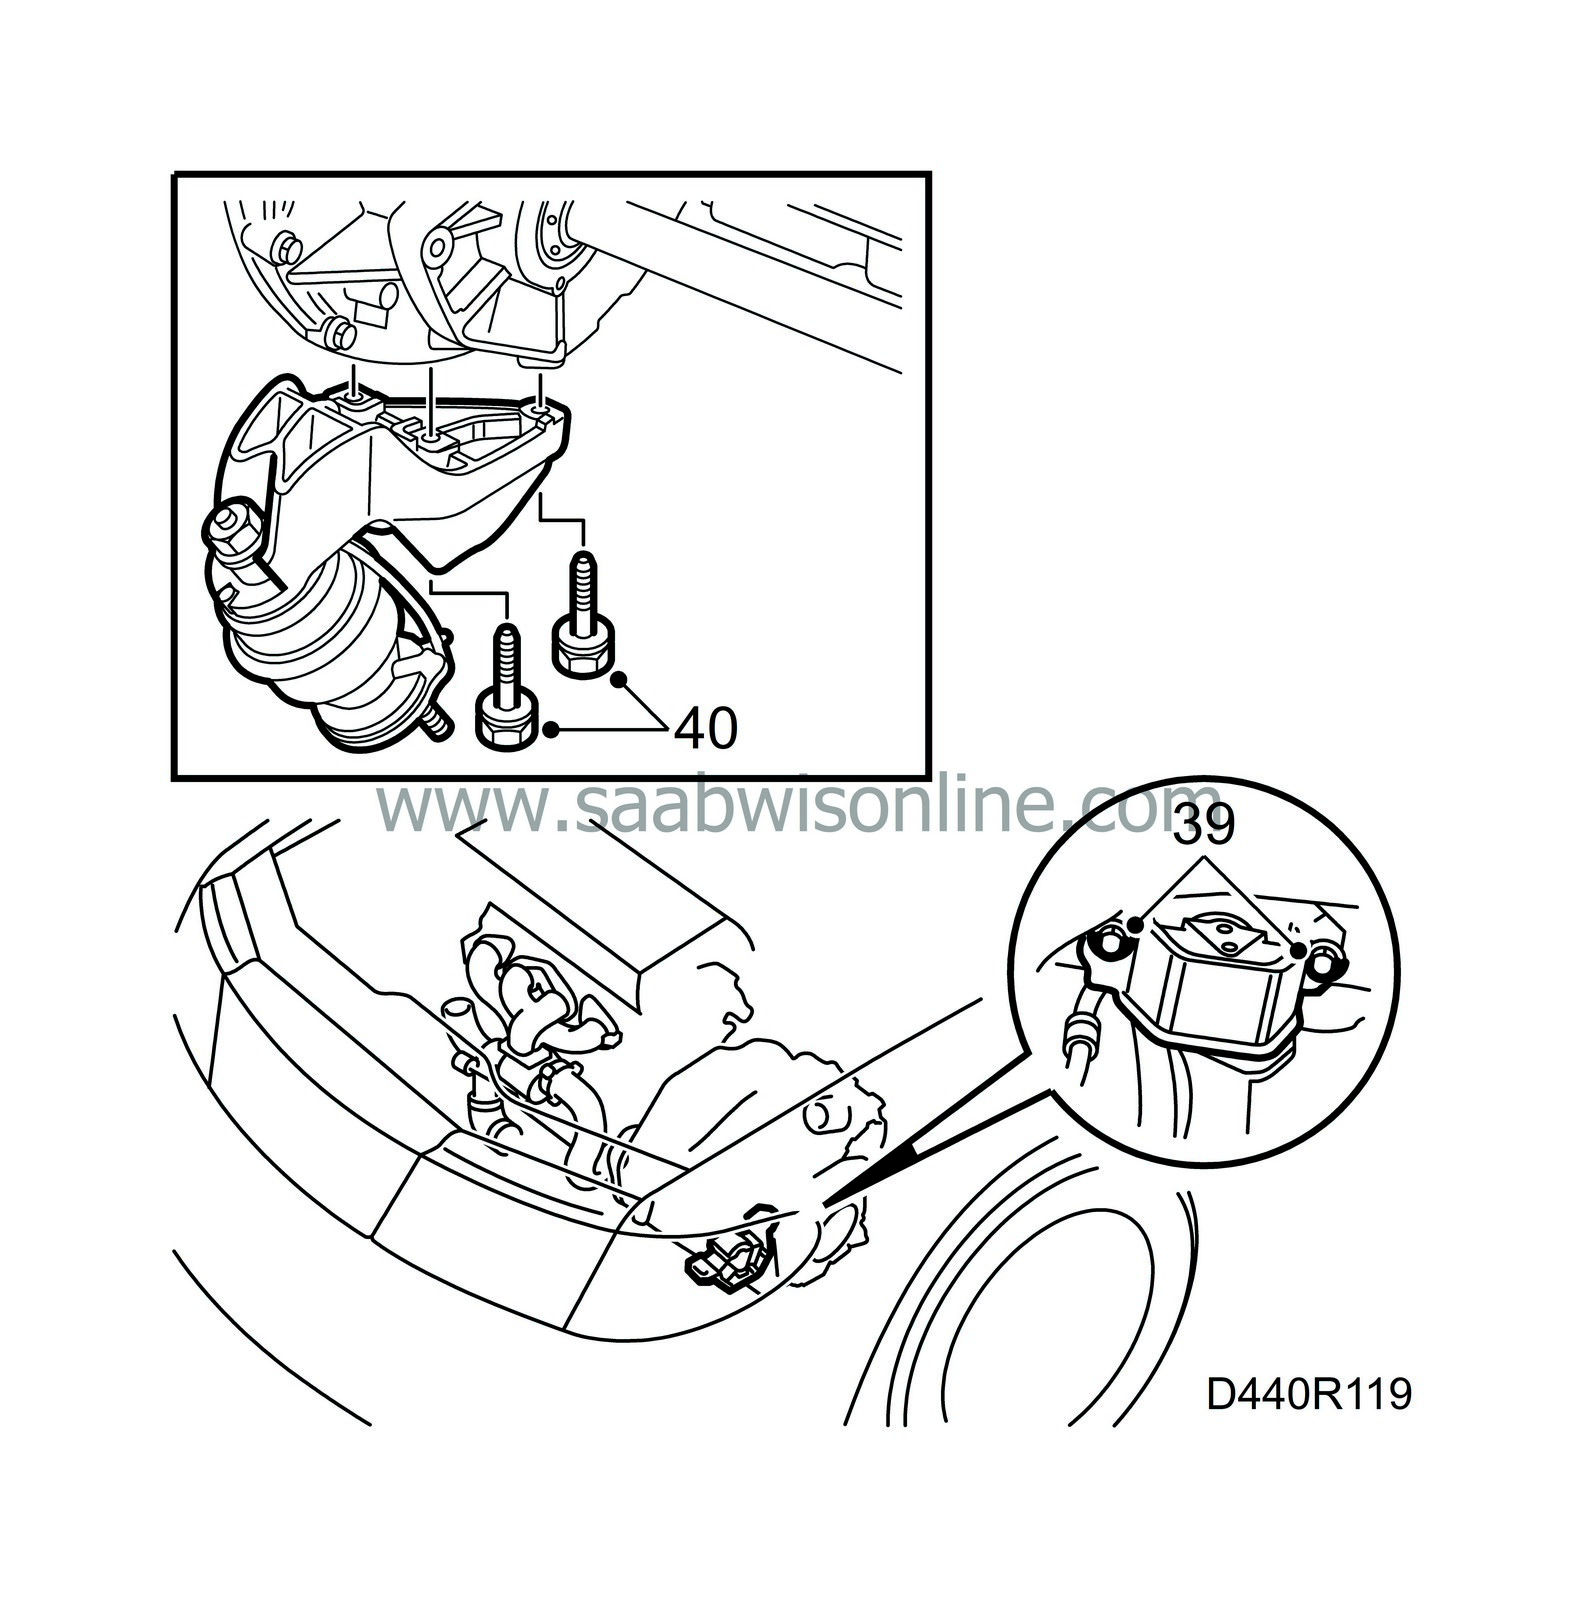
Remove the retaining bolts for the front engine mounting.
|
|
40.
|
Remove the rear engine mounting from the gearbox.
Lower the car to the floor.
|
|
41.
|
Lower the engine and gearbox with the lifting beam so that there is a play of about 1 dm between the body and the front mounting of the gearbox. the play can be observed from the front left wheel housing.
|
|
43.
|
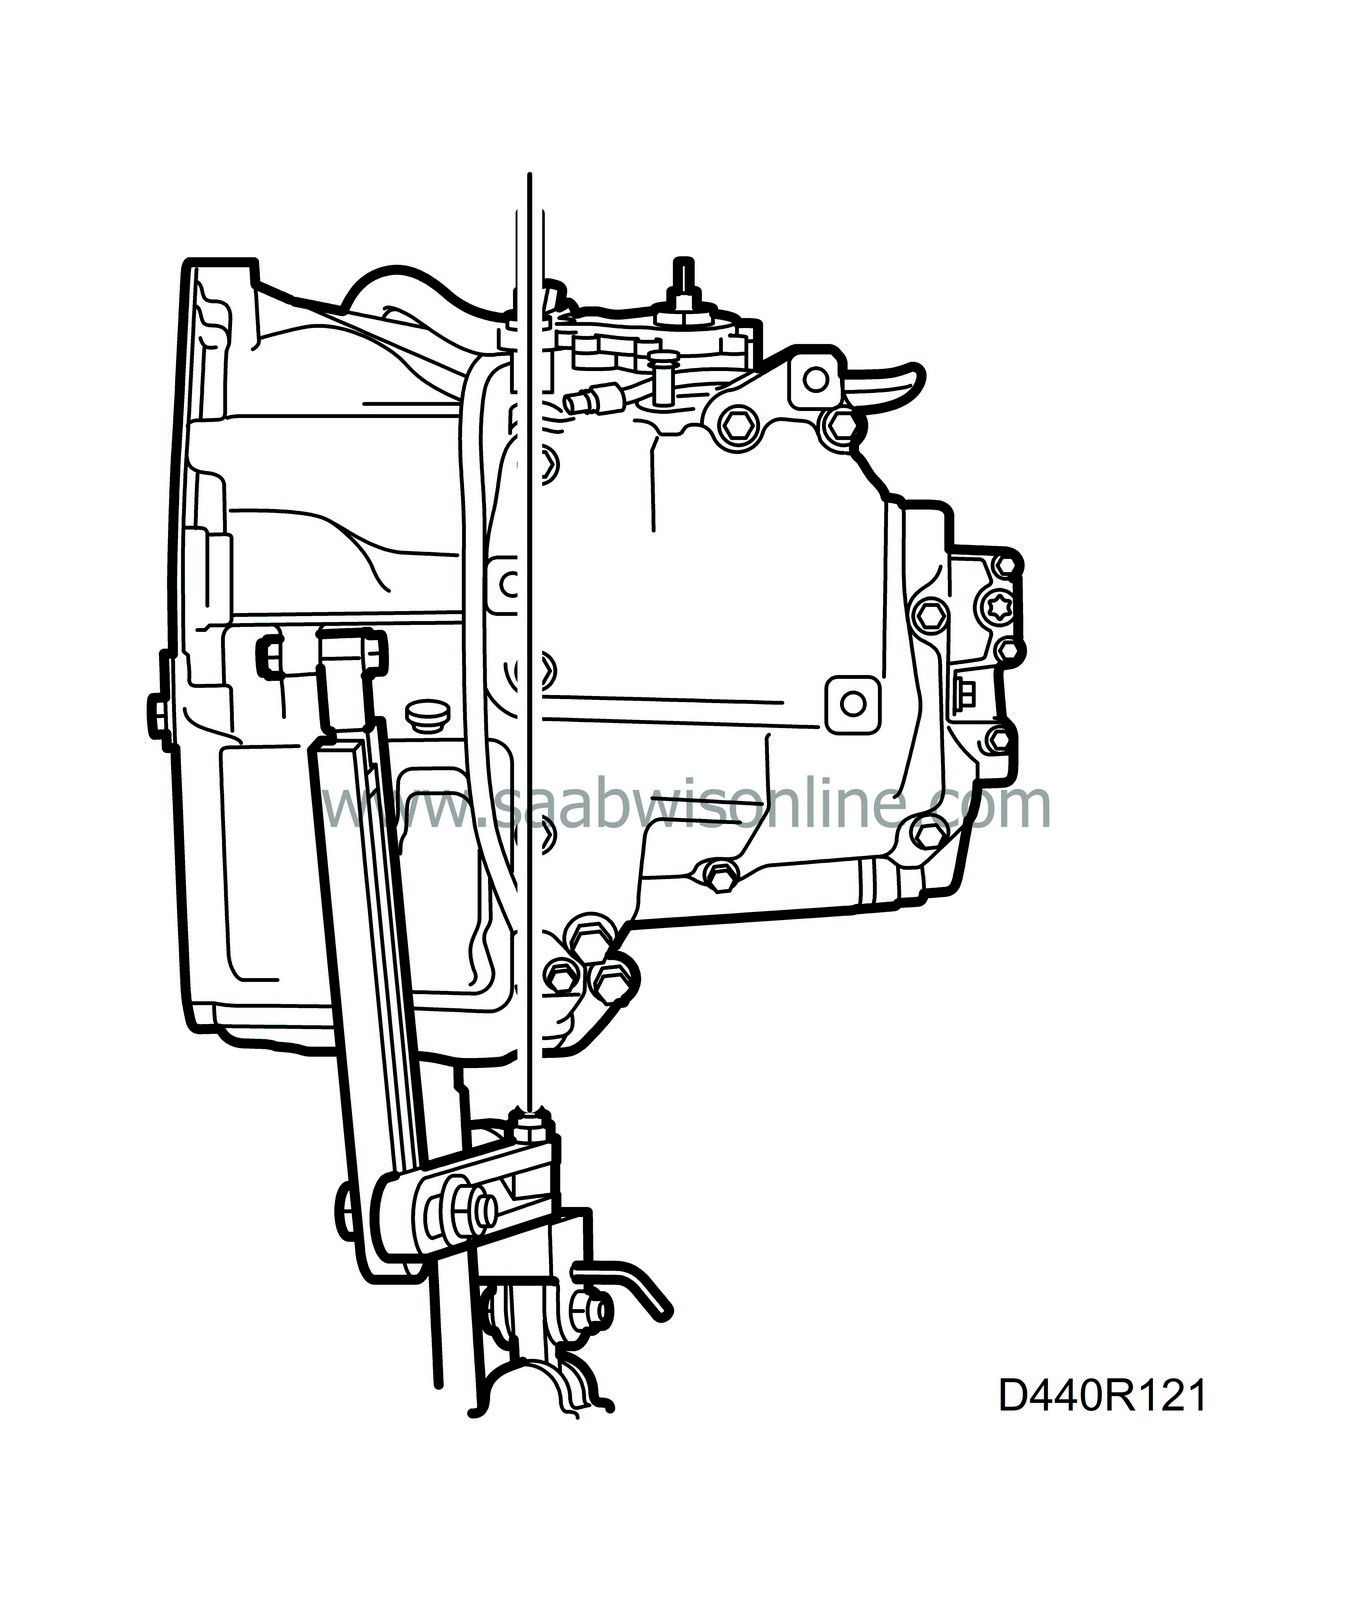
Fit the lifting tool (MKM-886), part no. 87 92 608, onto a pillar jack.

Adjust the tool so that it is centred with the lifting lug on top of the gearbox and tighten it on the gearbox.
|
|
44.
|
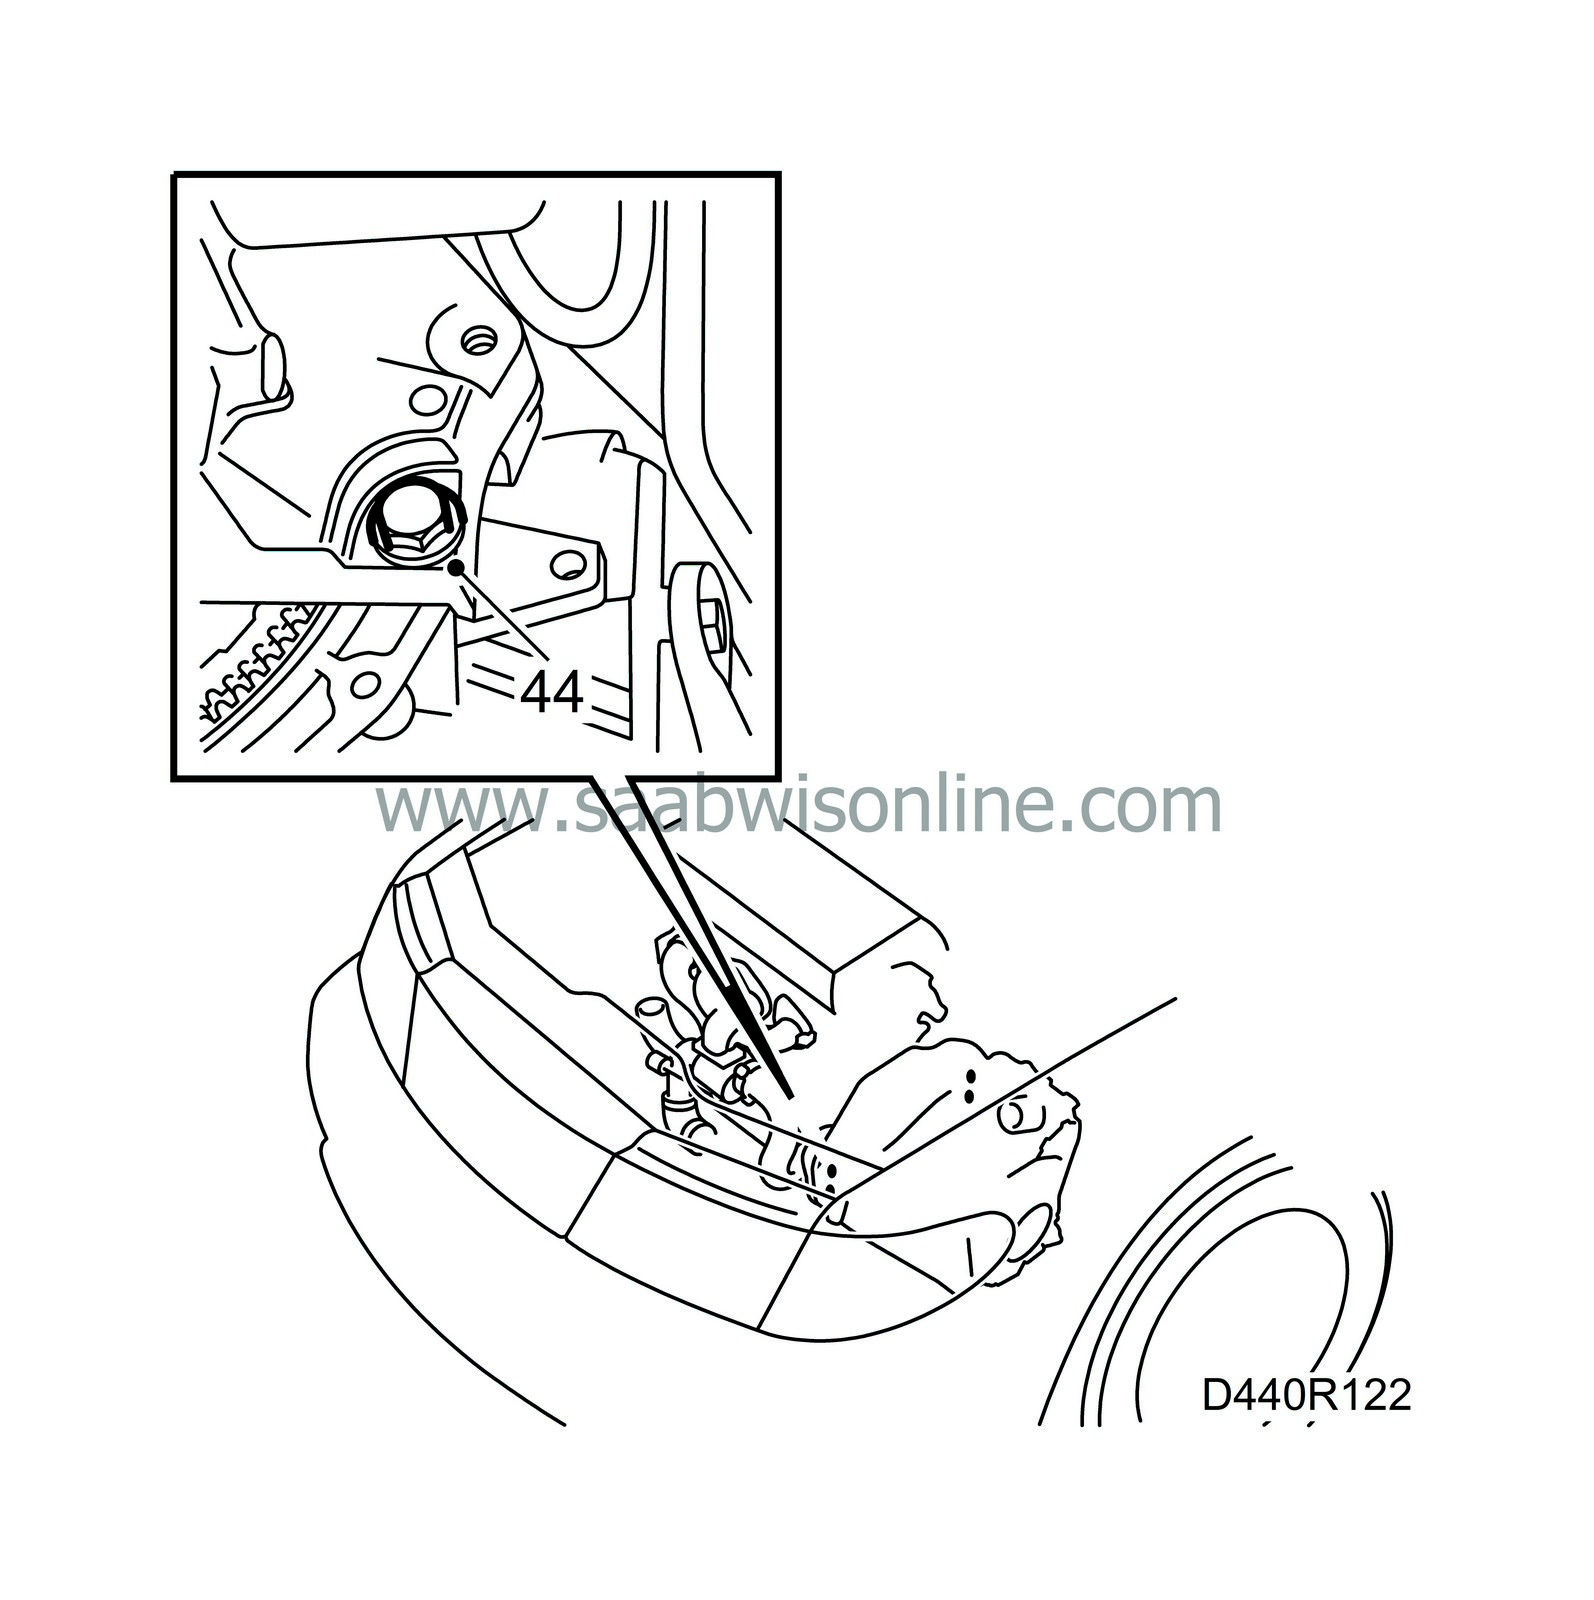
Remove the front bolt between the engine and the gearbox.
|
|
45.
|
Pull out and lower the gearbox.
 Warning
|
|
The pillar-type jack may tip over. Exercise care.
|
|
|
|
|
|
|
|
46.
|
Lift down the gearbox from the pillar jack with an engine lift at the same time as detaching the lifting tool from the gearbox.
|

When fitting a new gearbox, transfer the holder 87 92 277 for the torque converter from the new gearbox to the old one. Also, transfer the front engine mounting and selector lever cable mounting from the old gearbox to the new one.
|
1.
|
Turn the torque converter so that the bolt holes line up with the holes in the drive plate.
|
|
2.
|
Make sure the two guide sleeves are fitted on the engine. Lubricate the sleeves with a thin layer of anti-corrosion oil.
Fit new drive shaft seals, lubricate the seals.
|
|
3.
|
Attach the lifting tool MKM-886, part no. 87 92 608. Adjust the tool, if its setting has been changed since removal, so that it is centred on the lifting lug on top of the gearbox and tighten it to the gearbox.

|
|
4.
|
Fit the gearbox using the lifting tool and a pillar jack.

 Warning
|
|
The pillar-type jack may tip over. Exercise care.
|
|
|
|
|
|
|
|
5.
|
Fit protective collar 83 95 162 in the right-hand shaft seal on the gearbox to protect the seal when the gearbox is fitted.

|
|
6.
|
Place the gearbox in position.
|
Important
|
|
Push the gearbox into place until about 20 mm remains and then remove tool 83 95 162.
|
|
|
|
|
7.
|
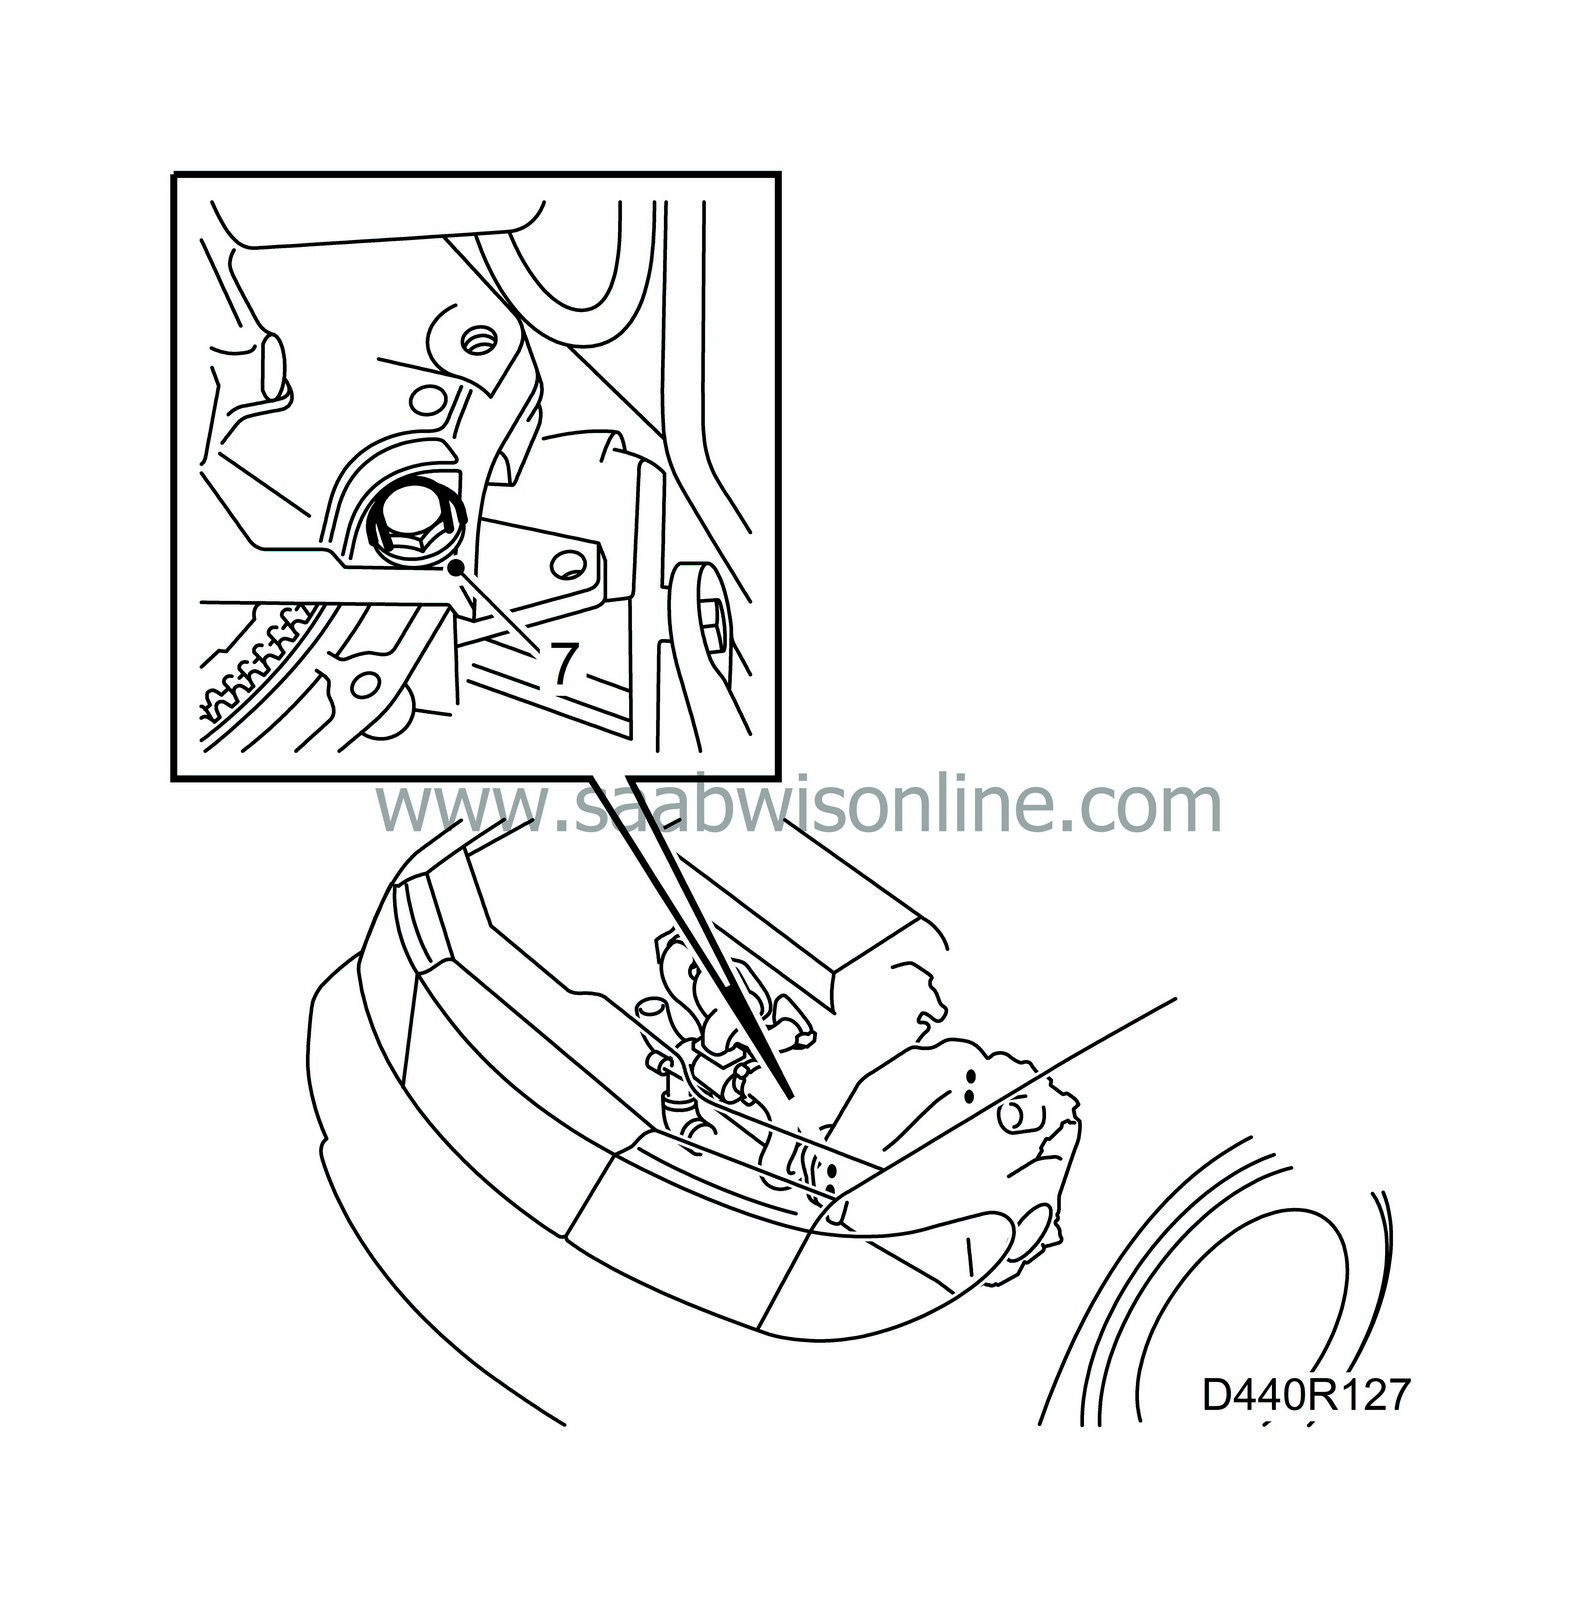
Tighten the bottom bolts between the engine and the gearbox.
Tightening torque: 75 Nm (55 lbf ft)
|
|
8.
|
Fit the rear engine mounting on the gearbox.
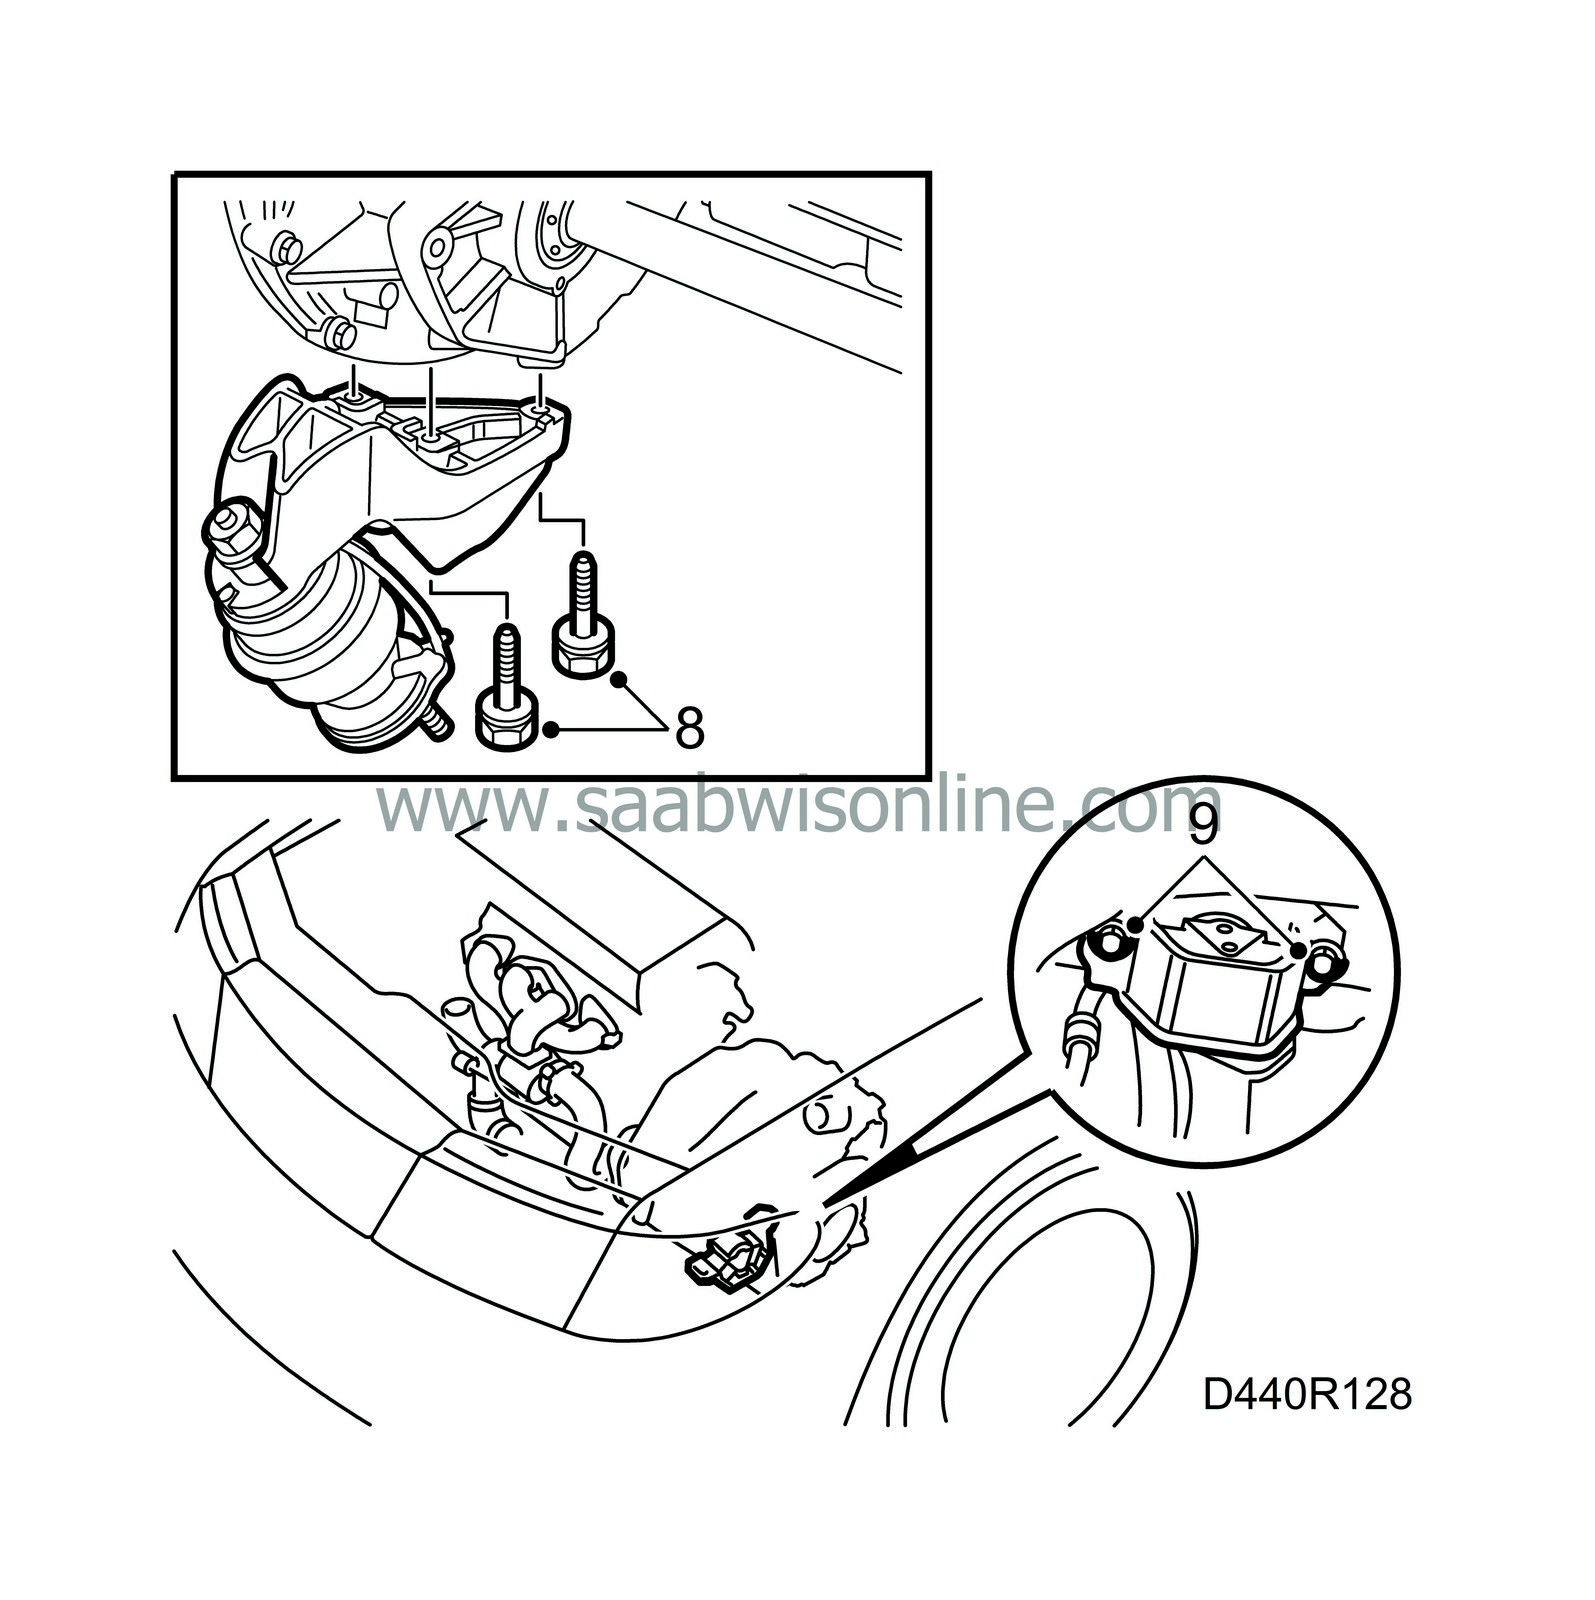
Tightening torque: 40 Nm (30 lbf ft)
|
|
9.
|
Lift the powertrain with a jack and tighten the left-hand engine mounting on the body.
Tightening torque: 62 Nm (46 lbf ft)
|
|
10.
|
Remove the lifting tool from the gearbox and remove the jack.
|
|
11.
|
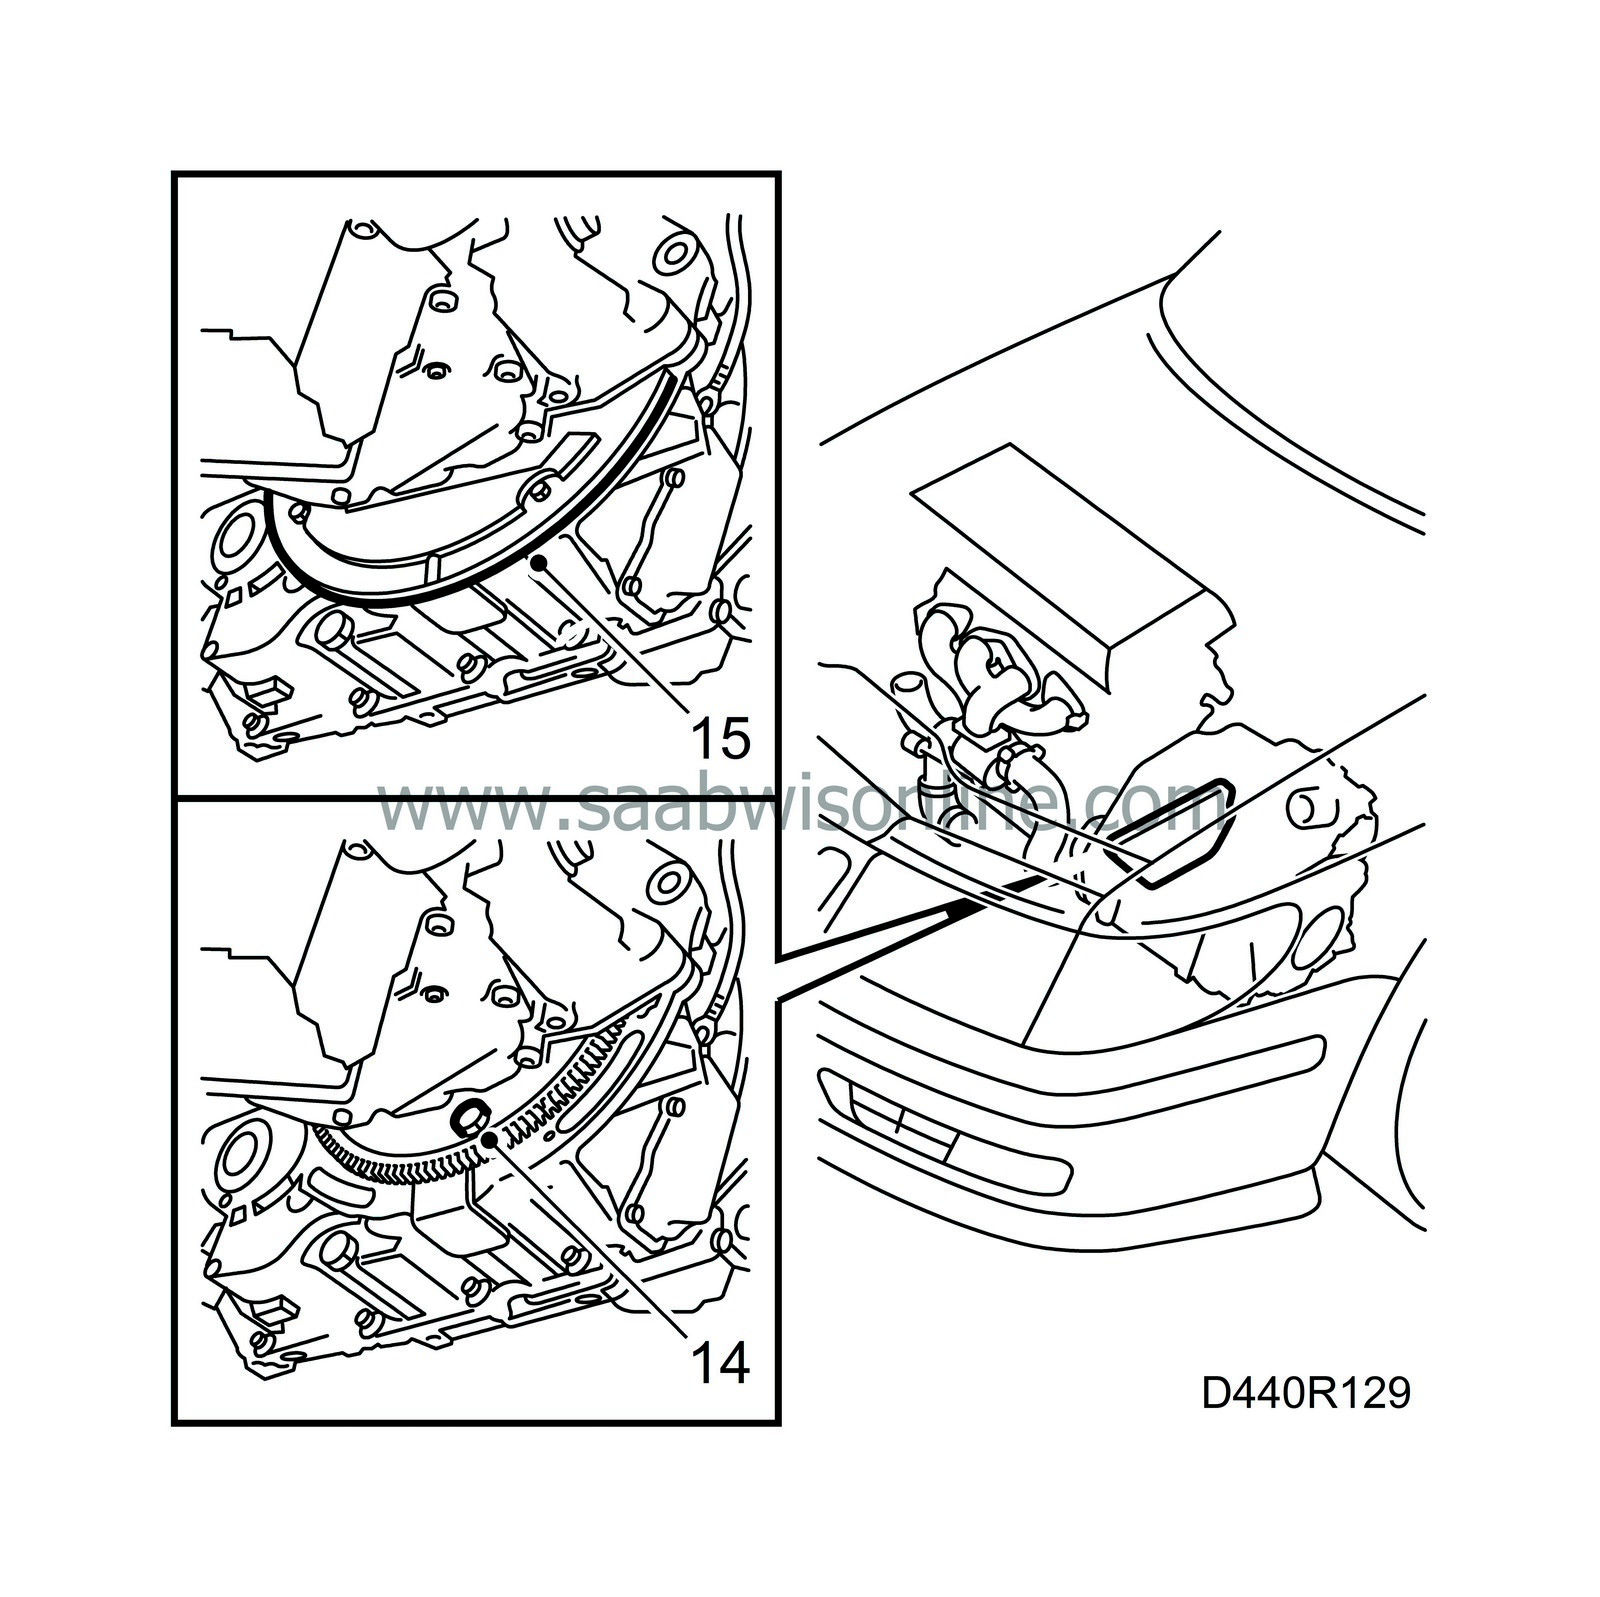
Remove tool 87 92 277 that is holding the torque converter in position. Fit the plug.
|
|
12.
|
Apply Loctite 242 (74 96 268) to the bolts securing the torque converter to the drive plate.
|
Note
|
|
Use the original bolts with washers. If the bolts are too long, the torque converter will be ruined.
|
|
|
13.
|
Fit the 6 bolts without tightening them.
|
|
14.
|
Tighten them when they are all fitted in place.
Tightening torque: 60 Nm (44 lbf ft)
|
|
15.
|
Fit the splash guard.
|
|
16.
|
Fit protective collar 83 95 162 in the sealing ring.

|
|
17.
|
Make sure that the drive shaft is clean and then align it with the tool.
|
Important
|
|
Insert all but 20 mm of the drive shaft in the gearbox and then withdraw the tool before the shaft's sealing surface reaches the shaft seal.
|
|
|
|
|
18.
|
Push in the rest of the shaft until the circlip clicks in.
|
|
20.
|
Attach the inlet and outlet hoses for the transmission fluid cooling. Make sure they do not rest on the subframe.
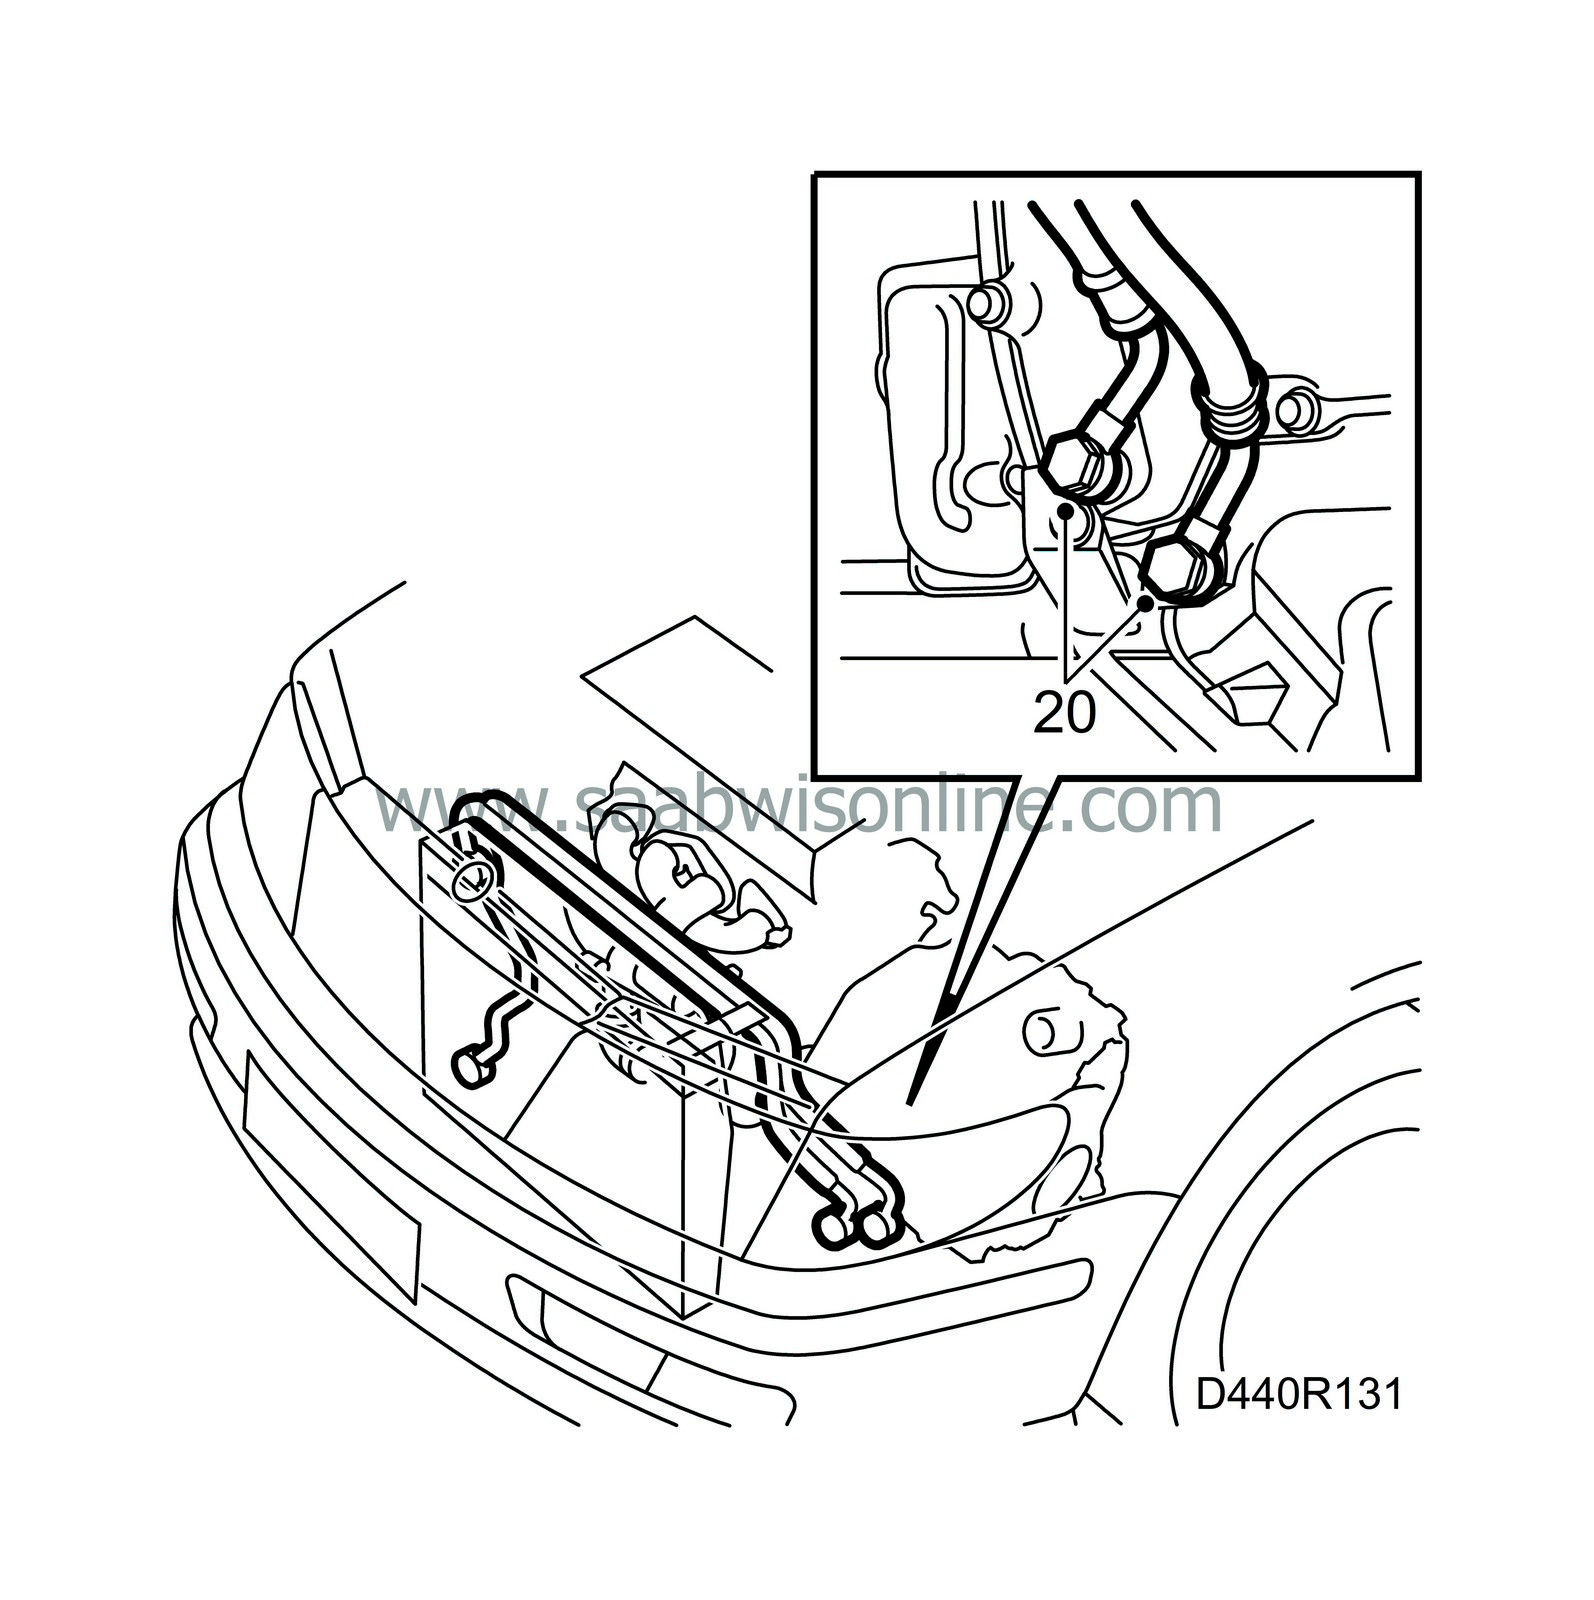
Tightening torque: 27 Nm (20 lbf ft)
|
|
21.
|
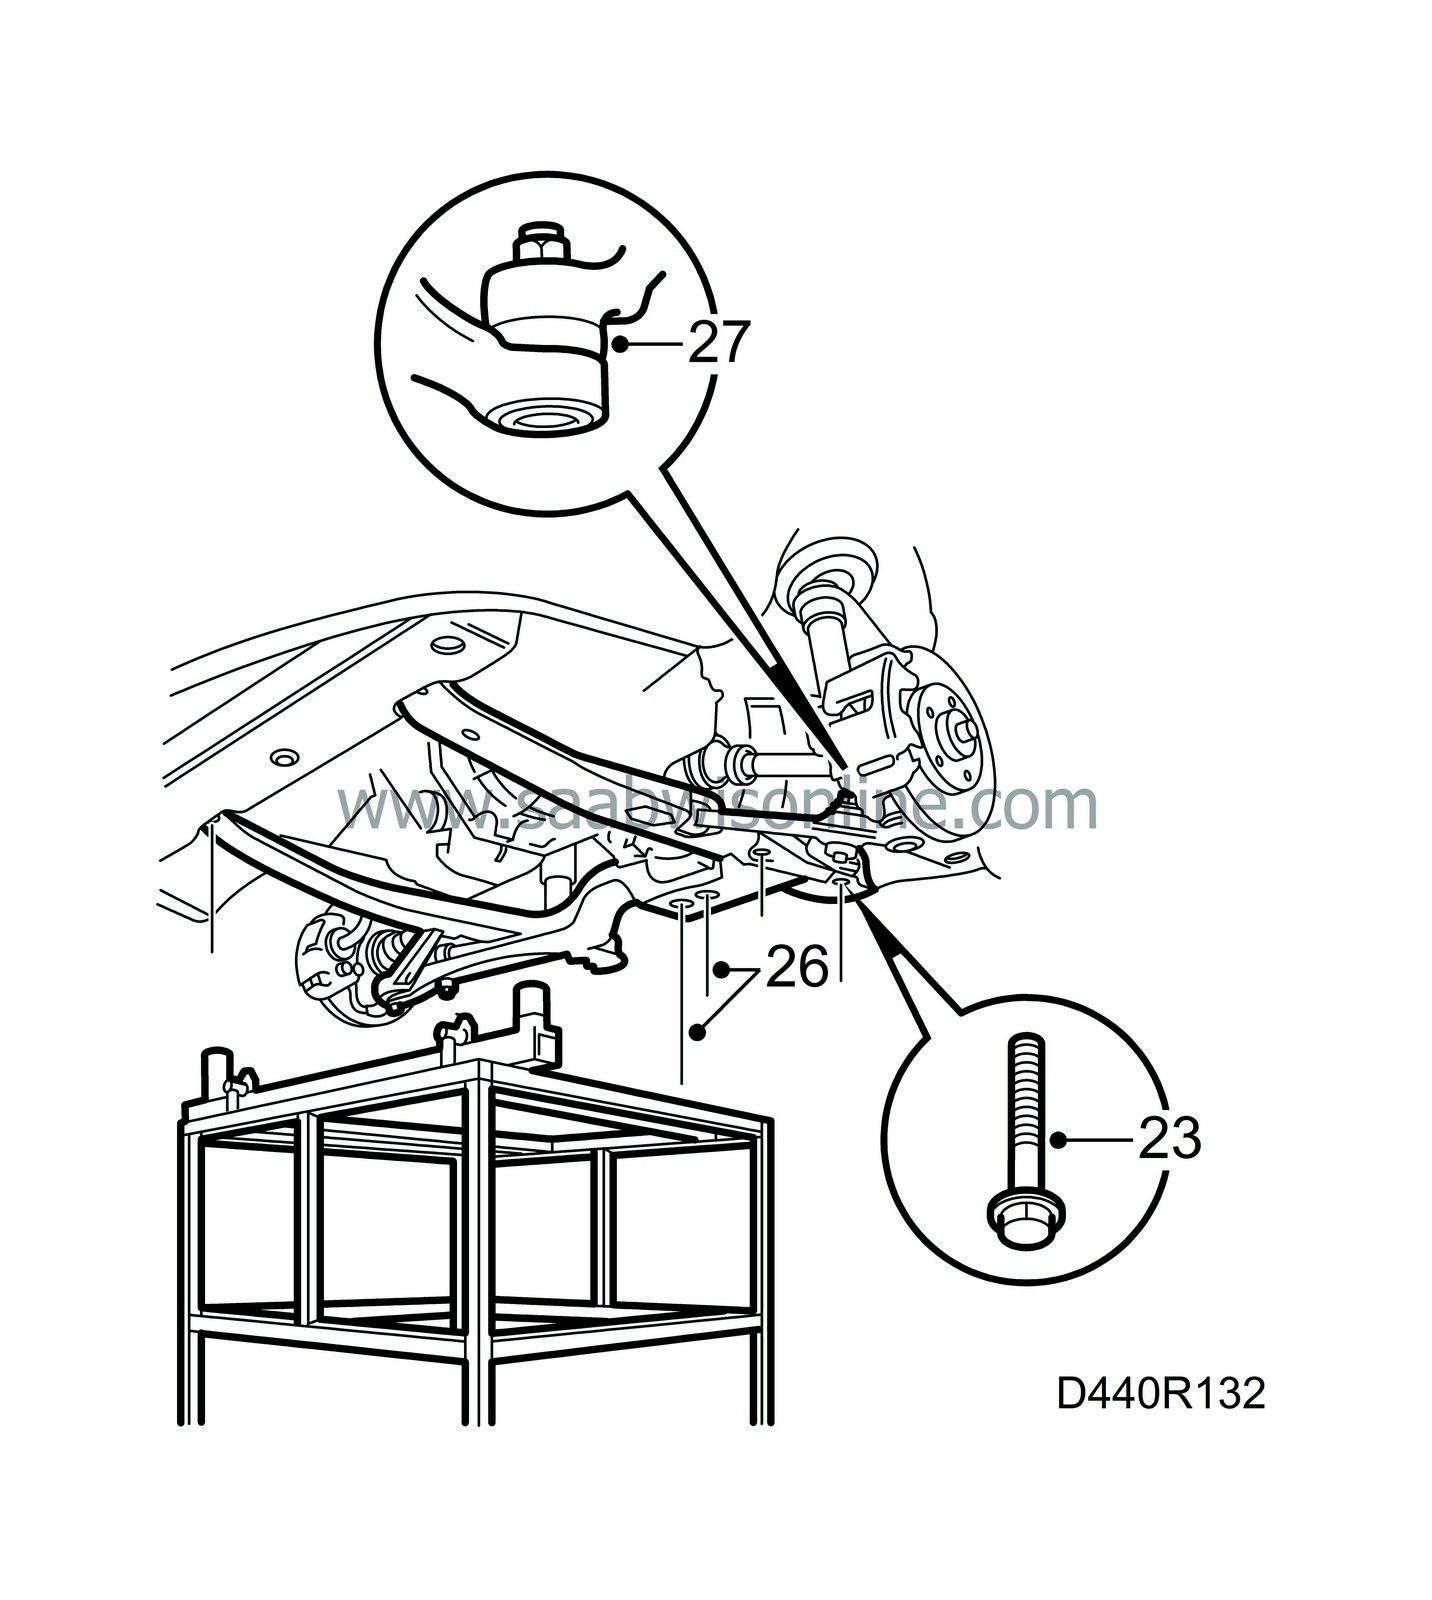
Carefully raise the subframe. Make sure the washers on the rear mountings are in place and then position the suspension arm end pieces.
|
|
22.
|
Adjust the subframe so that the bolt holes are aligned with the body.
|
|
23.
|
Tighten the 4 corner bolts on the subframe.
Tightening torques:
front 115 Nm (85 lbf ft)
rear 110 Nm (81 lbf ft) + 75°
|
|
24.
|
Lower the lifting trolley and move it away.
|
|
25.
|
Tighten the remaining bolts on the subframe.
Tightening torque: centre 190 Nm (141 lbf ft)
|
|
26.
|
Tighten the nuts on the rear engine mounting.
Tightening torque: 50 Nm (37 lbf ft)
|
|
27.
|
Tighten the suspension arm end pieces on both sides and tighten the nuts.
Tightening torque: 75 Nm (55 lbf ft)
|
|
28.
|
Attach the ground lead to the end of the gearbox.
|
|
29.
|
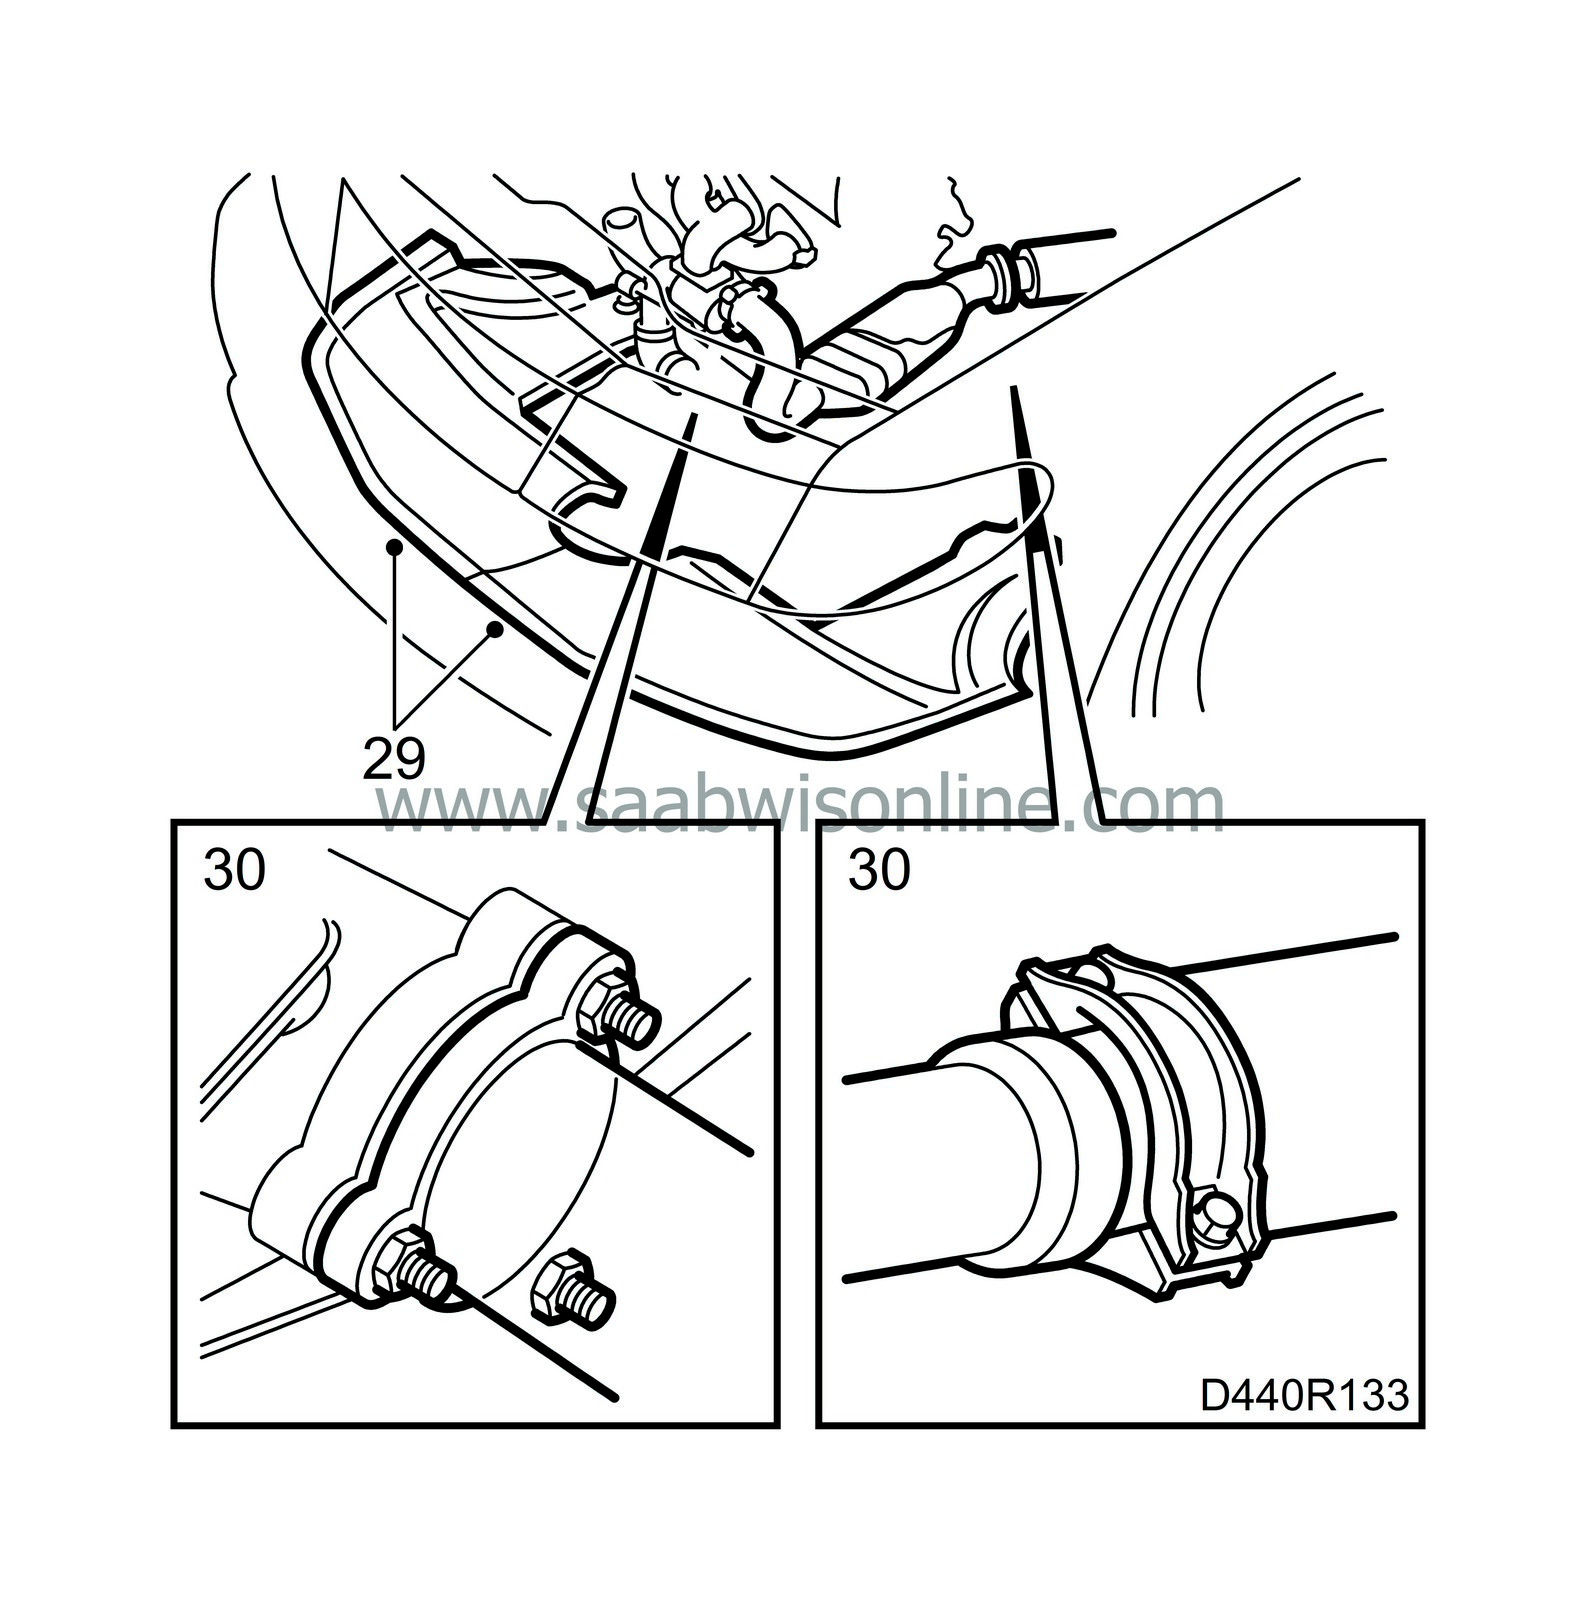
Refit the air shields and the lining in the right wheel housing.
|
|
30.
|
Fit the front exhaust pipe and put back the clips for the oxygen sensor cable.
Tightening torque: 40 Nm (30 lbf ft)
|
|
31.
|
Fit the front wheels.
Tightening torque: 110 Nm (81 lbf ft)
Lower the car to the floor.
|
|
32.
|
Take away the lifting beam and tighten the top bolts between the engine and the gearbox.
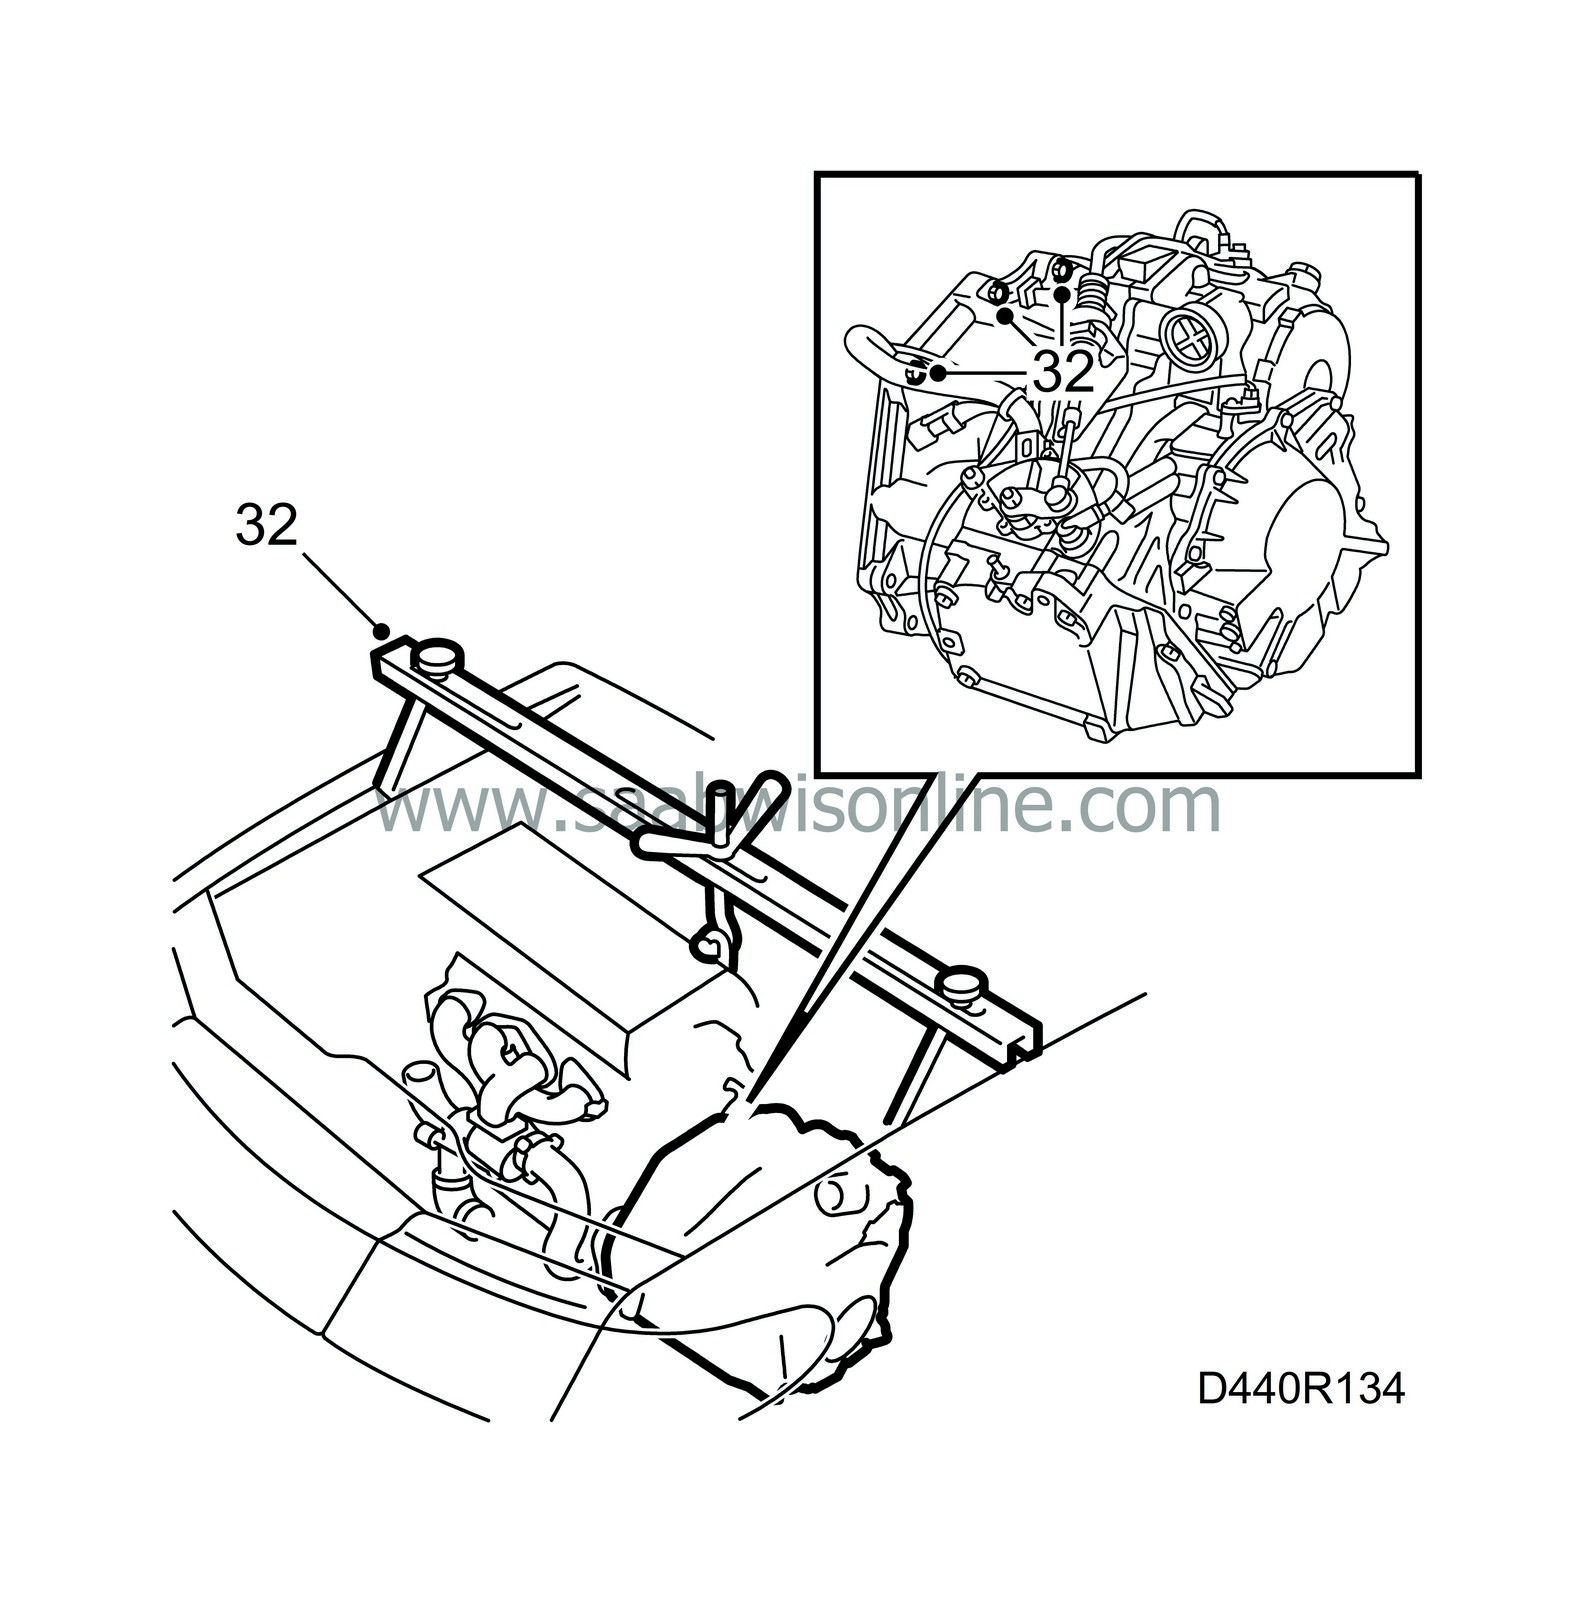
Tightening torque: 75 Nm (55 lbf ft)
|
|
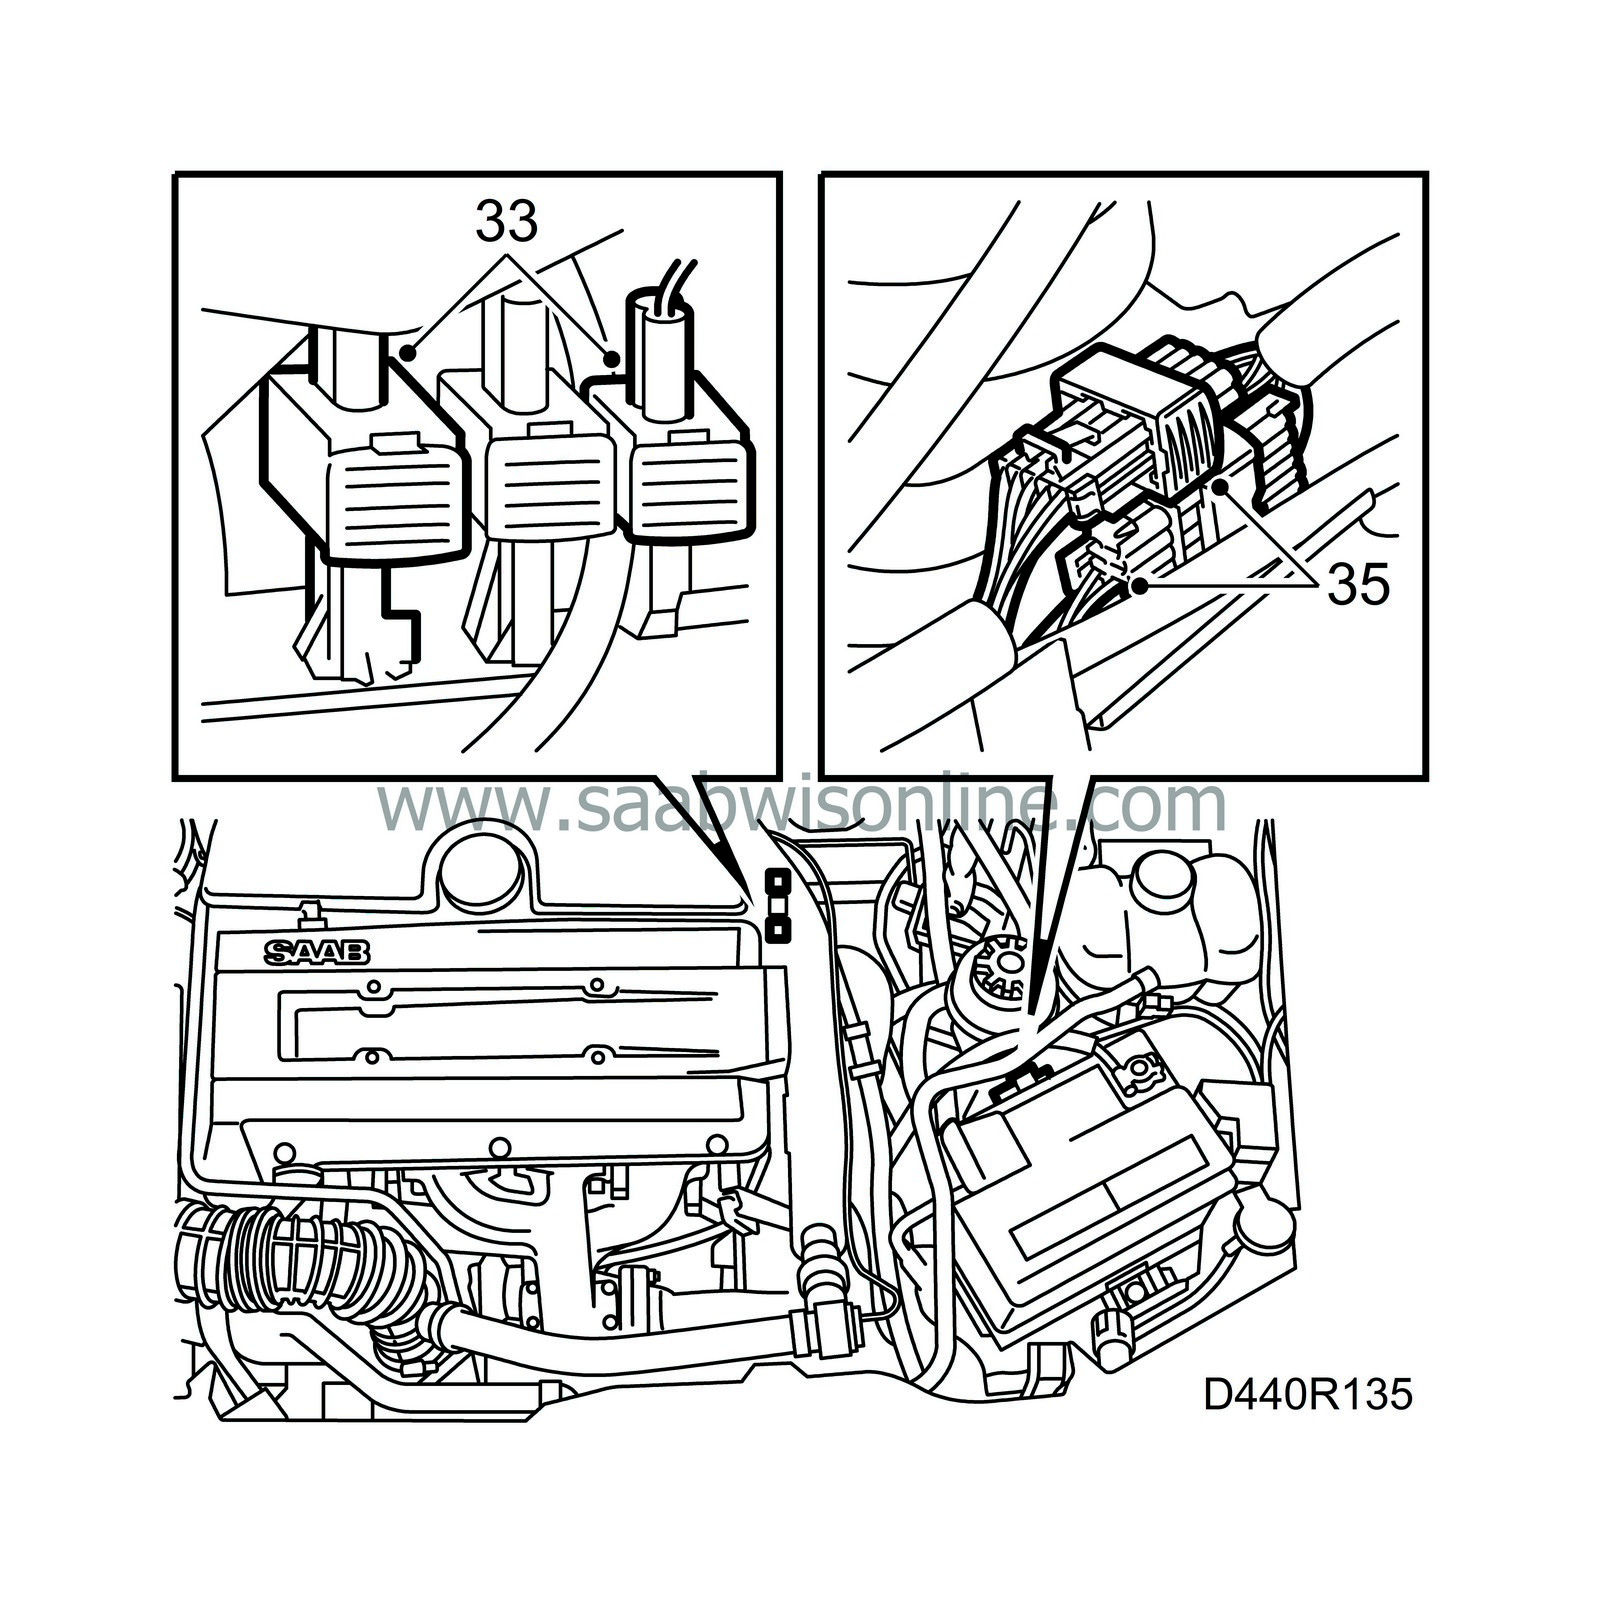
33.
|
Connect the oxygen sensor and attach the clips.
|
|
34.
|
Fit the positive cable mounting on the engine.
|
|
35.
|
Plug in the electrical connections for the gearbox (located on a bracket behind the battery).
|
|
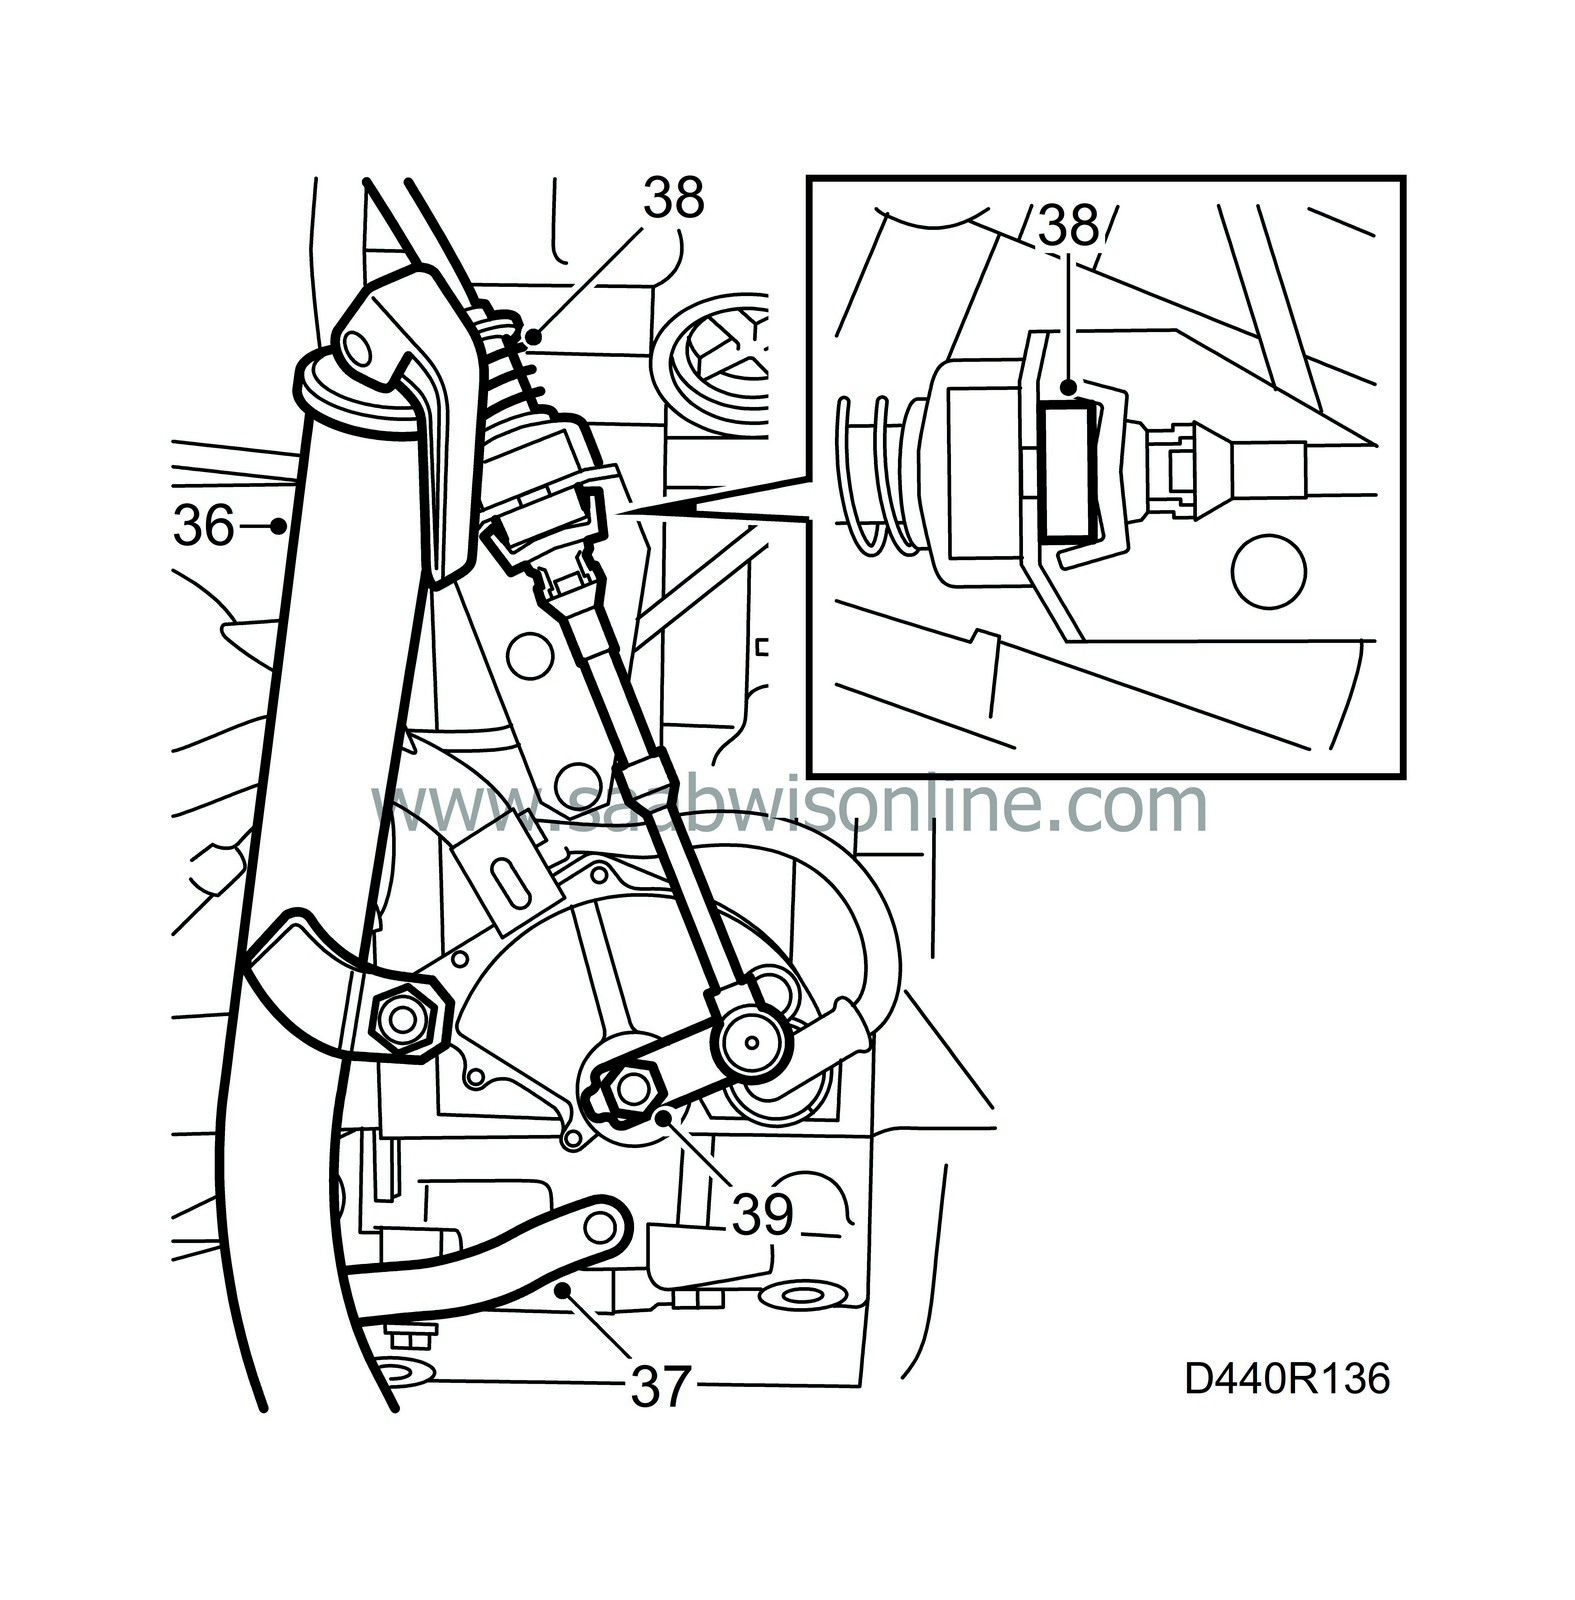
36.
|
Clean and fit the dipstick pipe.
|
|
37.
|
Fit the gearbox breather hose.
|
|
38.
|
Fit the shifting cable to the bracket on the gearbox. Fit the clamp.
|
|
39.
|
Mount the shifting cable on the selector lever.
|
|
40.
|
Fit the cover over the intake manifold, alternatively the resonator, with hoses and mass air flow sensor.
|
|
41.
|
Check and if necessary adjust the position of the selector lever.
|
|
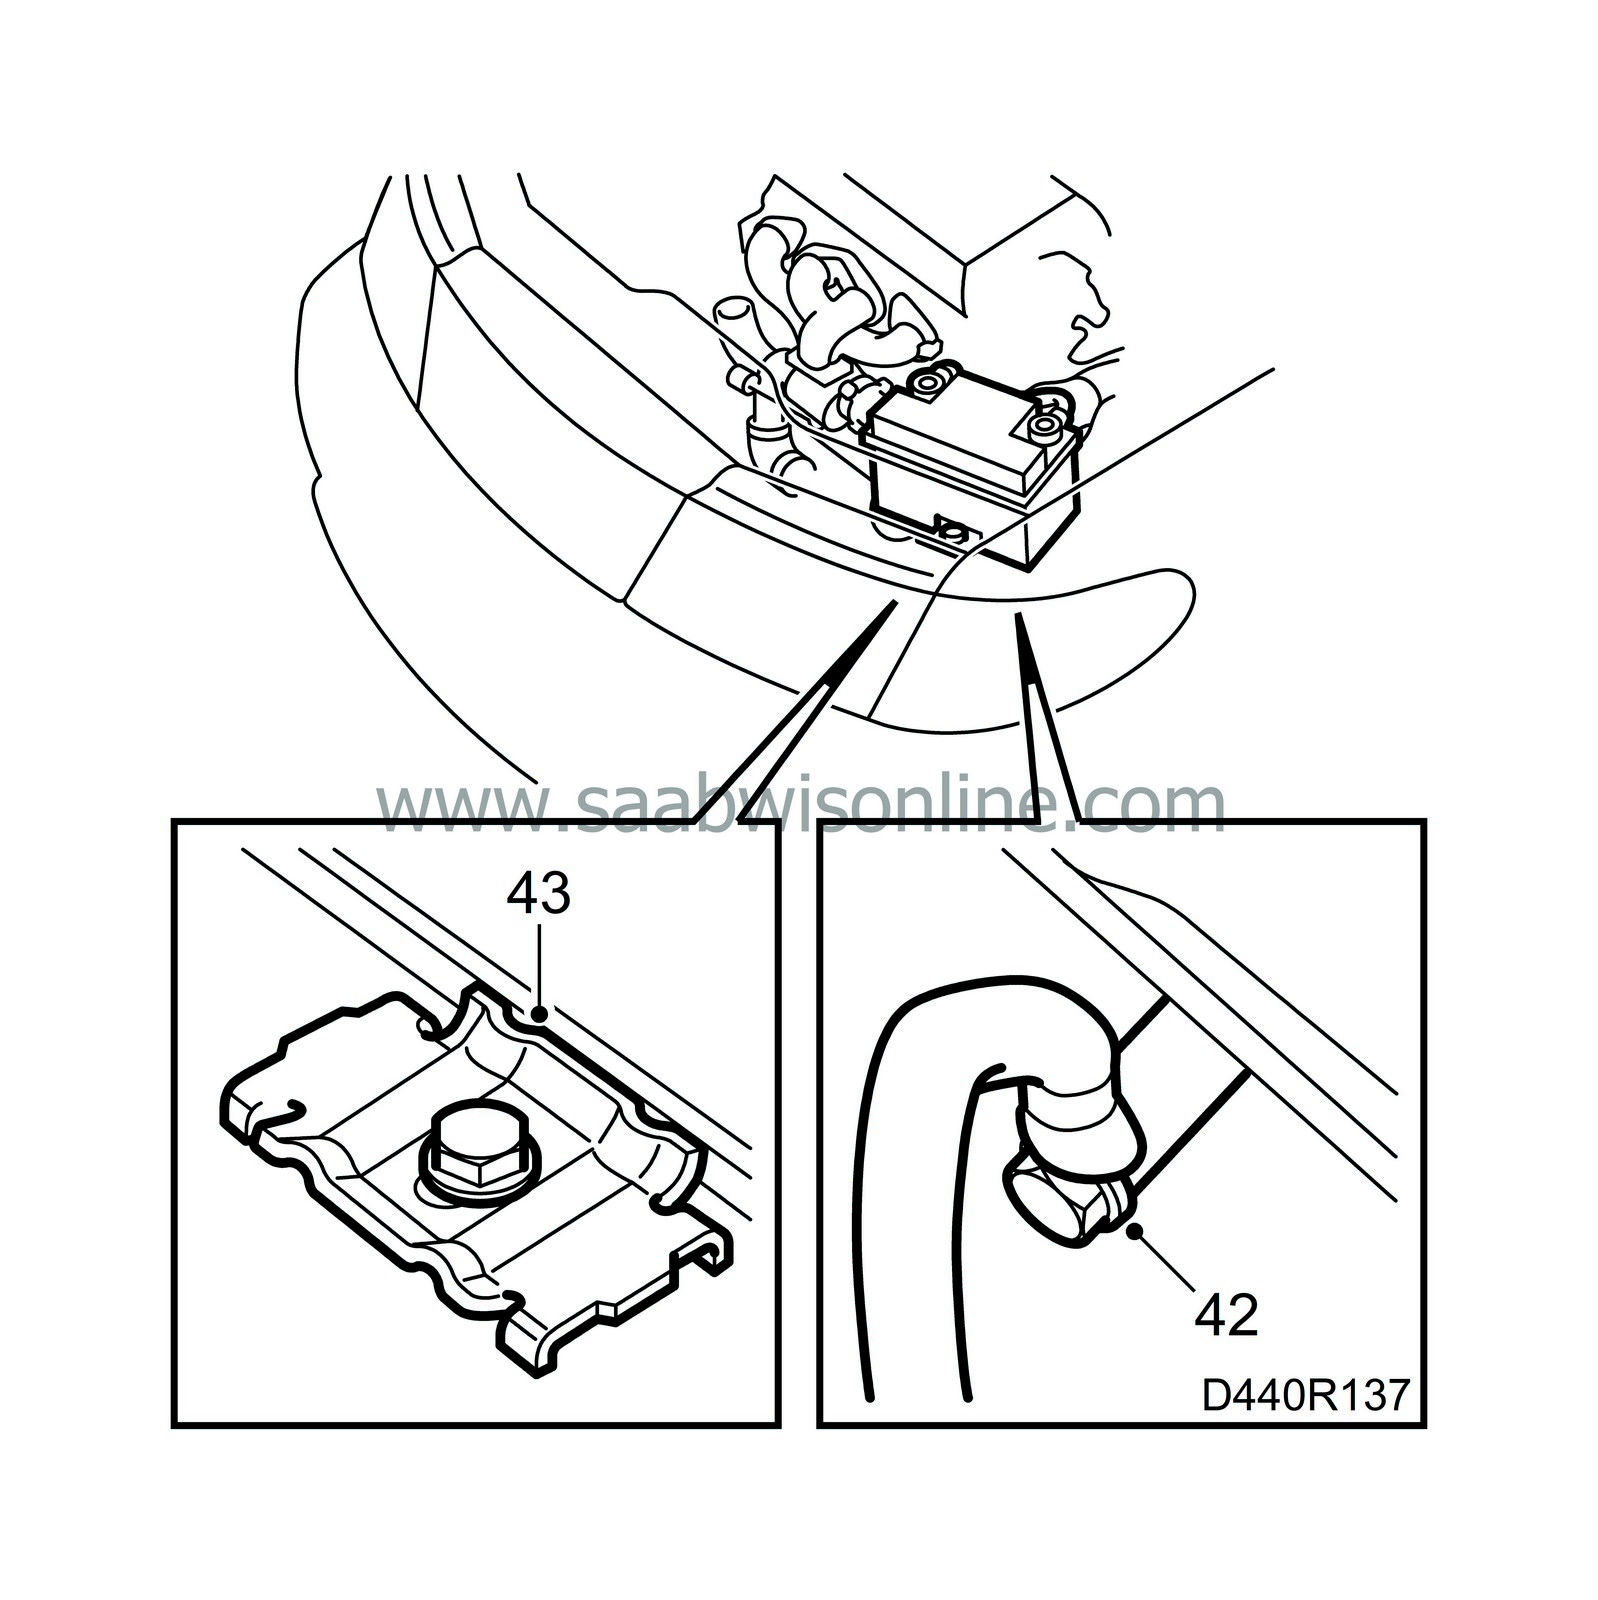
42.
|
Connect the battery negative cable to the grounding point on the gearbox.
|
|
44.
|
Fill with Texaco Texamatic DEXRON III (7045 EU, TL1863 US) mineral based fluid to the correct level.
|
|
45.
|
Test drive the car at varying loads and engine speeds, and read any diagnostic trouble codes. Also, check the position of the steering wheel when driving straight ahead on a level road. Adjust if necessary.
|


 Warning


