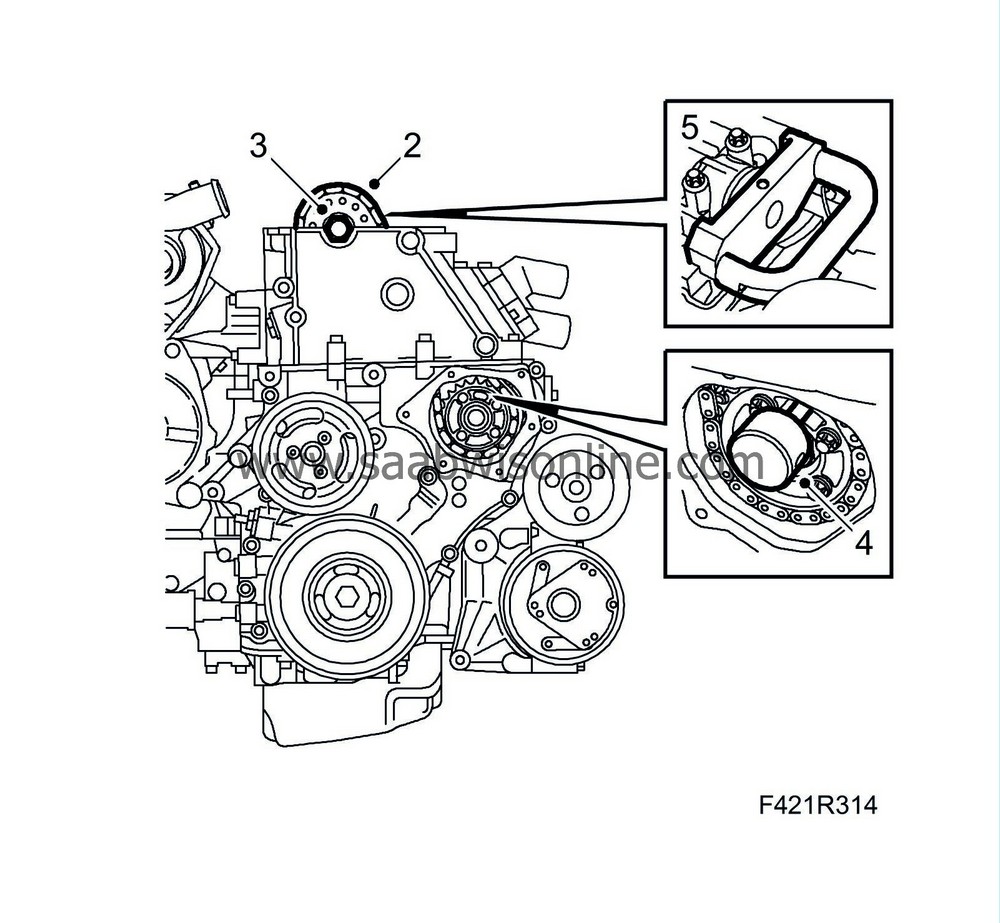
Upper timing chain
| Upper timing chain |
(in-situ)
| To remove |
| 1. |
Protect the wings with covers.
|
|
| 2. |
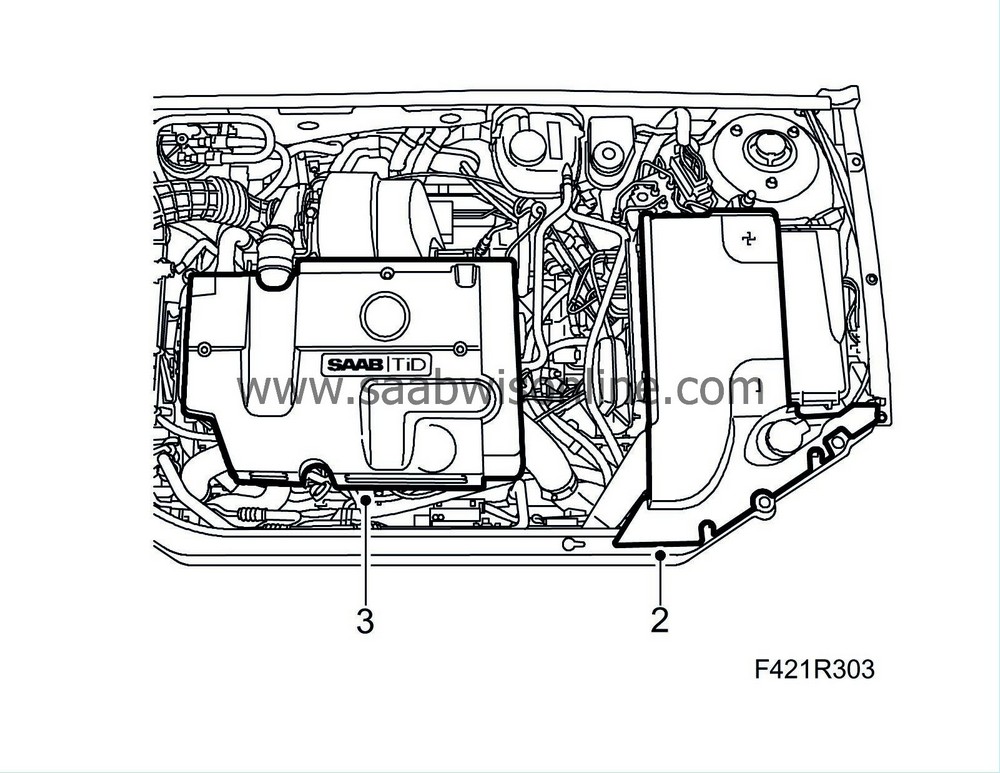
Remove the battery cover and the negative battery cable.
|
|
| 3. |
Remove the upper engine cover.
|
|
| 4. |
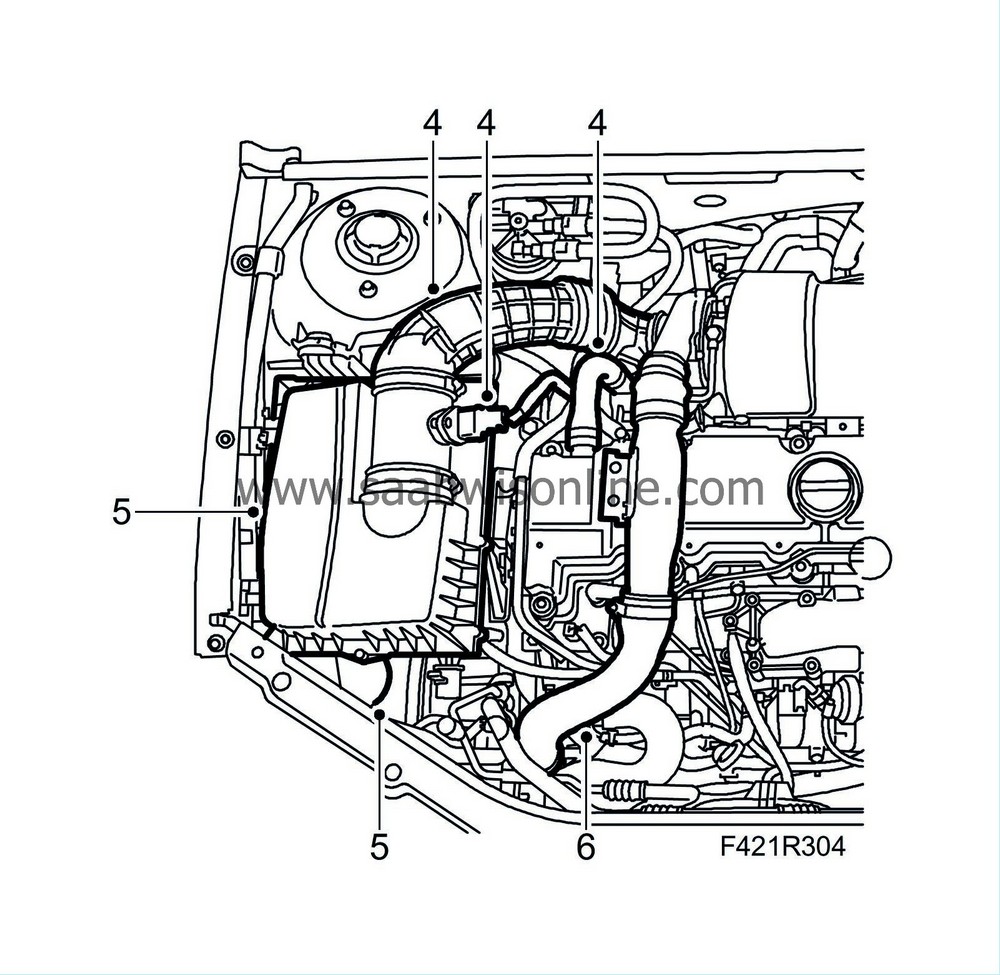
Remove the turbocharger intake hose and plug the turbocharger inlet. Unplug the crankcase ventilation hose and mass air flow sensor connector.
|
|
| 5. |
Remove the air filter housing lid and the air filter. Detach the intake hose and remove the filter housing.
|
|
| 6. |
Remove the charge air hose and charge air pipe from the turbocharger, and the charge air pipe from the fan cowling. Plug the connections.
|
|
| 7. |
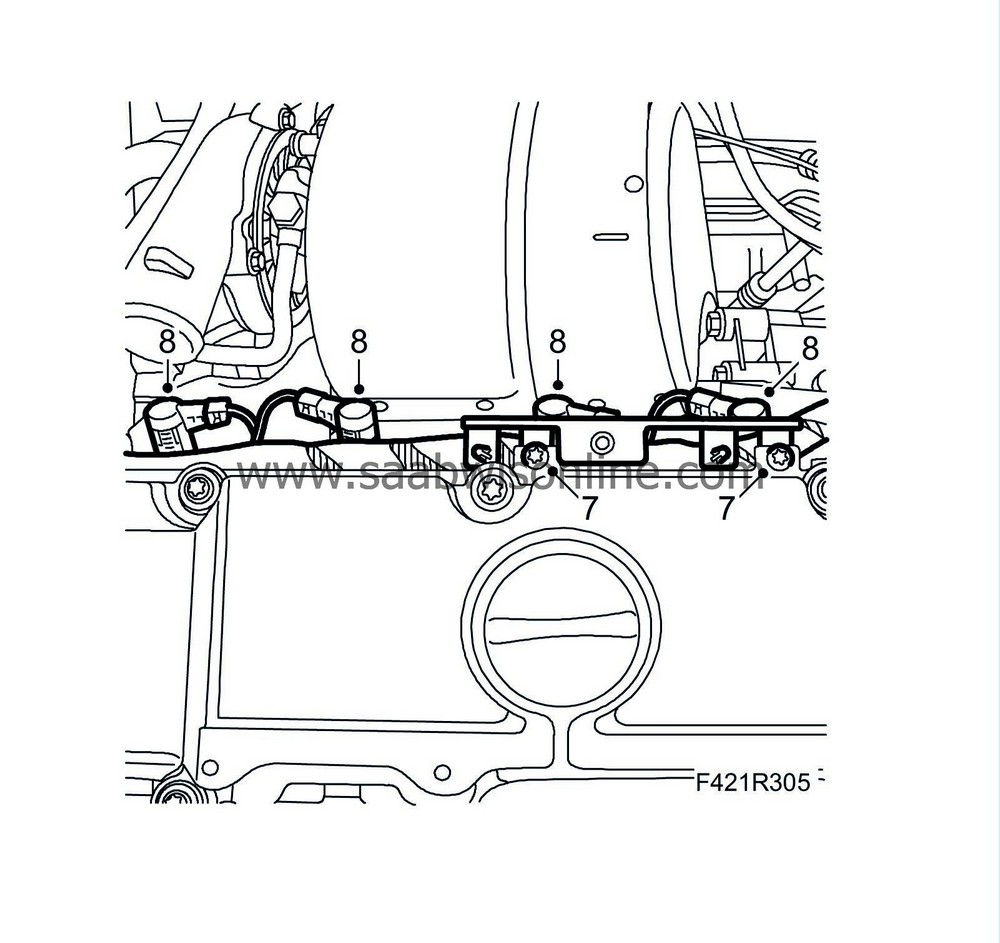
Undo the rear wiring harness mounting from the camshaft cover.
|
|
| 8. |
Disconnect the glow plug connectors and bend aside the wiring harness.
|
|
| 9. |
Raise the car and remove the front right wheel and right
front wing liner
.
|
|
| 10. |
Remove the lower engine cover.
|
|
| 11. |
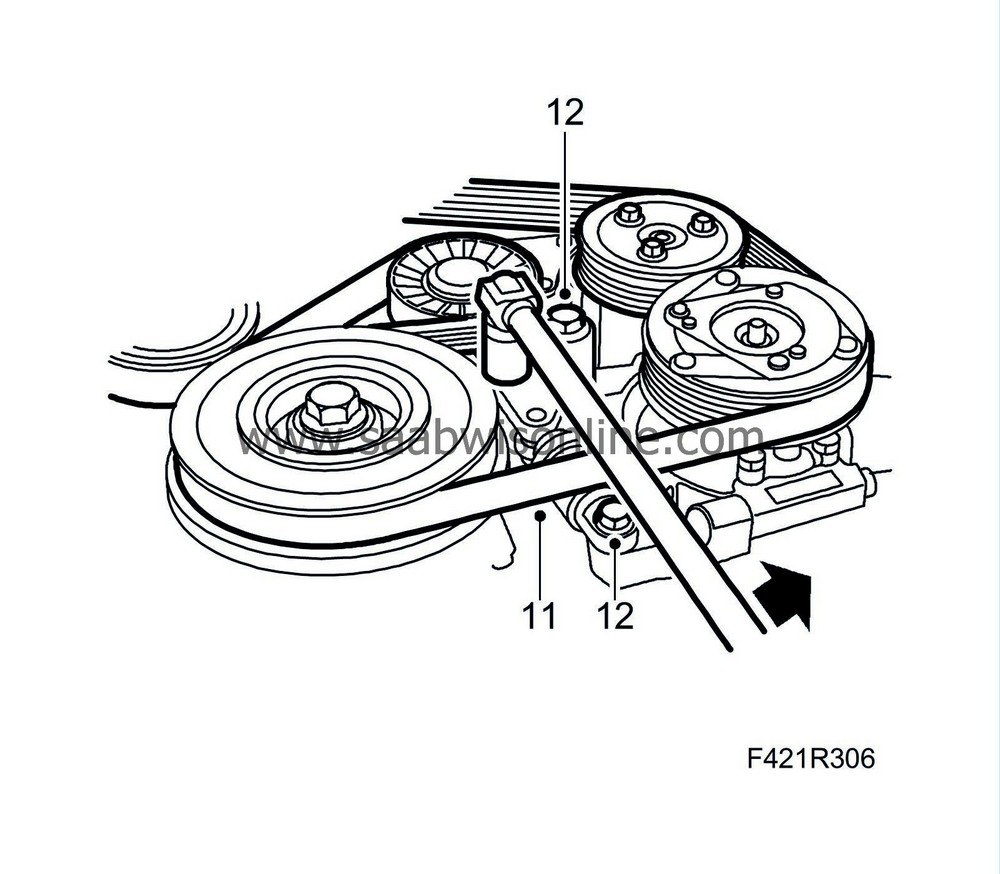
Mark the belt's direction of rotation. Detension and remove the poly-V-belt.
|
|
| 12. |
Remove the belt tensioner. Place the belt tensioner standing upright.
|
|
| 13. |
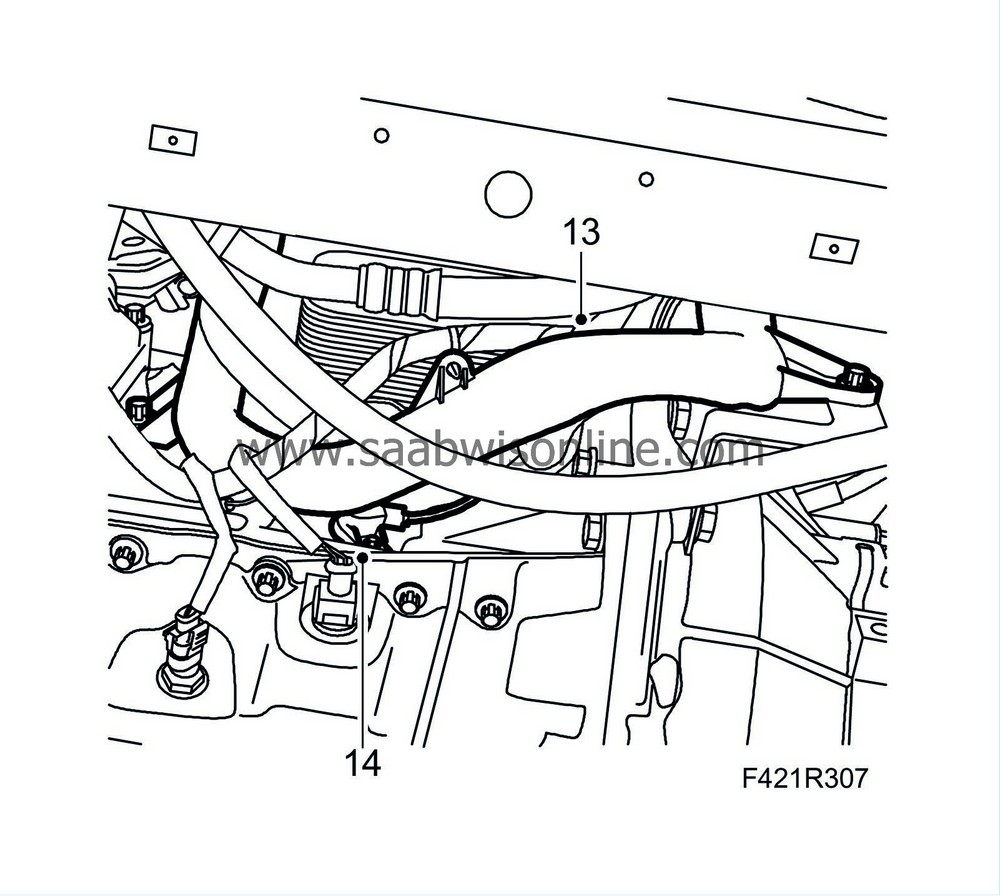
Remove the coolant pipe from the gearbox and cylinder block.
|
|
| 14. |
Remove the crankshaft position sensor.
|
|
| 15. |
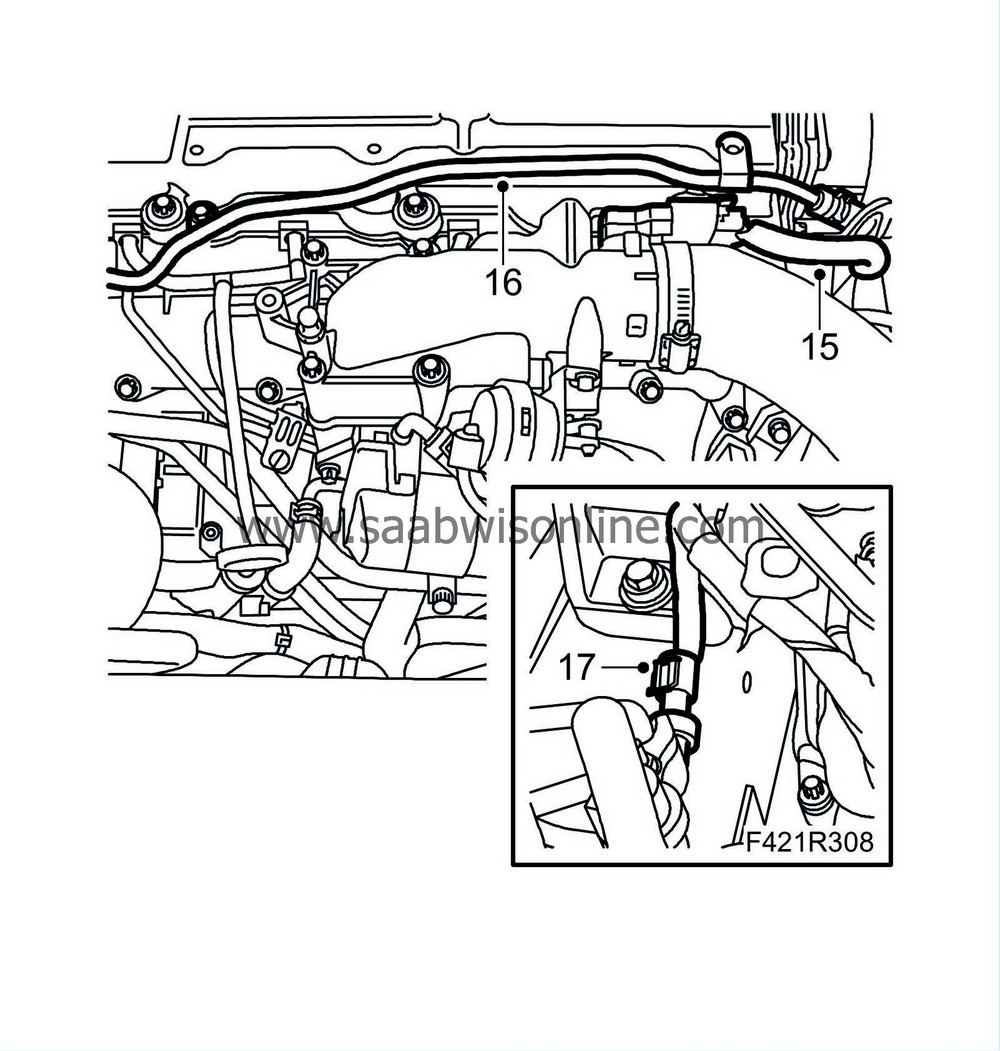
Lower the car and unplug the connector to the pressure/temperature sensor.
|
|
| 16. |
Undo the bolt to the coolant pipe bracket from the camshaft cover.
|
|
| 17. |
Unplug the connector to the AC pressure sensor.
|
|
| 18. |
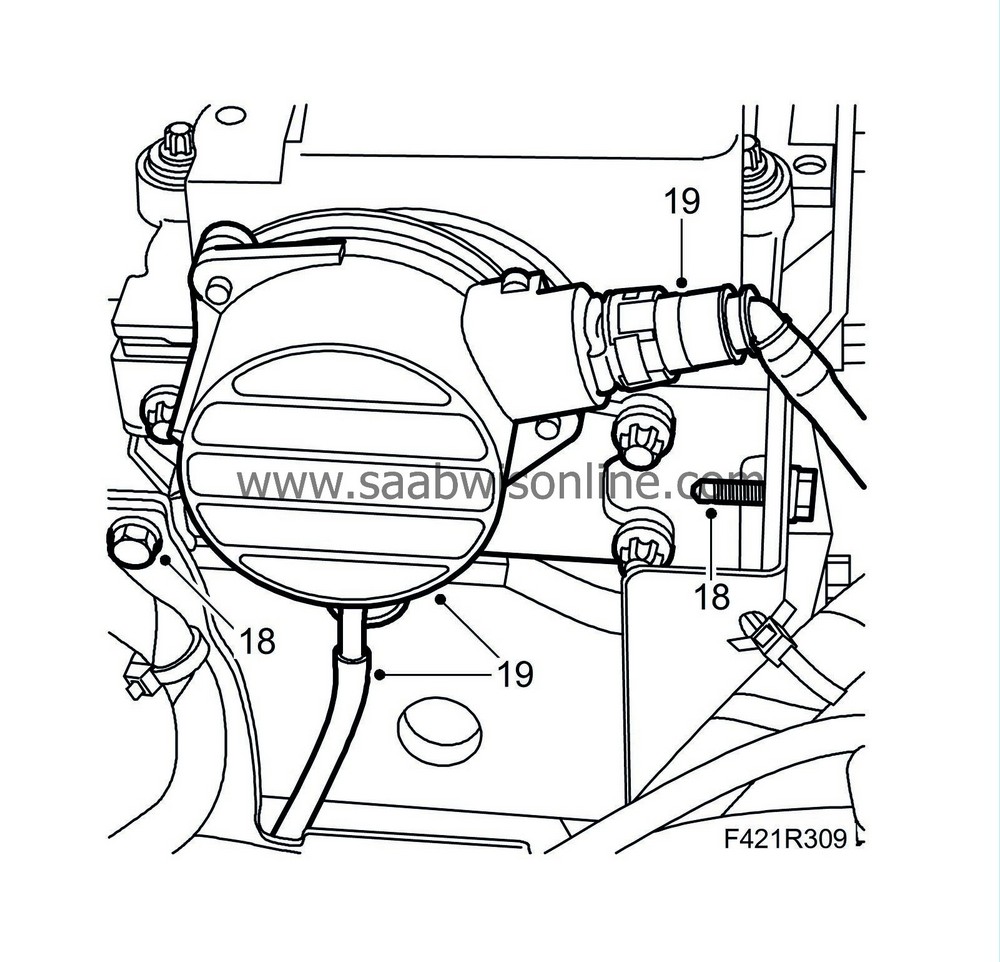
Remove the bolts to the cable duct on the vacuum pump.
|
|
| 19. |
Disconnect the hoses from the vacuum pump and remove the vacuum pump. Have a rag at hand to catch any oil spills.
|
|
| 20. |
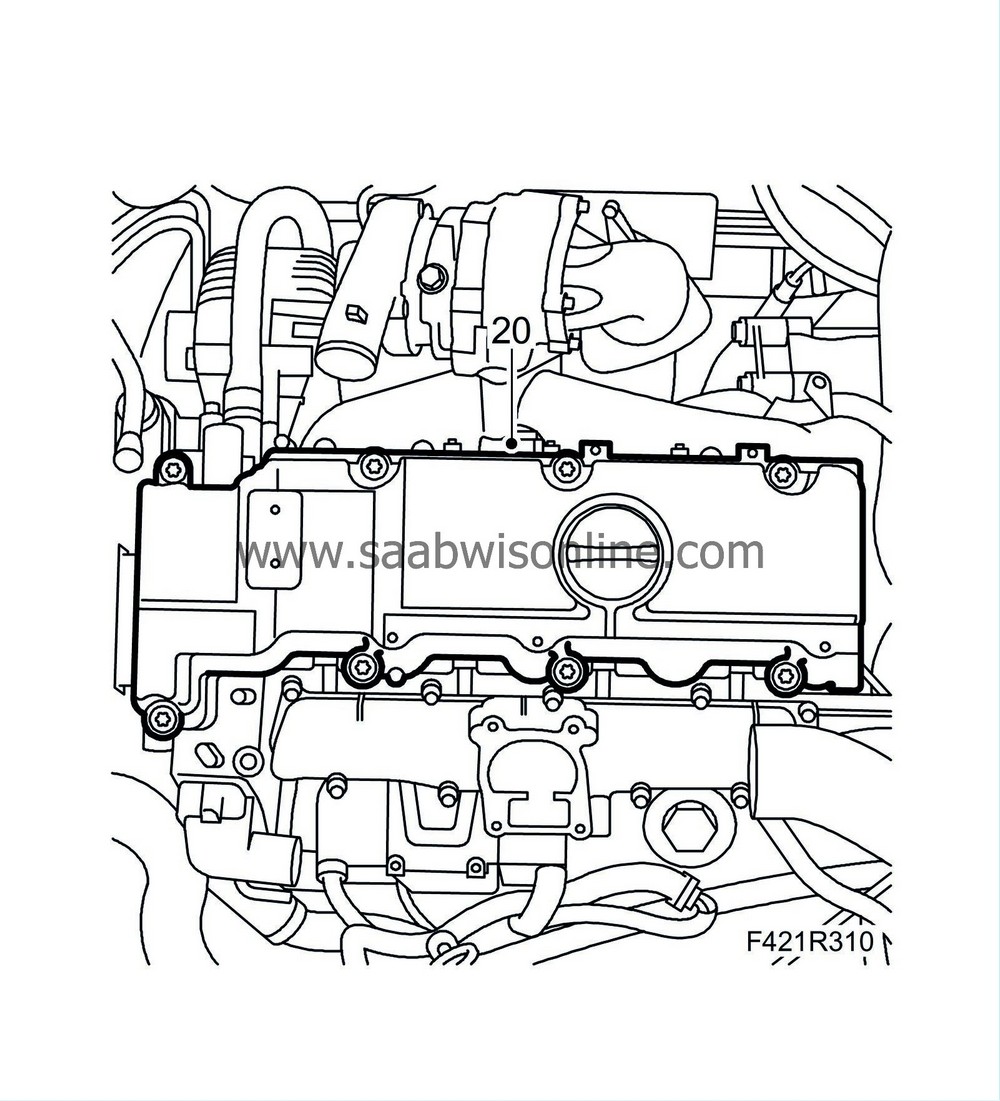
Remove the camshaft cover and move away the fuel lines.
|
|
| 21. |
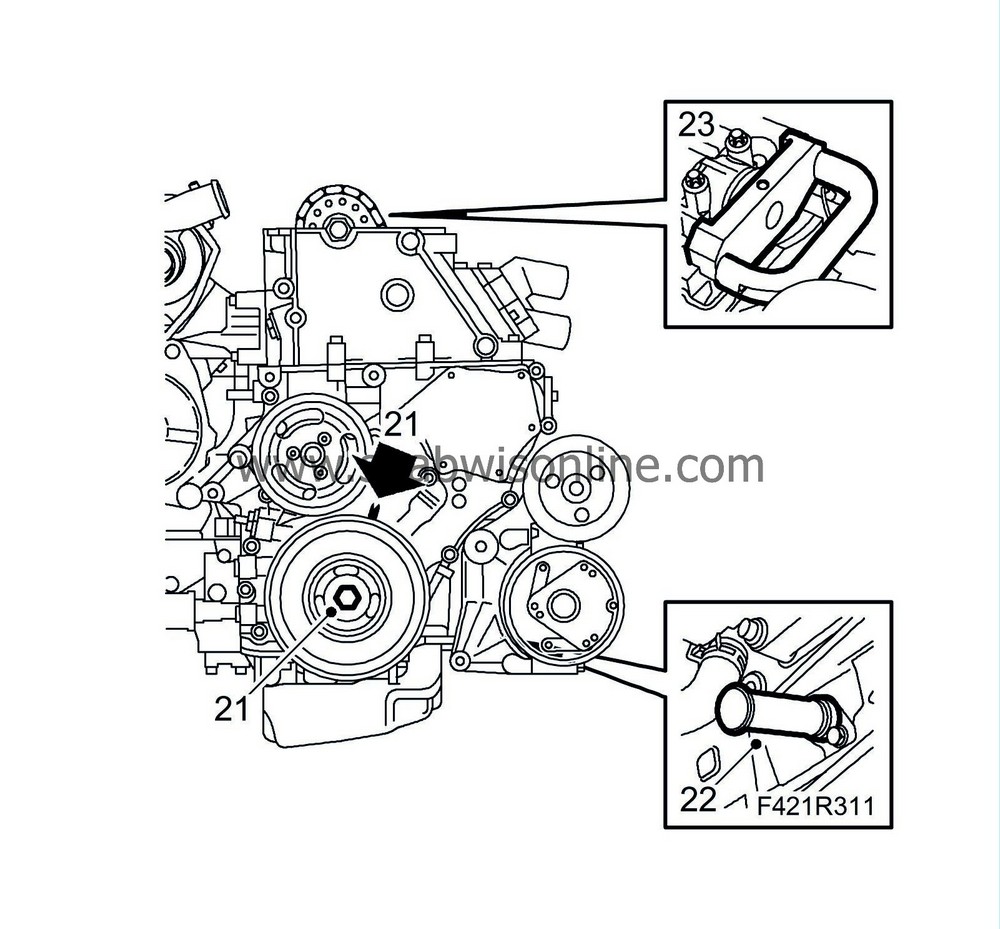
Turn the crankshaft to just before the mark for TDC for cylinder . Check that both the cams for cylinder 1 are pointing obliquely upward.
|
|
| 22. |
Raise the car and insert
83 95 352 Adjustment tool, crankshaft
into the hole for the crankshaft position sensor. Press the tool in while turning the crankshaft to zero. The tool should enter a recess in the crankshaft and lock it.
|
|
| 23. |
Lower the car and fit
83 95 386 Adjustment tool, camshaft
to the camshaft and cylinder head.
|
|
| 24. |
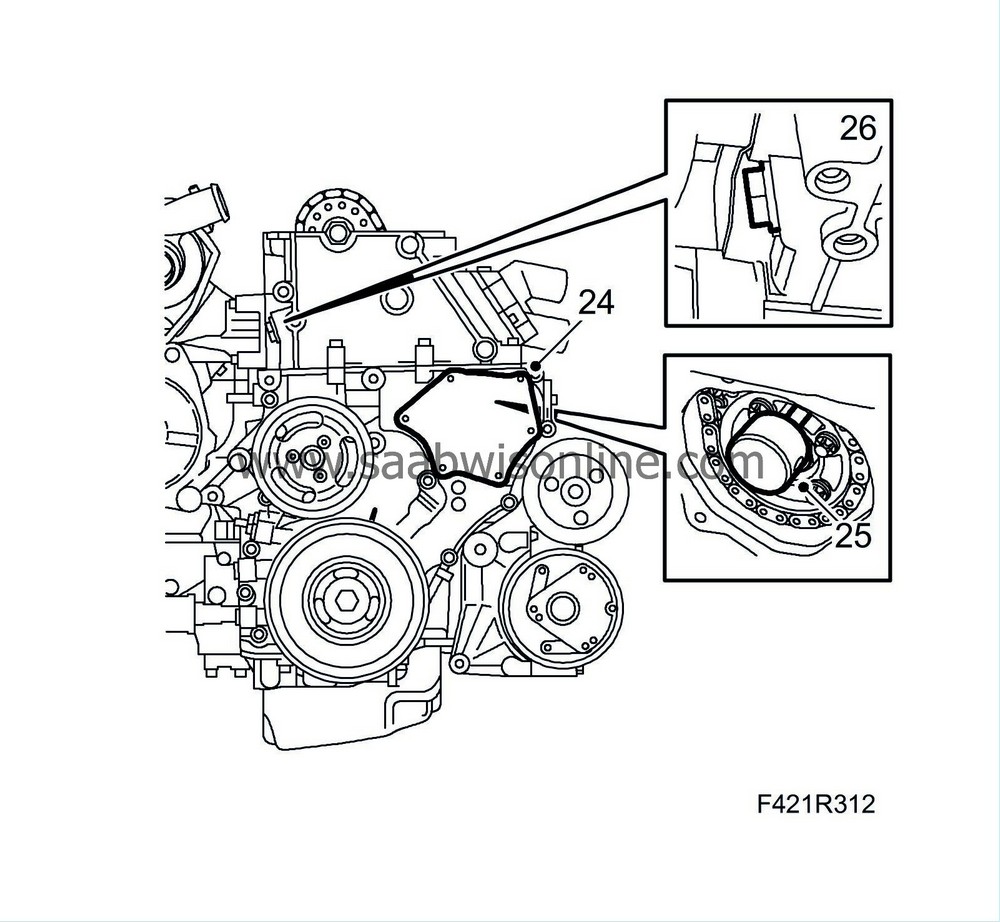
Remove the bolts from the cover on the timing cover. Carefully insert a pallet knife behind the cover and prise it off.
|
|
| 25. |
Insert
83 95 337 Adjustment tool, fuel pump
into the recess on the fuel distribution pump.
|
|
| 26. |
Remove the upper timing chain tensioner.
|
|
| 27. |
Remove
83 95 337 Adjustment tool, fuel pump
from the outlet on the fuel pump.
|
|
| 28. |
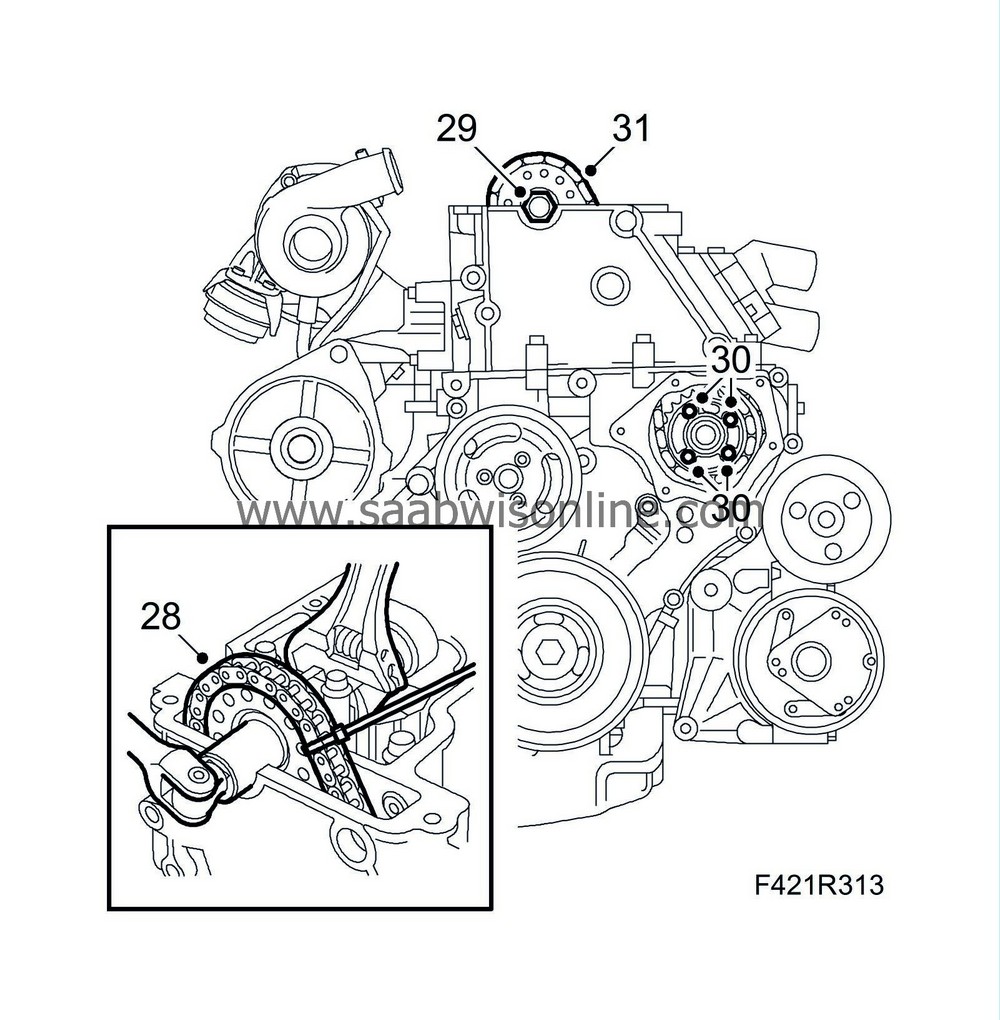
Secure the upper timing chain to the camshaft sprocket with a cable tie.
|
|
| 29. |
Remove the camshaft sprocket using an open-ended wrench on the hexagonal key to hold the camshaft still.
|
|
| 30. |
Remove the bolts for the fuel distribution pump sprocket and remove the sprocket.
|
||||||||||
| 31. |
Pull up the chain and remove it.
|
|
| To fit |
| 1. |
Clean any gasket remains from the sealing surfaces.
|
|
| 3. |
Position the camshaft sprocket so it runs easily on the camshaft and fit it with a new bolt. Tighten the sprocket bolts by hand.
|
|
| 4. |
Reposition
83 95 337 Adjustment tool, fuel pump
into the recess on the fuel distribution pump.
|
|
| 5. |
Position
83 95 386 Adjustment tool, camshaft
to the camshaft and cylinder head.
|
|
| 6. |
Fit the adapter for
83 95 394 Adjustment tool, timing chain
to the camshaft sprocket and fit the adjustment tool to the cylinder head.
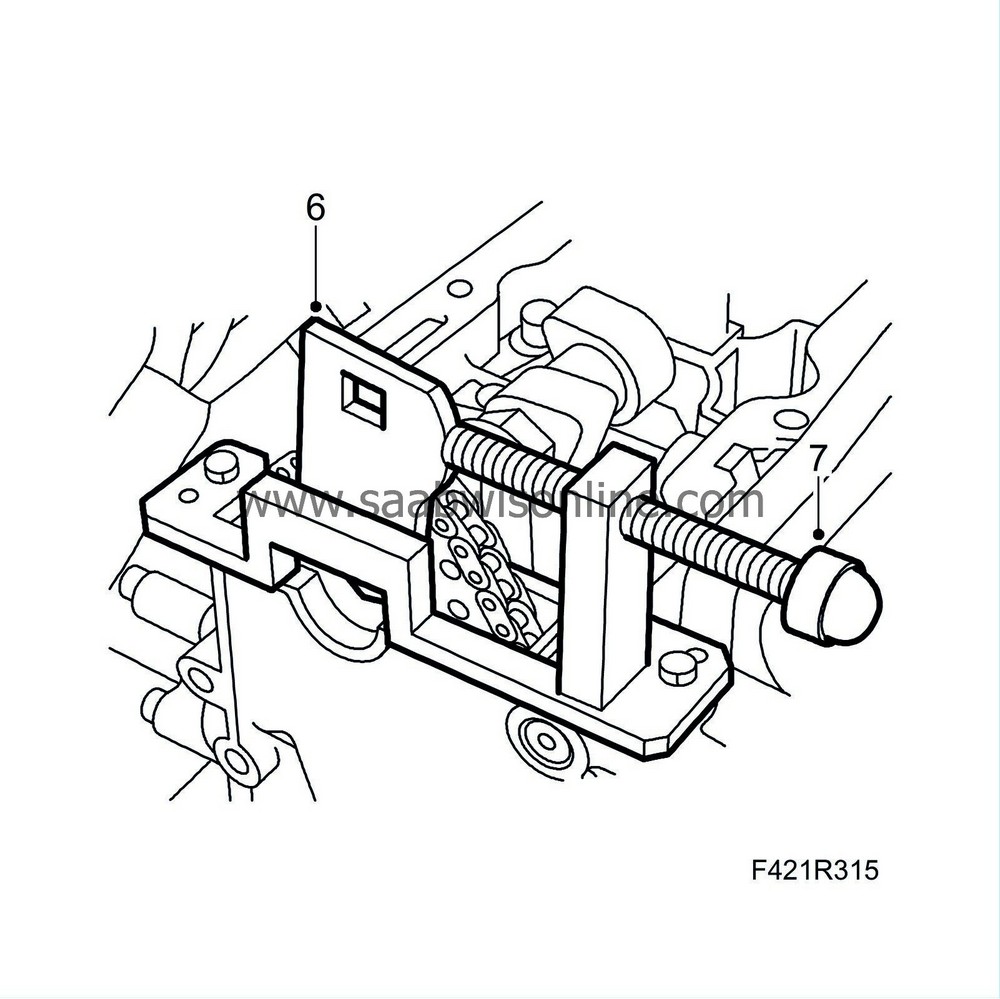
|
|
| 7. |
Fix the position for the adapter on the camshaft sprocket by lightly twisting it anticlockwise with a ratchet handle. Tighten the adjustment screw on the tool.
|
||||||||||
| 8. |
Remove the adjustment tool for the fuel distribution pump sprocket and tighten the bolts.
Tightening torque 20 Nm (15 lbf ft) 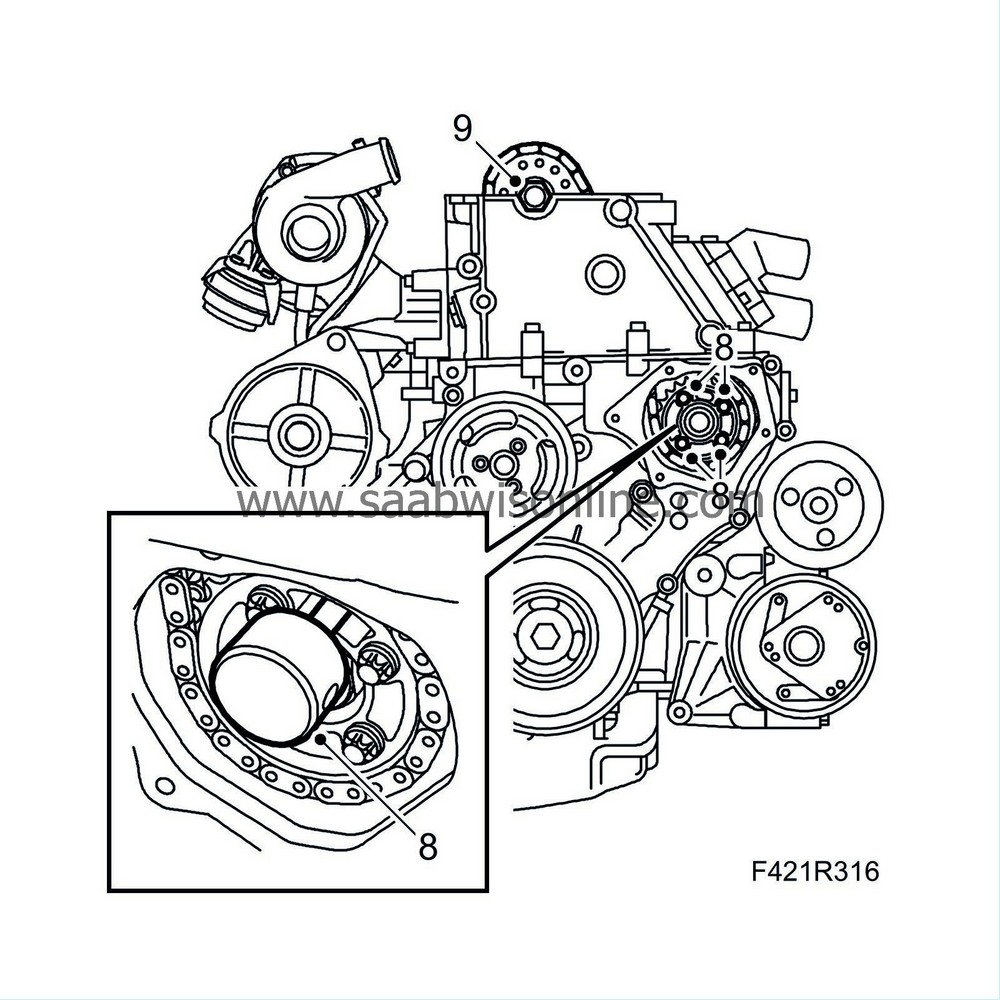
|
|
| 9. |
Tighten the bolt securing the camshaft sprocket. Use an open-ended spanner in the hexagonal key to hold the camshaft still.
Tightening torque 90 Nm + 60° (66 lbf ft + 60°) |
|
| 10. |
Fit the upper chain tensioner for the timing chain using a new gasket.
Tightening torque 60 Nm (44 lbf ft) 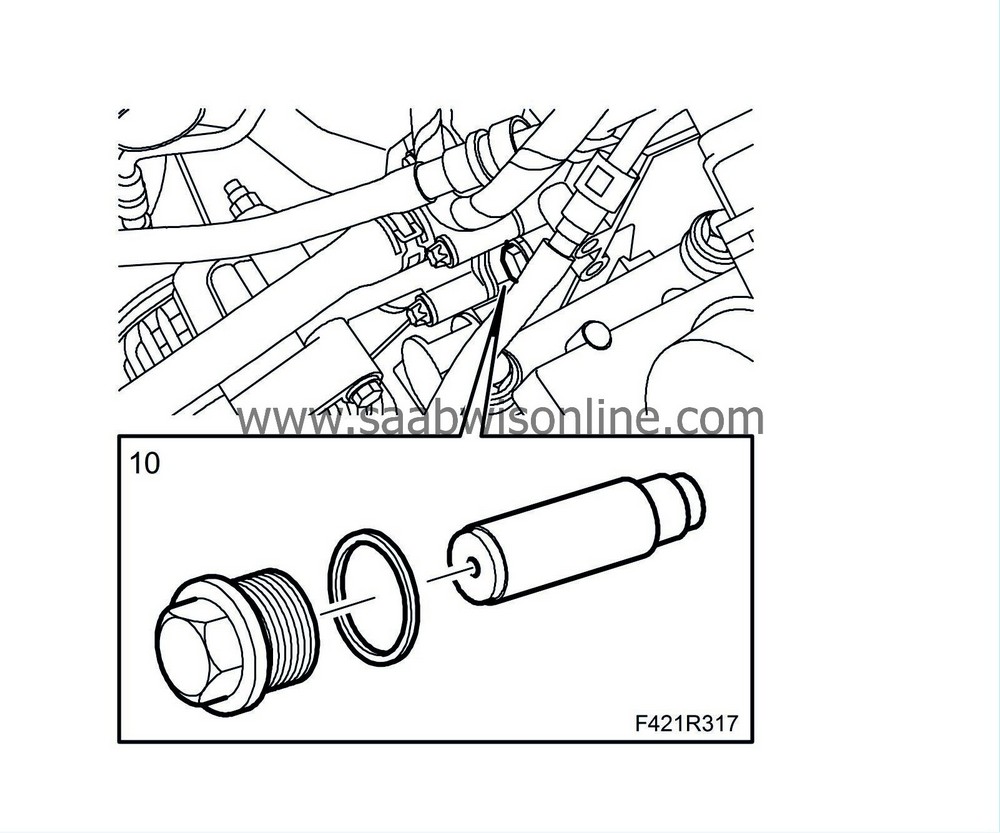
|
|
| 11. |
Remove all the adjustment tools. Raise the car to remove
83 95 352 Adjustment tool, crankshaft
.
|
|
| 12. |
Lower the car and turn the crankshaft two revolutions using the pulley centre bolt to just before the mark for TDC in cylinder 1. Check that both cams for cylinder 1 are pointing up.
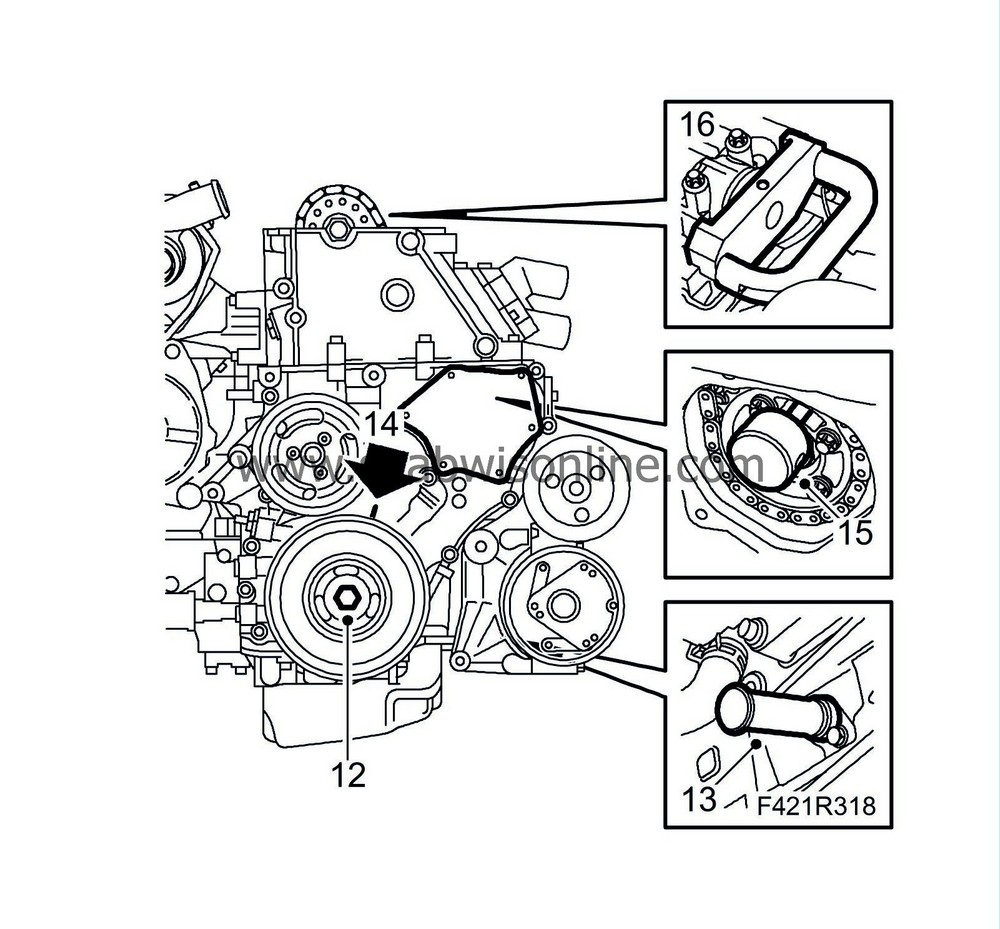
|
|
| 13. |
Raise the car and insert
83 95 352 Adjustment tool, crankshaft
into the hole for the crankshaft position sensor. Press the tool in while turning the crankshaft to zero. The tool will then engage a recess in the crankshaft and lock it.
|
|
| 14. |
Lower the car and check that the markings on the crankshaft pulley and timing cover are aligned. Also, the arrow on the single camshaft sprocket by the fuel distribution pump should be aligned with the recess on the pump.
|
|
| 15. |
Position
83 95 337 Adjustment tool, fuel pump
into the recess on the fuel distribution pump.
|
|
| 16. |
Position
83 95 386 Adjustment tool, camshaft
to the camshaft and cylinder head.
|
|
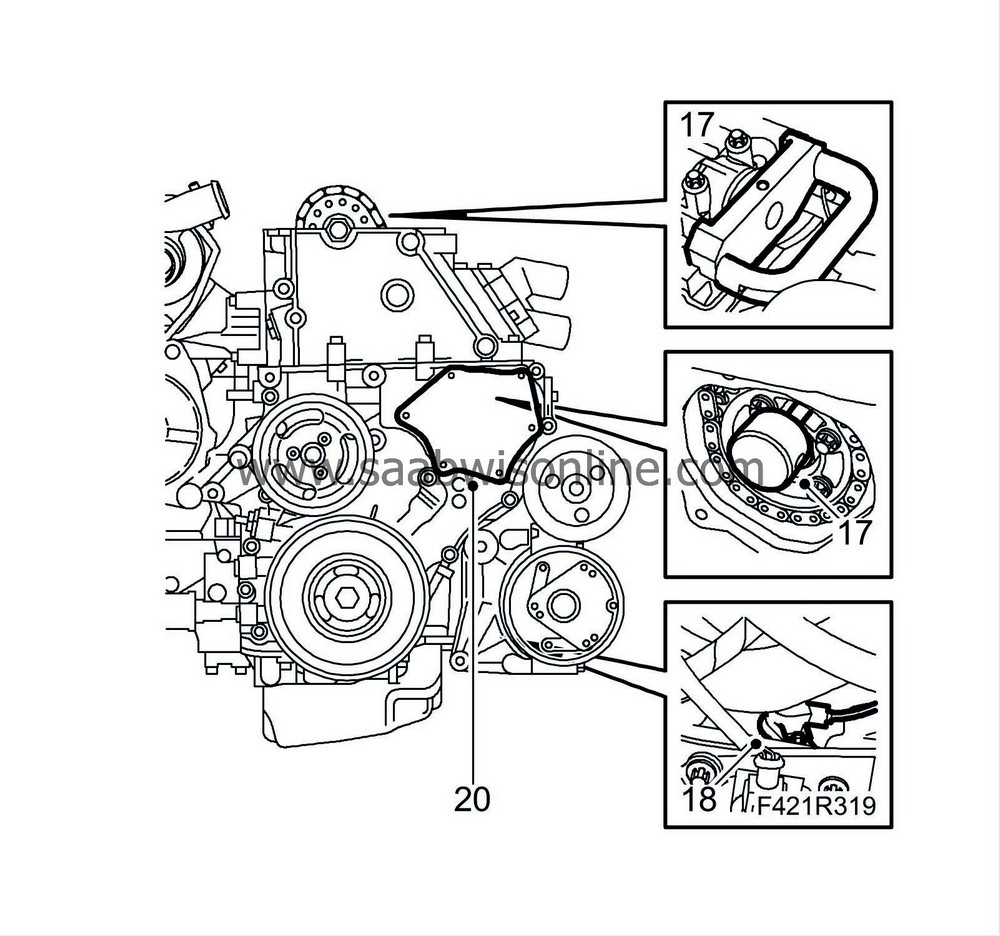
| 17. |
Remove all the adjustment tools. Raise the car to remove
83 95 352 Adjustment tool, crankshaft
.
|
|
| 18. |
Fit the position sensor to the crankshaft with a new O-ring.
|
|
| 19. |
Lower the car and cover the opening in the timing cover with a lint free cloth. Clean any old gasket remains from the sealing surfaces and clean the sealing surface on the cover.
|
|
| 20. |
Apply a 2 mm bead of
83 95 691 Flange sealant
to the cover. Remove the cloth from the timing cover and fit the cover.
Tightening torque 6 Nm (5 lbf ft) |
|
| 21. |
Clean any gasket remains from the sealing surfaces of the cylinder head. Fit a new gasket to the camshaft cover. Apply
83 95 691 Flange sealant
to the sealing surface as illustrated and fit the camshaft cover.
Tightening torque 8 Nm (6 lbf ft) 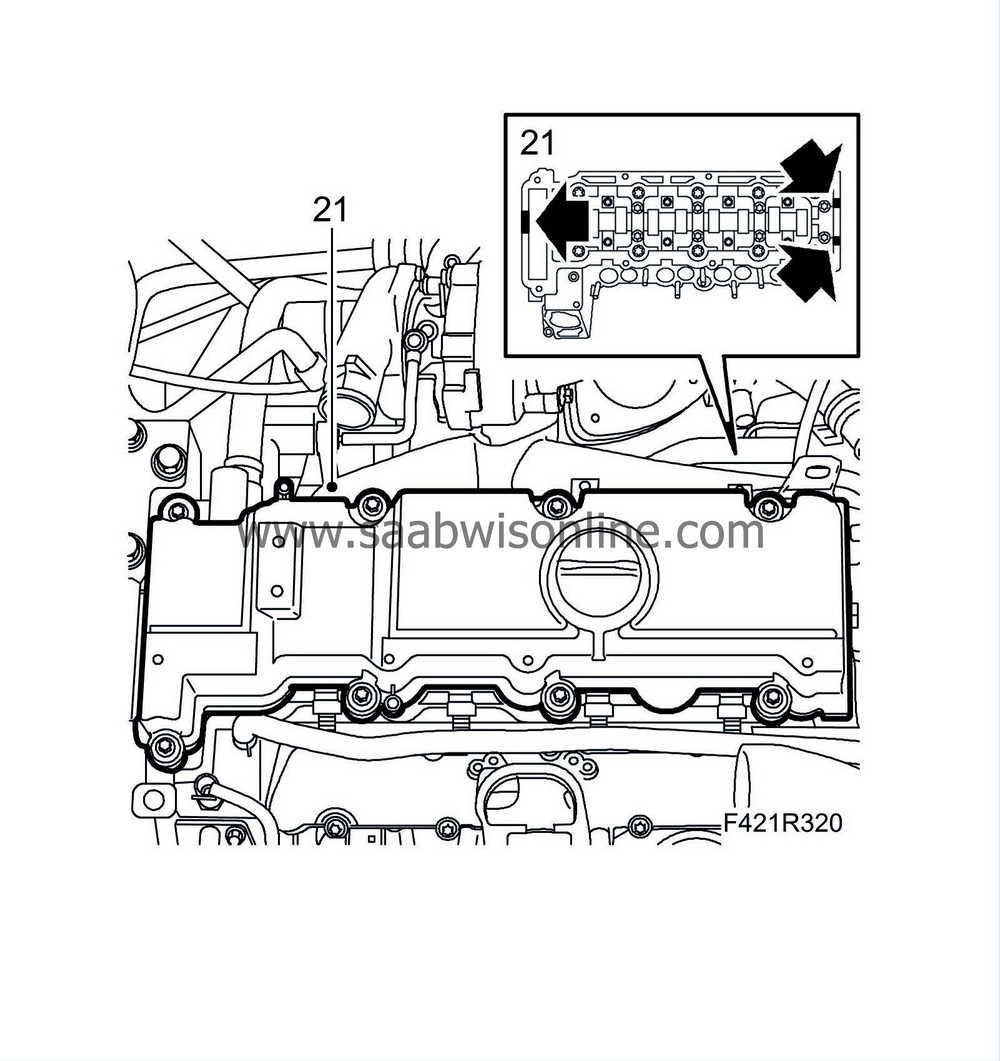
|
|
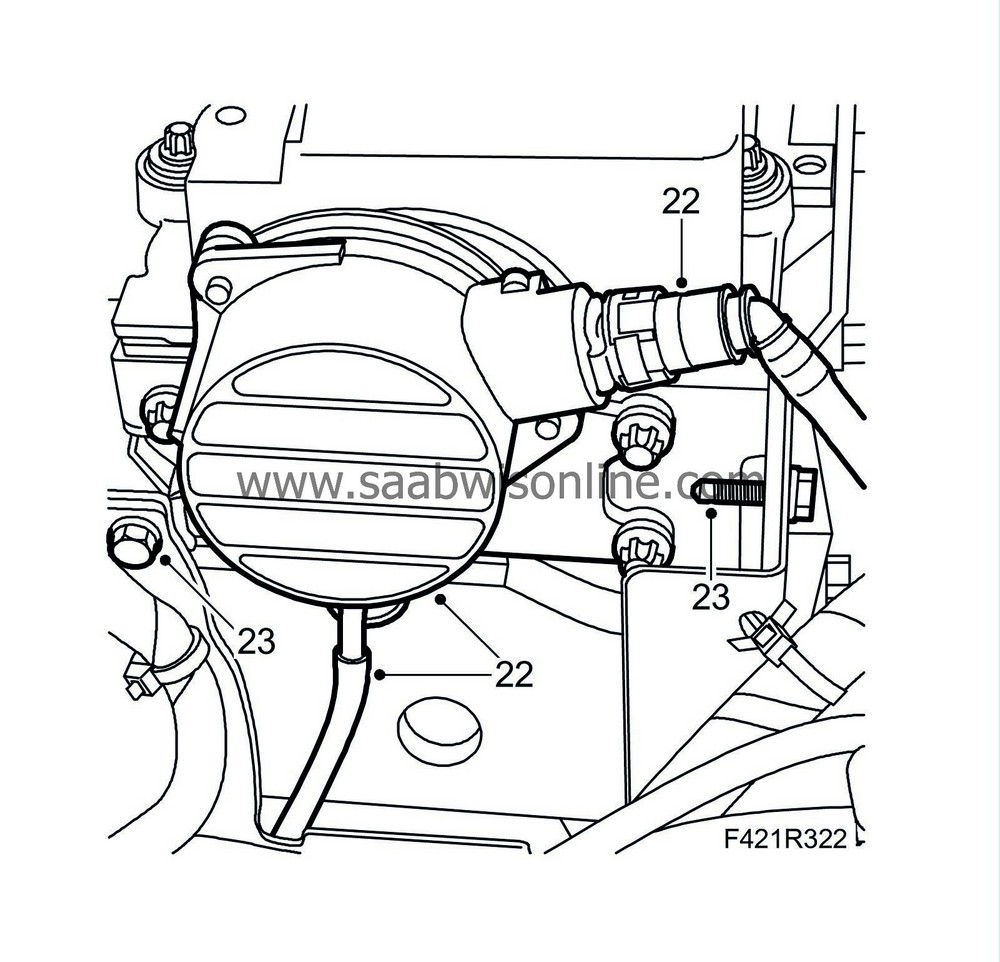
| 22. |
Position the vacuum pump. Apply
83 95 691 Flange sealant
as illustrated and fit the vacuum pump, adapter and a new gasket. Connect the hoses to the vacuum pump.
Tightening torque 8 Nm (6 lbf ft) 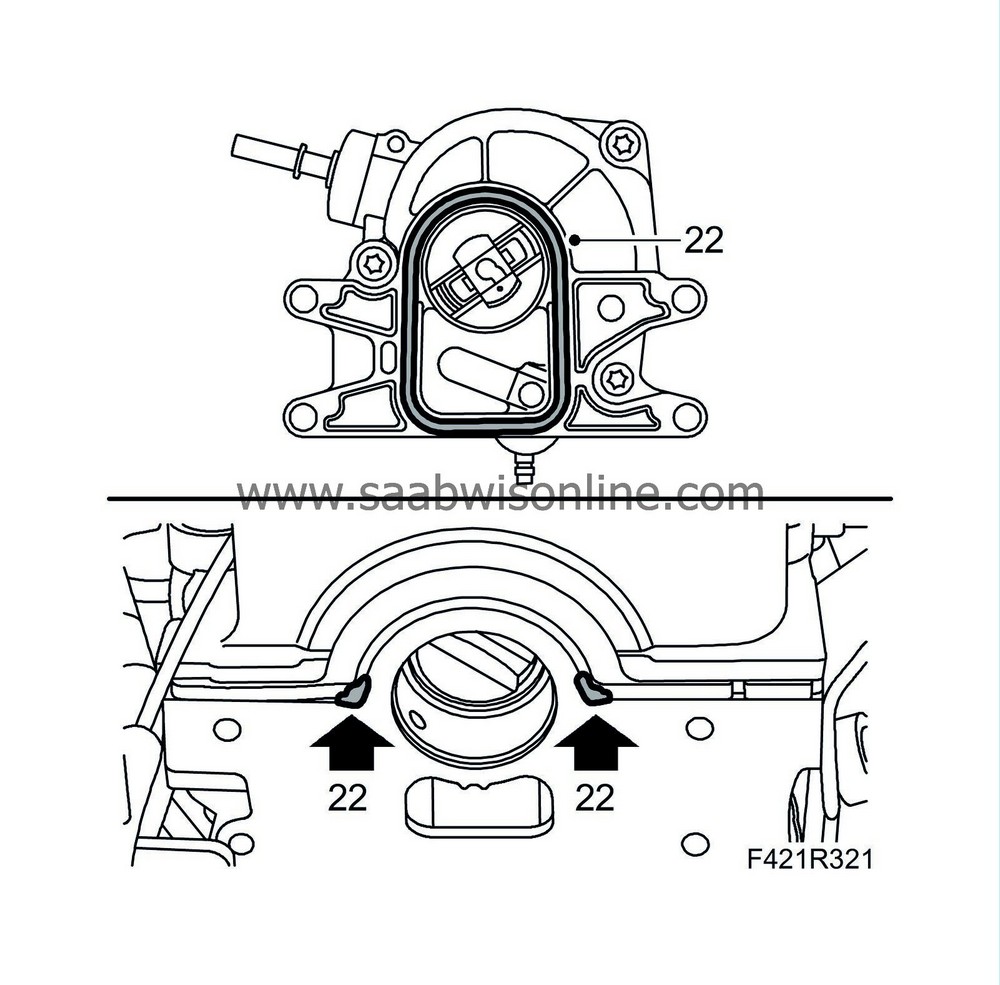
|
|
| 23. |
Fit the bolts securing the cable duct to the vacuum pump.
|
|
| 24. |
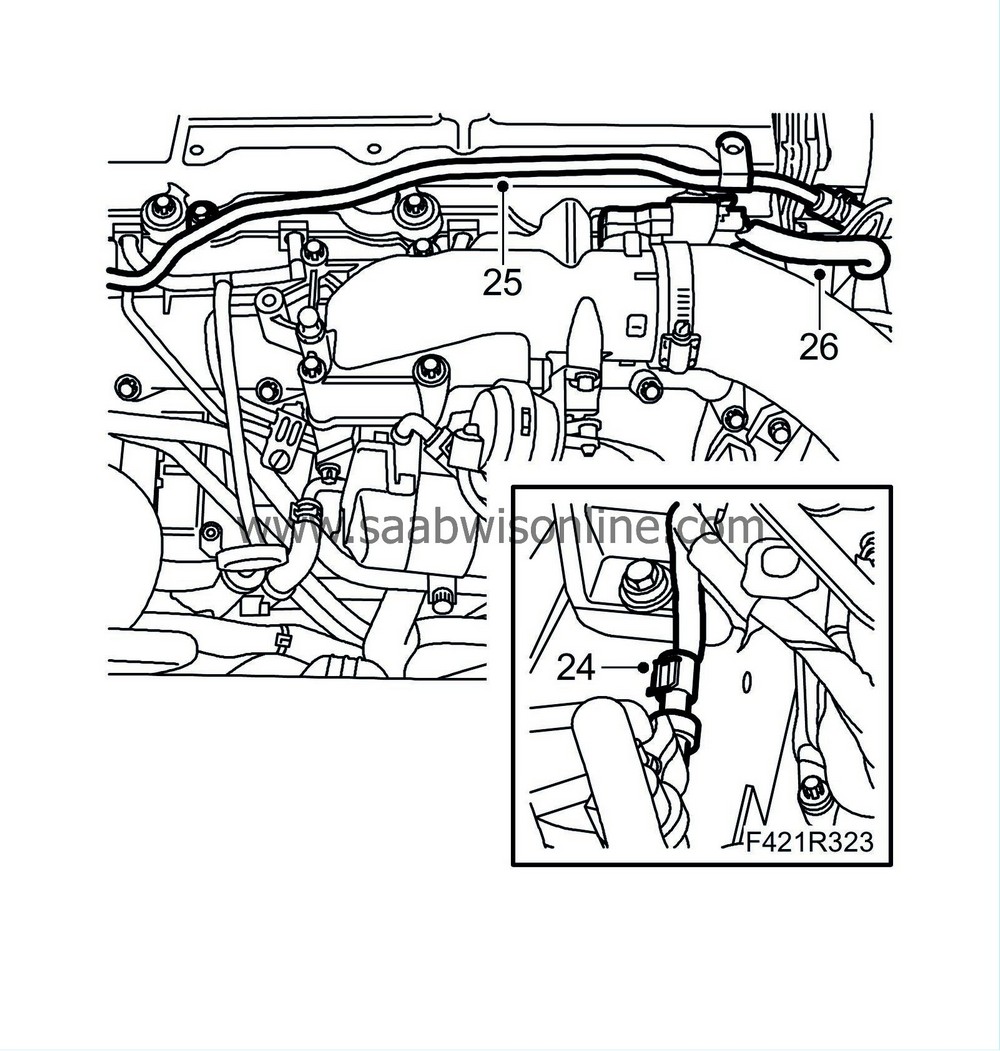
Plug in the connector to the AC pressure sensor.
|
|
| 25. |
Fit the bolt to the coolant pipe bracket on the camshaft cover.
|
|
| 26. |
Plug in the connector to the pressure/temperature sensor.
|
|
| 27. |
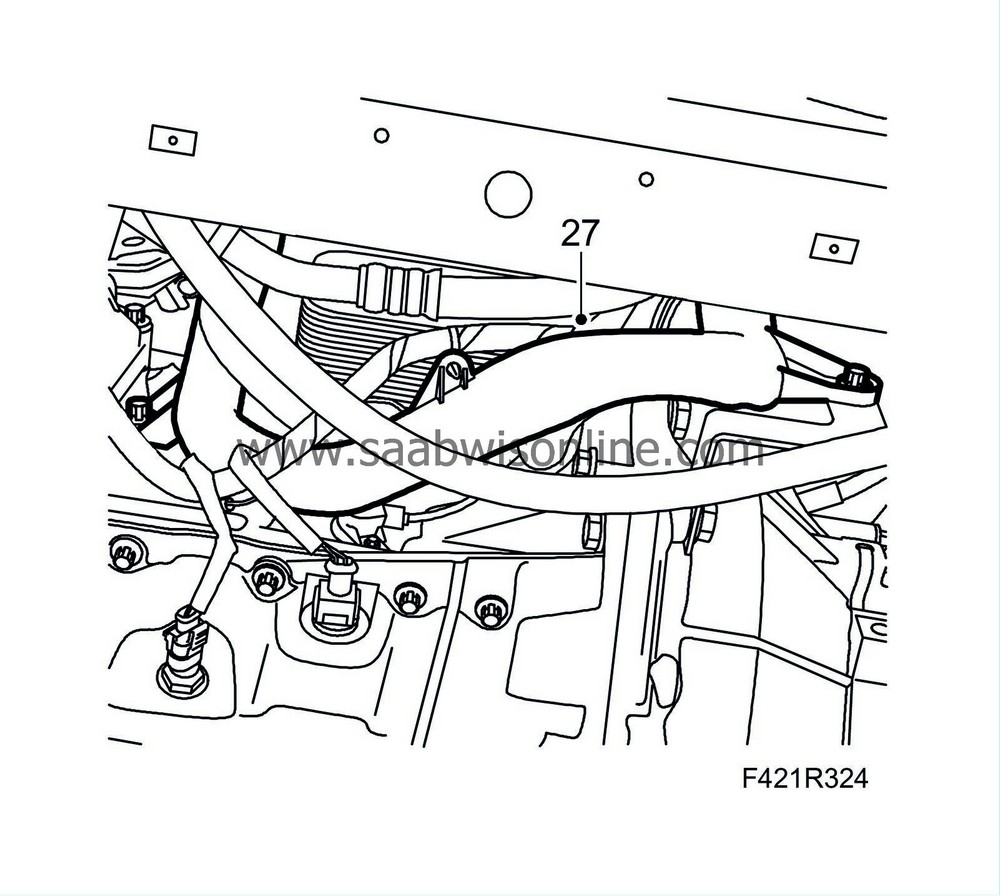
Raise the car and fit the coolant pipe mounting to the gearbox and cylinder block.
|
|
| 28. |
Fit the belt tensioner.
Tightening torque, lower screw 24 Nm (18 lbf ft) Tightening torque, upper screw 42 Nm (31 lbf ft) 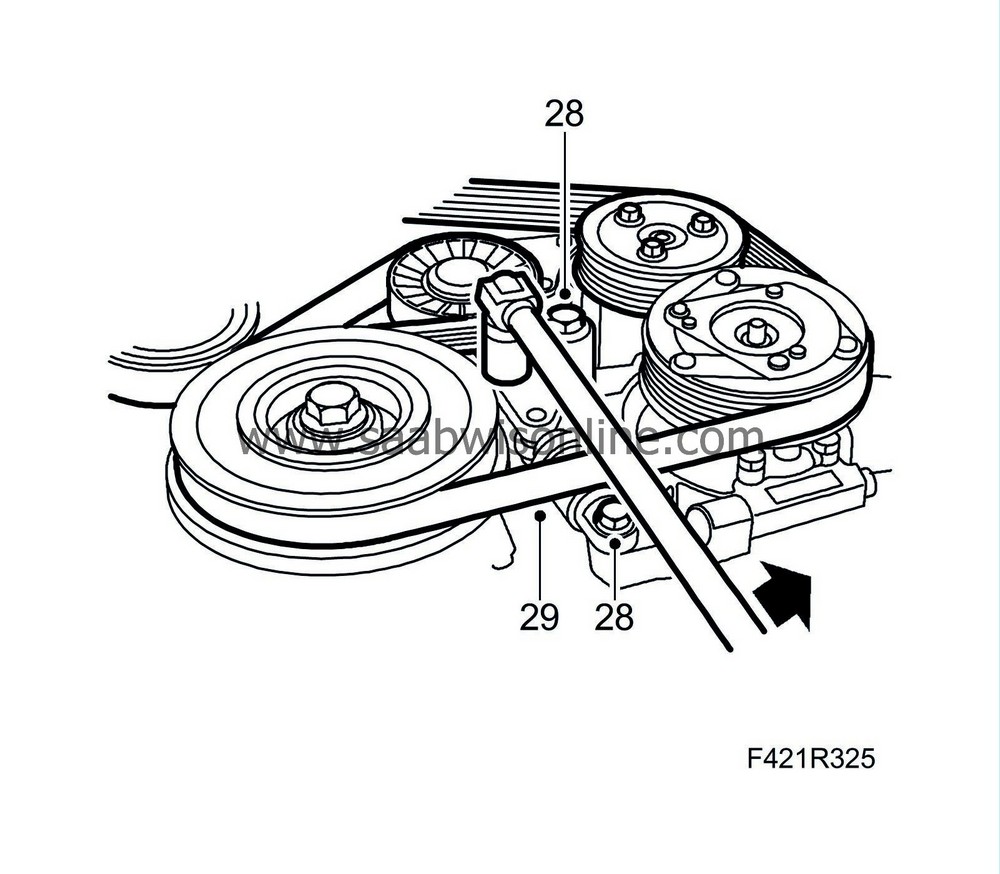
|
|
| 29. |
Release the tension of the poly-V-belt and fit it in the direction of rotation marked. Make sure it is positioned correctly over all pulleys.
|
|
| 30. |
Fit the lower engine cover.
|
|
| 31. |
Lower the car and fit the right-hand wing liner and front right wheel. See
Wheels
.
|
|
| 32. |
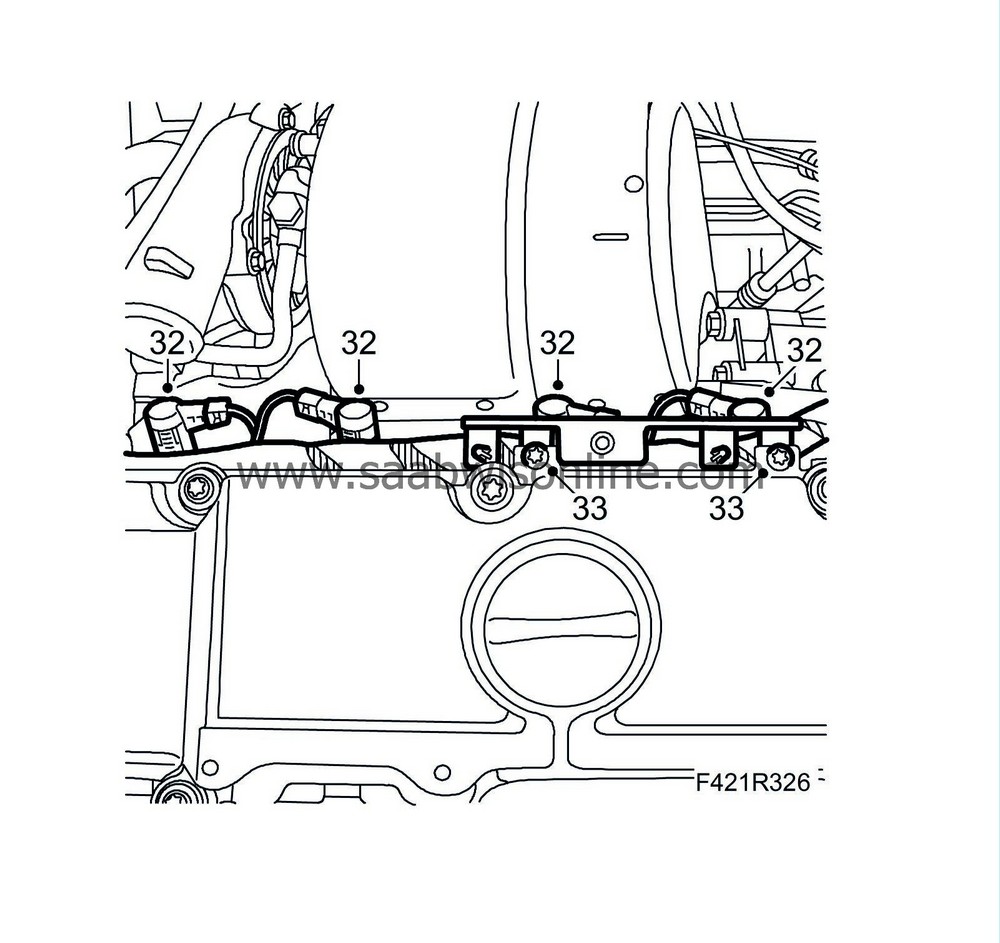
Connect the glow plug connectors.
|
|
| 33. |
Fit the rear wiring harness mounting to the camshaft cover.
|
|
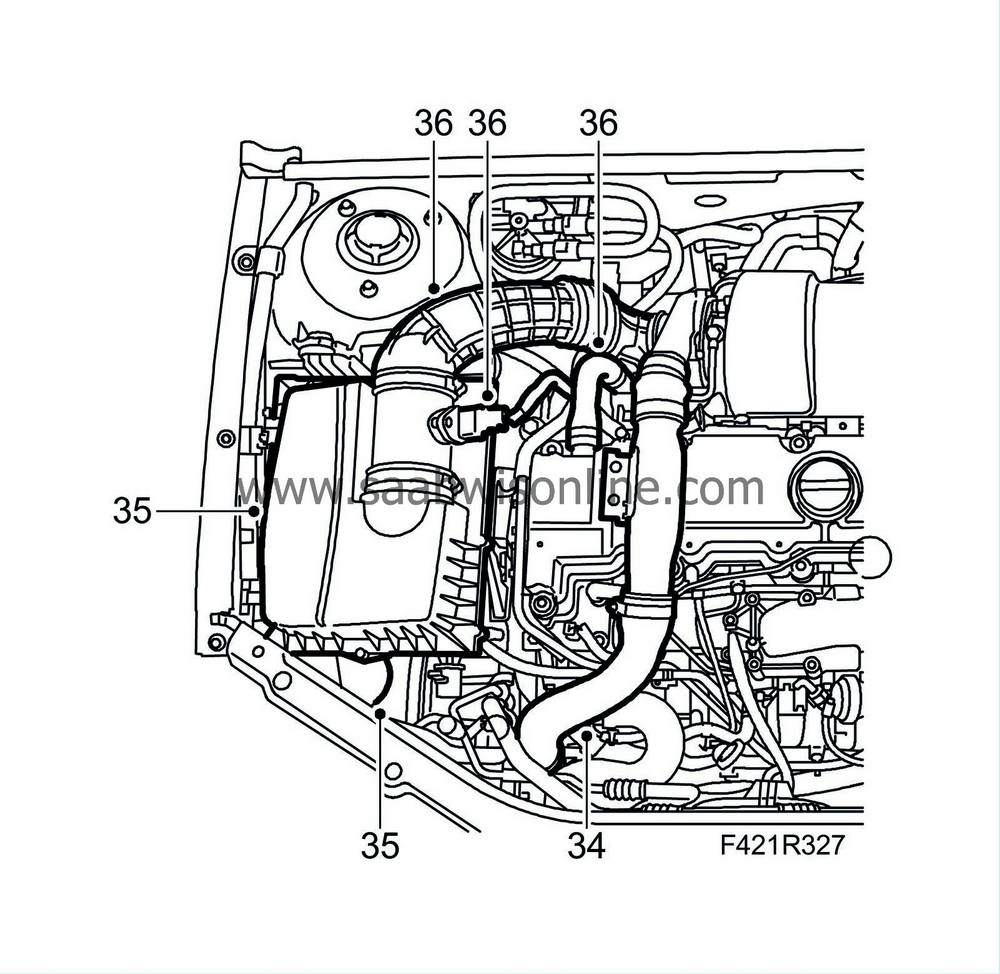
| 34. |
Fit the charge air hose and charge air pipe to the turbocharger and the charge air pipe to the fan cowling.
|
|
| 35. |
Fit the air filter housing and connect the intake hose. Fit the air filter and air filter housing lid.
|
|
| 36. |
Connect the crankcase ventilation hose and plug in the mass air flow sensor. Fit the turbocharger intake hose.
|
|
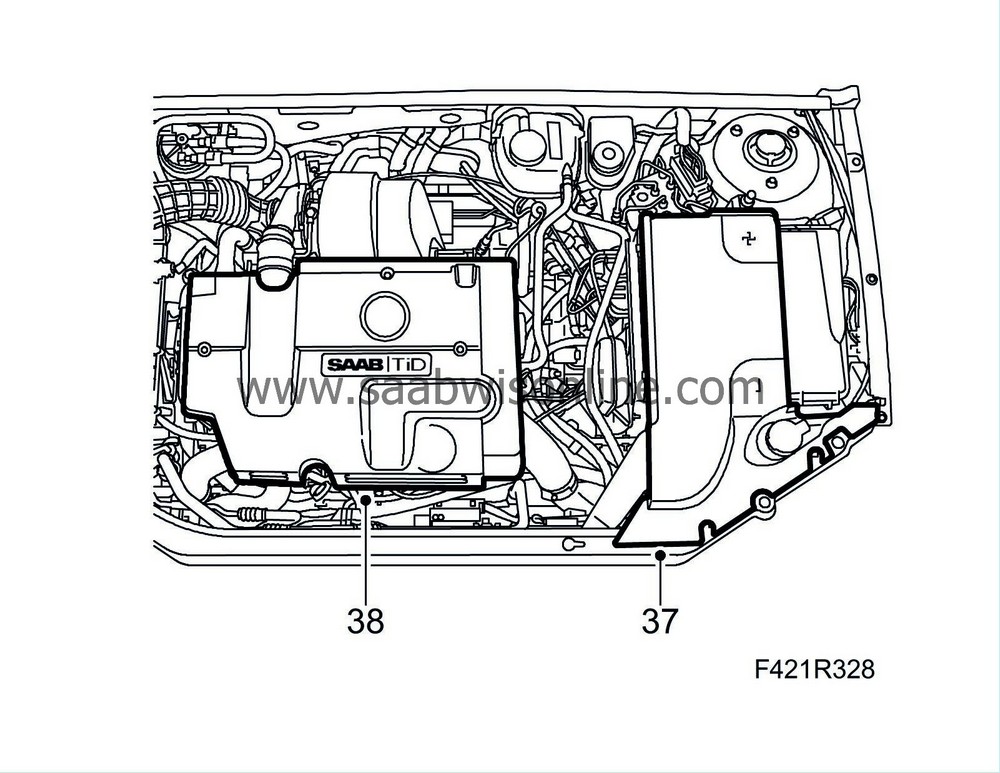
| 37. |
Connect the negative battery cable and fit the battery cover.
|
|
| 38. |
Fit the upper engine cover.
|
|
| 39. |
Remove the covers from the wings and return the electrical system to its original state. Refer to
Procedures after reconnecting the battery
.
|
|

