Tank vent valve, removing and fitting
| Tank vent valve, removing and fitting |
|
||||||||||||||||||||||
 Warning
| 1. |
Disconnect the battery.
Remove the ground cable |
|
| 2. |
Undo and pull off the cable set connector (4)
from the EVAP canister purge valve (2) 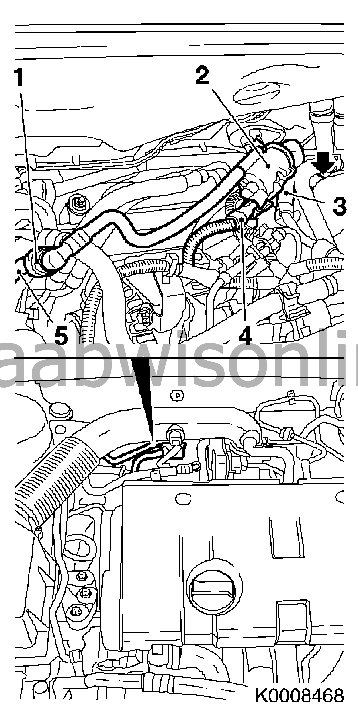
|
|
| 3. |
Undo and close the flushing air line
Detach the quick coupling (1) with 83 95 261 Fuel line tool - from the front flushing air line (5) |
|
| 4. |
Pull the flushing air line from the throttle body (arrow)
|
|
| 5. |
Remove the EVAP canister purge valve (2) from the holder (3)
Undo the catch Pull off and remove from the holder |
|
| 6. |
Remove the tank vent valve (2) from the holder (arrow)
Undo the catch Pull off and remove from the holder Warning: damage to the valve body, flushing air line or flushing air hose can cause a fire hazard due to leakage. |
|
| 7. |
Check for any damage to the valve body, flushing air line and flushing air hose
To fit |
|
| 8. |
Fit the EVAP canister purge valve (2) to the holder (3)
Fasten to the holder The catch must snap in place
|
|
| 9. |
Connect the flushing air hose to the throttle body (arrow)
- Fasten to the connection |
|
| 10. |
Connect the flushing air line
to the front flushing air line (5) Remove KM-807 Important: observe the repair directions for the fuel lines and the quick couplings - see Repair directions . Connect the quick coupling (1) |
|
| 11. |
Connect the cable set connector (4)
to the EVAP canister purge valve The catch must snap in place |
|
| 12. |
Connect the battery.
Fit the ground cable |
|
| 13. |
Program erased memories
|
|
This project is supported by memberships and donations. If you use this site, please consider Joining SCNA and/or making a donation.
Our Friends
