Control Valve Body Cover Replacement
| Control Valve Body Cover Replacement |
| Removal Procedure |
| 1. |
Remove the battery tray. Refer to
Battery Tray Replacement
.
|
|
| 2. |
Remove the front compartment front sight shield. Refer to
Front Compartment Front Sight Shield Replacement
.
|
|
| 3. |
Raise and support the vehicle. Refer to
Lifting and Jacking the Vehicle
.
|
|
| 4. |
Remove the radiator lower baffle and deflector assembly. Refer to
Radiator Air Lower Deflector Replacement
.
|
|
| 5. |
Remove the front transmission mount. Refer to
Transmission Front Mount Replacement
.
|
|
| 6. |
Drain the transmission. Refer to
Transmission Fluid Replacement
.
|
|
| 7. |
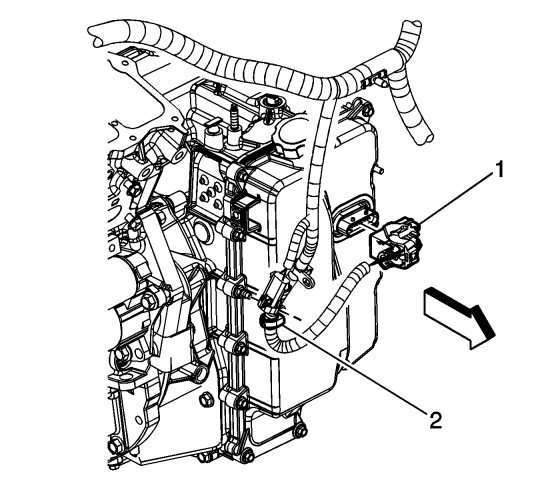
Remove the wire harness retainer (2) from the control valve body cover stud.
|
|
| 8. |
Disconnect the control valve body transmission control module (TCM) electrical connector (1).
|
|
| 9. |
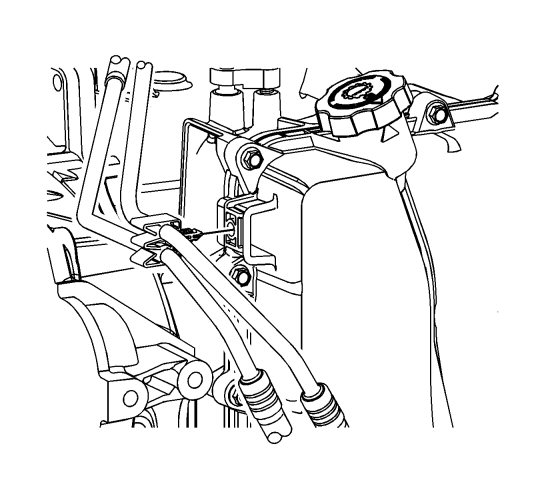
Remove the oil cooler inlet and outlet hoses from the retainer on the control valve body cover.
|
|
| 10. |
Remove the 2 control valve body cover studs M6 x 30.
|
|
| 11. |
Remove the 9 lower control valve body cover bolts M6 x 30.
|
|
| 12. |
Lower the vehicle.
|
|
| 13. |
Disconnect the transmission wire harness retainer from the bracket on top of the transmission.
|
|
| 14. |
Remove the top 3 control valve body cover bolts M6 x 30.
|
|
| 15. |
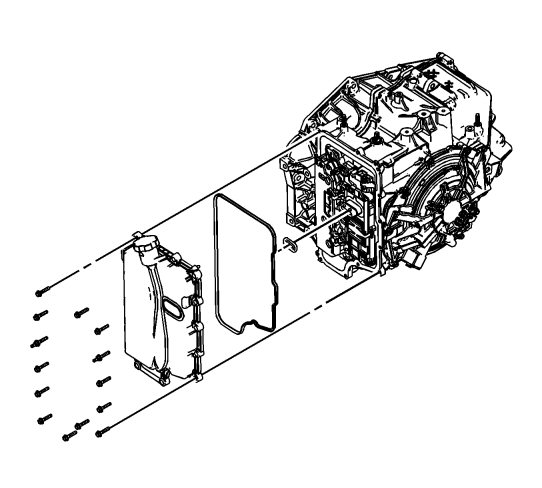
Remove the control valve body cover.
|
|
| 16. |
Remove the control valve body cover gasket.
|
|
| 17. |
Remove the control valve body cover wiring connector hole seal.
|
|
| 18. |
Remove all traces of the old gasket material. Clean the transmission case and control valve body cover gasket surfaces.
|
|
| Installation Procedure |
| 1. |
Install the control valve body cover wiring connector hole seal.
|
|
| 2. |
Install the control valve body cover gasket to the control valve body cover.
|
|
| 3. |
Install the control valve body cover.
|
|
| 4. |
Refer to
Fastener Caution
.
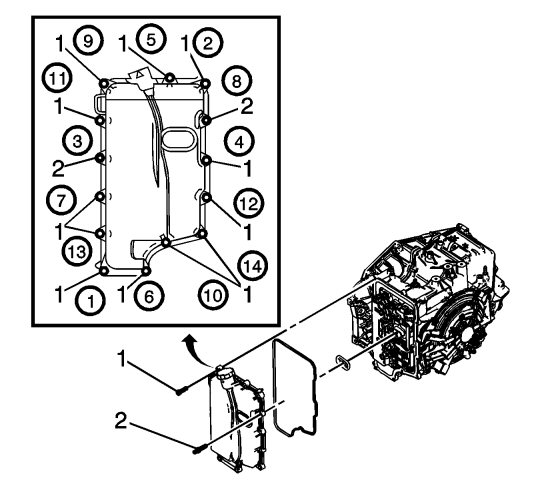
Install the top 3 control valve body cover bolts (1) M6 x 30. |
|
| 5. |
Connect the transmission wire harness retainer to the bracket on top of the transmission.
|
|
| 6. |
Raise the vehicle.
|
|
| 7. |
Install the 9 lower control valve body cover bolts (1) M6 x 30.
|
|
| 8. |
Install the 2 control valve body cover studs (2) M6 x 30.
|
|
| 9. |
Tighten the 12 bolts and 2 studs in sequence to
12 Nm (106 lb in)
.
|
|
| 10. |
Connect the control valve body TCM electrical connector (1).
|
|
| 11. |
Install the oil cooler inlet and outlet hoses to the retainer on the control valve body cover.
|
|
| 12. |
Install the wire harness retainer (2) to the control valve body cover stud.
|
|
| 13. |
Tighten the nut to
12 Nm (106 lb in)
.
|
|
| 14. |
Install the front transmission mount. Refer to
Transmission Front Mount Replacement
.
|
|
| 15. |
Install the radiator lower baffle and deflector assembly. Refer to
Radiator Air Lower Deflector Replacement
.
|
|
| 16. |
Lower the vehicle.
|
|
| 17. |
Install the battery tray. Refer to
Battery Tray Replacement
.
|
|
| 18. |
Fill the transmission. Refer to
Transmission Fluid Replacement
.
|
|
| 19. |
Install the front compartment front sight shield. Refer to
Front Compartment Front Sight Shield Replacement
.
|
|
| 20. |
Check for leaks.
|
|
This project is supported by memberships and donations. If you use this site, please consider Joining SCNA and/or making a donation.
Our Friends
