Transmission Fluid Cooler Pipe Seal Replacement
| Transmission Fluid Cooler Pipe Seal Replacement |
Special Tools
| • |
DT-41239-1A
Cooler Line Seal Installer
|
|
| • |
DT-45201
Cooler Line Seal Remover
|
|
For equivalent regional tools, refer to Special Tools .
| Removal Procedure |
| 1. |
Raise the vehicle. Refer to
Lifting and Jacking the Vehicle
.
|
|
| 2. |
Place a drain pan or suitable container under the vehicle. |
|||||||||
 Warning
| 3. |
Remove the transaxle oil cooler line assembly nut from the transaxle.

|
|
| 4. |
Disconnect the transaxle oil cooler lines from the vehicle.
|
|
| 5. |
Insert the collet piece (2) of the DT-45201 Cooler Line Seal Remover into the cooler line seal. 
|
|||||||
| 6. |
Insert the forcing screw piece (1) of the
DT-45201
Cooler Line Seal Remover into the collet (2).
|
|
| 7. |
Tighten the forcing screw (1) until snug.
|
|
| 8. |
Thread the collar piece (1) of the
DT-45201
Cooler Line Seal Remover onto the collet (3) until snug.

|
|
| 9. |
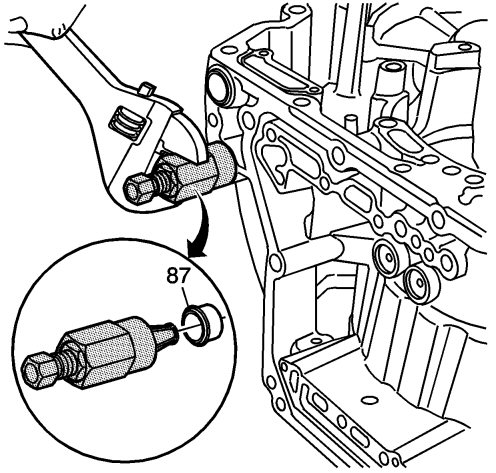
Turn the collar clockwise in order to remove the cooler line seal (87).
|
|
| 10. |
Discard the seal (87).
|
|
| 11. |
Clean the case bores for the cooler line seals.
|
|
| Installation Procedure |
| 1. |
Insert a new transaxle cooler line seal into the case bore.
|
|
| 2. |
Remove the nub from the
DT-41239-1A
Cooler Line Seal Installer.

|
|
| 3. |
Install the nub of the
DT-41239-1A
Cooler Line Seal Installer on the transaxle cooler line seal.

|
|
| 4. |
Tap the new transaxle cooler line seal into the case bore.
|
|
| 5. |
Install the transaxle oil cooler line assembly to the transaxle.
|
|
| 6. |
Refer to
Fastener Caution
.
Install the transaxle oil cooler line assembly nut and tighten to 9 Nm (80 lb in) . |
|
| 7. |
Lower the vehicle.
|
|
| 8. |
Add fluid to the transaxle. Refer to Adhesives, Fluids, Lubricants, and Sealers |
|||||||
| 9. |
Start the engine and check for leaks.
|
|
This project is supported by memberships and donations. If you use this site, please consider Joining SCNA and/or making a donation.
Our Friends
