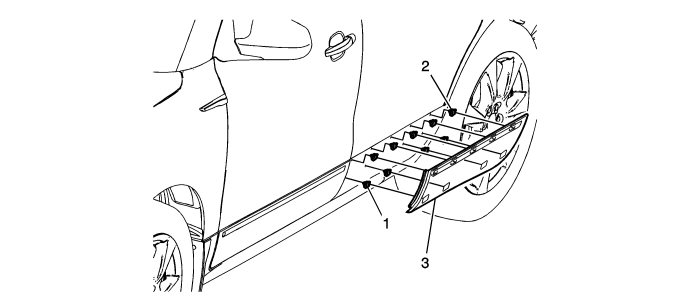
Rear Side Door Lower Center Molding Replacement
|
|
Rear Side Door Lower Center Molding Replacement
|
|
Callout
|
Component Name
|
Preliminary Procedures
Open the door in order to access the lower rear door molding retainer clips first.
|
|
1
|
Rear Side Door Center Lower Molding Lower Retainer Clip (Qty: 4)
Procedure
|
1.
|
Using a trim-type release tool, release the lower retainer clips from the lower edge of the door.
|
|
2.
|
Working upwards on the molding, release the adhesive tape from the lower door and molding using a plastic flat-bladed tool.
|
|
3.
|
Using a trim-type release tool, release the upper retainer clips from the lower edge of the door.
|
|
4.
|
Clean the adhesive tape residue from the door using a 50 / 50 mixture by volume of clean drinkable water and isopropyl alcohol.
|
|
5.
|
Ensure the area of the lower door is clean and dry prior to installing the new rear side door lower molding.
|
|
|
2
|
Rear Side Door Center Lower Molding Upper Retainer Clip (Qty: 5)
|
|
3
|
Rear Side Door Center Lower Molding
|


