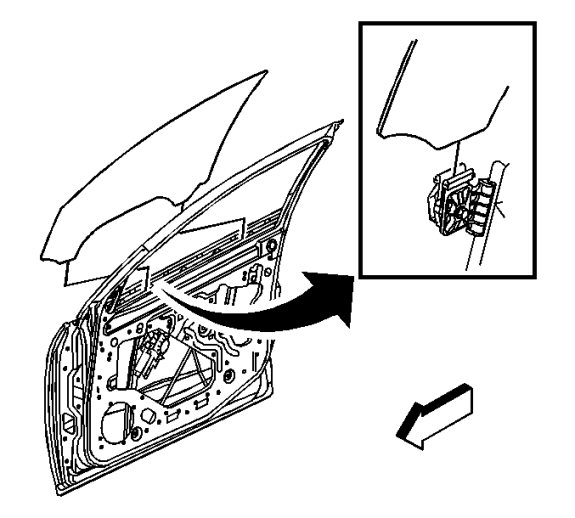
Front Side Door Window Replacement
| Front Side Door Window Replacement |
| Removal Procedure |
| 1. |
Run the window to the fully closed position.
|
|
| 2. |
Refer to
Glass and Sheet Metal Handling Warning
.
Refer to Express Window Down Warning . Remove the front side door trim panel. Refer to Front Side Door Trim Replacement . |
|
| 3. |
Remove the front side door garnish molding. Refer to
Front Side Door Window Garnish Molding Replacement
.
|
|
| 4. |
Remove the water deflector.
|
|
| 5. |
Remove the front side window inner sealing strip. Refer to
Front Side Door Window Inner Sealing Strip Replacement
.
|
|
| 6. |
Tape the window in the closed position.
|
|
| 7. |
Loosen the window regulator guide nuts 4 revolutions.
|
|
| 8. |
Connect the door trim panel electrical connector.
|
|
| 9. |
Using the power window switch, lower the window regulator to separate the window from the regulator guides.
|
|
| 10. |
Remove the tape.
|
|
| 11. |
Remove the window by tilting the window forward then pulling the window up and out of the door.

|
|
| Installation Procedure |
| 1. |
Install the window down into the door. 
|
|||||||
| 2. |
Position the window into the 2 window regulator guides.
|
|
| 3. |
Start the vehicle. |
|||||||
| 4. |
Refer to
Fastener Caution
.
Using the power window switch, raise the window to the fully closed position. Tighten the window regulator guide nuts to 11 Nm (98 lb in) . |
|
| 5. |
Install the front side window inner sealing strip. Refer to
Front Side Door Window Inner Sealing Strip Replacement
.
|
|
| 6. |
Inspect the window for proper operation and a tight seal.
|
|
| 7. |
Shut off the vehicle.
|
|
| 8. |
Install the water deflector.
|
|
| 9. |
Install the front side door garnish molding. Refer to
Front Side Door Window Garnish Molding Replacement
.
|
|
| 10. |
Install the front side door trim panel. Refer to
Front Side Door Trim Replacement
.
|
|


