Oil pump, to change (in car)
|
|
Oil pump, to change (in car)
|
|
1.
|
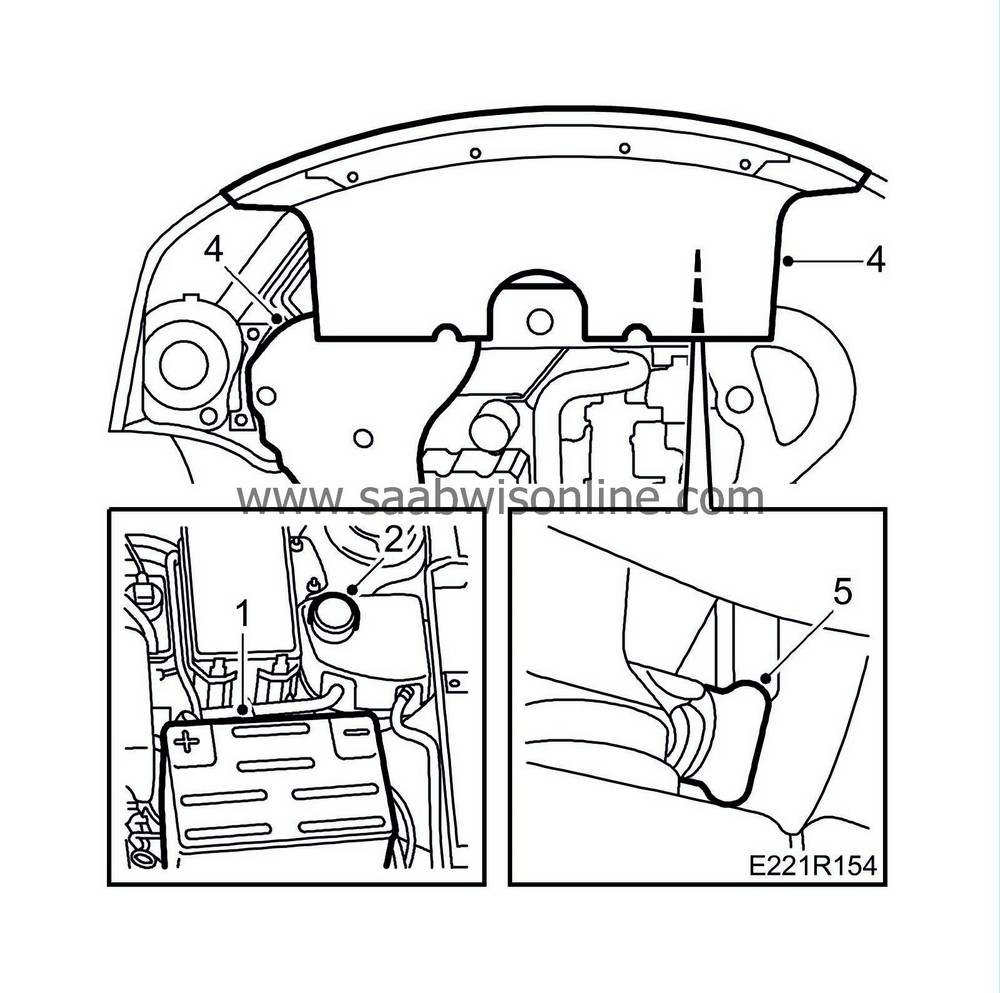
Drape wing protectors over the wings and remove the engine cover. Disconnect the negative cable from the battery.
|
|
2.
|
Open the cap on the expansion tank and release the pressure.
|
|
3.
|
Raise the car and remove the right-hand front wheel.
|
|
4.
|
Remove the lower spoiler sections.
|
|
5.
|
Drain the coolant from the radiator.
|
|
7.
|
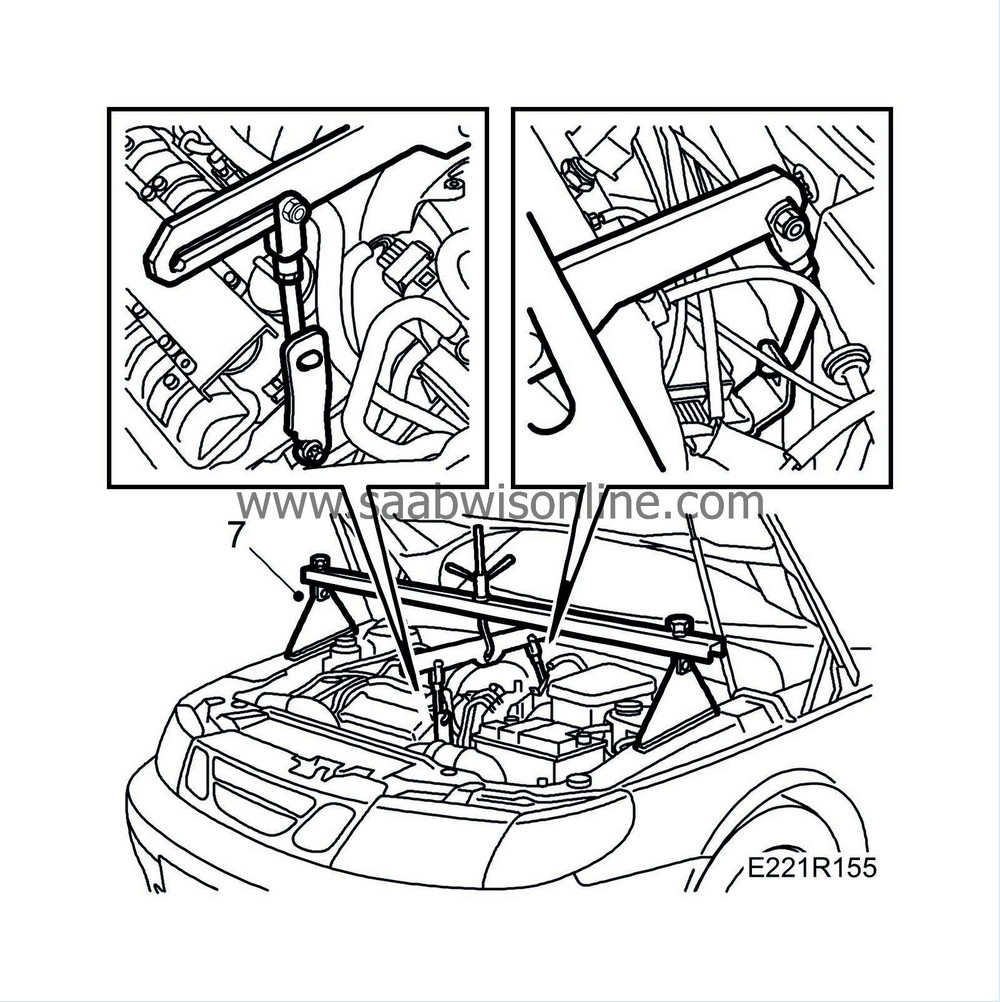
Fit a lifting eye on the front cylinder head. Use lifting beam 83 94 850 and suspend the engine from the lifting eye.
|
|
8.
|
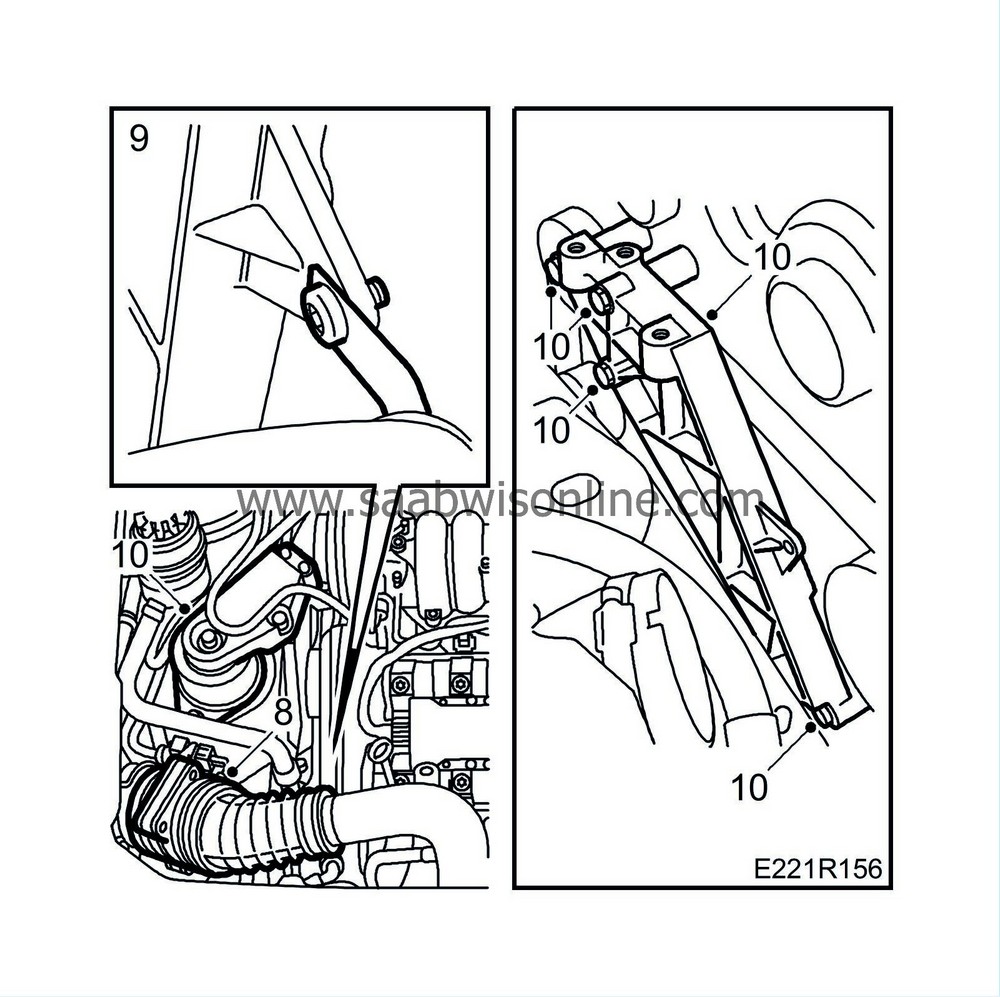
Remove the mass air flow sensor with hose.
|
|
9.
|
Detach the power steering hose from the holder.
|
|
10.
|
Remove the right-hand engine attachment with bracket and engine mount.
|
|
11.
|
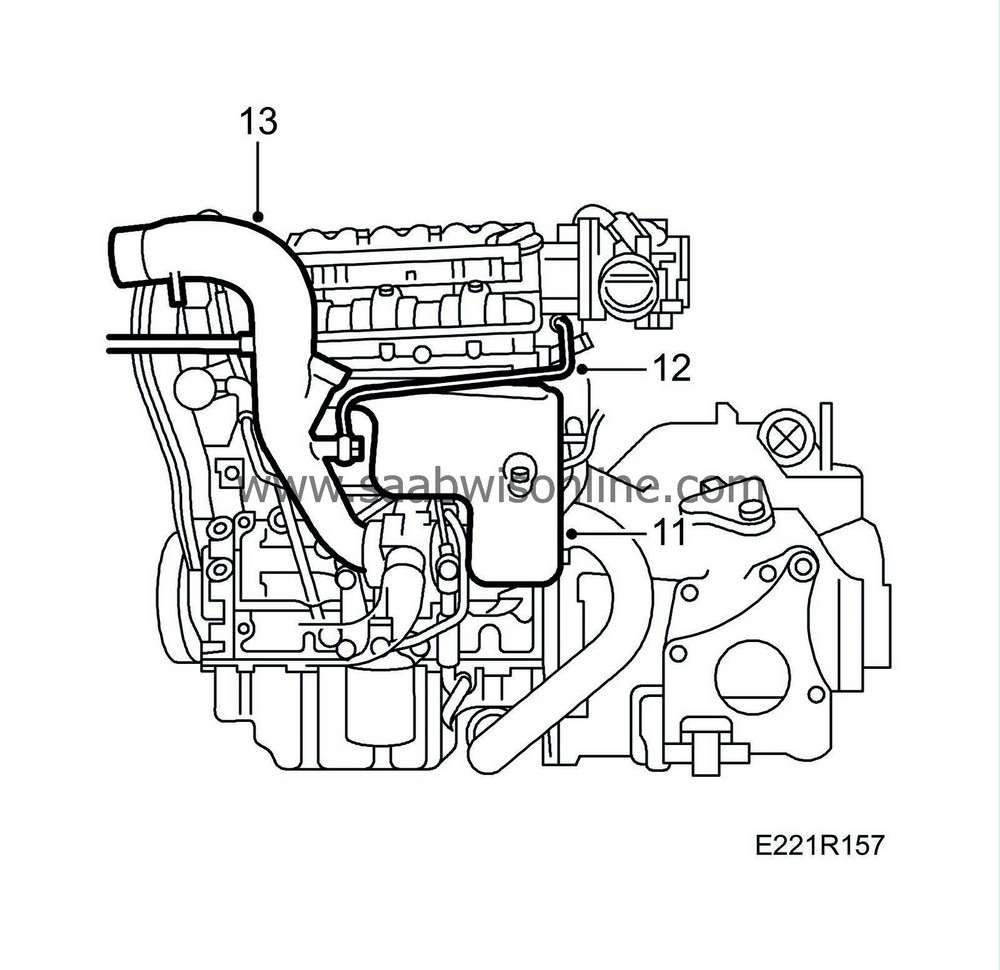
Remove the front exhaust manifold's heat shield.
|
|
12.
|
Detach the crankcase breather pipe from the turbo intake pipe. Note the gasket. Move the pipe aside.
|
|
13.
|
Remove the turbo intake pipe. Also detach the hose connected to the venting valve.
|
|
14.
|
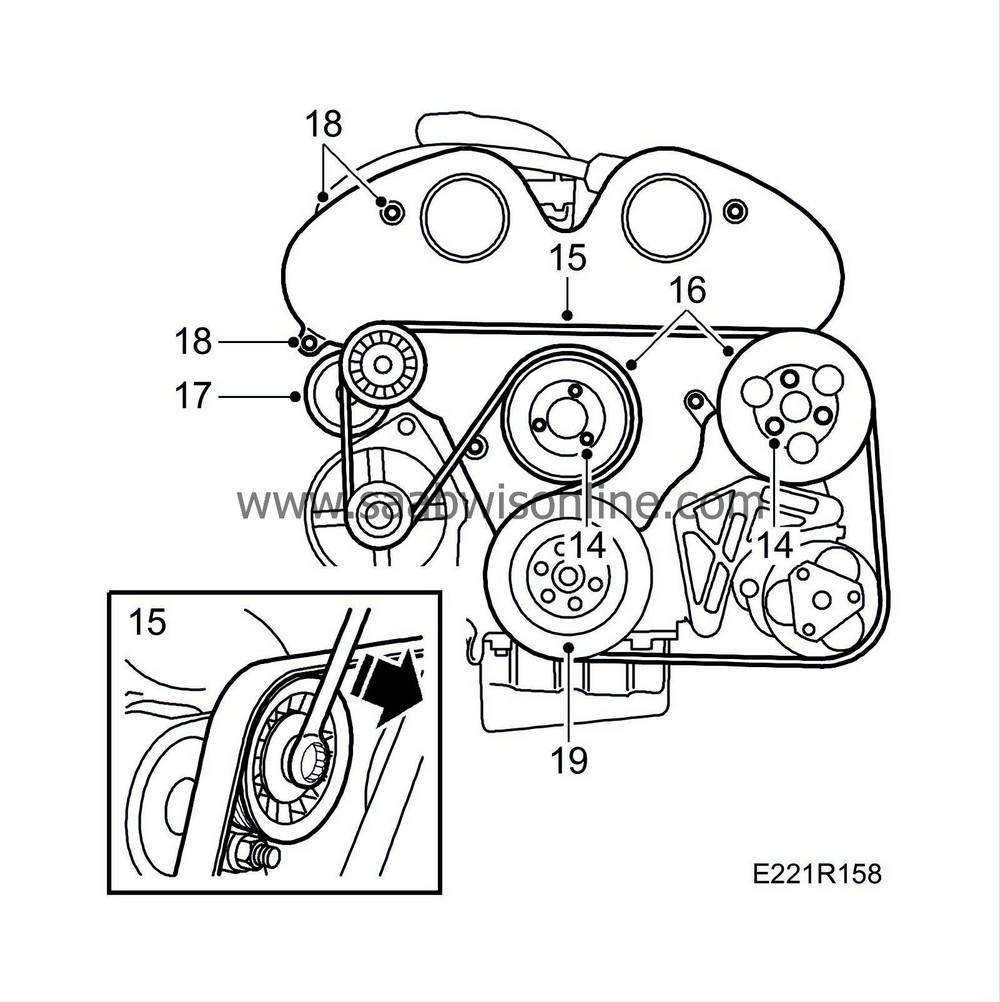
Undo the retaining bolts from the coolant pump pulley and power steering pump pulley
|
|
15.
|
Release the multigroove belt from tension.
|
|
16.
|
Remove the coolant pump pulley and power steering pump pulley.
|
|
17.
|
Remove the belt tensioner and generator air intake.
|
|
18.
|
Remove the timing cover.
|
|
19.
|
Remove the crankshaft pulley.
|
|
20.
|
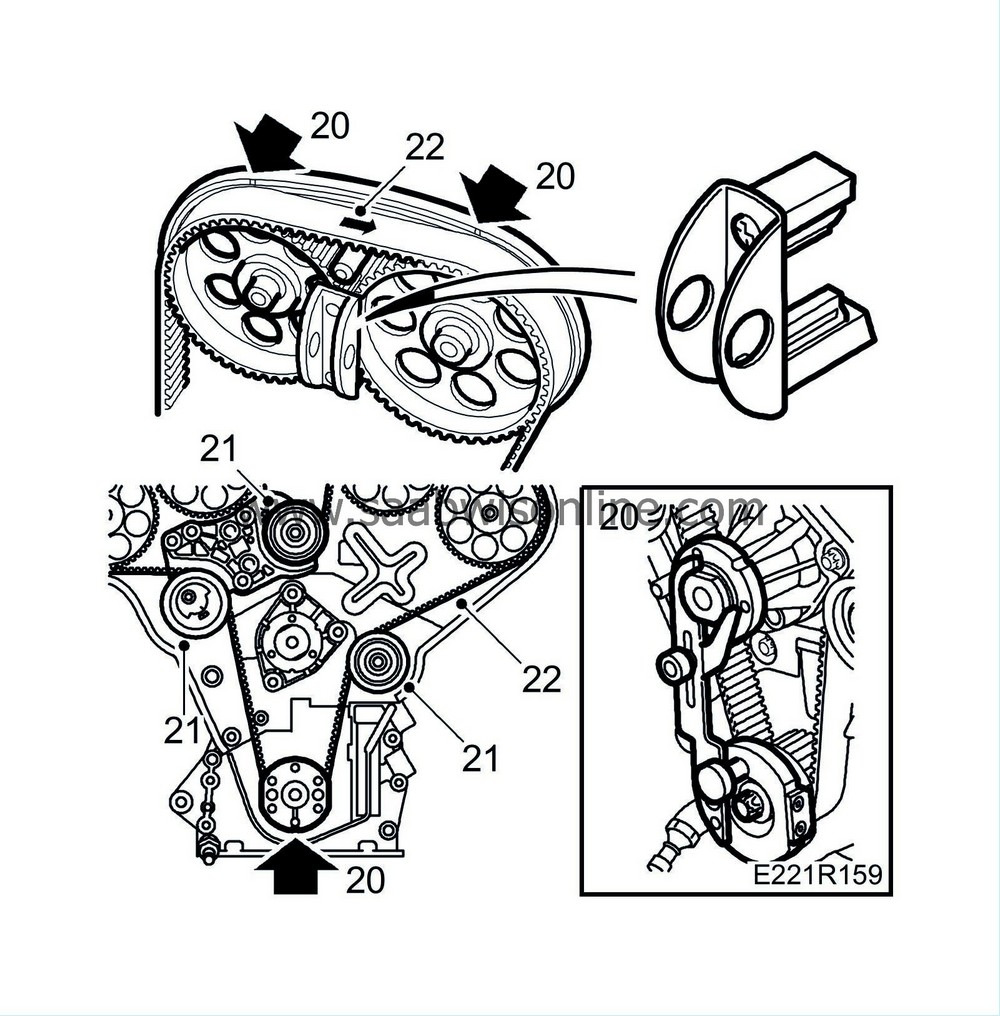
Zero the engine. The markings on the camshaft sprockets and timing cover should be in alignment as also should the marking on the crankshaft. Fit locking tools KM-800-1 and KM-800-2 for the camshaft sprockets and KM-800-10 for the crankshaft.
|
|
21.
|
Remove the tensioning roller and the adjuster rollers.
|
|
22.
|
Mark the belt's direction of rotation. To facilitate refitting, the belt can be marked at both the camshaft marking and the crankshaft marking. Remove the internally toothed timing belt.
|
|
23.
|
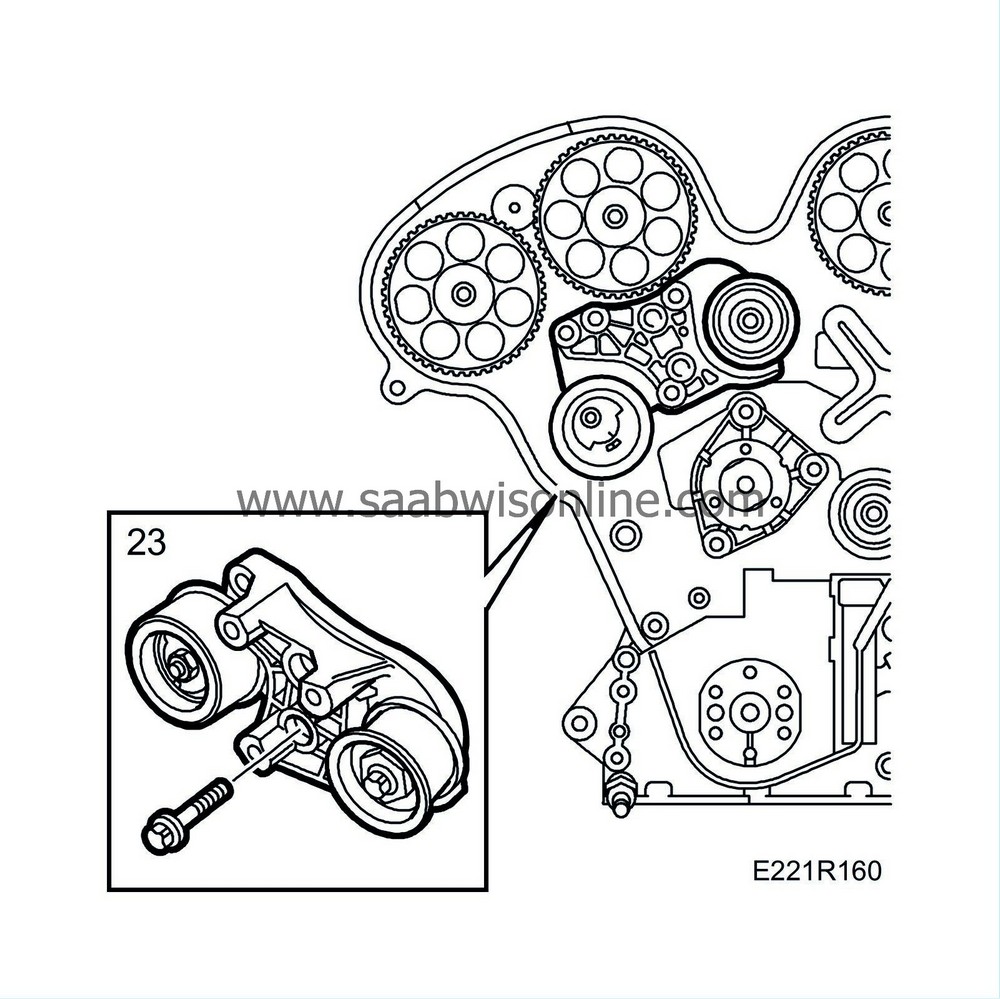
Remove the bracket with the upper adjuster roller and tensioning roller. Also remove the lower adjuster roller.
|
|
24.
|
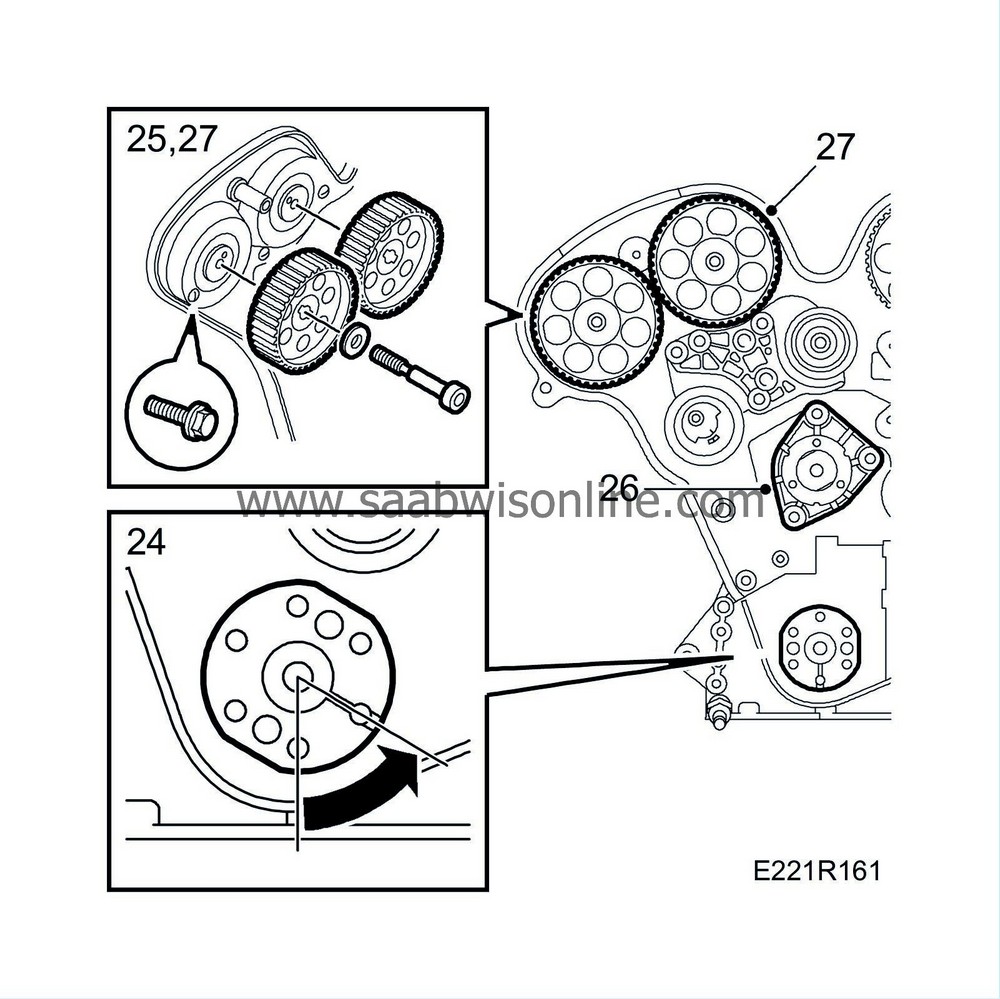
Turn the crankshaft to 60° BTDC. Note the marking.
|
|
25.
|
Lock the camshaft sprockets with locking tools KM-800-1 and KM-800-2 and remove the sprockets.
|
|
26.
|
Remove the coolant pump.
|
|
27.
|
Remove the inner timing cover.
|
|
28.
|
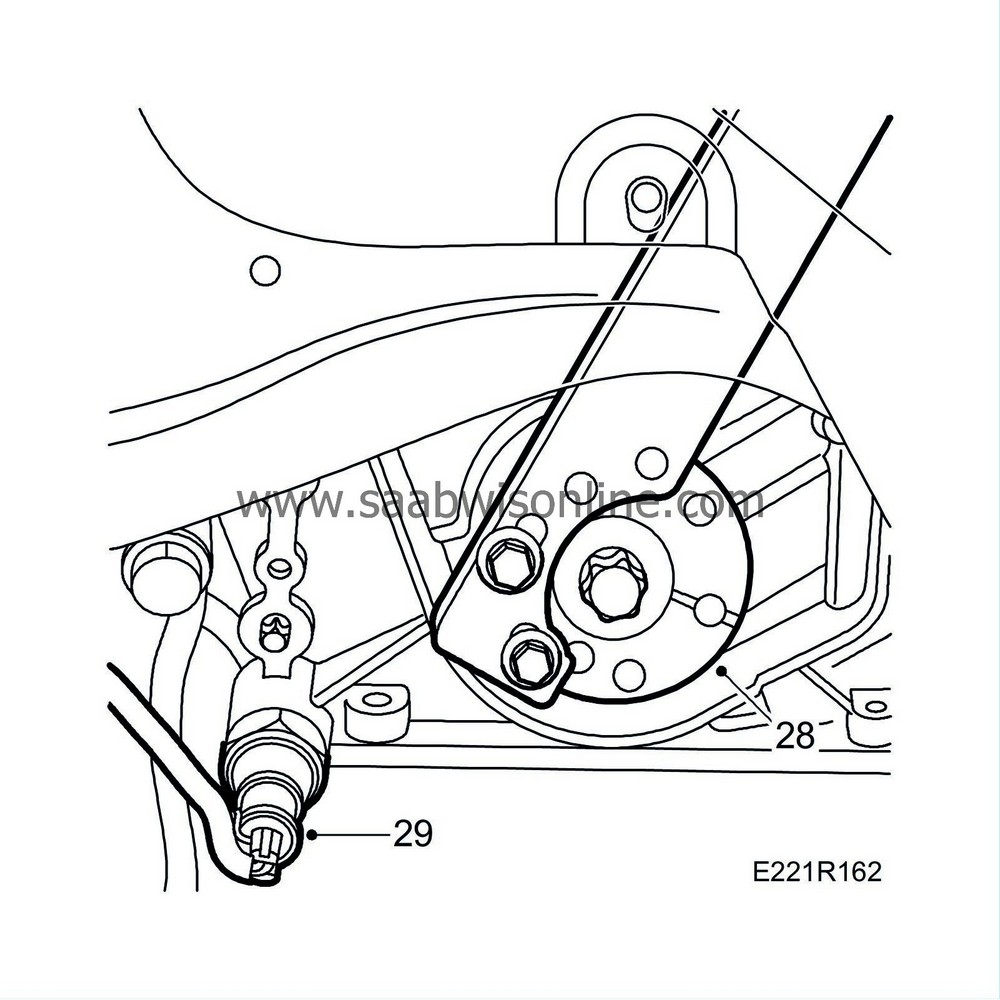
Fit counterstay 83 95 063 and remove the crankshaft's timing belt pulley.
|
|
29.
|
Disconnect the lead for the oil pressure switch.
|
|
30.
|
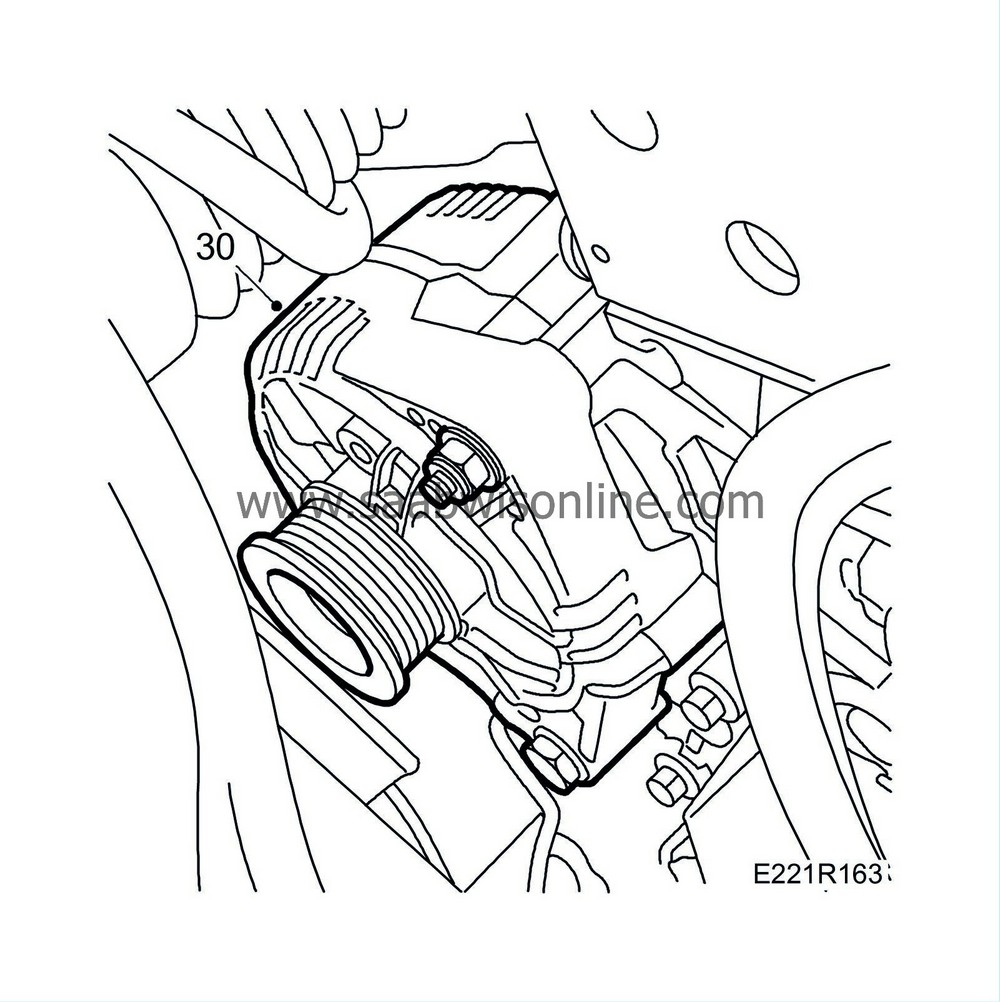
Remove the generator.
|
|
32.
|
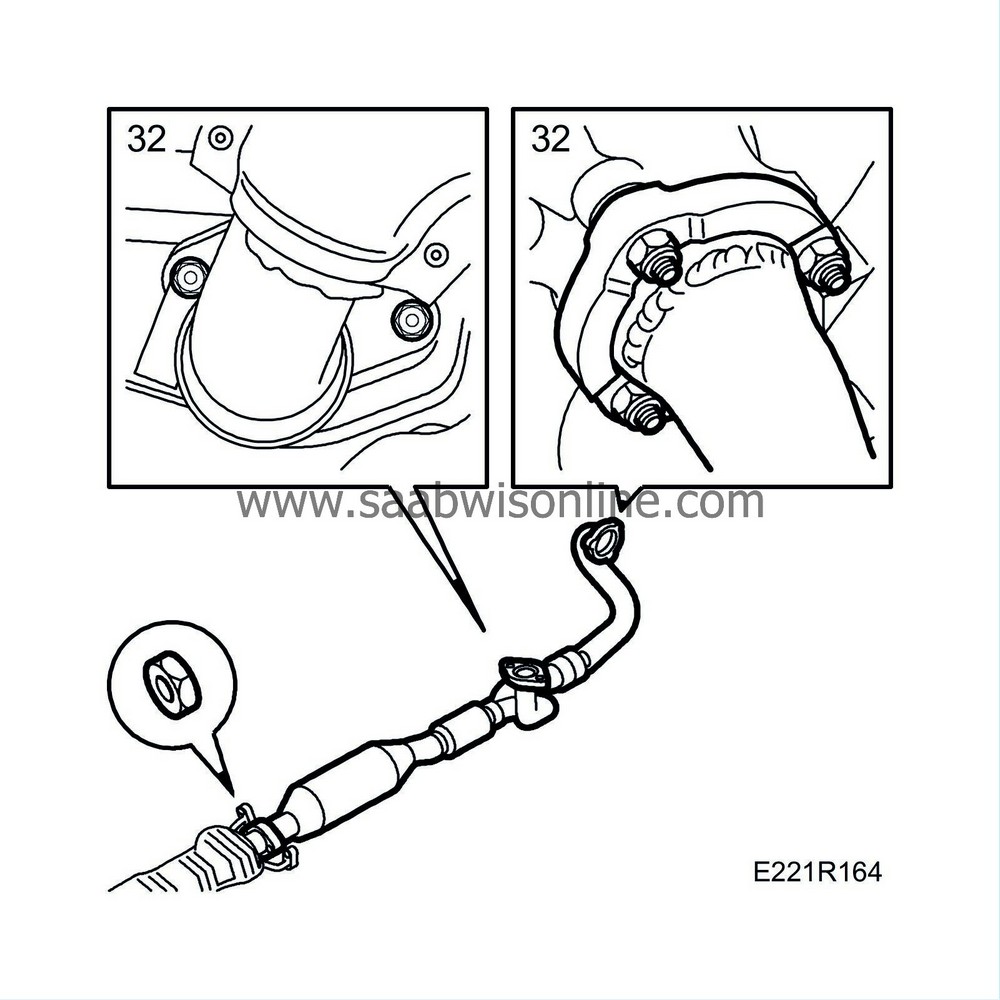
Remove the front exhaust pipe.
|
|
33.
|
Drain the engine oil.
|
|
34.
|
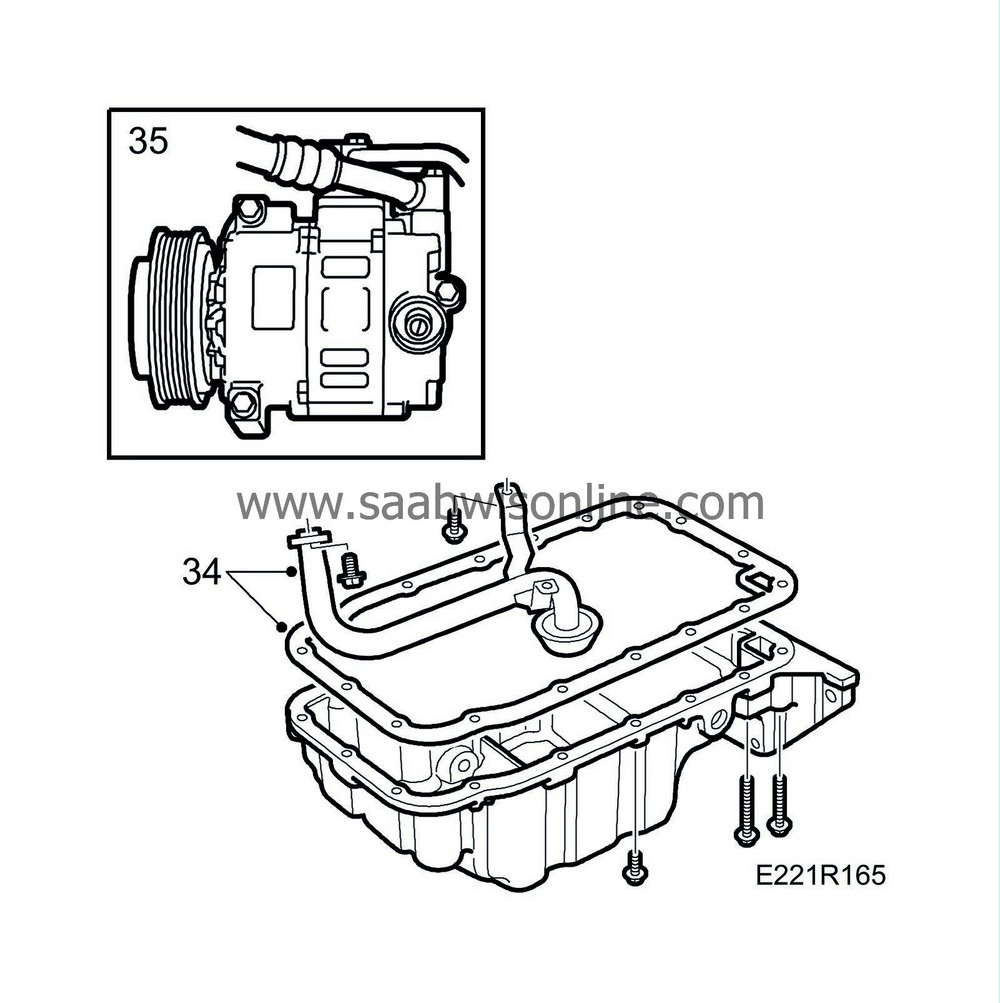
Remove the oil sump and oil strainer.
|
|
35.
|
Undo the A/C compressor and bracket. Move aside.
|
|
37.
|
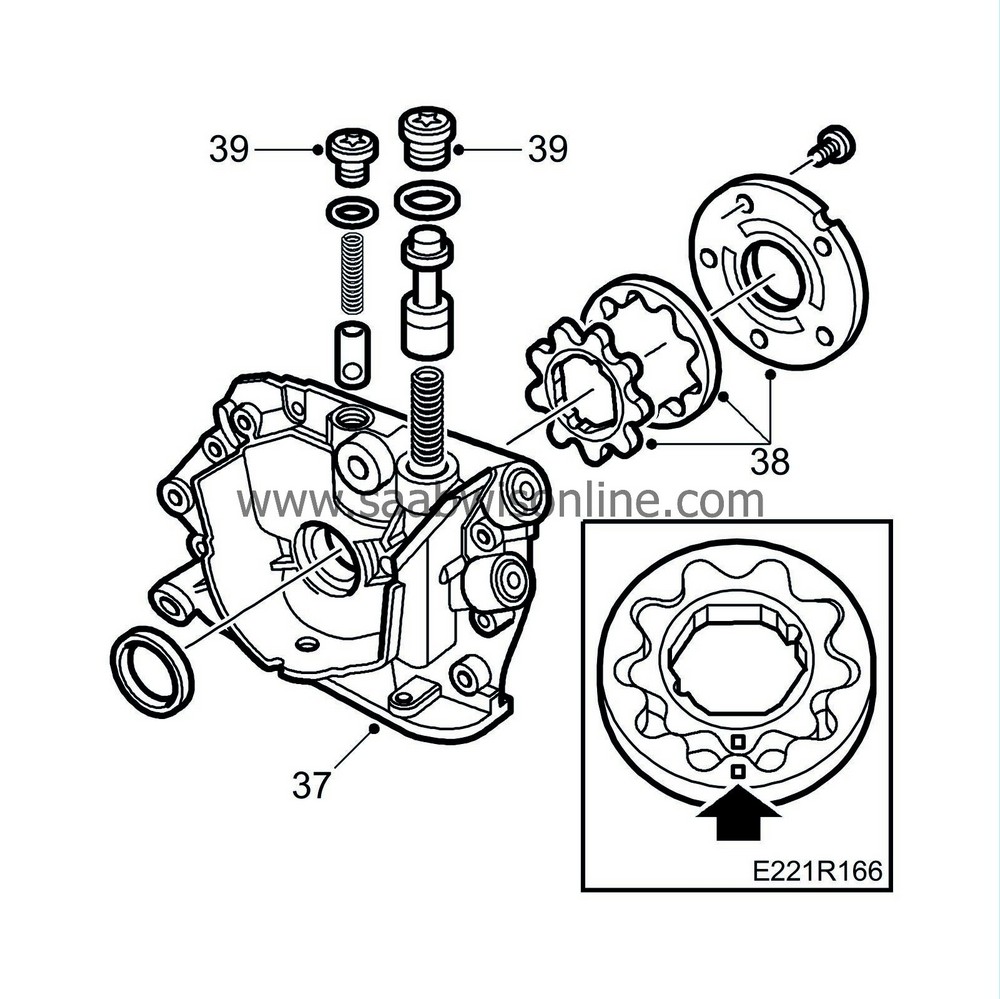
Remove the oil pump housing.
|
|
38.
|
Remove the cover and take out the two pump wheels (impellers).
|
|
39.
|
If necessary, check the oil pressure release valve and oil pressure control valve.
|
|
1.
|
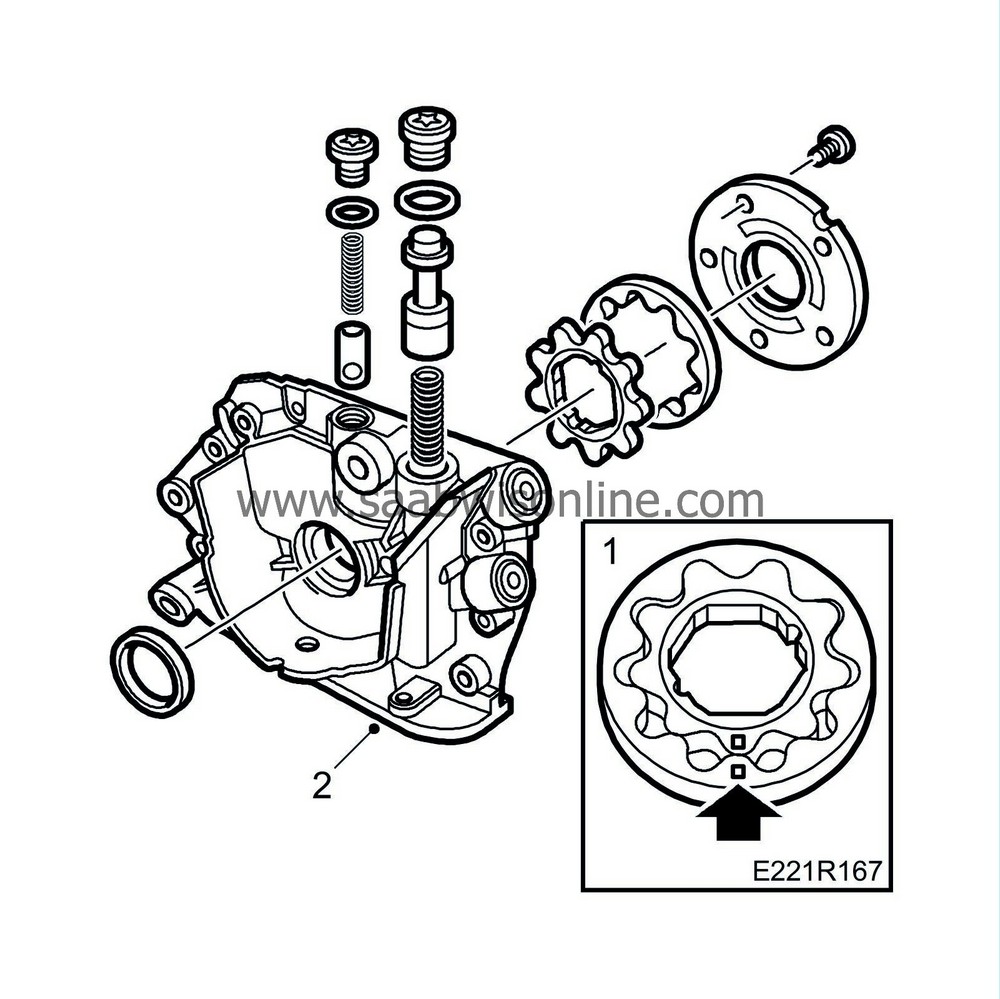
Position the pump wheels (impellers) in the housing and fit the cover. Apply part No. (10) 74 96 268 to the bolts.
Tightening torque: 6 Nm (4.5 lbf ft).
|
Important
|
|
The marks on the pump wheels (impellers) should face outwards when fitting.
|
|
|
|
|
2.
|
Fit a new gasket. Coat it with part No. (10) 93 21 795 and fit the pump housing.
Tightening torque: 6 Nm (4.5 lbf ft).
|
|
3.
|
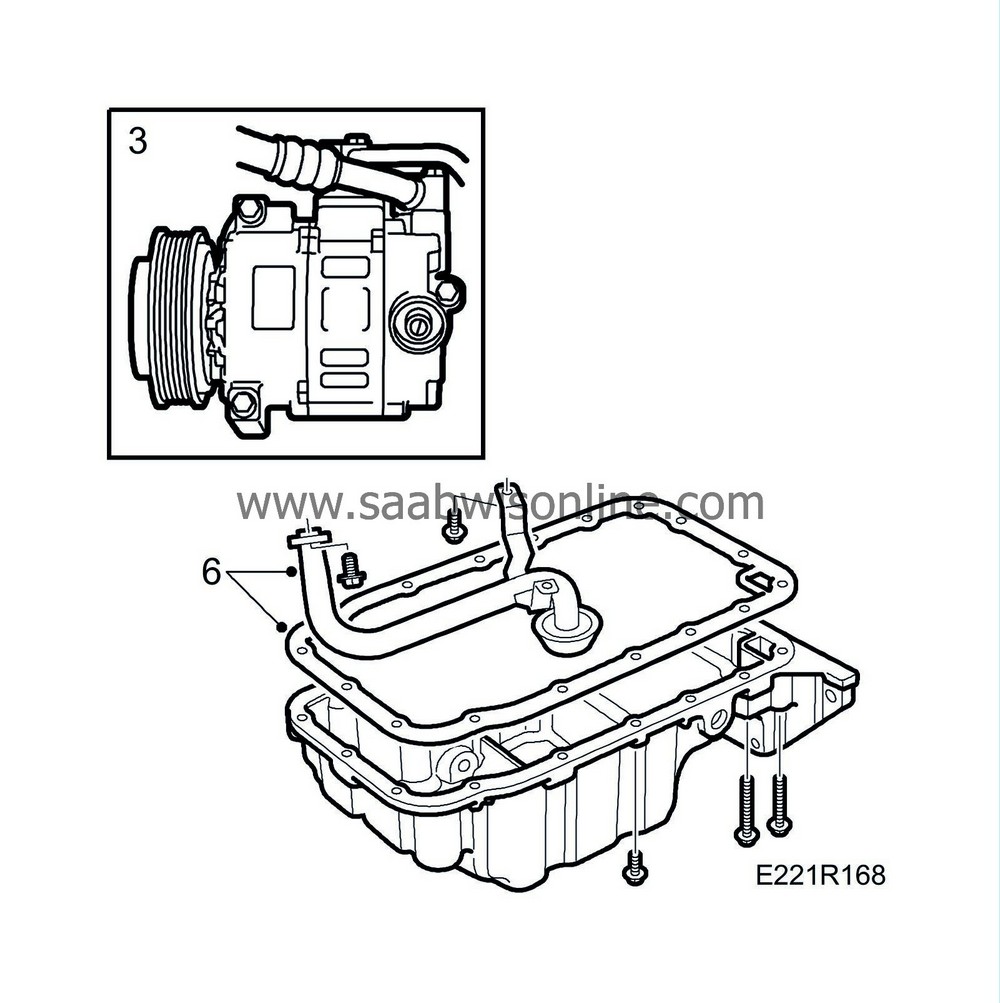
Fit the A/C compressor and bracket. Fit the right-hand front wheel.
|
|
5.
|
Seal the joints in the oil sump mating surface with part No. (10) 81 52 381.
|
|
6.
|
Fit the oil strainer and oil sump.
Tightening torque:
Oil strainer: 8 Nm (6 lbf ft)
Oil sump: 15 Nm (11 lbf ft)
|
|
7.
|
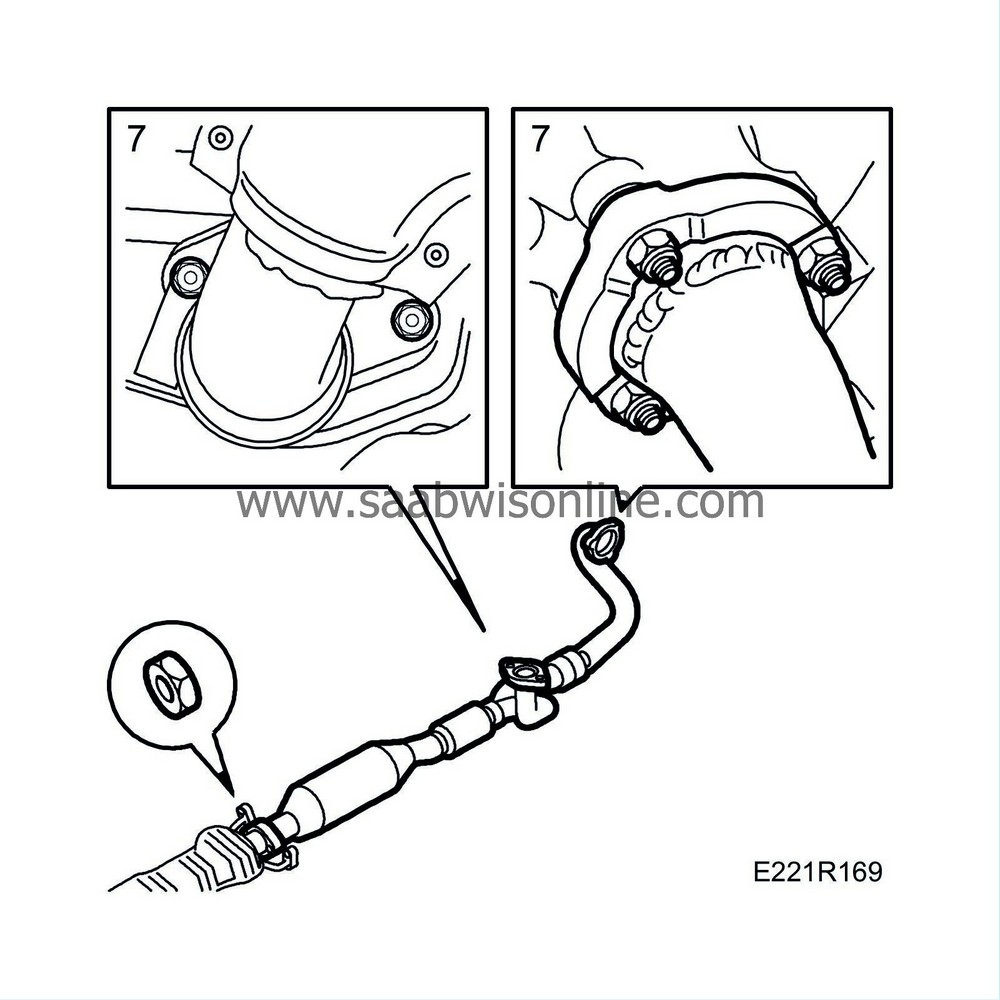
Fit the front exhaust pipe.
Tightening torque:
Front/rear exhaust system: 22 Nm (16 lbf ft)
Front pipe/rear exhaust manifold
40 Nm (29.5 lbf ft)
Front pipe/turbo: 24 Nm (18 lbf ft)
|
|
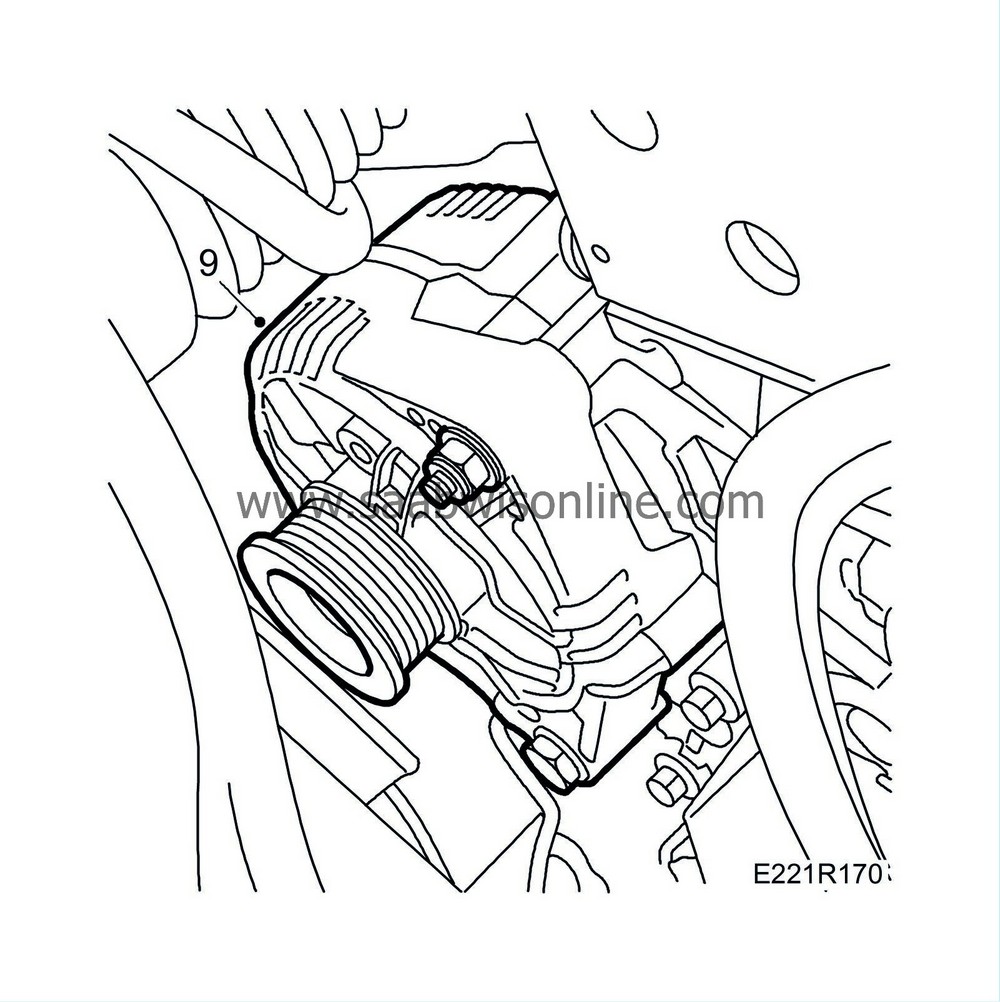
9.
|
Fit the generator.
|
|
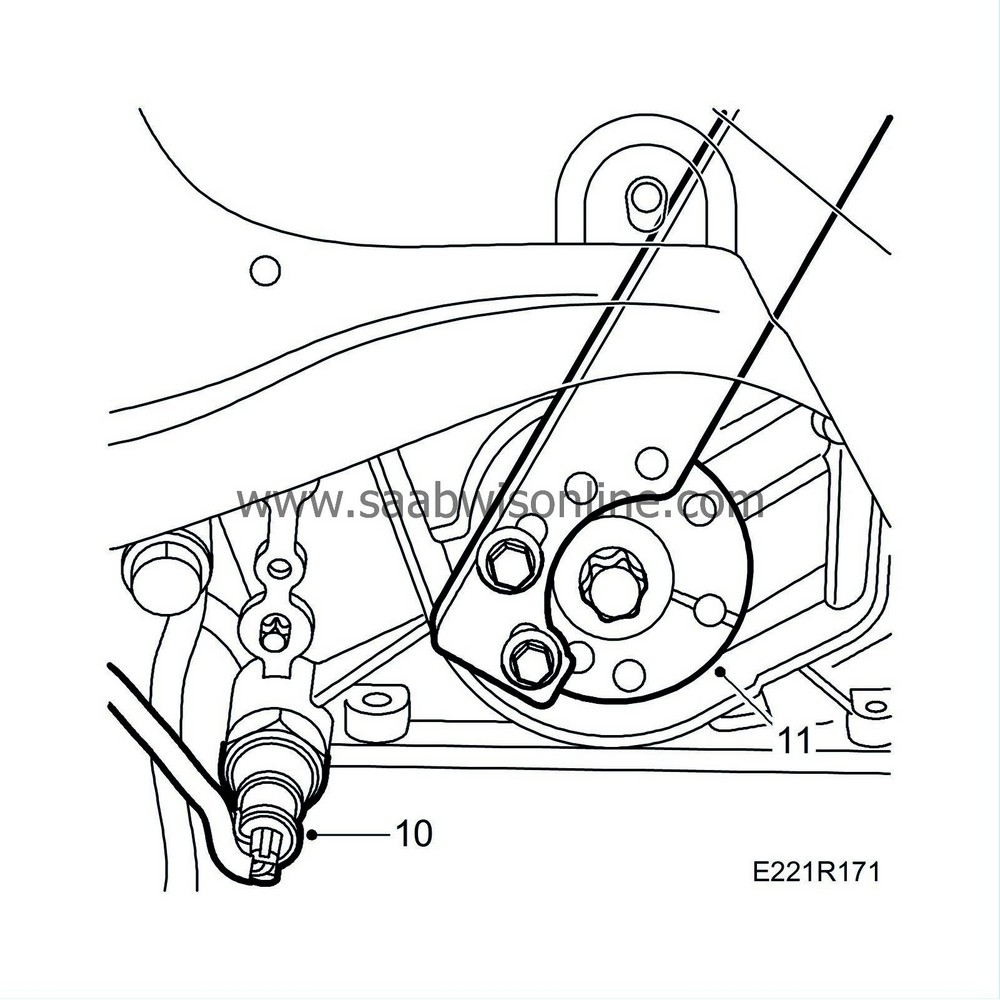
10.
|
Connect the lead for the oil pressure switch.
|
|
11.
|
Use counterstay 83 95 063 and fit the crankshaft timing belt pulley.
Tightening torque:
250 Nm (184.5 lbf ft) + 45°
|
|
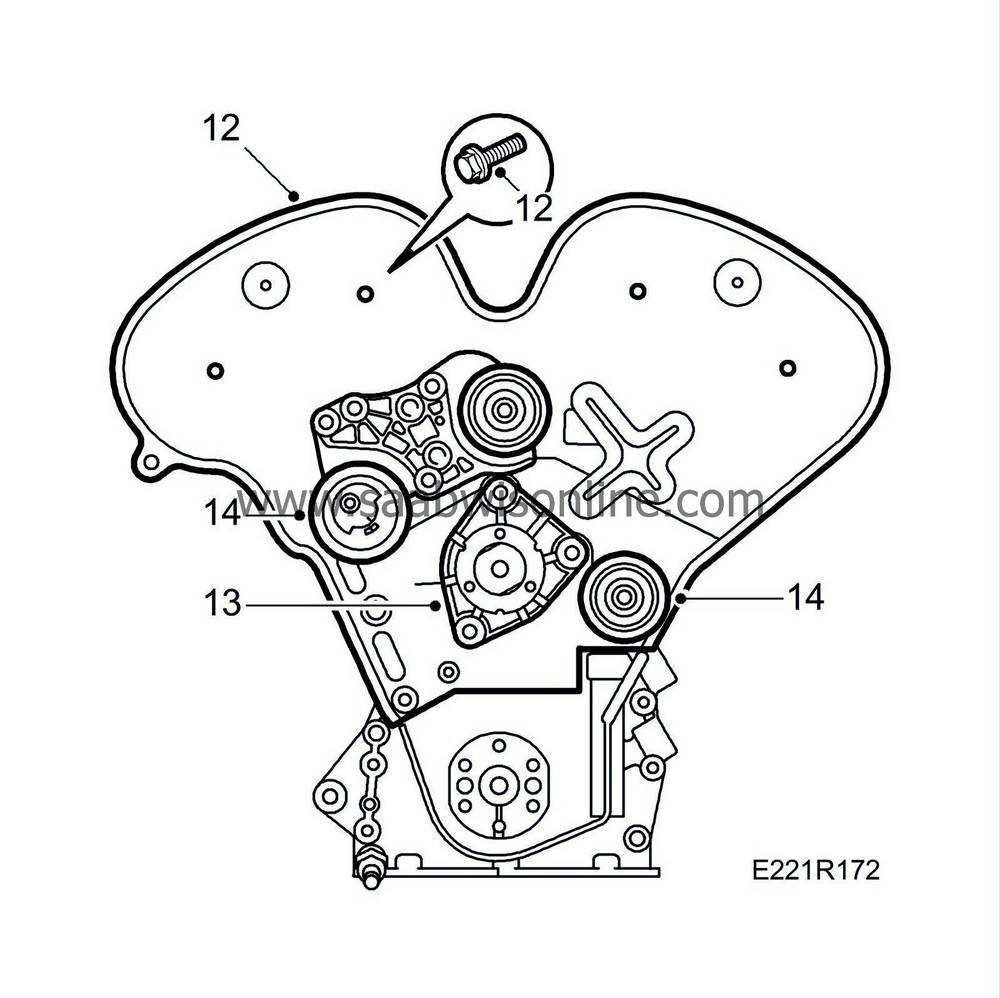
12.
|
Fit the inner (rear) timing cover.
|
|
13.
|
Fit the coolant pump.
Tightening torque: 25 Nm (18.5 lbf ft).
|
|
14.
|
Fit the bracket with tensioning roller and the upper adjuster roller. Also fit the lower adjuster roller.
|
|
15.
|
Fit the camshaft sprockets correctly in relation to the locating pins.
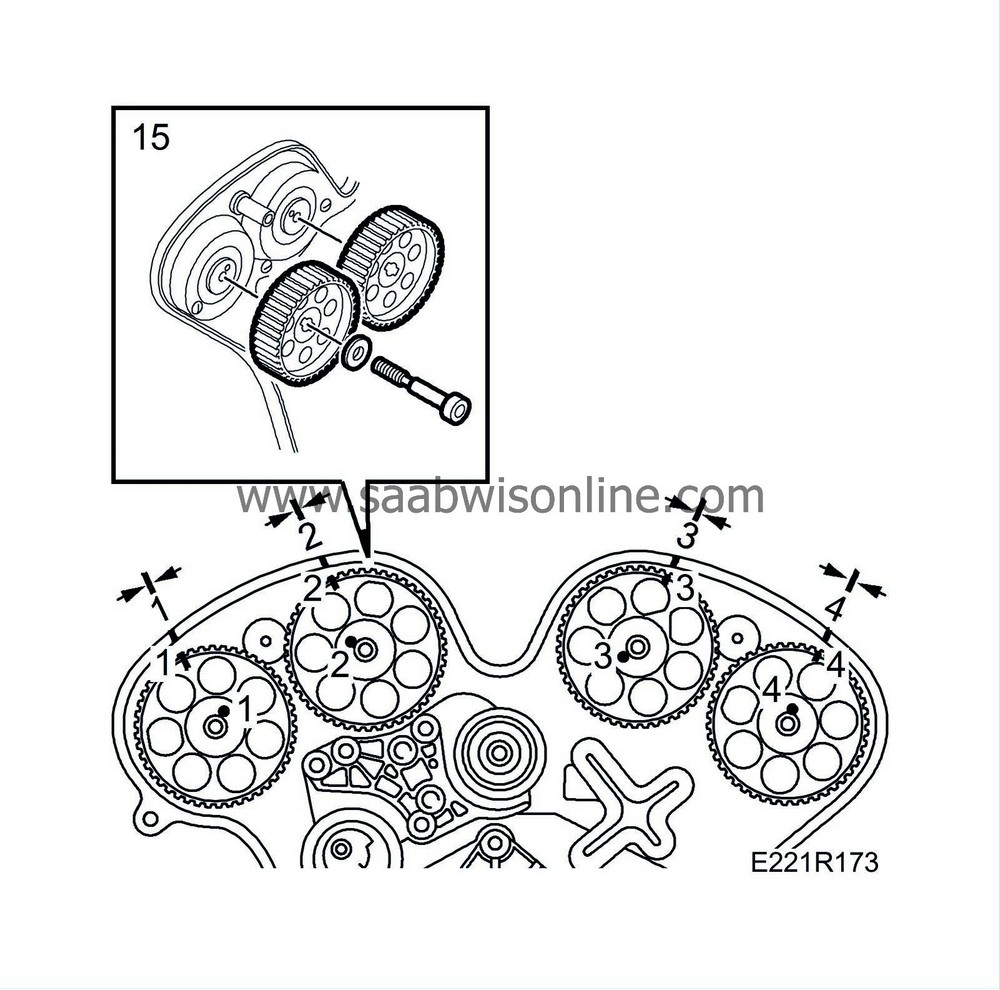
Tightening torque: 50 Nm (37 lbf ft) + 60°
|
|
16.
|
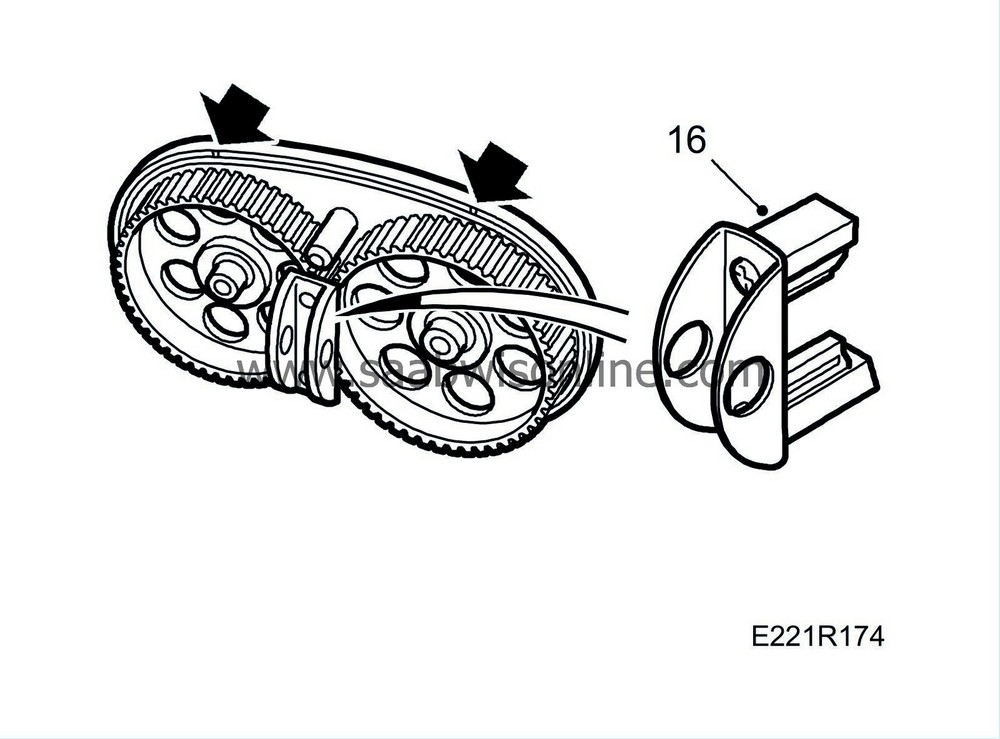
Fit locking tool KM-800-1 on No. 1 and No. 2 camshaft sprockets and locking tool KM-800-2 on No. 3 and No. 4 camshaft sprockets.
|
|
17.
|
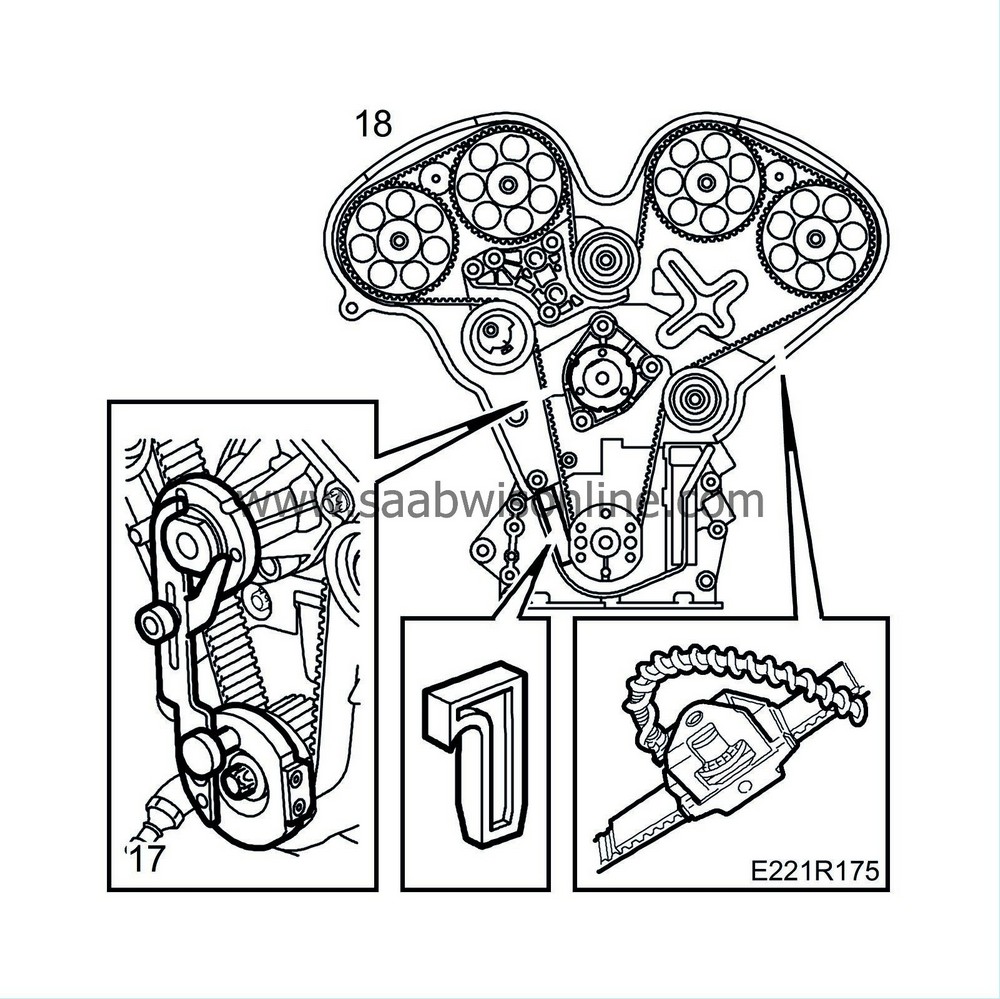
Turn the crankshaft to just before the 0° mark and fit locking tool KM-800-10 on it. Carefully turn the crankshaft in the direction of engine rotation until the arm comes up against the coolant pump flange and remove the tool.
|
|
18.
|
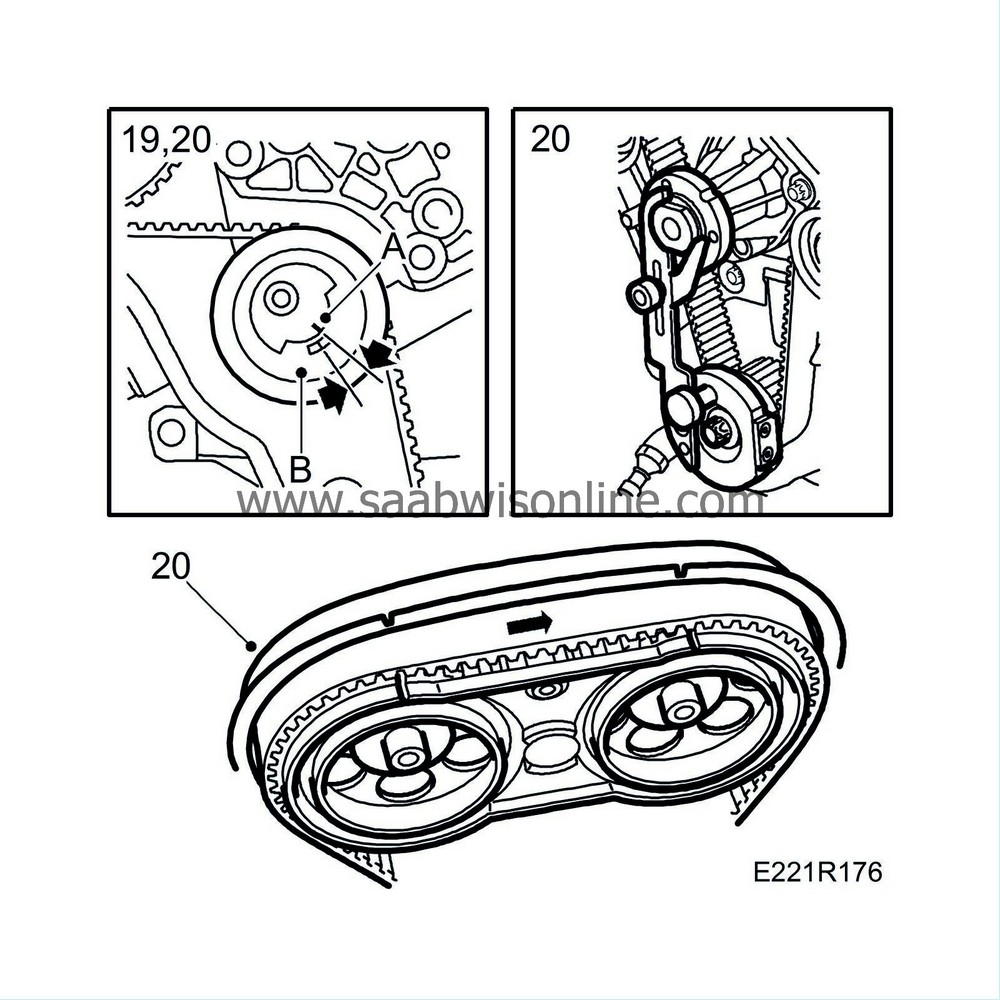
Fit the internally toothed belt over the sprockets in the marked direction of rotation, using tool KM-800-30 to hold the belt in place. Adjust the tensioning roller lightly by hand so that the belt does not jump a cog. Adjust anticlockwise.
Fit a part of the toothed belt in place and fit tool 83 93 985 to measure the tension of the belt.
Tighten the centre bolts of the adjuster rollers lightly. Adjust the lower adjuster roller anticlockwise until a tension of 275-300 Nm is obtained. Tighten the adjuster roller's screw.
Tightening torque: 40 Nm (30 lbf ft)
|
Important
|
|
Adjustment of belt tension is only a preparatory measure and must not be used as a check when the belt is finally adjusted.
|
|
|
|
|
19.
|
Adjust the tensioning roller by means of an Allen key until the two lines on it are in alignment. Tighten.
Tightening torque: 20 Nm (15 lbf ft)
Remove the locking tool for camshaft sprockets 1 and 2. Then adjust the upper adjuster roller anticlockwise until sprocket No. 2 moves 1-2 mm clockwise.
Tightening torque: 40 Nm (30 lbf ft)
Remove the other locking tools.
|
|
20.
|
Turn the crankshaft two revolutions until just before the zero mark and fit locking tool KM-800-10 on it. Carefully turn the crankshaft in the engine's direction of rotation until the arm abuts against the coolant pump flange and tighten it. Fit tool KM-800-20 and check that the markings on the camshaft sprockets are opposite the markings on the tool and that the edge of the belt coincides with the edge of the sprockets.
|
Important
|
|
Check that marking A is about 2 mm above marking B. If this distance is smaller, adjustment must be carried out afresh.
|
|
|
|
|
21.
|
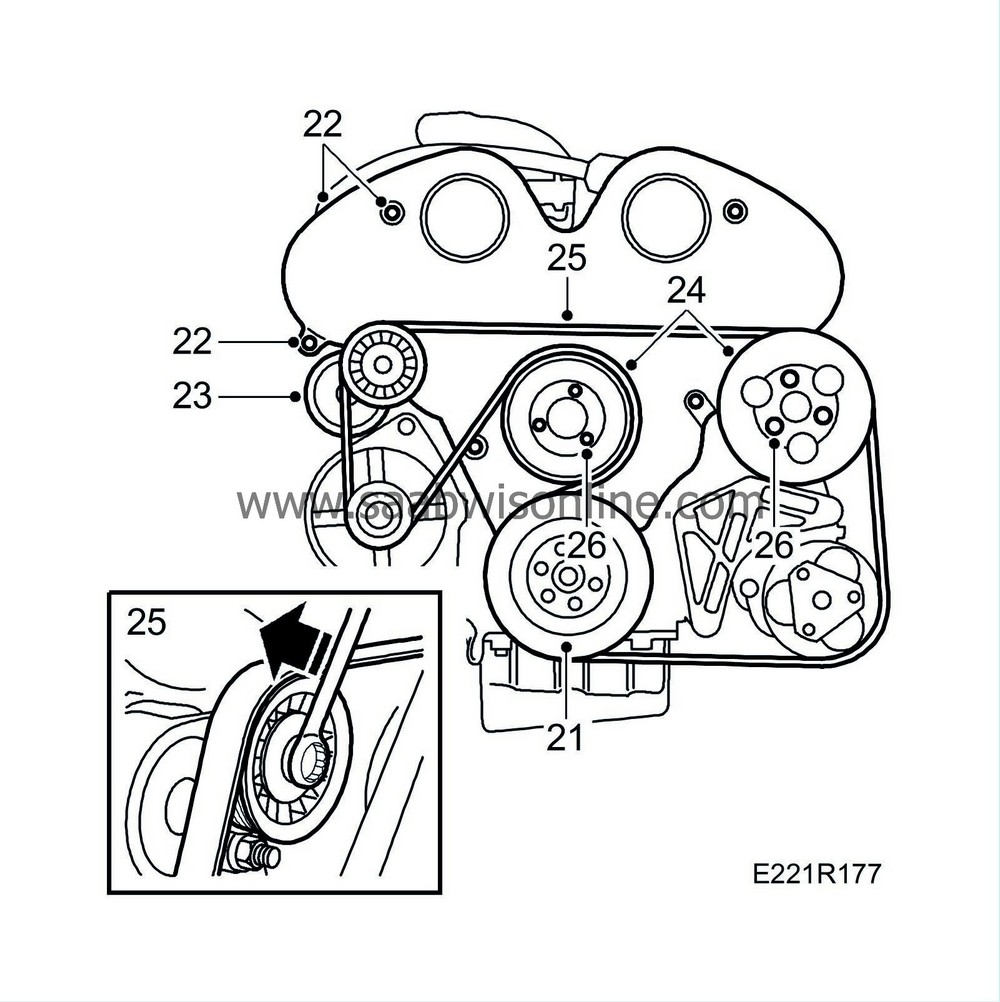
Fit the crankshaft pulley.
Tightening torque: 20 Nm (15 lbf ft)
|
|
22.
|
Fit the timing cover.
Tightening torque: 8 Nm (6 lbf ft)
|
|
23.
|
Fit the belt tensioner and the generator air intake.
|
|
24.
|
Fit the coolant pump pulley and the power steering pump pulley. Use Loctite, part No. 74 96 292. Do not tighten the bolts.
|
|
25.
|
Fit the multigroove belt.
|
|
26.
|
Tighten the retaining bolts on the pulleys.
Tightening torque:
Belt pulley/coolant pump: 8 Nm (6 lbf ft)
Belt pulley/power steering pump: 20 Nm (15 lbf ft)
|
|
27.
|
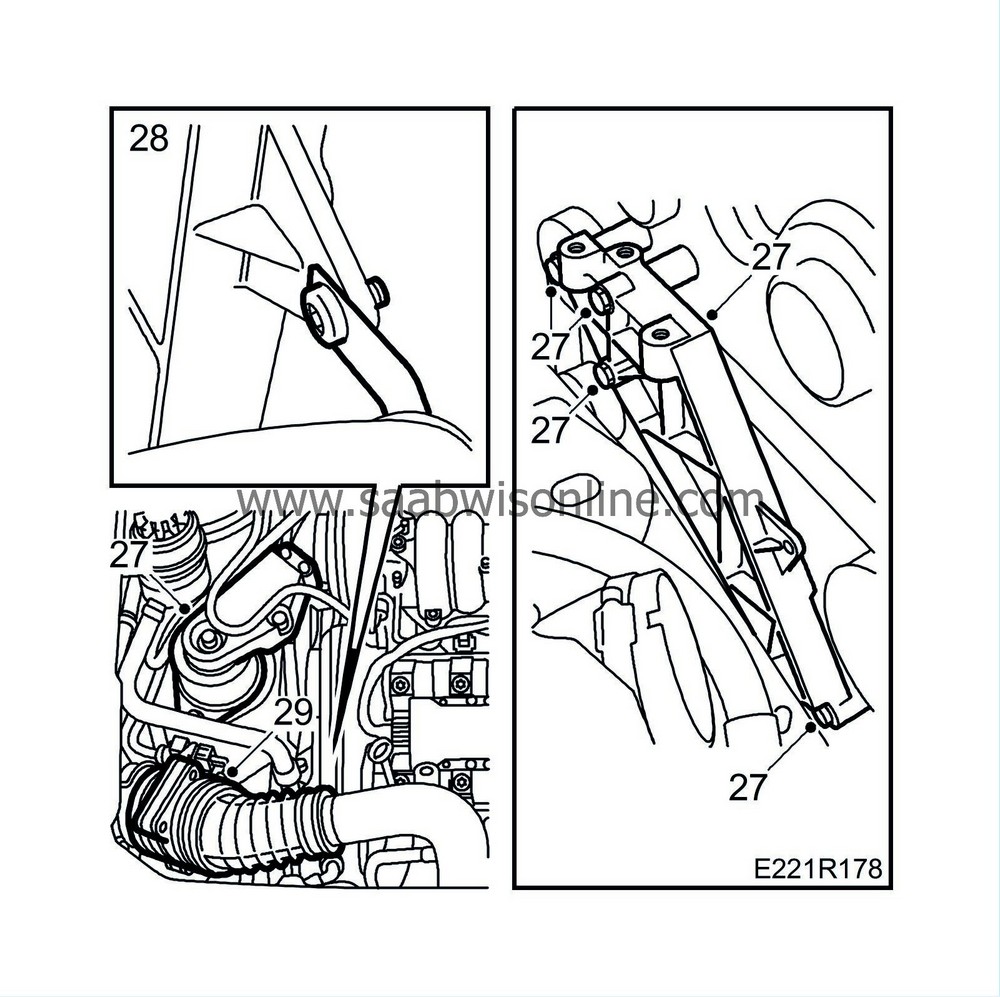
Fit the right-hand engine attachment with bracket and engine mount.
Tightening torque:
To body 63 Nm (46.5 lbf ft)
|
|
28.
|
Fit the power steering hose in the holder
|
|
29.
|
Fit the mass air flow sensor with hose.
|
|
30.
|
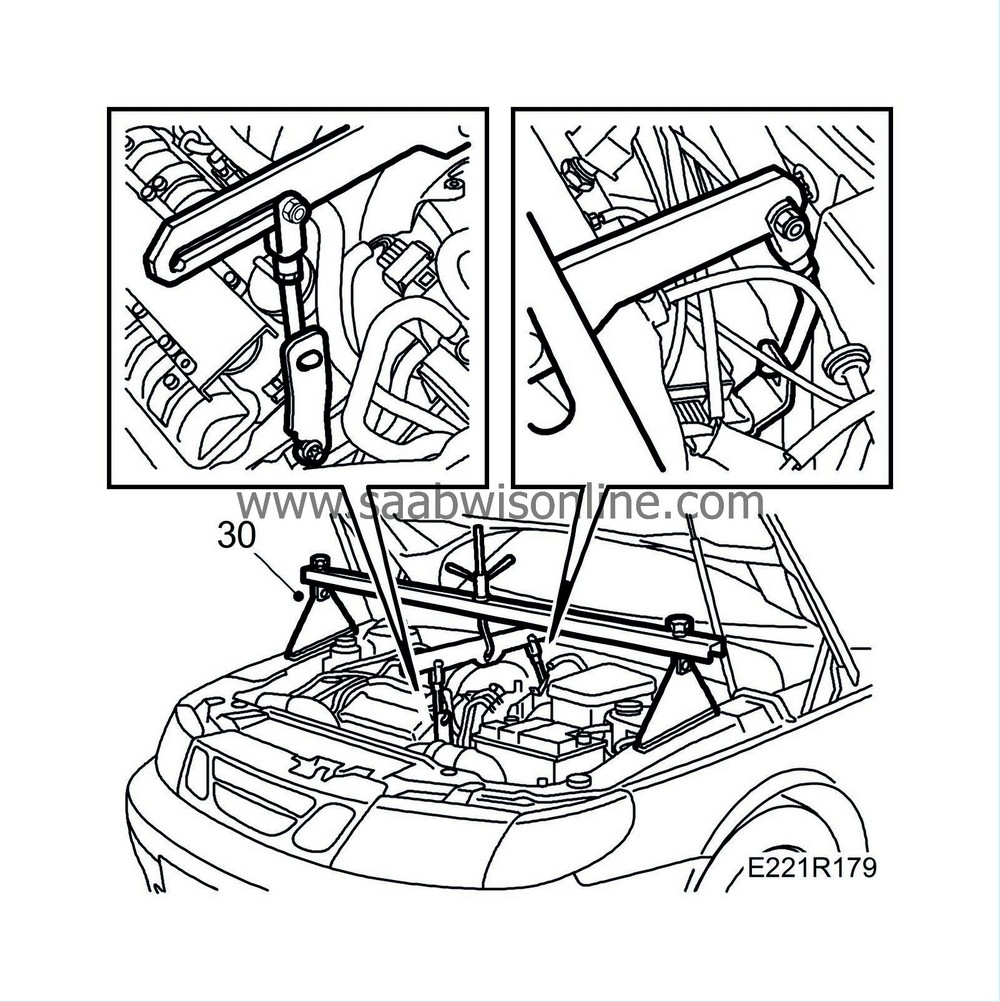
Remove the lifting beam and lifting eye.
|
|
31.
|
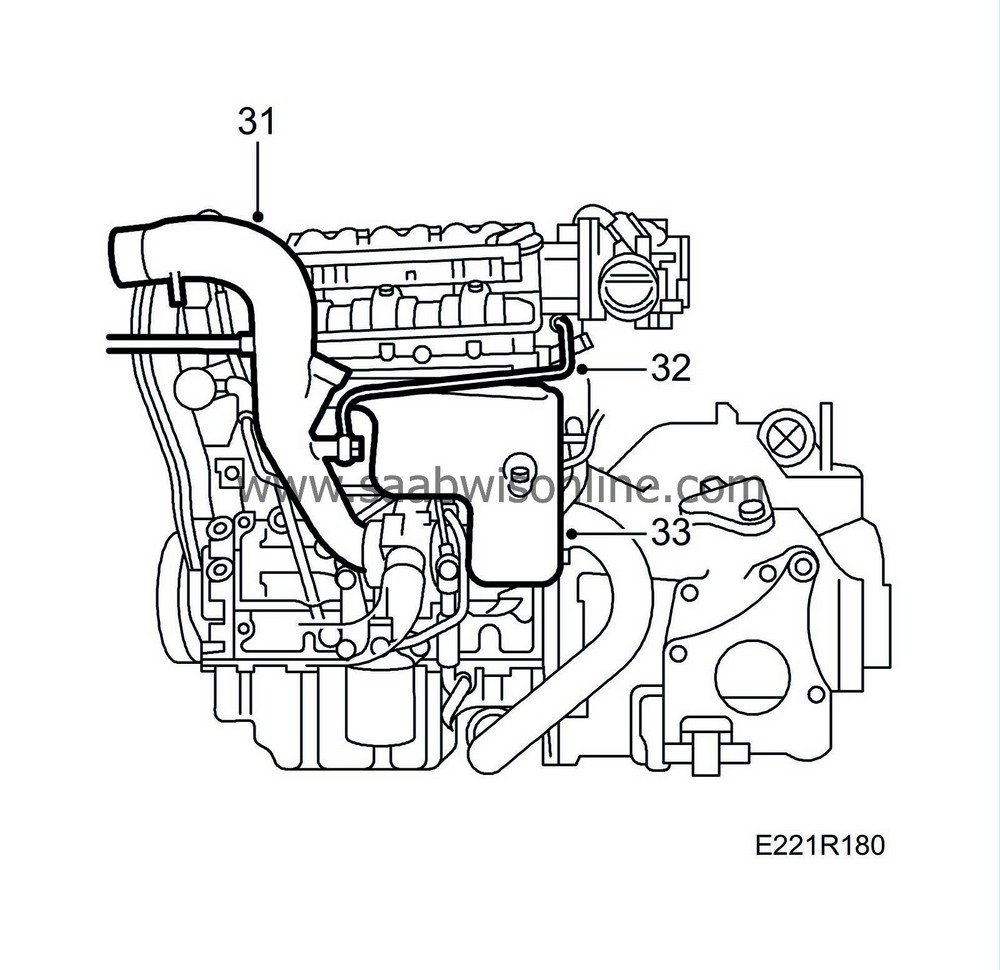
Connect the hose to the venting valve and fit the turbo intake pipe.
Tightening torque:
V-clamp 3 Nm (2 lbf ft)
U-clamp cylinder head 14 Nm (10 lbf ft)
|
|
32.
|
Fit the crankcase breather pipe to the turbo intake pipe.
Tightening torque: 24 Nm (18 lbf ft)
|
|
33.
|
Fit the front exhaust manifold's heat shield.
Tightening torque: 24 Nm (18 lbf ft)
|
|
34.
|
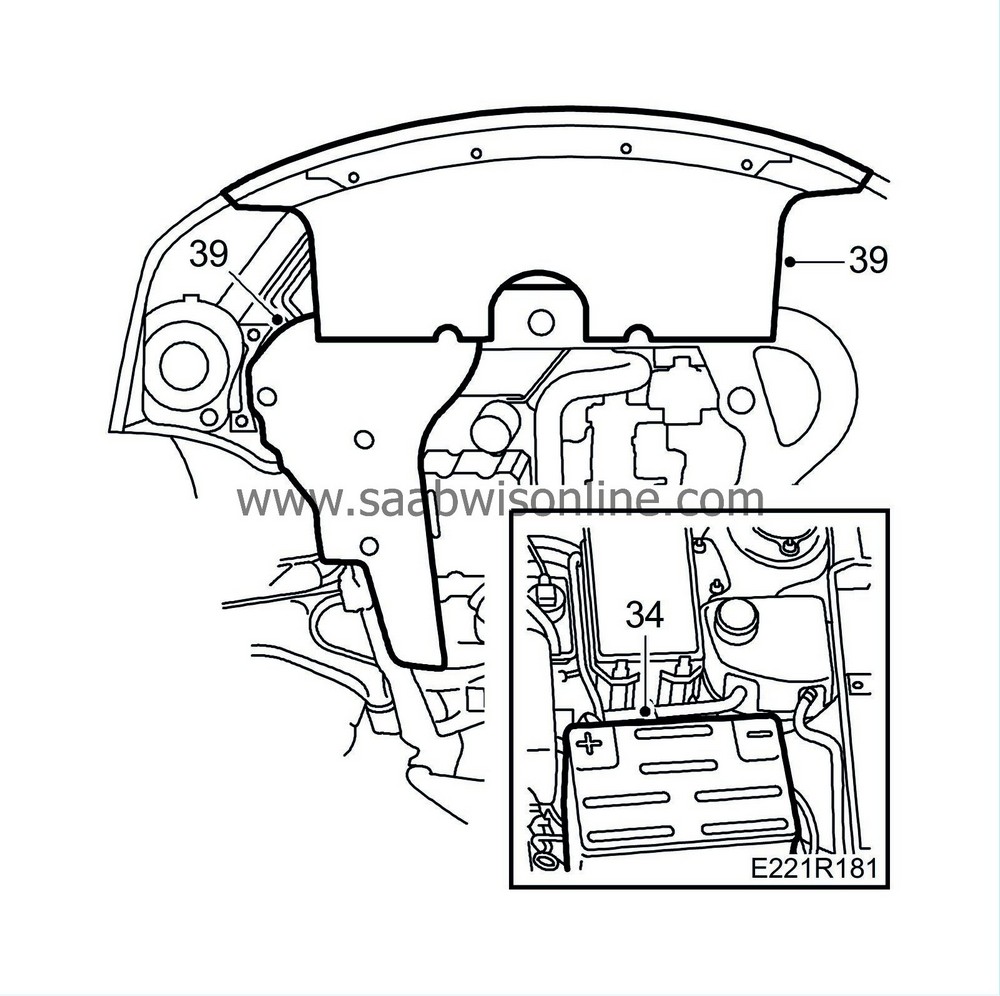
Reconnect the negative cable to the battery.
|
|
35.
|
Fill up with coolant. Do not forget to close the radiator drain cock first. Screw on the expansion tank filler cap.
|
|
36.
|
Bleed the cooling system as follows:
Fill the system up to the MAX level, close the expansion tank filler cap, start the engine and warm it up (by running it at varying rpm) until the radiator fan starts. Unscrew the expansion tank filler cap and top up again to the MAX level. Close the filler cap and run the engine at varying rpm until the radiator fan starts three more times. Switch off the engine and top up as necessary to the MAX level.
|
Note
|
|
The A/C should be OFF.
|
|
|
39.
|
Fit the lower spoiler sections.
|
|
40.
|
Lower the car, fit the engine cover and remove the wing protectors.
|
|
41.
|
Reset the clock and the radio, if fitted.
|


