(855-2088) Load road noise in cabin
|
TECHNICAL SERVICE BULLETIN
|
|
Bulletin Nbr:
|
855-2088
|
|
Date:
...........
|
February 1999
|
|
Market:
|
all
|
Saab 9-5 M98-99 up to and including VIN X3034800.
Irritating road noise may arise from the rear suspension on certain cars. This may be especially apparent to rear seat passengers.
If the customer is troubled by the noise, it can be rectified by the following procedure in this SI. The procedure is divided into three sections.
|
B.
|
Bush, longitudinal link
|
|
C.
|
Damper, longitudinal link
|
|
Important
|
|
It is essential that
all
sections of the procedure are carried out to achieve the desired result.
|
|
|
51 71 723 Kit containing
damper mat
bush (2 pcs.)
damper (2 pcs.)
nuts (2 pcs.)
The following is also required for dismantling the rear hub
43 45 153 Flange lock nut (8 pcs.)
A. Damper mat
|
1.
|
Dismantle the rear seat cushions and backrest. See WIS; 8 Interior equipment, Seats, Cushions, rear seat and Backrest, rear seat.
|
|
2.
|
Remove the scuff plates on both sides. Start by lifting the rear edge.
|
|
3.
|
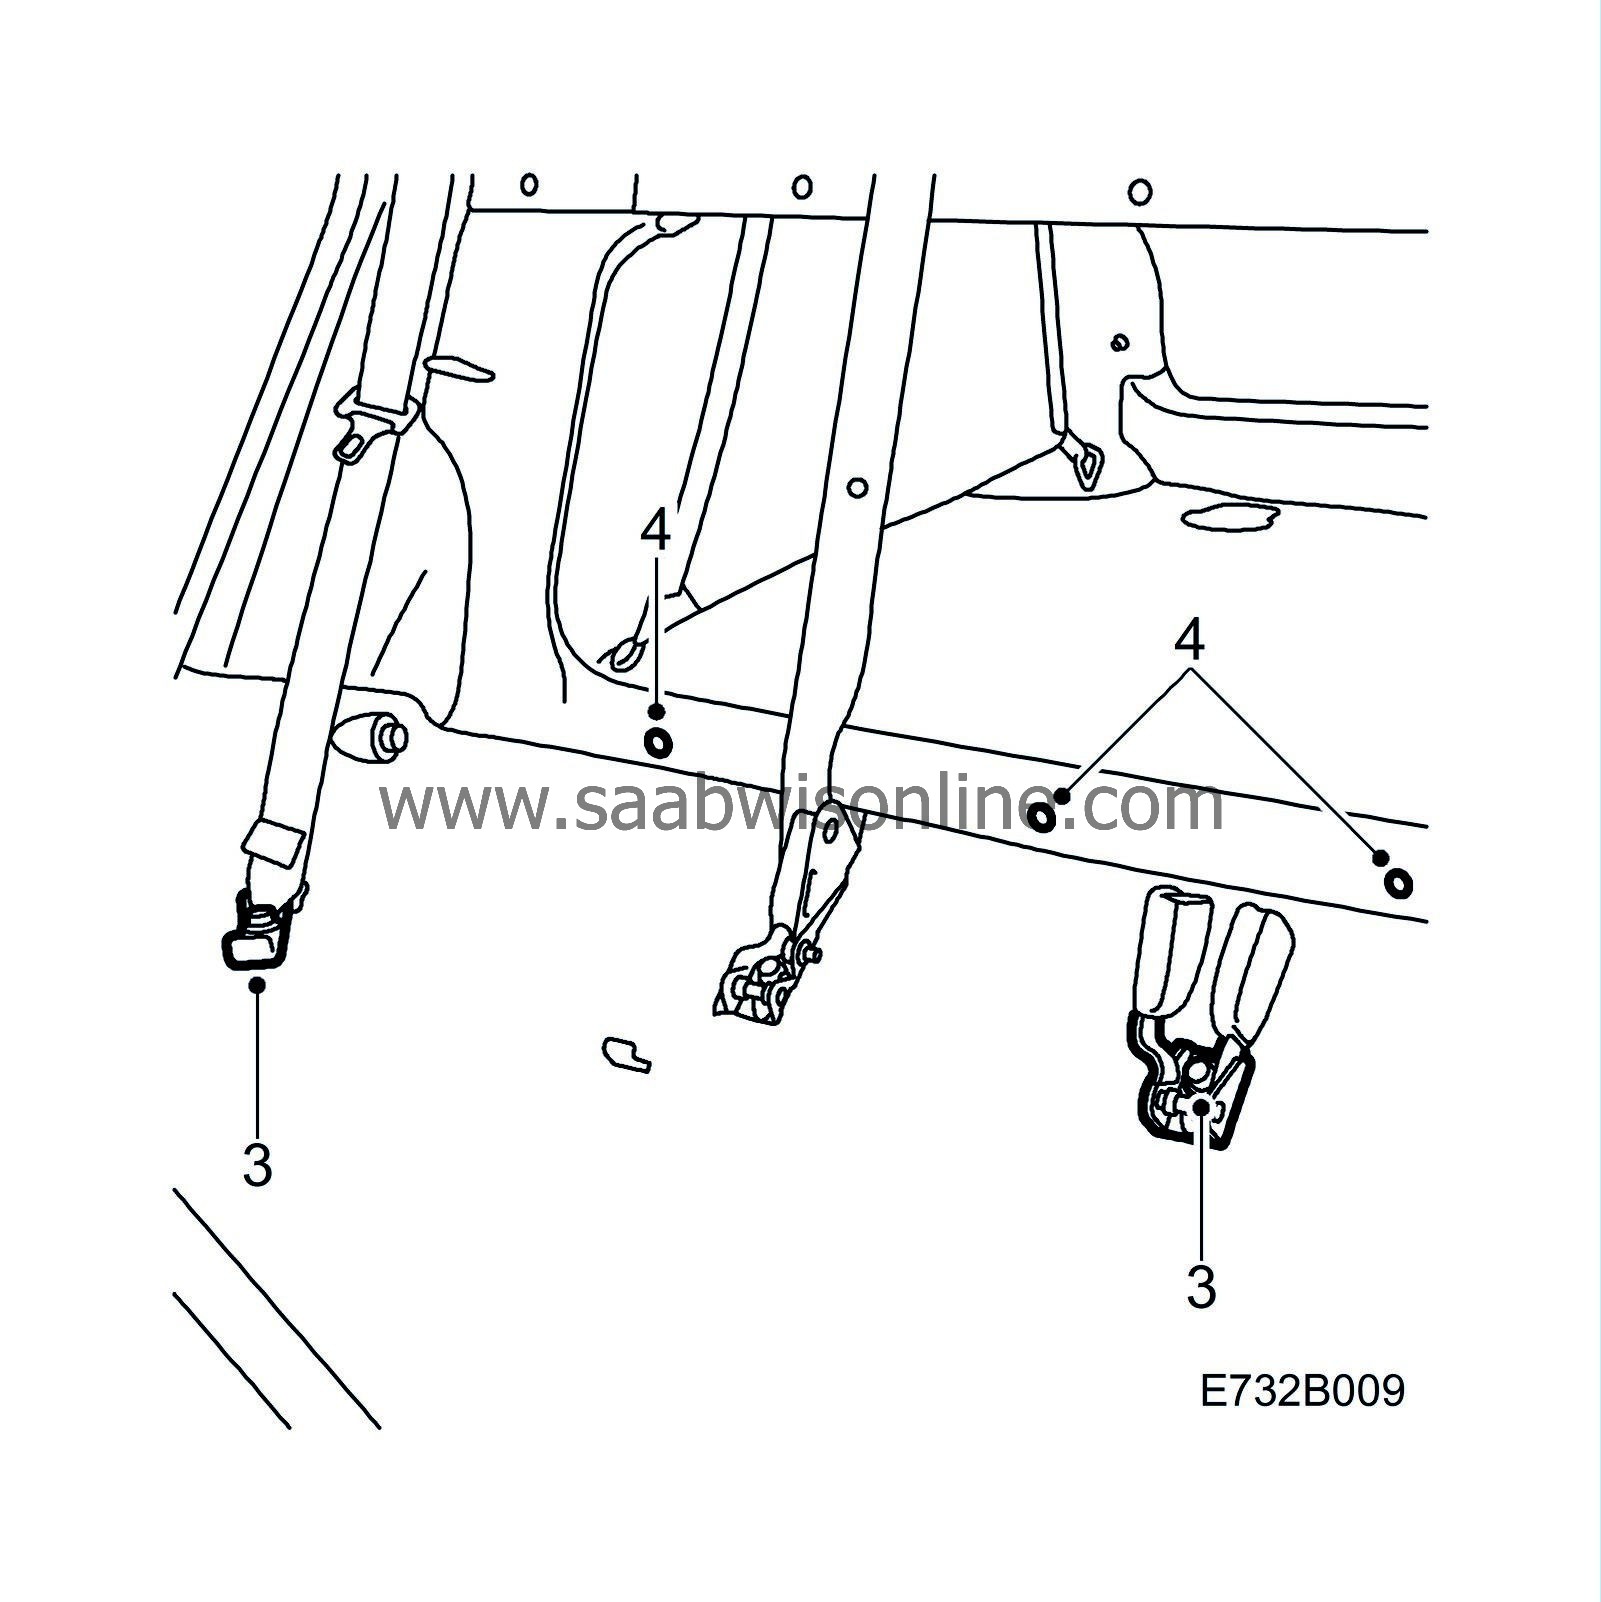
Remove the two outer seat belt mounting and left-hand seat belt buckle.
|
|
4.
|
Undo the clips securing the rear edge of the carpet. Use special tool no. 84 71 179.
|
|
5.
|
Fold the carpet forward.
|
Note
|
|
Fold along the line of the seat hinges.
|
|
|
6.
|
Lay out the damper mat and press down at the hinges. Lay the mat under the luggage compartment carpet.
 Warning
|
|
It is essential that the hooks for the anti-submarining protection protrude from the punched holes in the mat as they must grip the seat cushions in the event of a collision.
|
|
|
|
|
|

|
|
7.
|
Re-lay the carpet and fit the clips on the rear, pressing them firmly through the damper mat.

|
|
9.
|
Fit the seat belt mountings and buckles.
Tightening torque: 45 Nm (33 lbf ft)
|
Note
|
|
Buckle the seat belts and make sure that they have not become twisted during fitting.
|
|
|
10.
|
Fit the backrest and seat cushions. See WIS; 8 Interior equipment, Seats, Cushions, rear seat and Backrest, rear seat.
|
B. Bush, longitudinal link
|
1.
|
Raise the car so that the rear wheels are suspended freely.
|
|
2.
|
Remove the rear left wheel.
|
|
3.
|
Press in the brake piston with a pair of slip-joint pliers.
|
|
4.
|
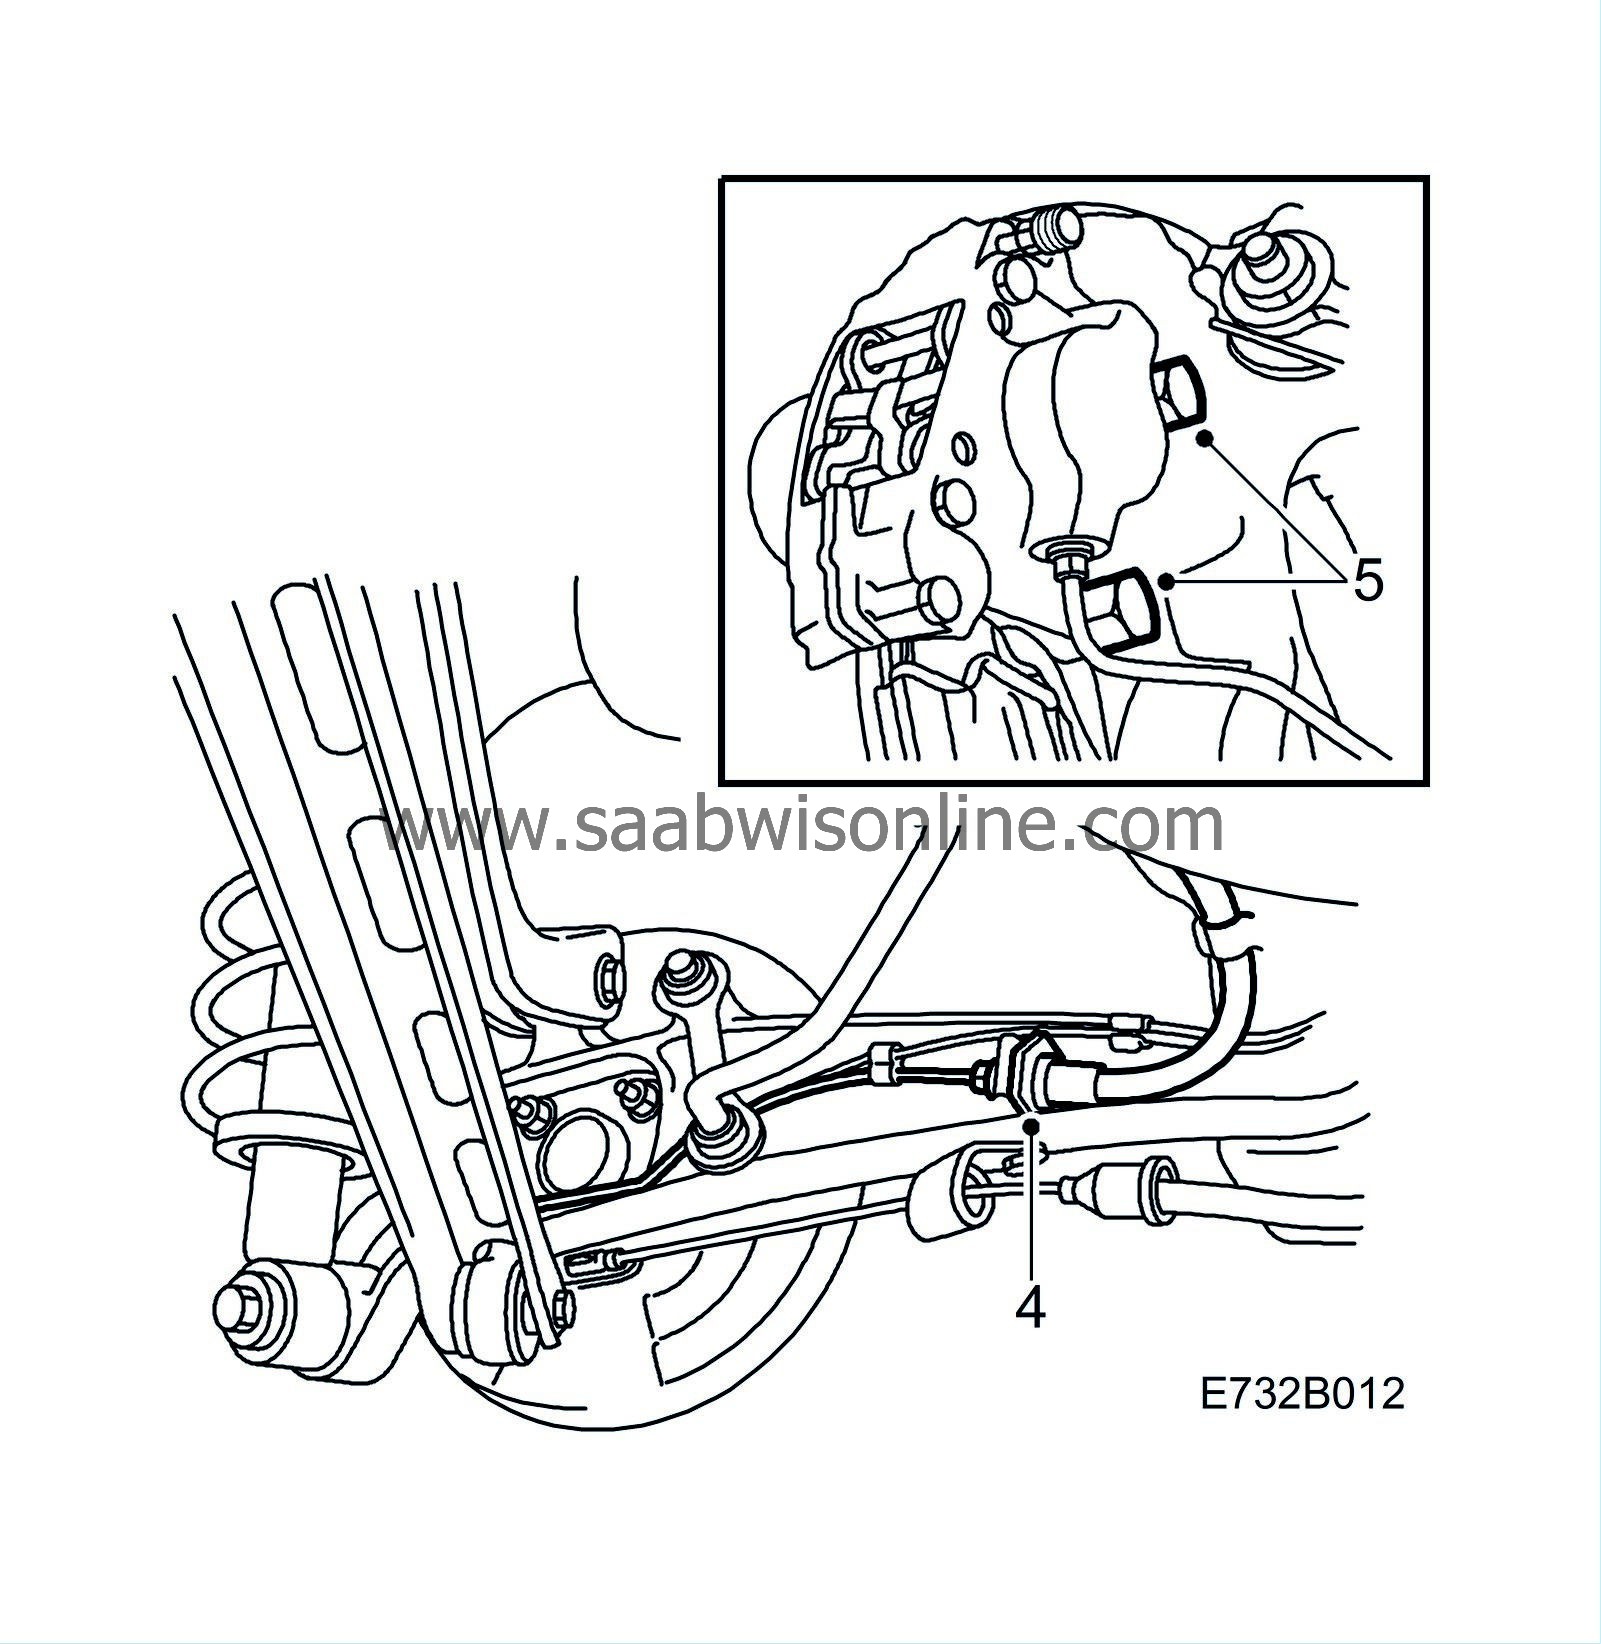
Remove the brake pipe bracket and the handbrake cable from the longitudinal link.
|
|
5.
|
Remove the two brake caliper retaining bolts. Suspend the brake calipers with a strap.
|
|
6.
|
Unplug the ABS sensor connector.

|
|
7.
|
Remove the lower damper retaining bolt.

|
|
8.
|
Remove the bolt securing the lower transverse link to the longitudinal link.
|
|
9.
|
Unhook the handbrake cable return spring and detach the cable.

|
|
10.
|
Remove the bolt securing the anti-roll bar link to the longitudinal link.
|
|
11.
|
Remove the bolt securing the upper transverse link to the longitudinal link.
|
|
12.
|
Remove the bolts securing the longitudinal link to the body and lower the longitudinal link with hub and brake disc.

|
|
13.
|
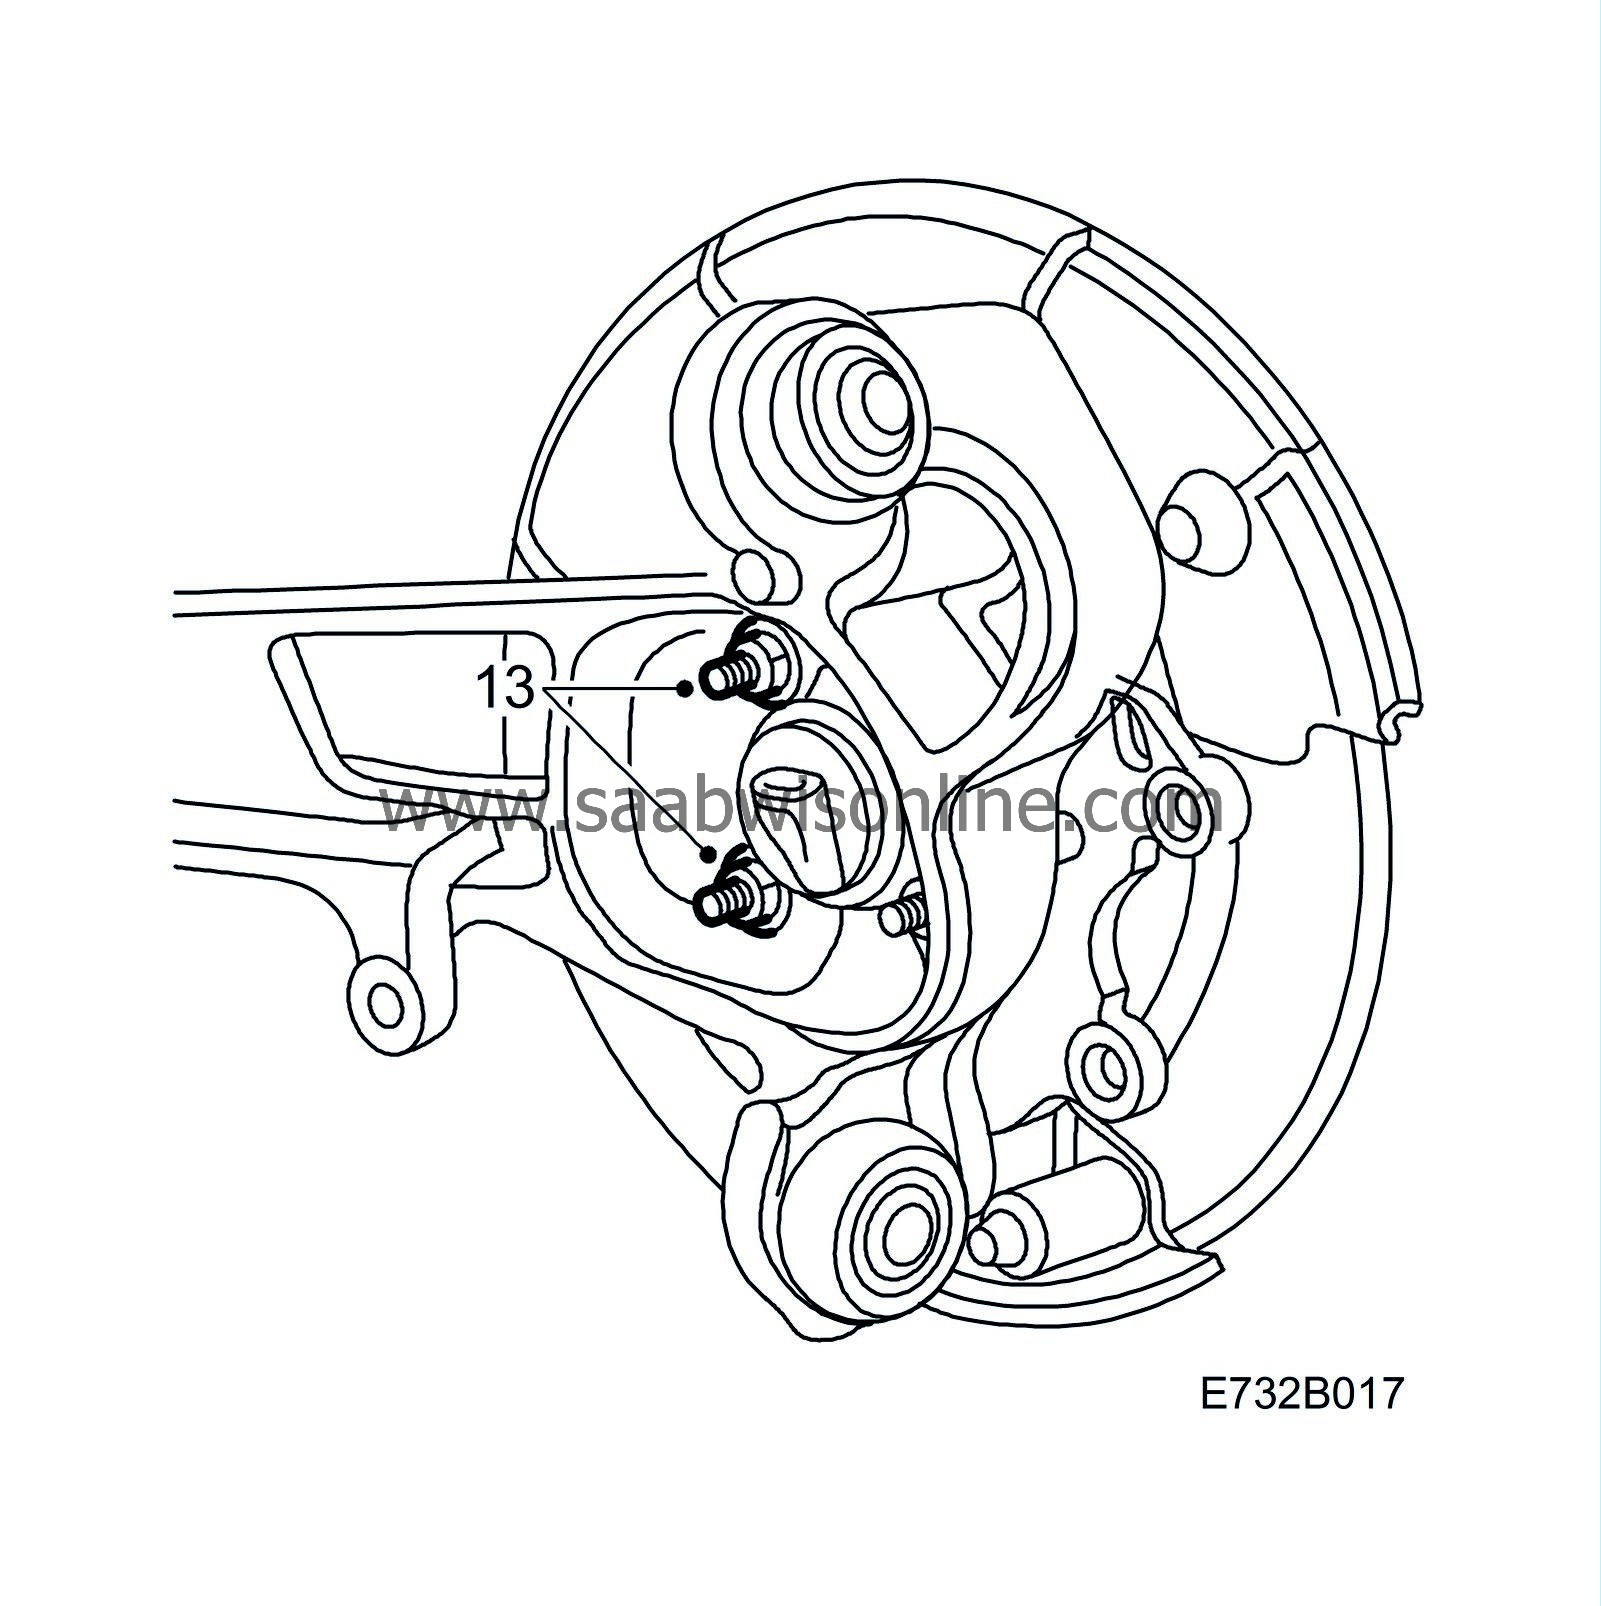
Remove the rear hub with disc brake-plate from the longitudinal link.
|
|
14.
|
Clamp on tool 89 96 753 (KM-901).

|
|
15.
|
Remove the bolt and nut from the longitudinal link bush and remove the tool.
|
|
16.
|
Remove the body bracket from the longitudinal link bush.
|
|
17.
|
Clamp the longitudinal link in a vice.
|
|
18.
|
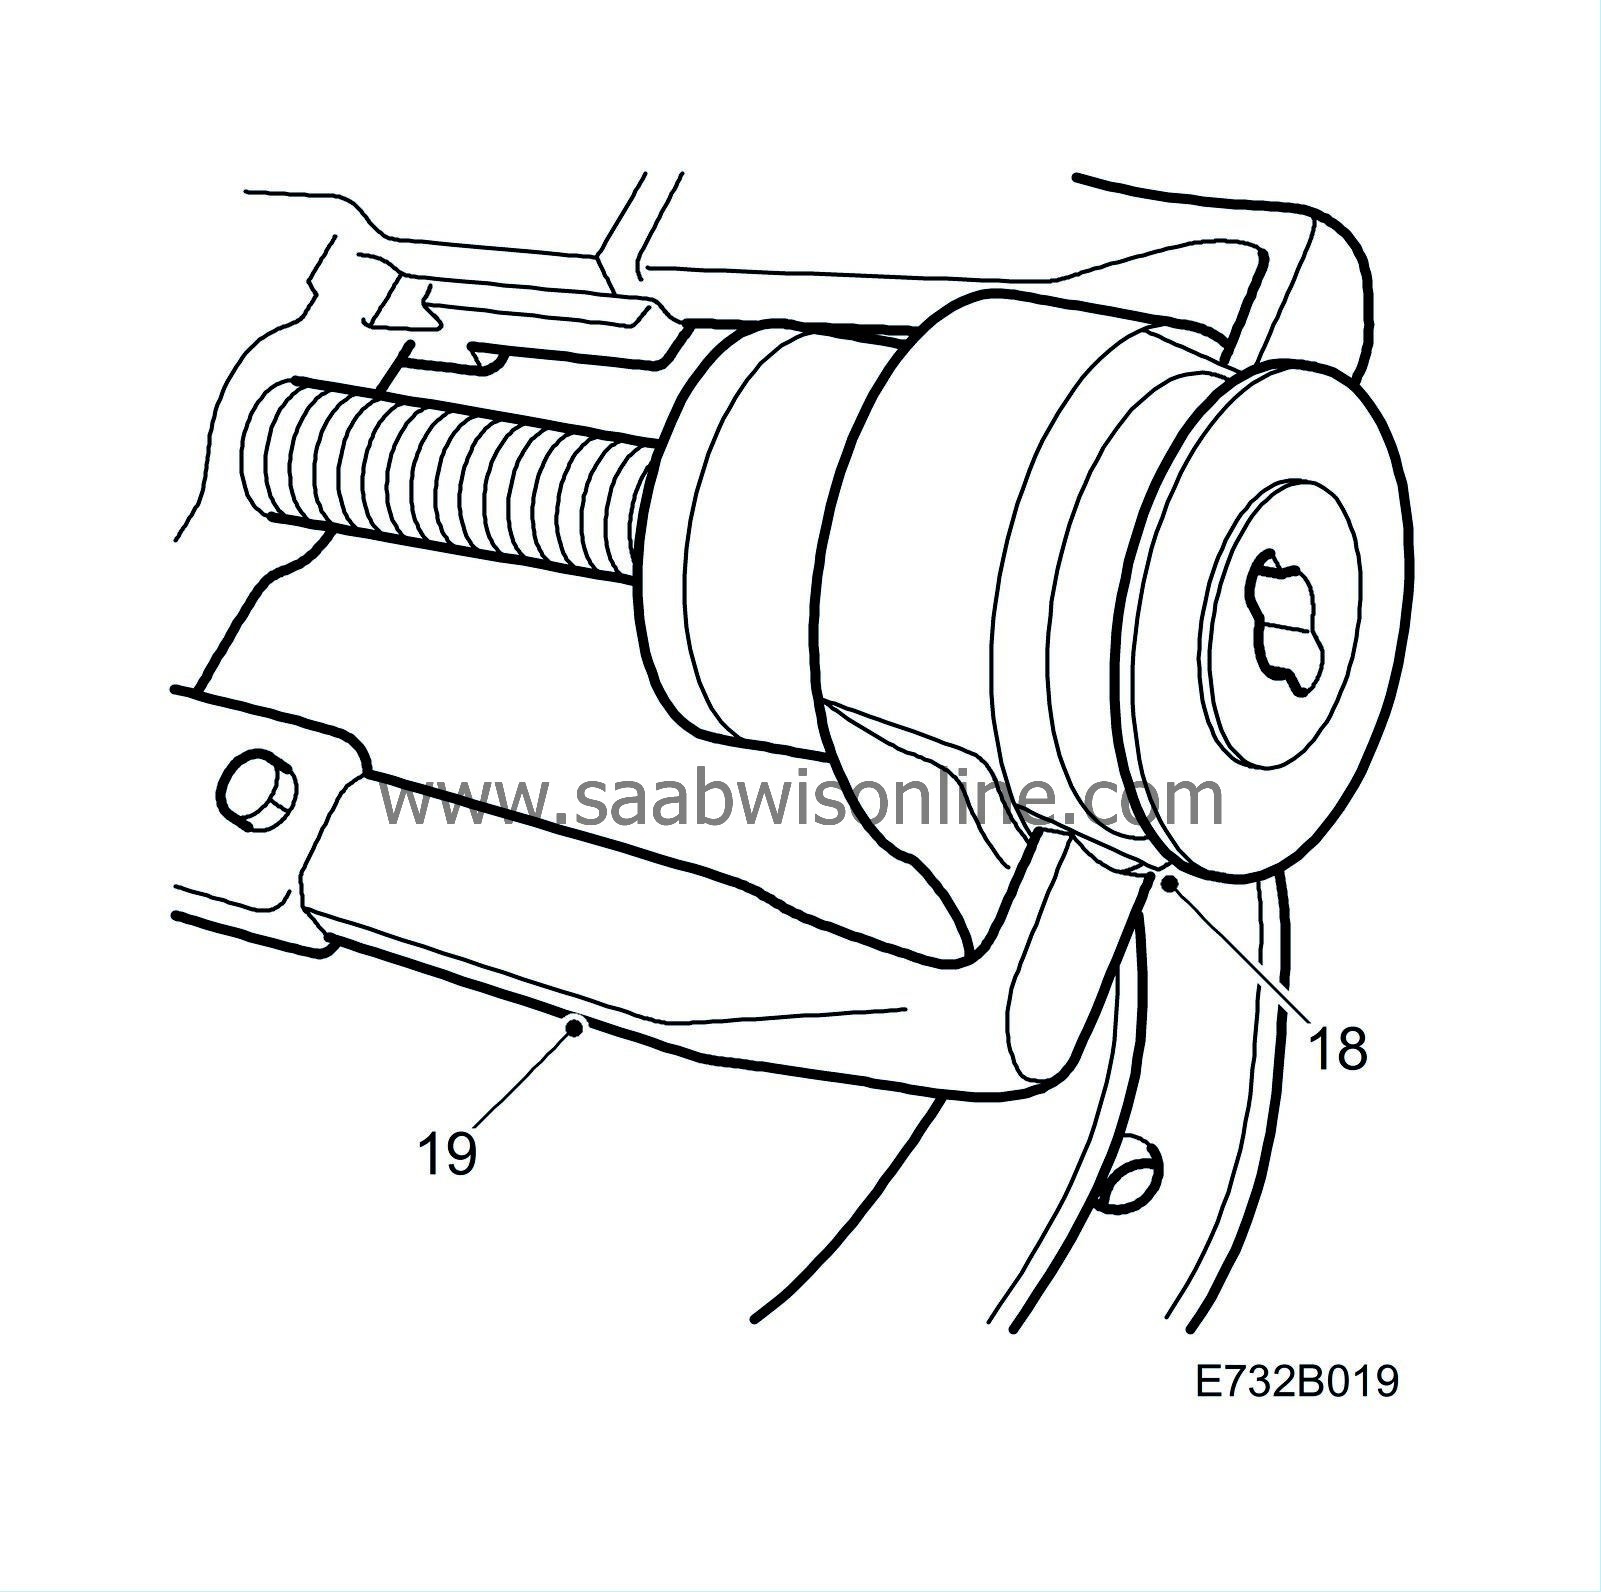
Saw away pieces of the bush edge so that the puller is provided with support when pressing out the bush.
|
|
19.
|
Use puller 87 91 287 and sleeve 89 96 761 (KM-906-41) to press out the bush.
|
|
20.
|
Position the bush correctly.

|
|
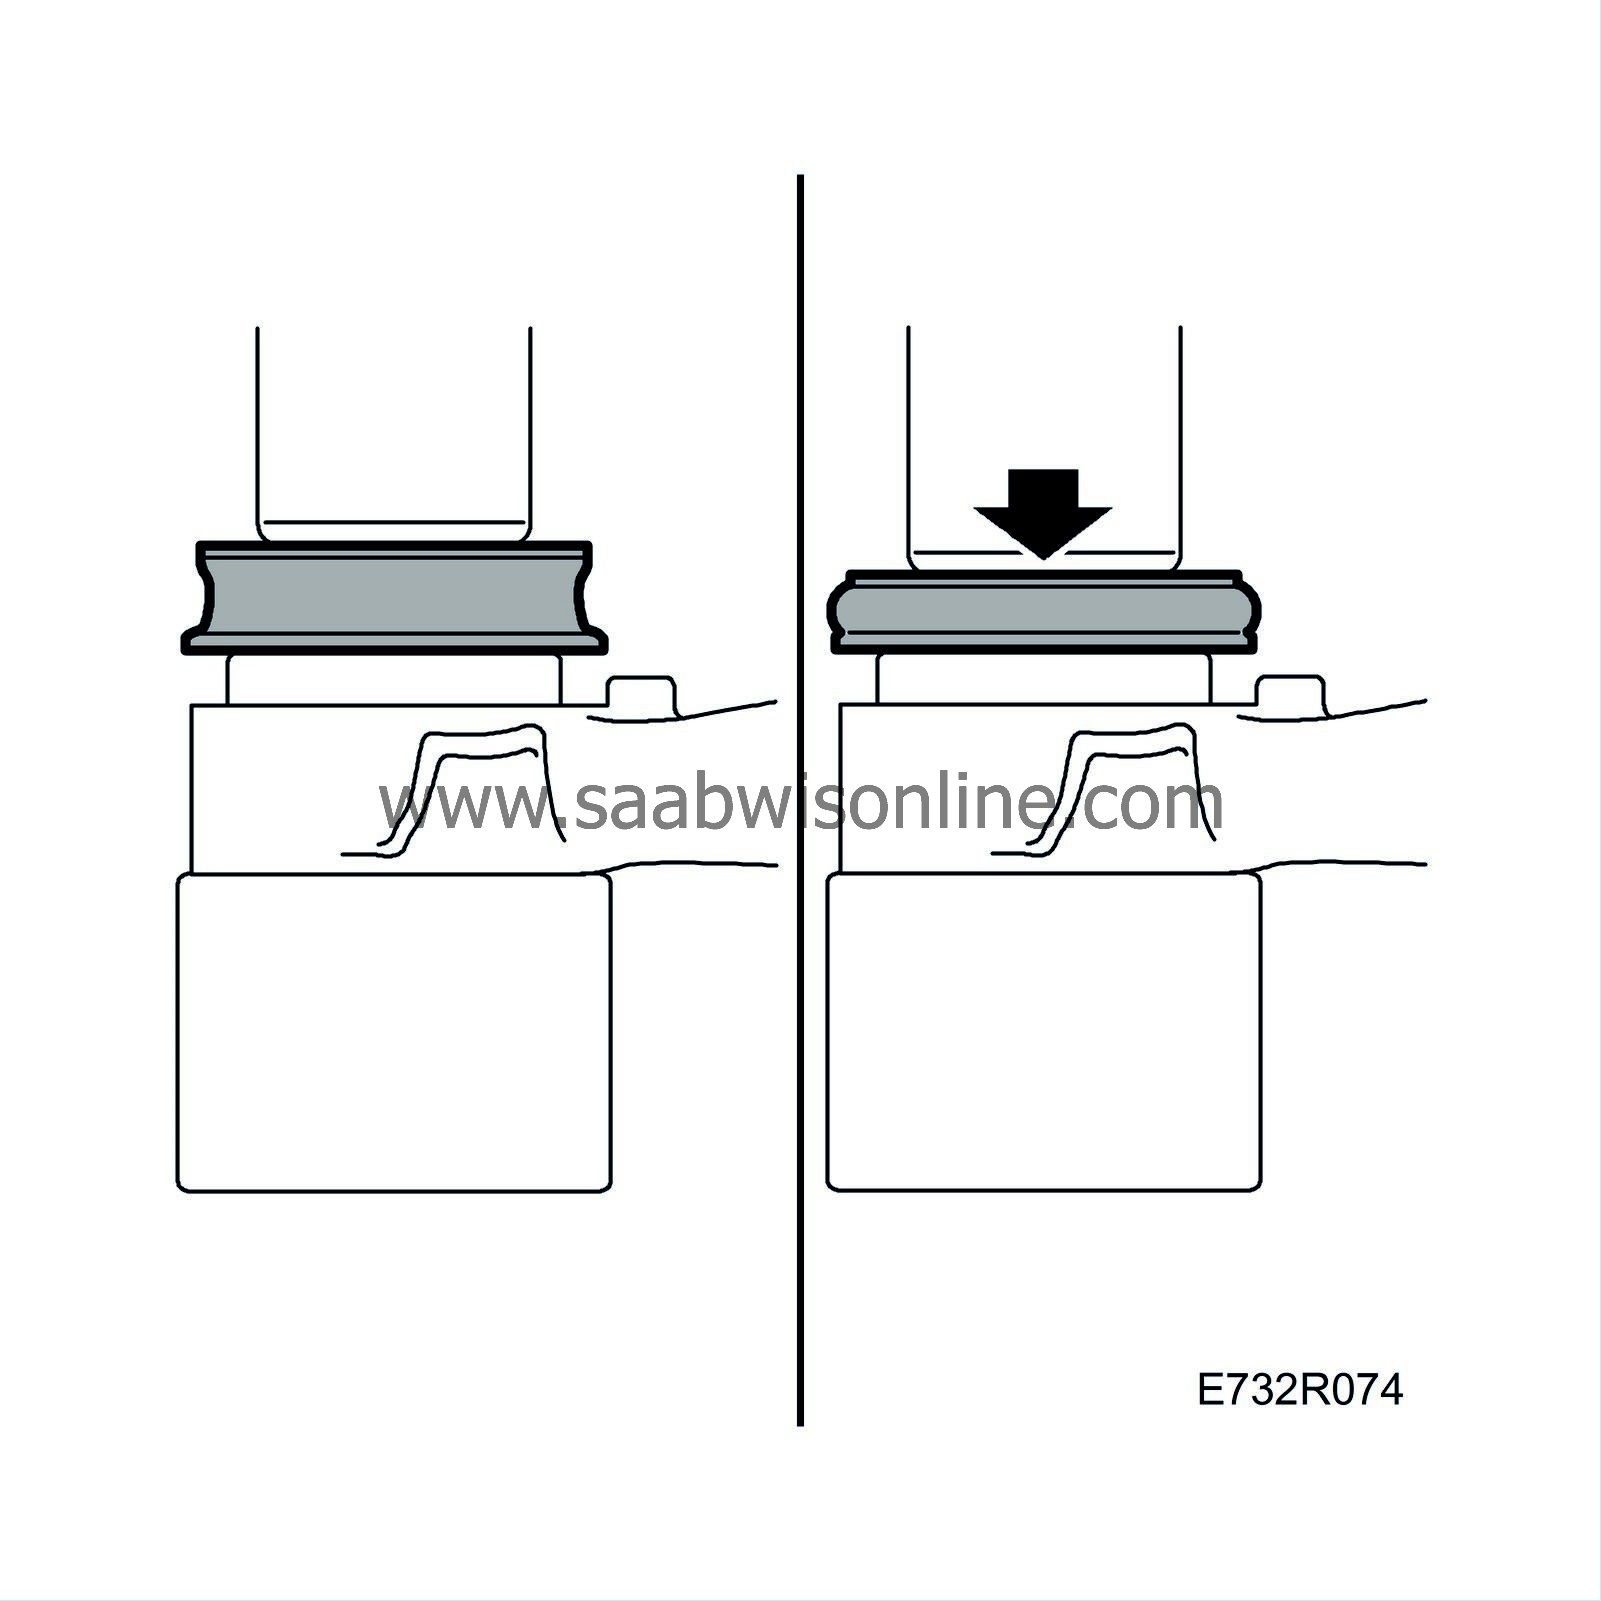
21.
|
Press in the bush with tool KM-906-42 as support.
|
Note
|
|
The swelling of the rubber at the sides is completely normal.
|
|
|
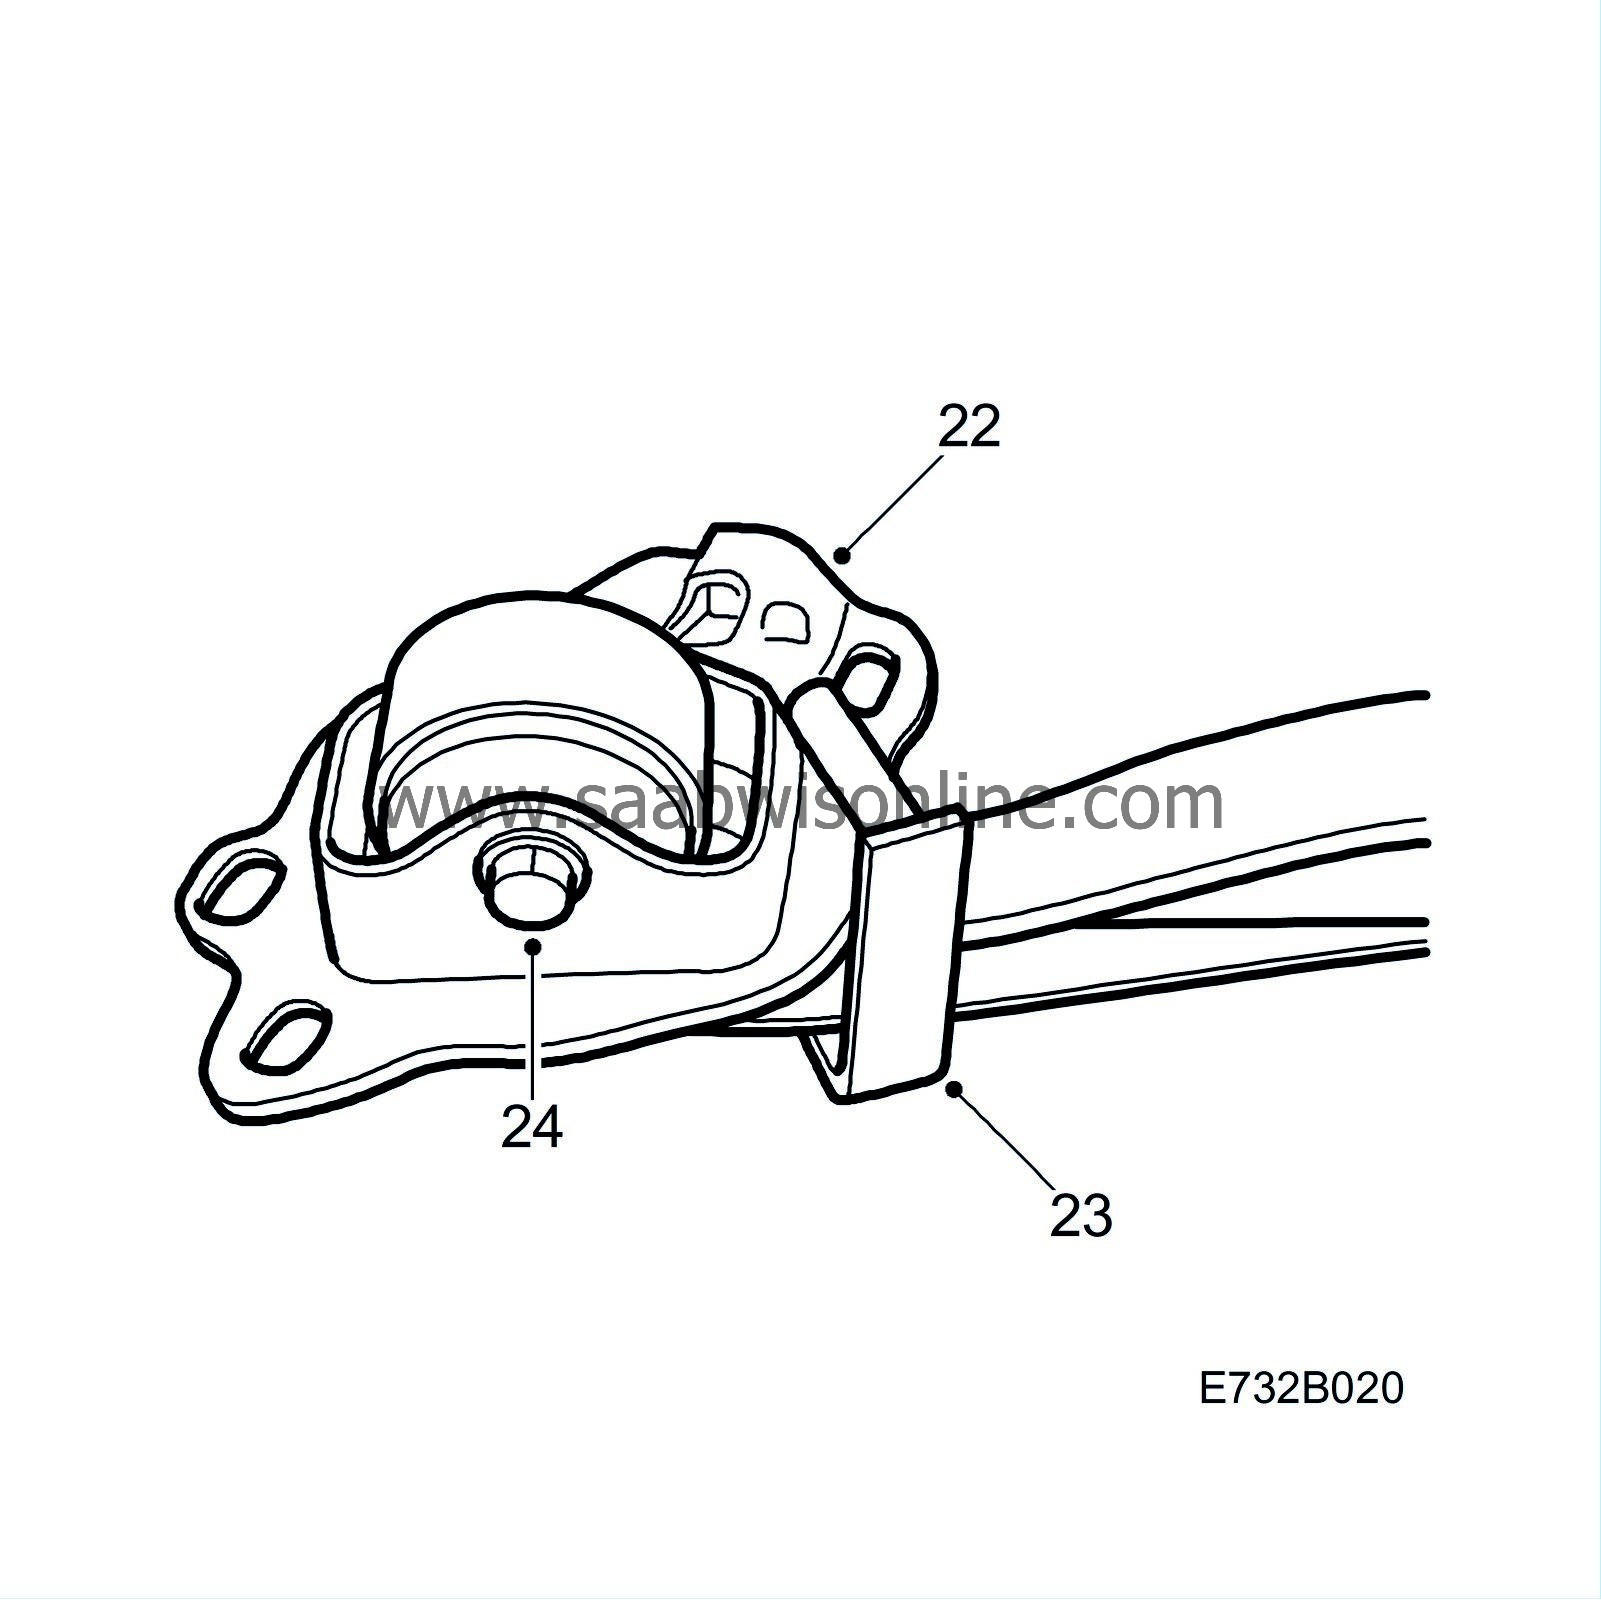
22.
|
Put back the body bracket on the longitudinal link bush.
|
|
23.
|
Clamp on tool 89 96 753 (KM-901).
|
|
24.
|
Fasten the body bracket with bolt and nut.
Tightening torque 90 Nm (70 lbf ft) +60
°
.
|
|
25.
|
Clean the wheel hub mating surface using a wire brush.
|
|
26.
|
Position the wheel hub to the longitudinal link and fit it with
four new
nuts. Tighten the nuts alternately.

Tightening torque 50 Nm (40 lbf ft) +30
°
.
|
|
27.
|
Lift up the longitudinal link to the body and screw in the bolts without tightening them.

|
|
28.
|
Tighten the bolt securing the upper transverse link to the longitudinal link.

Tightening torque 90 Nm (70 lbf ft) +60
°
.
|
|
29.
|
Tighten the bolt securing the anti-roll bar link to the longitudinal link.
Tightening torque 50 Nm (40 lbf ft).
|
|
30.
|
Hook on the handbrake cable and refit the return spring.
|
|
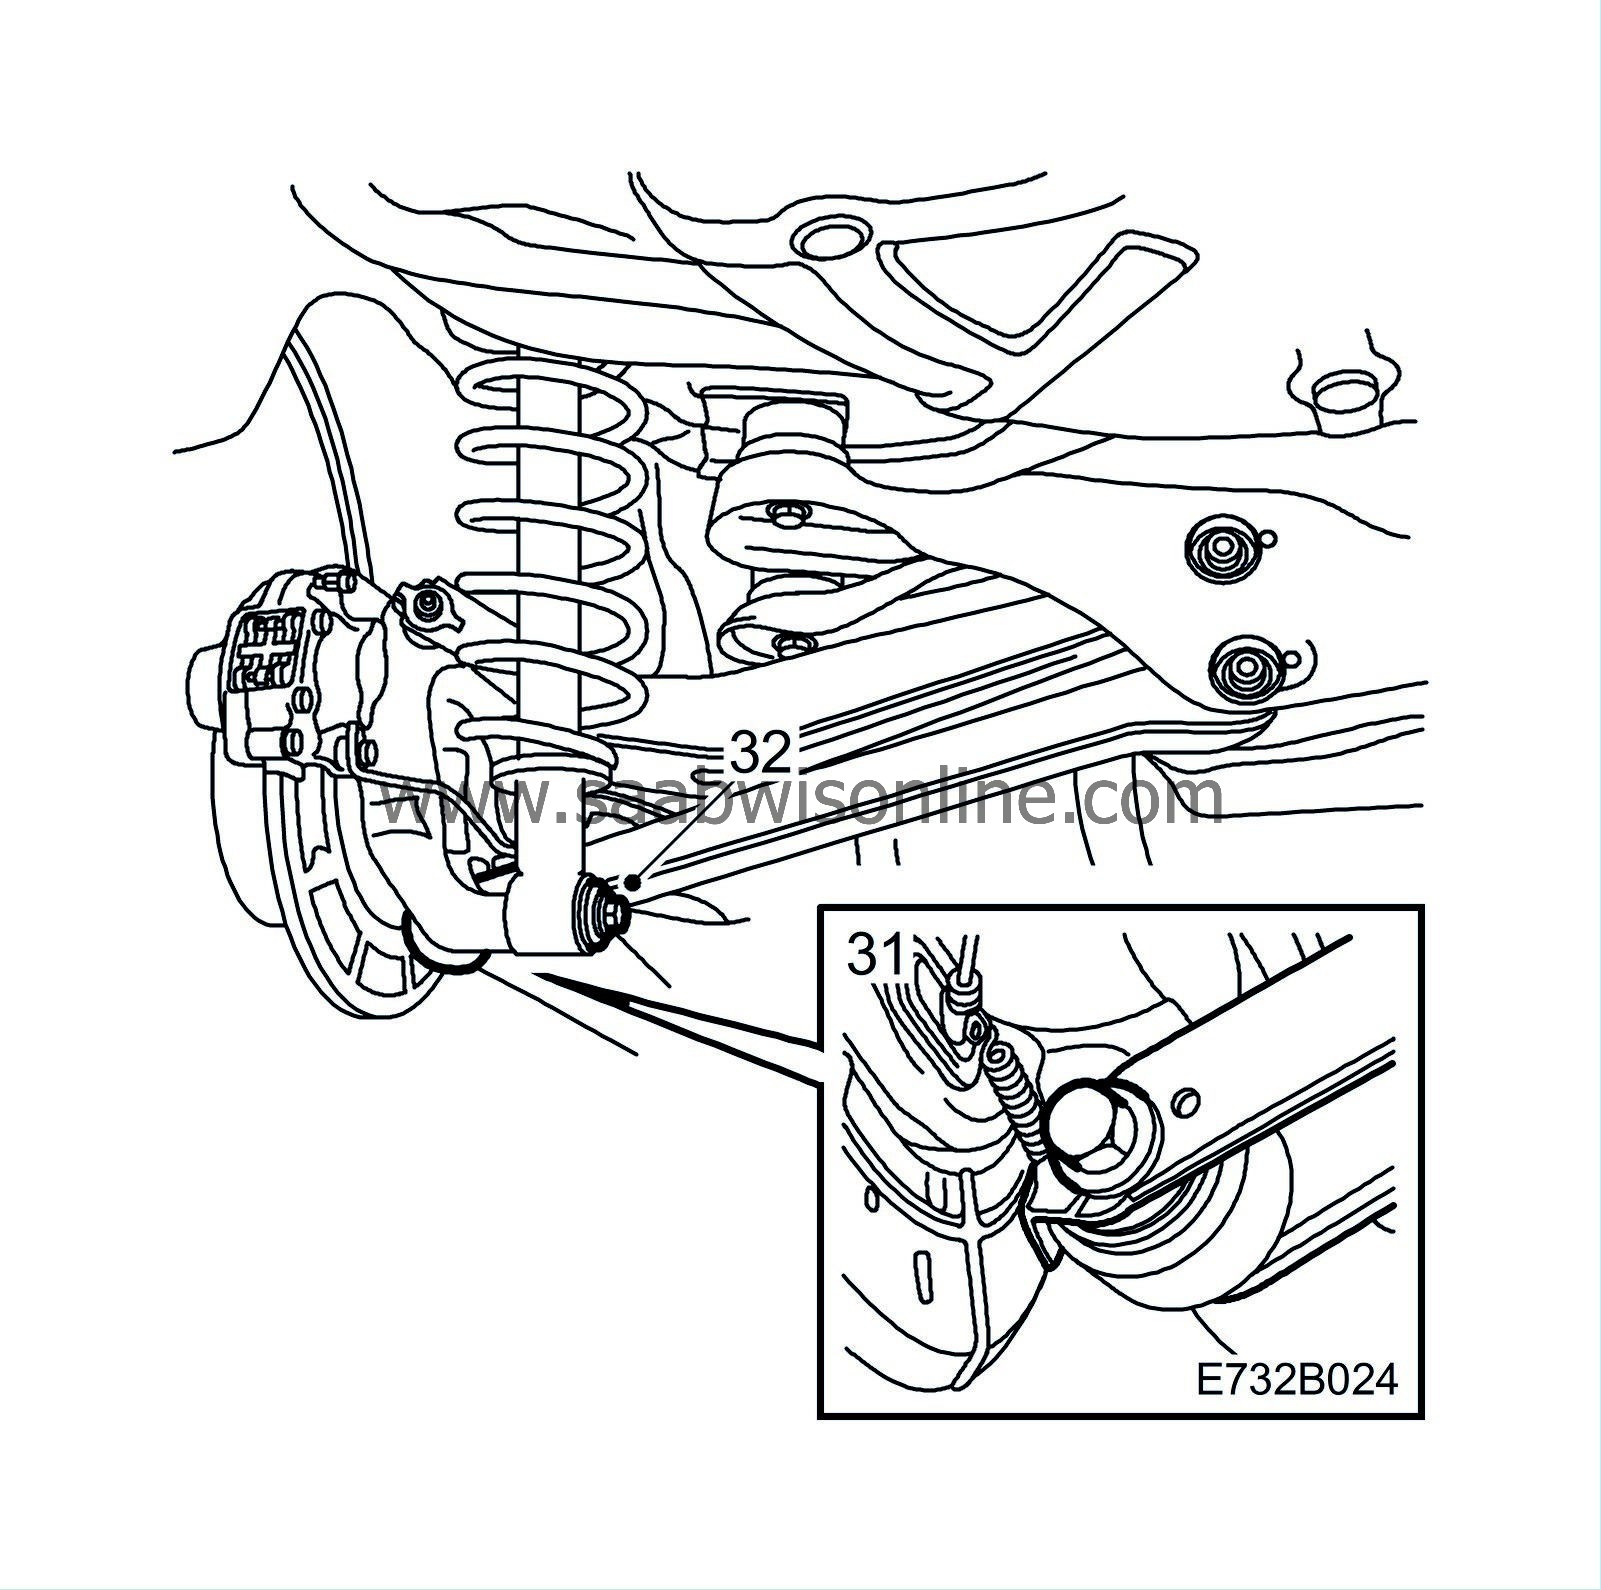
31.
|
Tighten the bolt securing the lower transverse link to the longitudinal link.
Tightening torque 90 Nm (70 lbf ft) +60
°
.
|
|
32.
|
Tighten the lower damper retaining bolt.
Tightening torque 190 Nm (140 lbf ft).
|
|
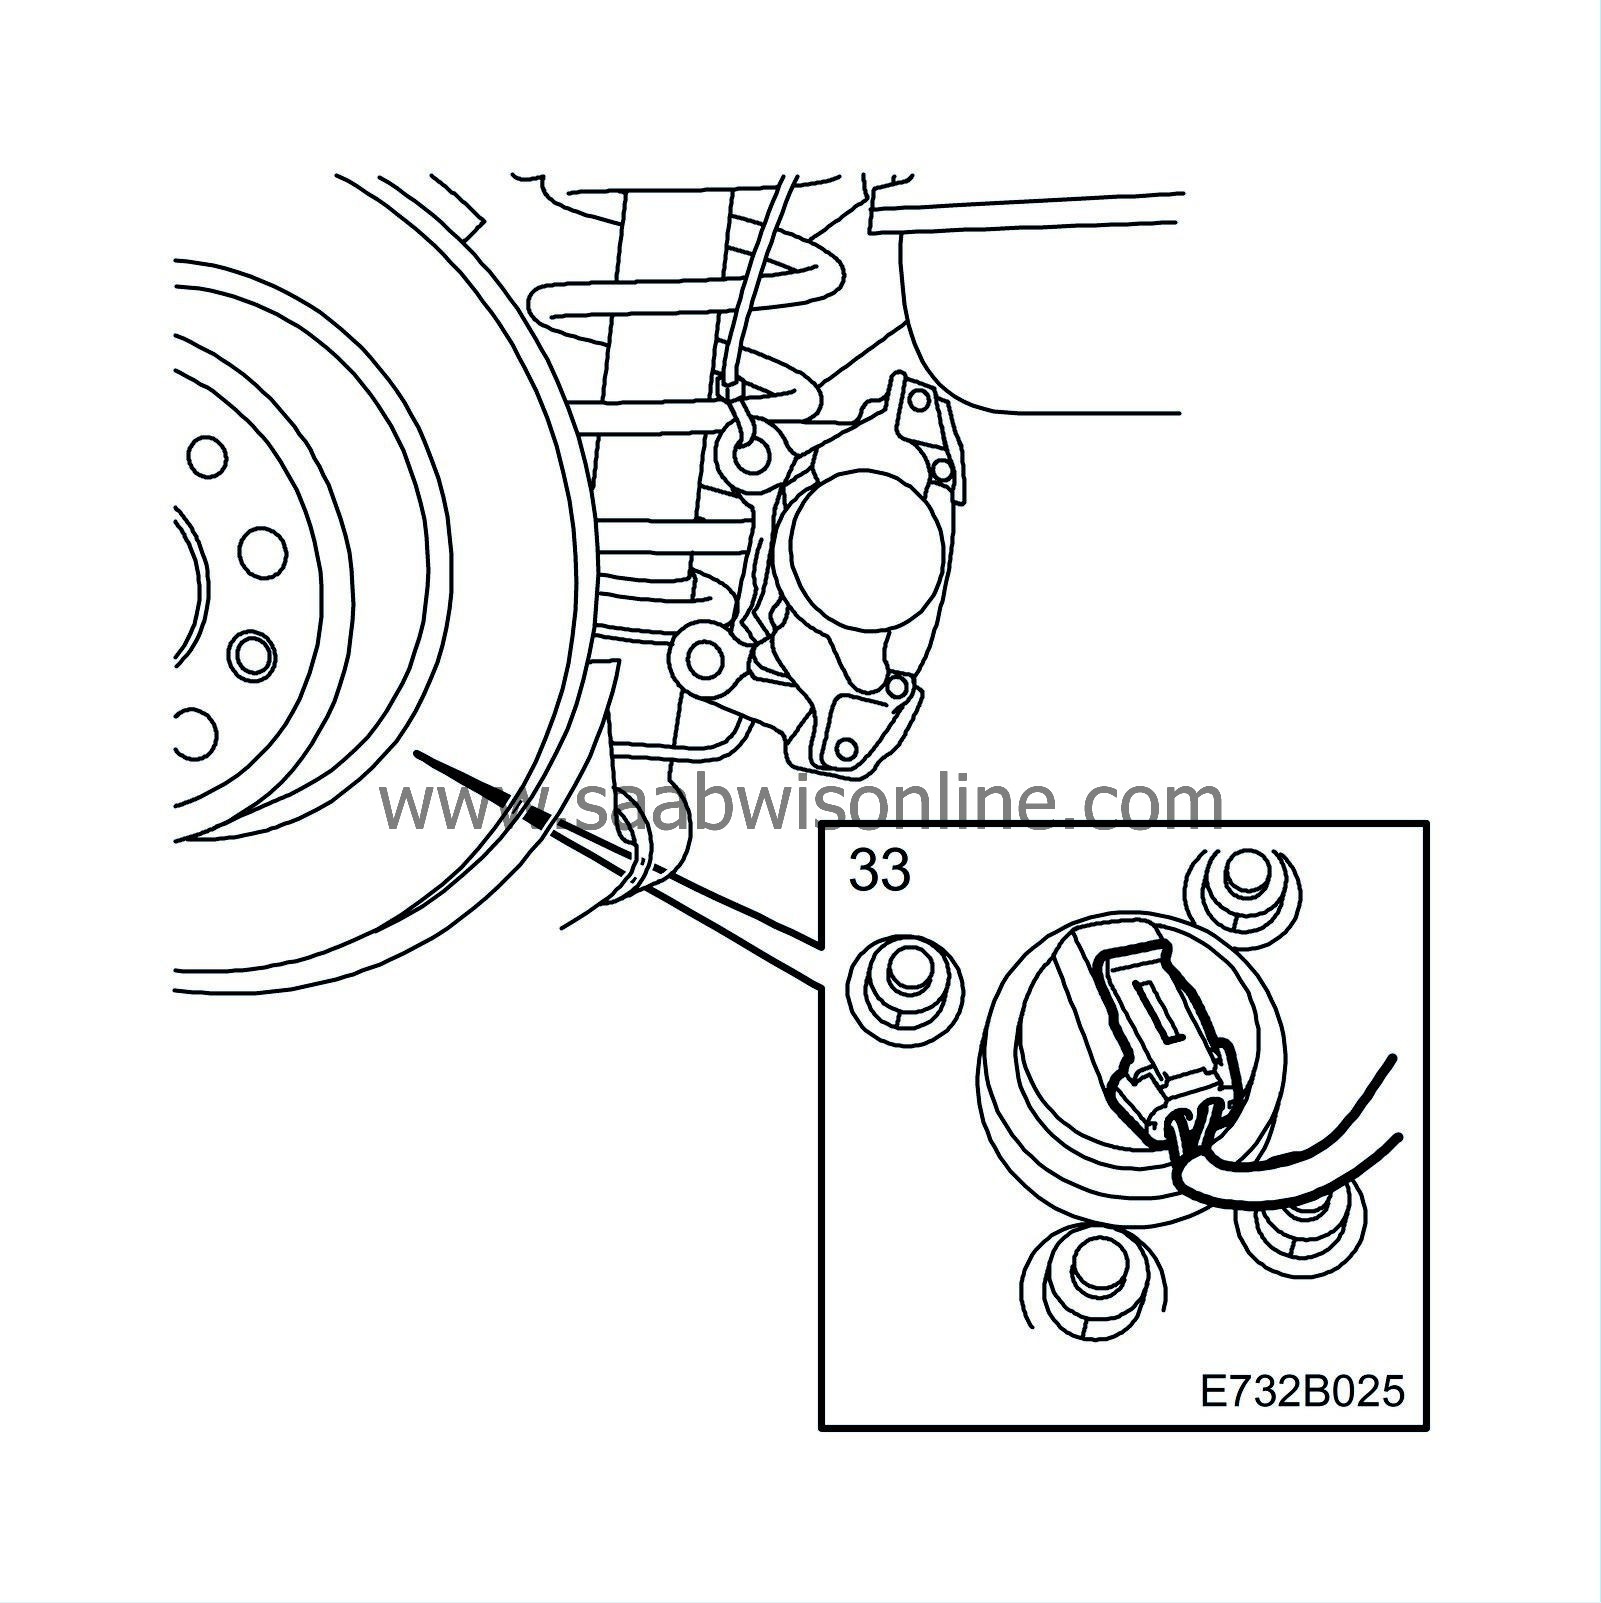
33.
|
Plug in the ABS sensor connector.
|
|
34.
|
Fit the brake caliper, apply threadlocker to the retaining bolts and tighten the bolts.

Tightening torque 80 Nm (60 lbf ft).
|
|
35.
|
Refit the brake pipe bracket and the handbrake cable to the longitudinal link.
|
|
36.
|
Repeat steps 2-35 for the right-hand side.
|
|
37.
|
Press out the pistons in the brake caliper.
|
C. Damper
|
1.
|
Fit a damper to each longitudinal link. Make sure they are parallel to the links.
|
Important
|
|
If is essential that the damper housing goes free on the longitudinal link.
|
|
|
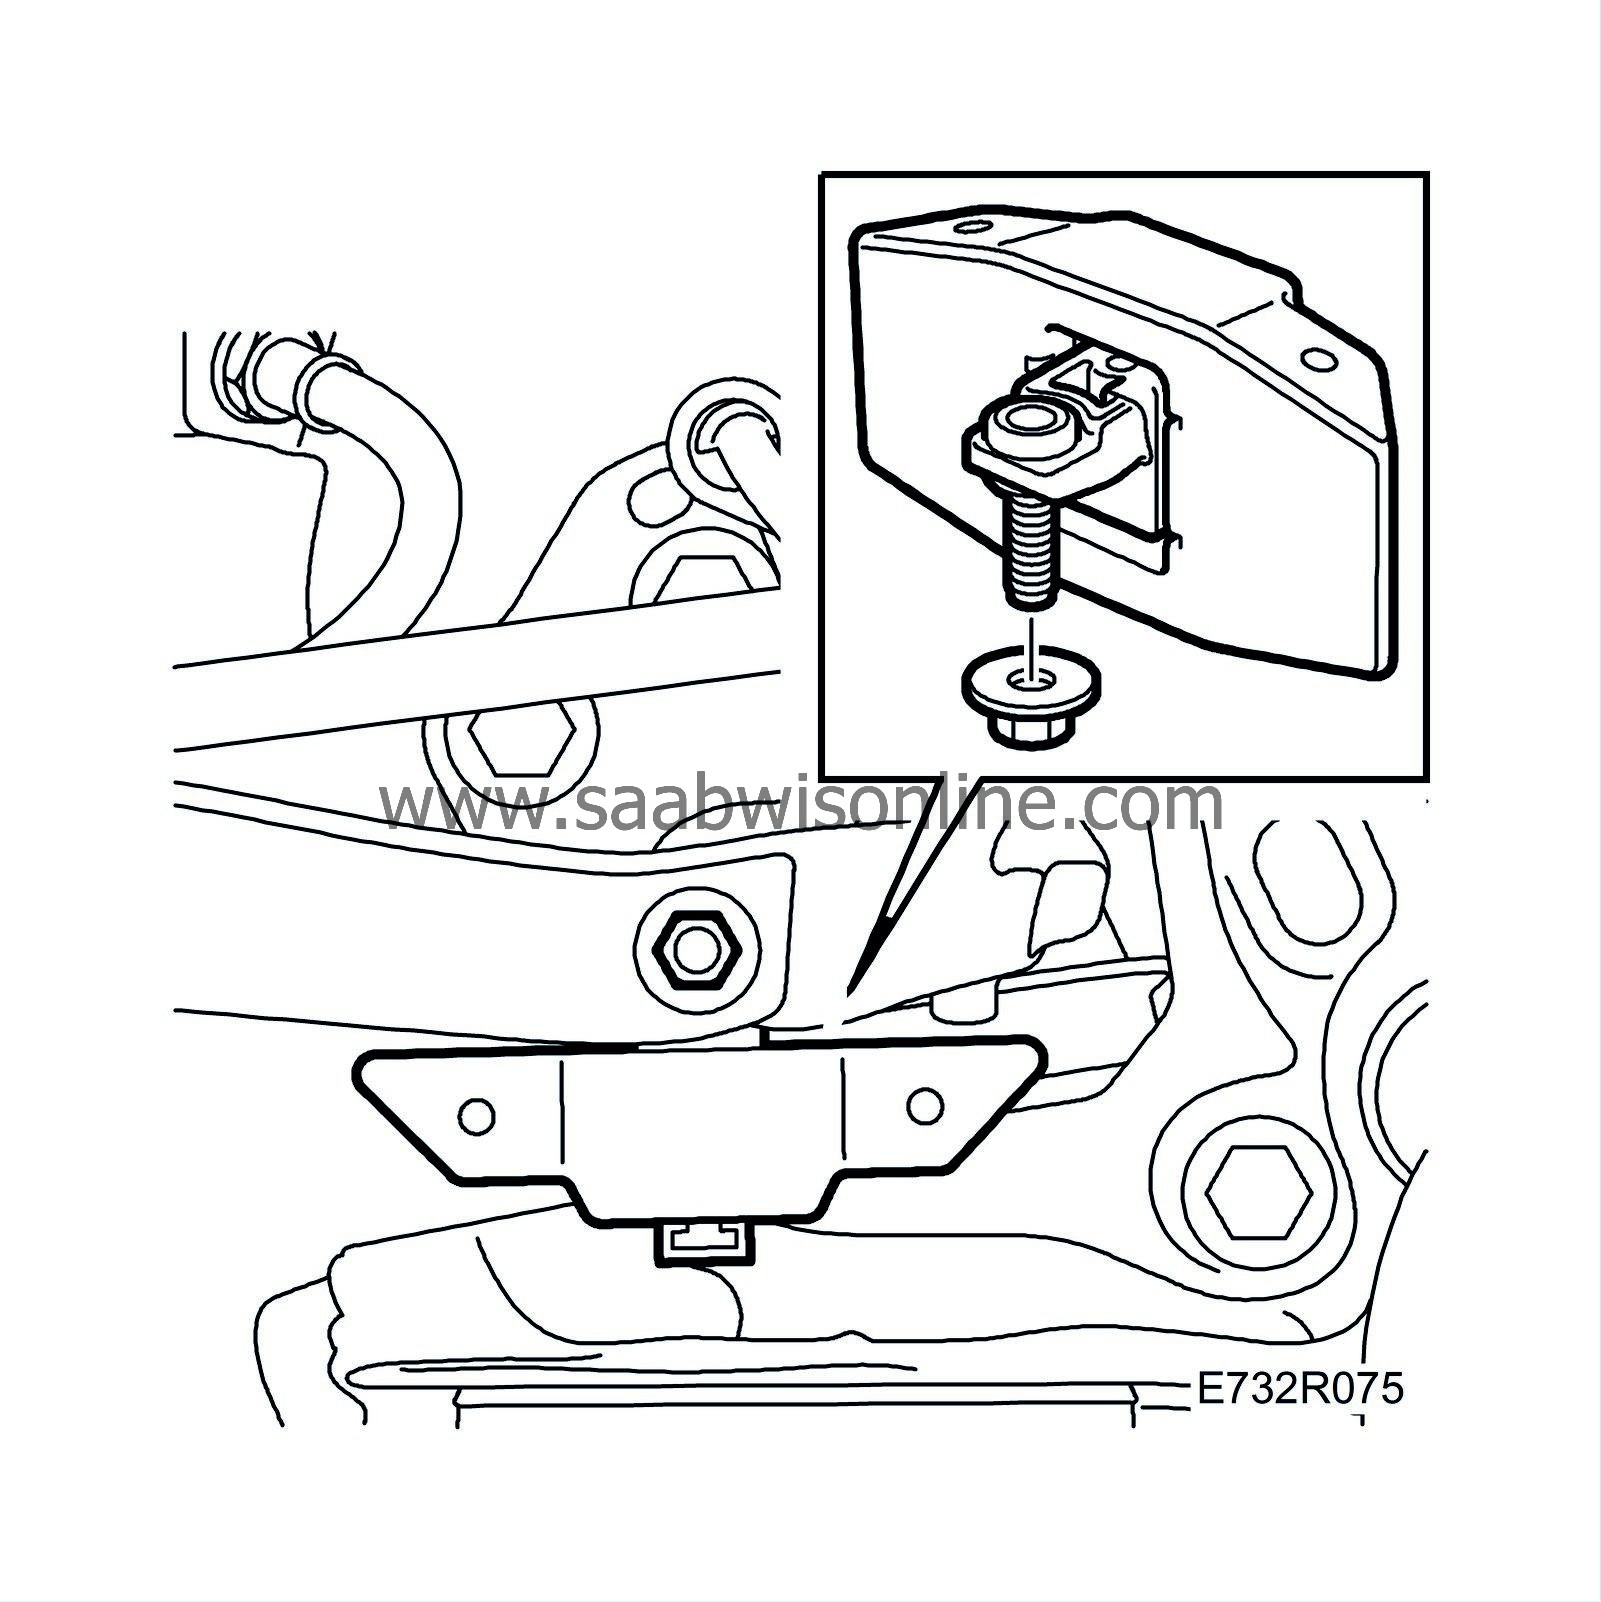
Tightening torque: 24 Nm (18 lbf ft)
|
|
2.
|
Fit the wheels and lower the car.
Tightening torque: 110 Nm (81 lbf ft)
|
|
3.
|
Adjust toe-in, see WIS “Wheel alignment” in the section “Steering linkage”.
|
|
Warranty/Time Information
|
Failed Object: 19042
Fault/Reason Code: 40
Location Code: 09 (US=)
Warranty Type (US):
Repair/Action code: 01
Labour Operation (US):
Time:
Steps A-C: 2.9 hrs
Four-wheel adjustment: 0.8 hrs
Adjust toe-in front: 0.2 hrs
Adjust toe-in rear: 0.2 hrs


 Warning


