Snapshot, Upload/Display
| Snapshot, Upload/Display |
| Using snapshots for troubleshooting and diagnostics |
Snapshots show what has happened in the control unit and are used to analyse fault sources during troubleshooting and diagnostics.
Starting the application
| 1. |
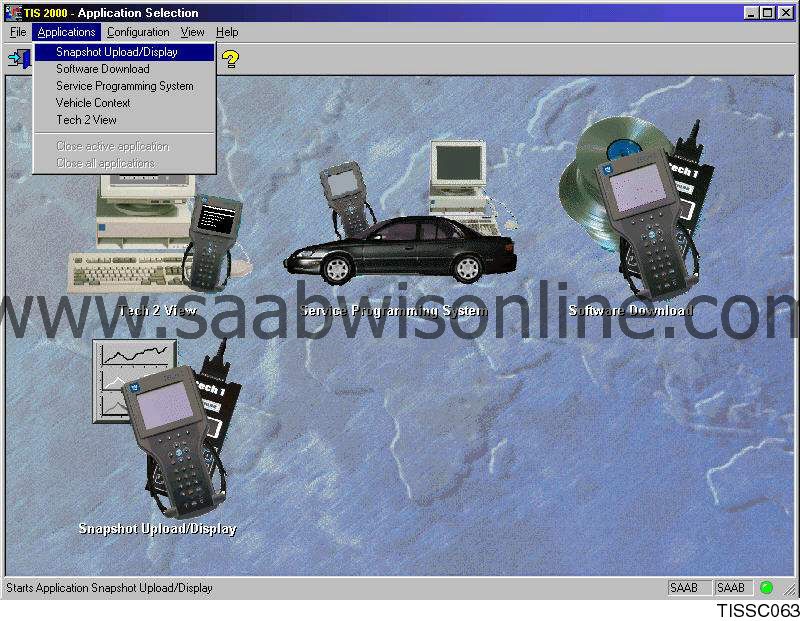
Start the application by clicking on the icon in the program window or selecting the Applications menu and clicking Snapshot, Upload/Display . |
|
| 2. |

Choose between uploading a snapshot from TECH2 or opening a saved snapshot. This can be done either by clicking on the buttons on the screen or by using the Snapshot menu. |
|
Uploading snapshots from TECH2
| 1. |
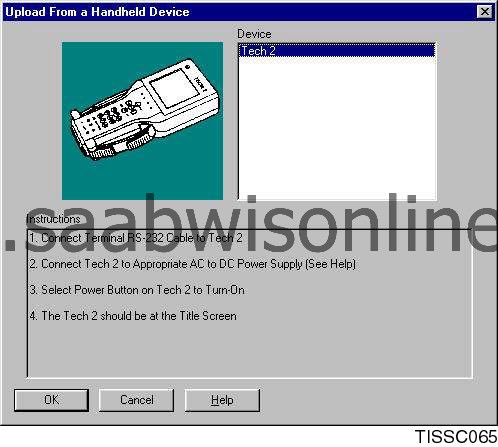
Mark TECH2 in the box. Follow the instructions on the screen and TECH2. Click OK . |
|
| 2. |

Select the snapshot you wish to upload. Click OK . |
|
| 3. |

The selected snapshot is uploaded to the computer. The status is indicated on the screen. |
|
Opening a saved snapshot
| 1. |

Mark the desired snapshot and from which media it is to be opened. Click OK . |
|
Toolbar
A toolbar above the snapshot window has a number of shortcut buttons for various functions. They can also be activated via the menu bar. The functions of the buttons are described below.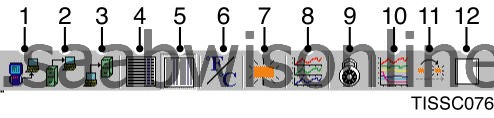
| 1. |
Retrieves a snapshot from TECH2.
|
|
| 2. |
Retrieves an existing snapshot file.
|
|
| 3. |
Saves a snapshot file on the computer.
|
|
| 4. |
Displays snapshot information in a column on the screen.
|
|
| 5. |
Shows snapshot information in two columns on the screen.
|
|
| 6. |
Toggles between showing temperature parameter values in Fahrenheit or Celsius.
|
|
| 7. |
Shows DTCs included in a snapshot.
|
|
| 8. |
Use to show parameters in diagram form.
|
|
| 9. |
Use to lock or unlock parameters, i.e. select parameters to your own list or remove them from the list.
|
|
| 10. |
|
|
| 11. |
|
|
| 12. |
|
|
Displaying snapshots
One snapshot consists of several shots (frames) after each other. When played, you can see the change in a parameter value and how it affects other parameter values. The buttons used to play the frames of a snapshot series are shown here and their functions are described below. These functions can also be activated via the Playback menu.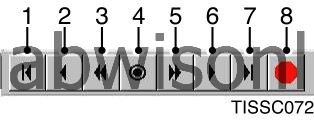
| 1. |
First frame:
Go back to the first frame in a snapshot series. This applies regardless of where you are.
|
|
| 2. |
Back one frame:
Scrolls back one frame at a time.
|
|
| 3. |
Play in reverse:
Plays the snapshot series in reverse. Stops when it reaches the first frame. Only works if you are farther along in the series.
|
|
| 4. |
Reference frame, trigger point:
Moves to the exact frame where a snapshot was triggered, e.g. when a DTC is set by the control unit. Only works if you are elsewhere in the series.
|
|
| 5. |
Play forward:
Plays a snapshot series forward. Stops when it reaches the last frame. Only works if you are farther along in the series.
|
|
| 6. |
Forward one frame:
Scrolls forward one frame at a time.
|
|
| 7. |
Last frame:
Goes to the last frame in a snapshot series. This applies regardless of where you are.
|
|
| 8. |
Stop:
Stops forward or reverse play of a snapshot series.
|
|
Analysing snapshots
| 1. |
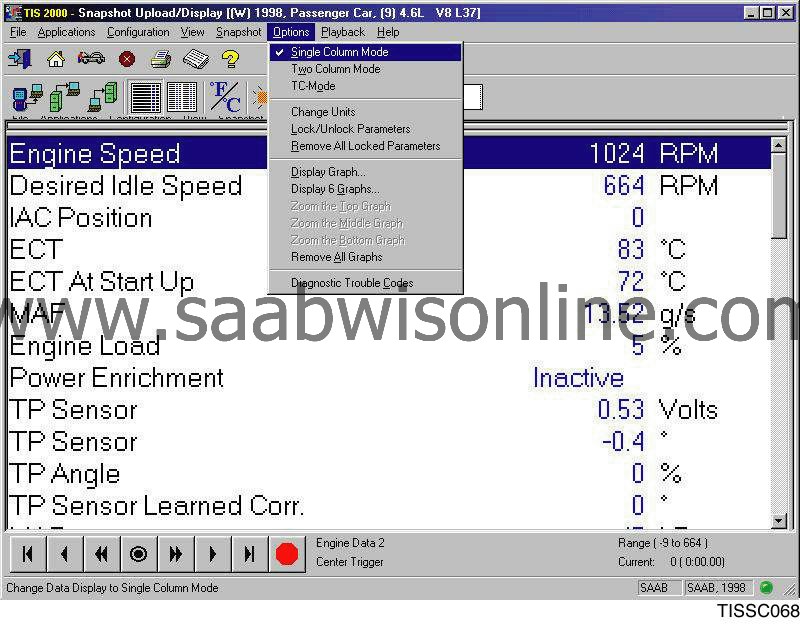

Snapshot information is now displayed on the screen. The parameters can be displayed in either one or two columns via the Options menu or the toolbar buttons. |
|
| 2. |
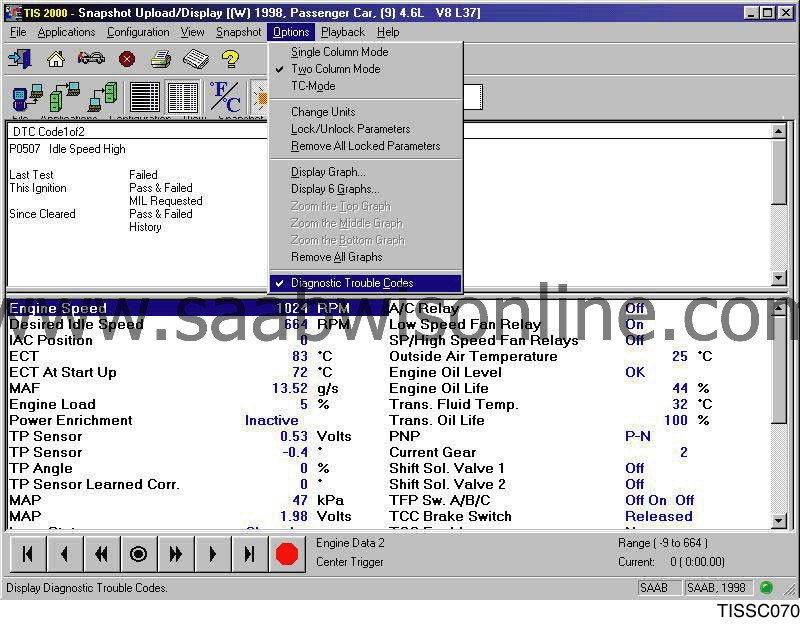
Relevant diagnostic trouble codes (DTCs) are shown by selecting Options and Diagnostic Trouble Codes . |
|
| 3. |

By double-clicking on individual parameters in the table, you can move them up to the top frame to provide a better overview. First click on the padlock symbol in the toolbar or select the Options menu and click Lock/Unlock Parameters . |
|
Graphing parameter values
| 1. |
Click on button 8 in the toolbar or select the
Options
menu and click
Display Graph
.
|
|
| 2. |

Create graphs of the parameter values by clicking on a graph button and then on the desired parameter in the list. Enter a minimum and maximum Y-axis value. Select black or white as the background colour. Click OK . |
|
Saving a snapshot
| 1. |

To save a snapshot: Click on button 3 in the toolbar or select the File menu. Choose whether to save to the hard drive or disk and click OK . |
|
This project is supported by memberships and donations. If you use this site, please consider Joining SCNA and/or making a donation.
Our Friends
