(980-2477) Checking the towbar installation
|
MODIFICATION INSTRUCTION
|
|
Bulletin Nbr:
|
980-2477
|
|
Date:
...........
|
Juni 2004
|
|
Market:
|
se separat lista
|
|
|
Checking the towbar installation
|
|
Customer Satisfaction Campaign 154 32
|
Cars in stock must be rectified before delivery.
A personal communication must be sent to the owners of cars already delivered requesting them to get in touch with the nearest Saab garage as soon as possible to have the fault rectified.
Saab 9-5 M98-M04 4D and 5D with towing bracket fitted. Cars affected can be traced in accordance with separate information.
The contents of the towbar kits 400 133 609, 400 133 617 and 400 133 583 may be incorrect. Instead of self-tapping bolts which are fitted in the bumper rail there may be bolts with normal threads packed. In addition, in the kit for the 4D the thread length of the 2 bolts which are fitted on the body is too short. This means that the clamping force in the joint is reduced and the towing bracket can begin to work loose.
The above kits are now updated.
Method A, 4D:
92 150 036 Bolt (x2)
Method B and D, 4D and 5D
48 25 634 Insulation pad (x4)
79 79 602 Nut (x4)
92 150 036 Bolt (x2) (applies only to 4D)
Checking the towbar installation
:
The following checking must be performed to determine which method shall be implemented.
|
2.
|
Check the bolts in the bumper rail. Are the bolts black as in the illustration?

Yes
:
5D
: The towbar installation is OK.
4D
: The bolts in the bumper are OK. The bolts fitted to the body are incorrect. Rectify in accordance with method A.
No
:
4D
: The towbar installation must be rectified in accordance with method B.
5D
: The towbar installation must be rectified in accordance with method D.
|
Note
|
|
The following methods apply to M02-M04. For M98-M01 certain items differ when removing and fitting the bumper and bumper rail. For supplementary information see WIS.
|
|
|
1.
|
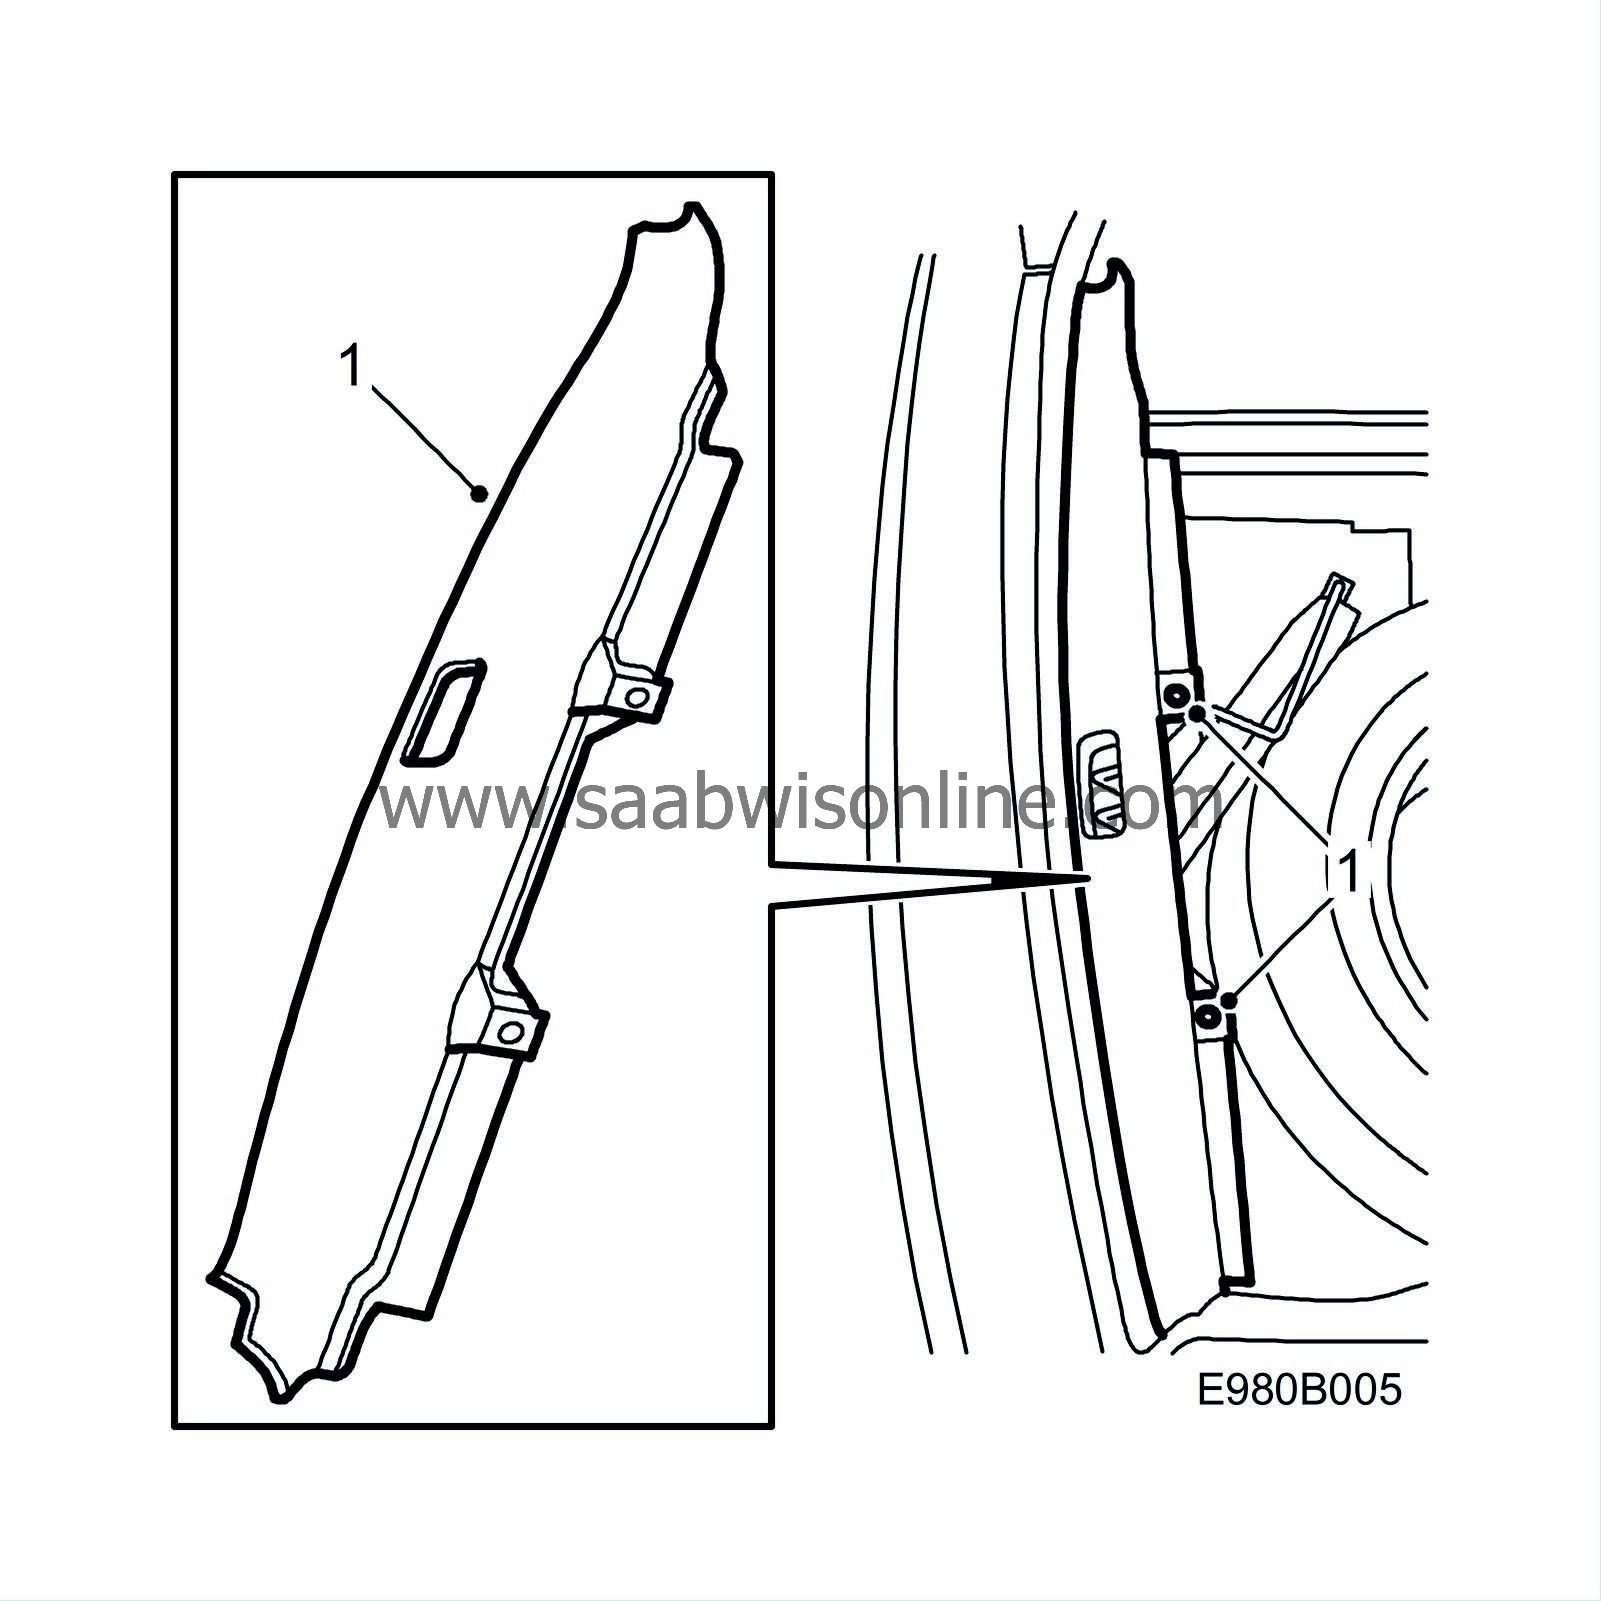
Remove the sill protection from the boot.
|
|
2.
|
Fold aside the luggage compartment mat.
|
Note
|
|
No counterhold is required on the back when removing the bolt. The nut has been replaced by a press nut.
|
|
|
3.
|
Remove the bolts on the right and left-hand sides and replace the incorrect bolts with new ones which have the correct thread length.
Tightening torque 40 Nm (30 lbf ft)

|
|
4.
|
Fit the luggage compartment mat.
|
|
1.
|
Remove the bumper in accordance with method C.
|
|
2.
|
Remove the towbar unit and the reinforcements from the bumper rail.

|
|
3.
|
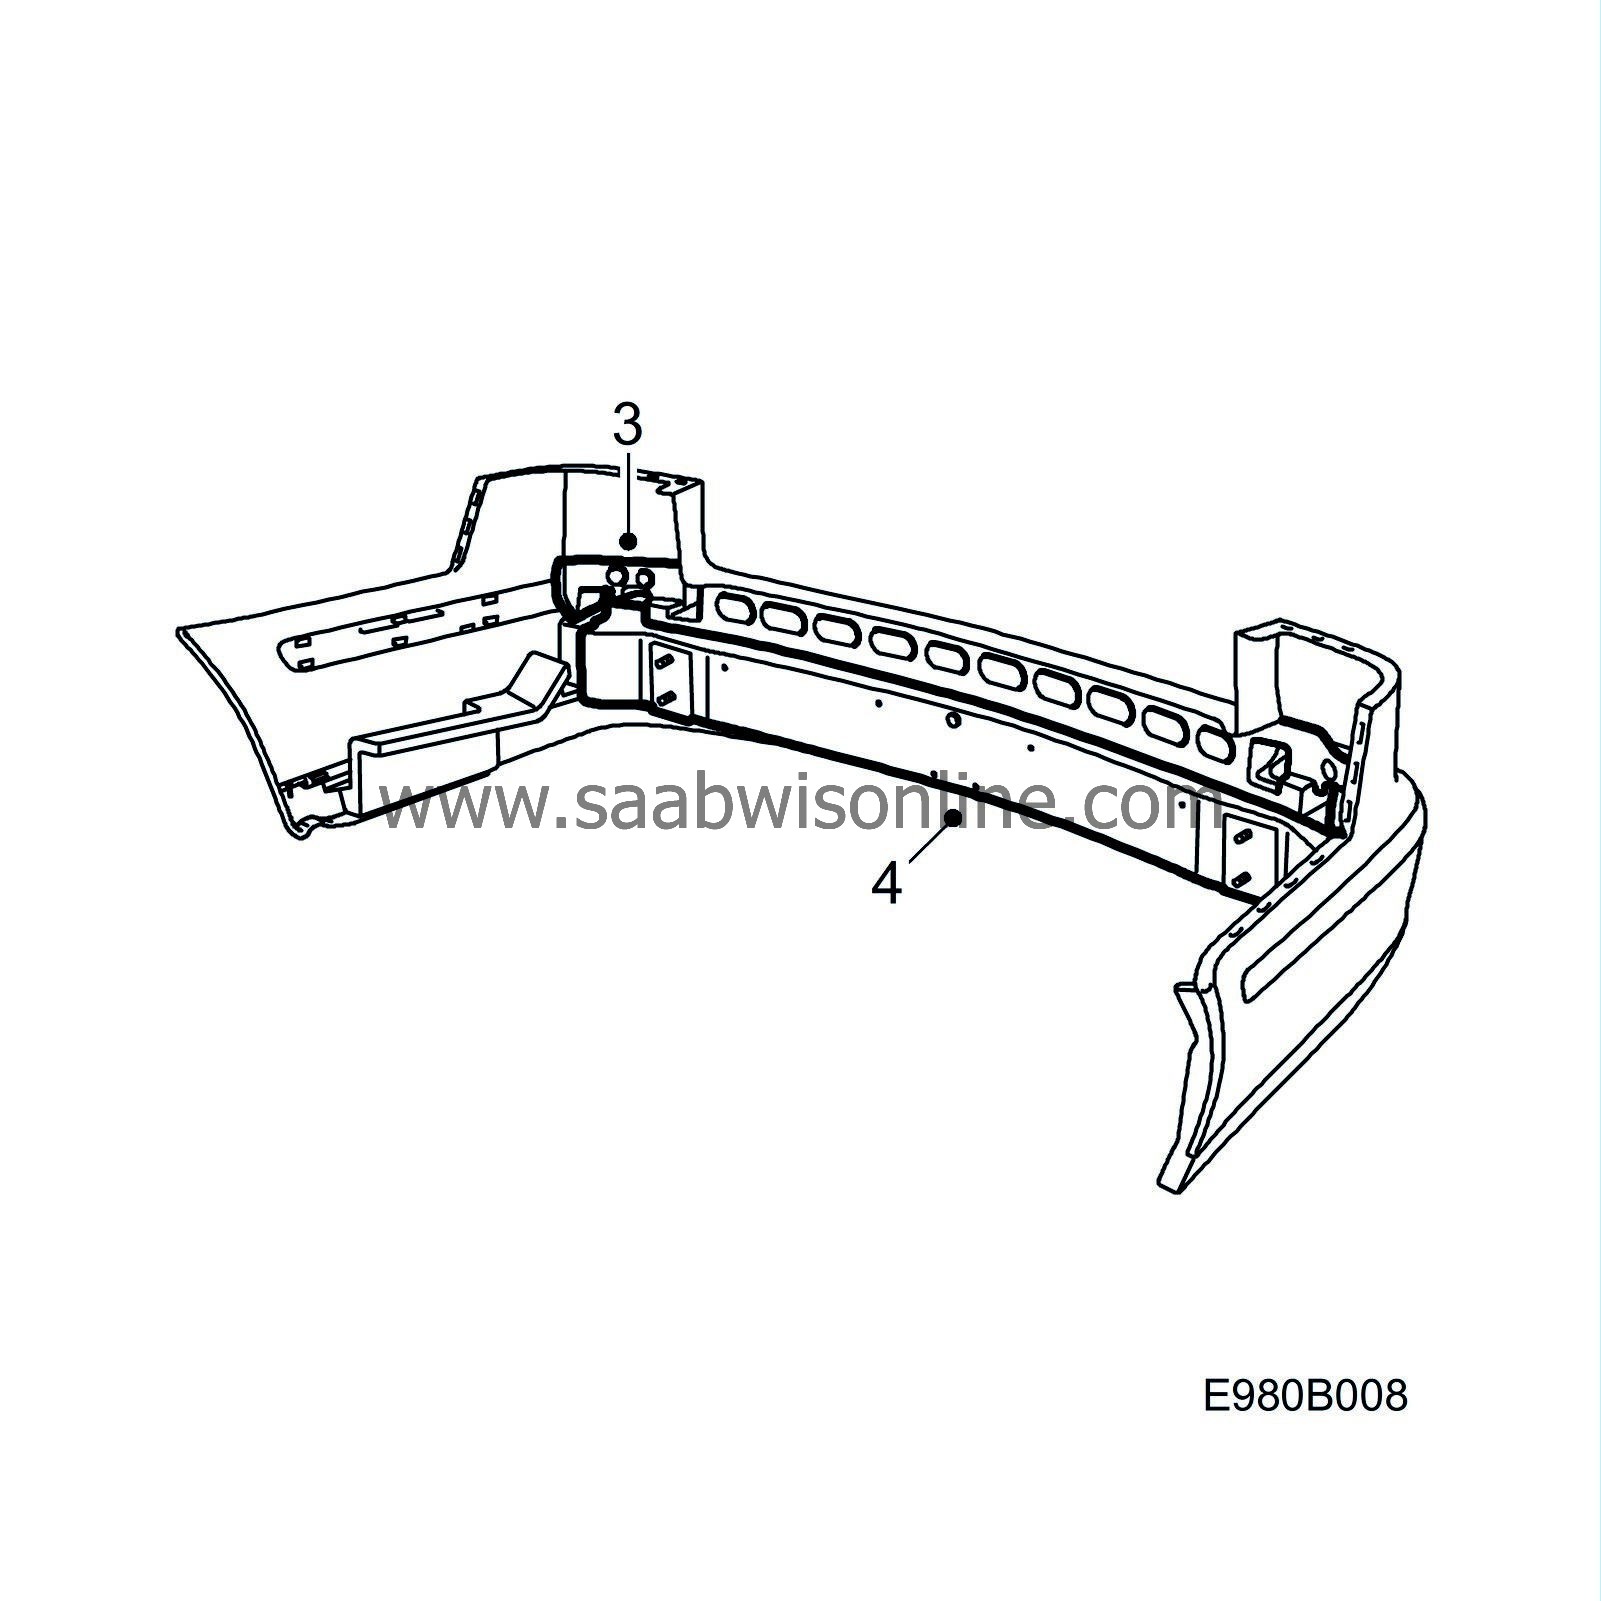
Remove the upper cellular block from the protective shell.
|
|
4.
|
Remove the bumper rail from the bumper shell.
Drill out the holes in the bumper rail for the towing bracket reinforcement with an 8.5 mm bit.
|
|
5.
|
Fit the towing bracket reinforcement on the bumper rail. Fit the new nuts on the old bolts.
Tightening torque 19 Nm (14 lbf ft)

|
|
6.
|
Cut out the cellular block approx. 30x30x30 mm so that there is space for the nuts.

|
|
8.
|
Cut the upper cellular block in accordance with the illustration. Fit the upper cellular block.
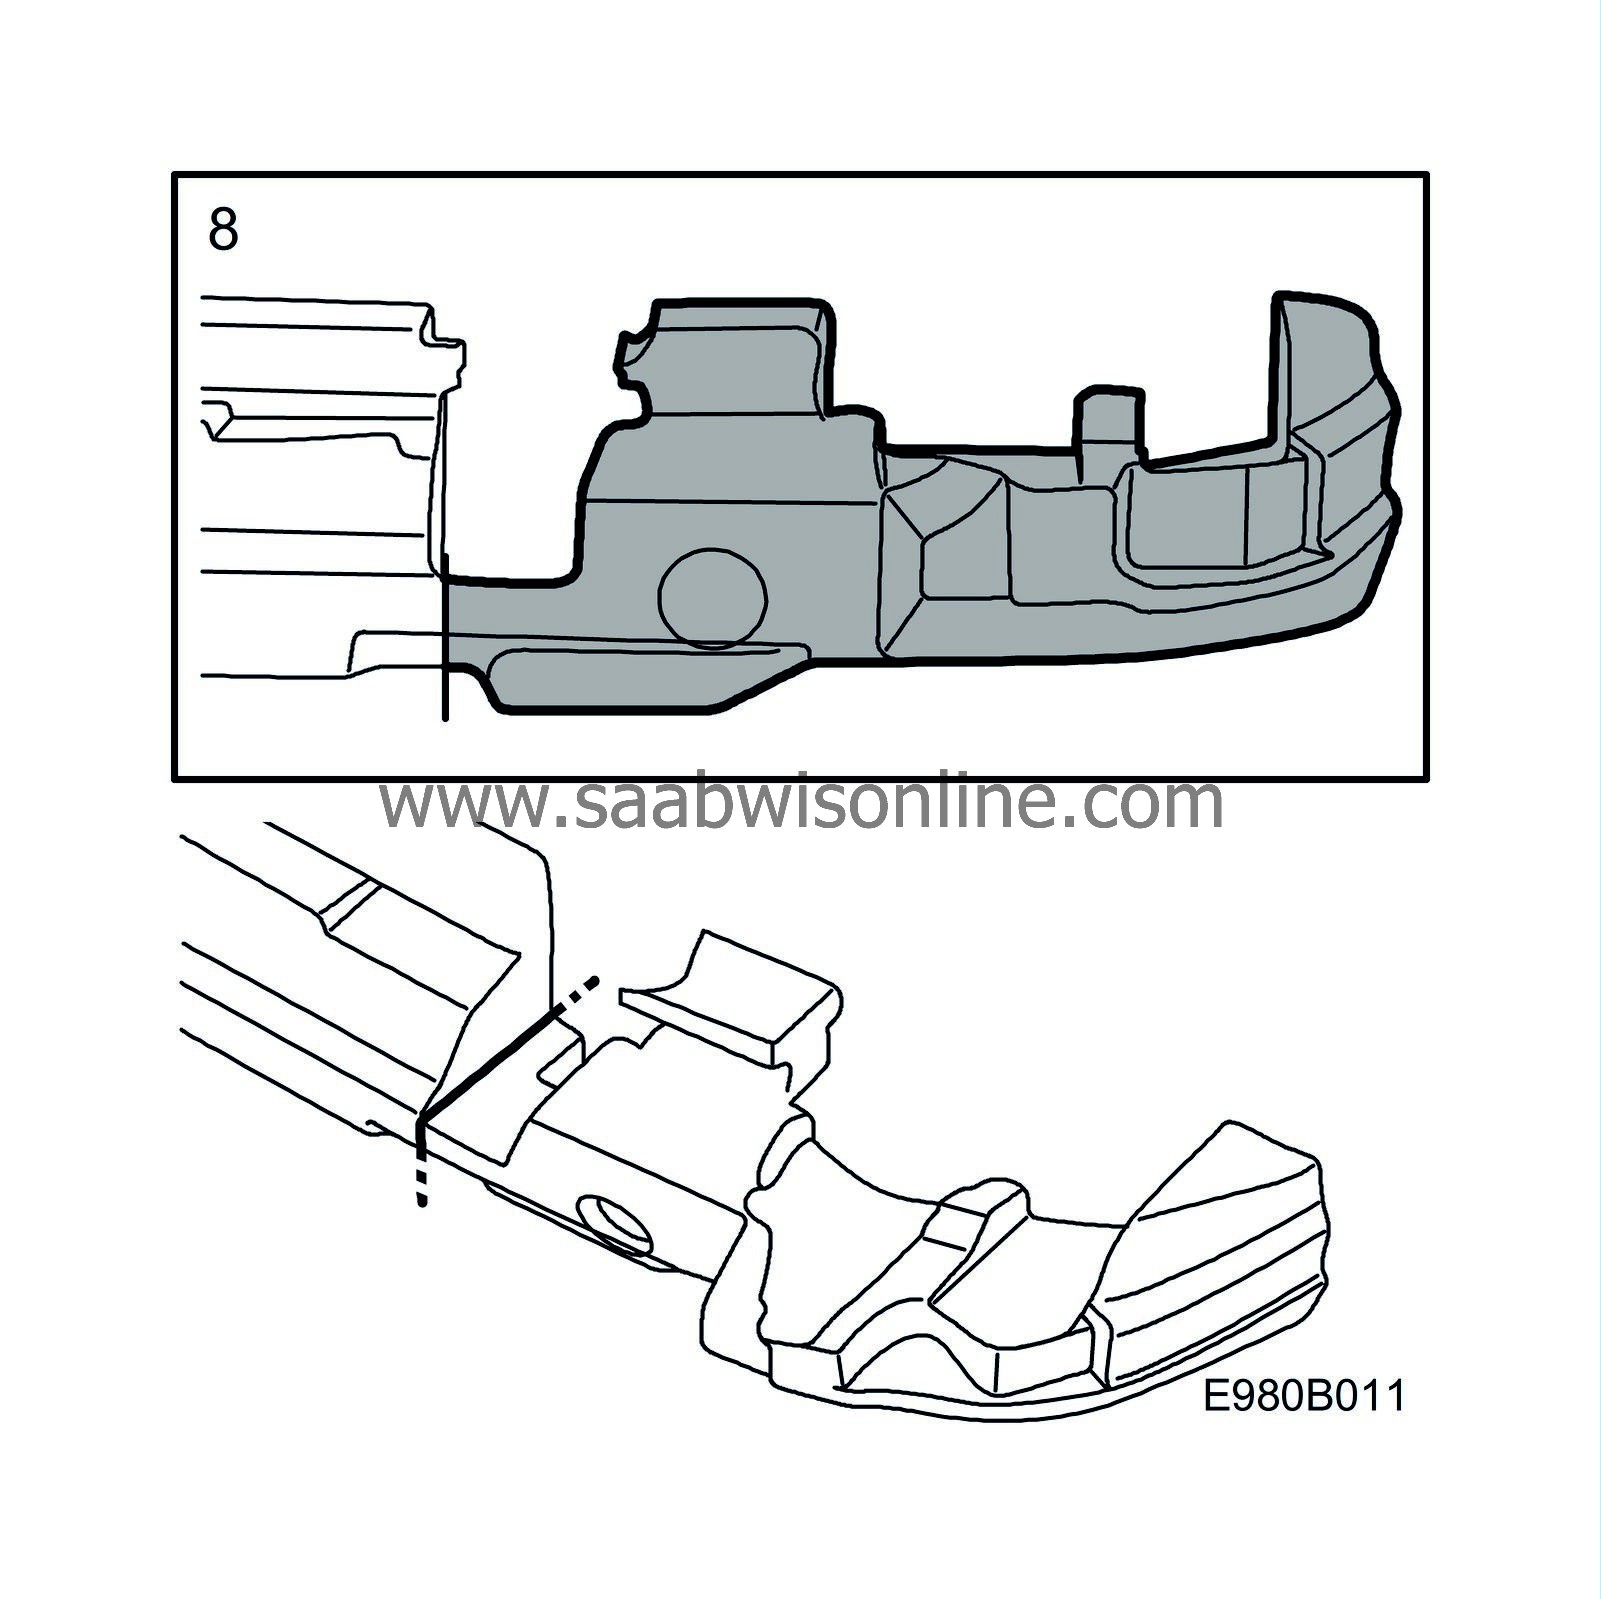
Fit the towbar unit to the bumper rail.
|
|
9.
|
Fit the bumper in accordance with method C.
|
|
Method C, removing the bumper, 4D
|
|
1.
|
Unscrew the bolts in the wheel housing, 2 on each side.

|
|
3.
|
Remove the sill protection from the boot.

|
|
4.
|
Fold aside the luggage compartment mat and remove the insulation pads. The old ones must be discarded and replaced with new.
|
|
5.
|
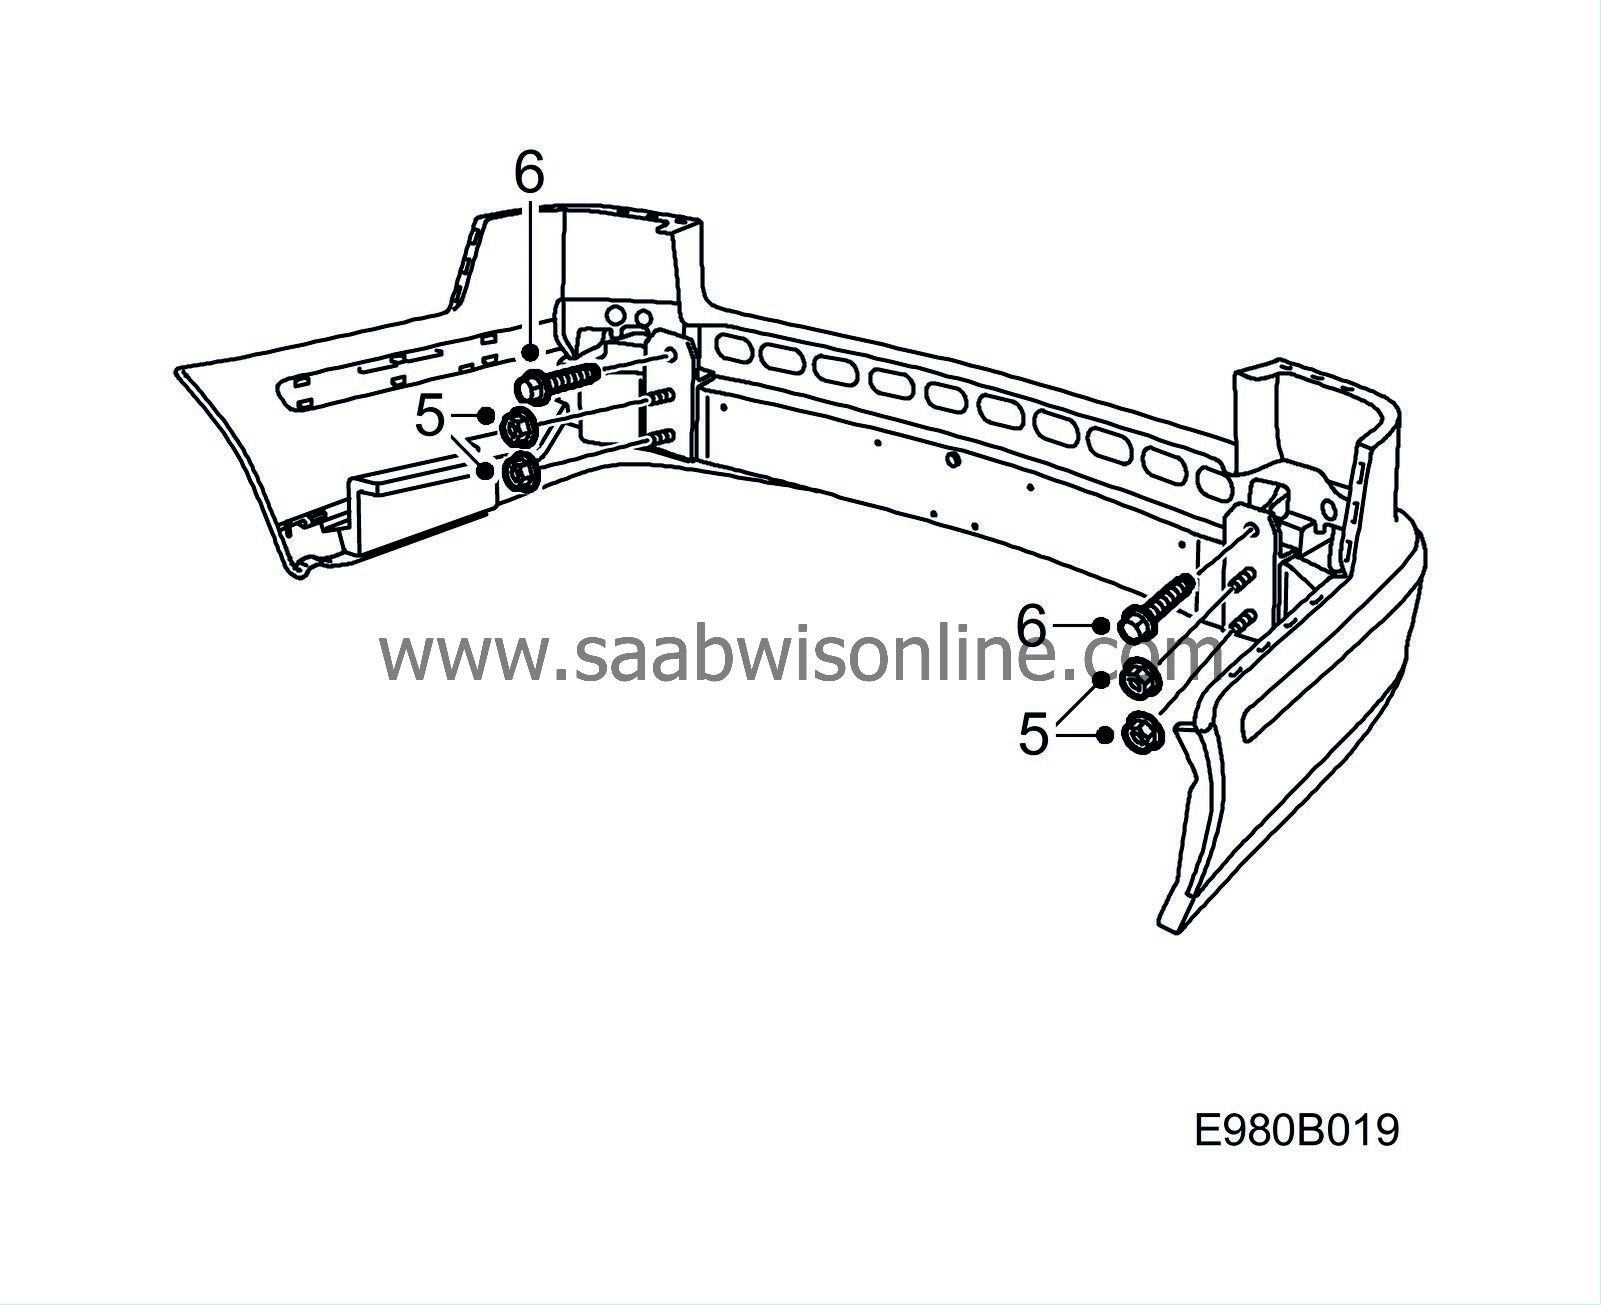
Remove the nuts holding the bumper.
|
Note
|
|
No counterhold is required on the back when removing the bolt. The nut has been replaced by a press nut.
|
|
|
6.
|
Remove the bolts from inside. These bolts are incorrect and must be replaced with new ones which have the correct thread length.
|
|
7.
|
Remove the towing bracket connector. Remove the bolts and the nut plates holding the towing bracket to the body.

|
|
8.
|
Get assistance from someone. Pull out the bumper from the clips. Lift the bumper out backwards.
|
|
9.
|
Cars with SPA
: Remove the connector.

|
|
Method C, fitting the bumper, 4D
|
|
1.
|
Cars with SPA:
Attach the connector.

|
|
2.
|
Fit the towing bracket connector in the bumper cavity.
|
|
3.
|
Fit the bumper in position and press it in above the edge of the wheel housing. Make sure that the clips engage correctly.
|
|
4.
|
Fit the bumper's nuts and bolts. Use the four new bolts which have the correct thread length.
Tightening torque 40 Nm (30 lbf ft)

|
|
5.
|
Fit the bolts into the edge of the wheel housing.

|
|
6.
|
Fit the bolts and nut plates that hold the towing bracket on the body.
Tightening torque 40 Nm (30 lbf ft)
Fit the towing bracket connector.

|
|
7.
|
Fit new insulation pads and fold down the luggage compartment mat.
|
|
8.
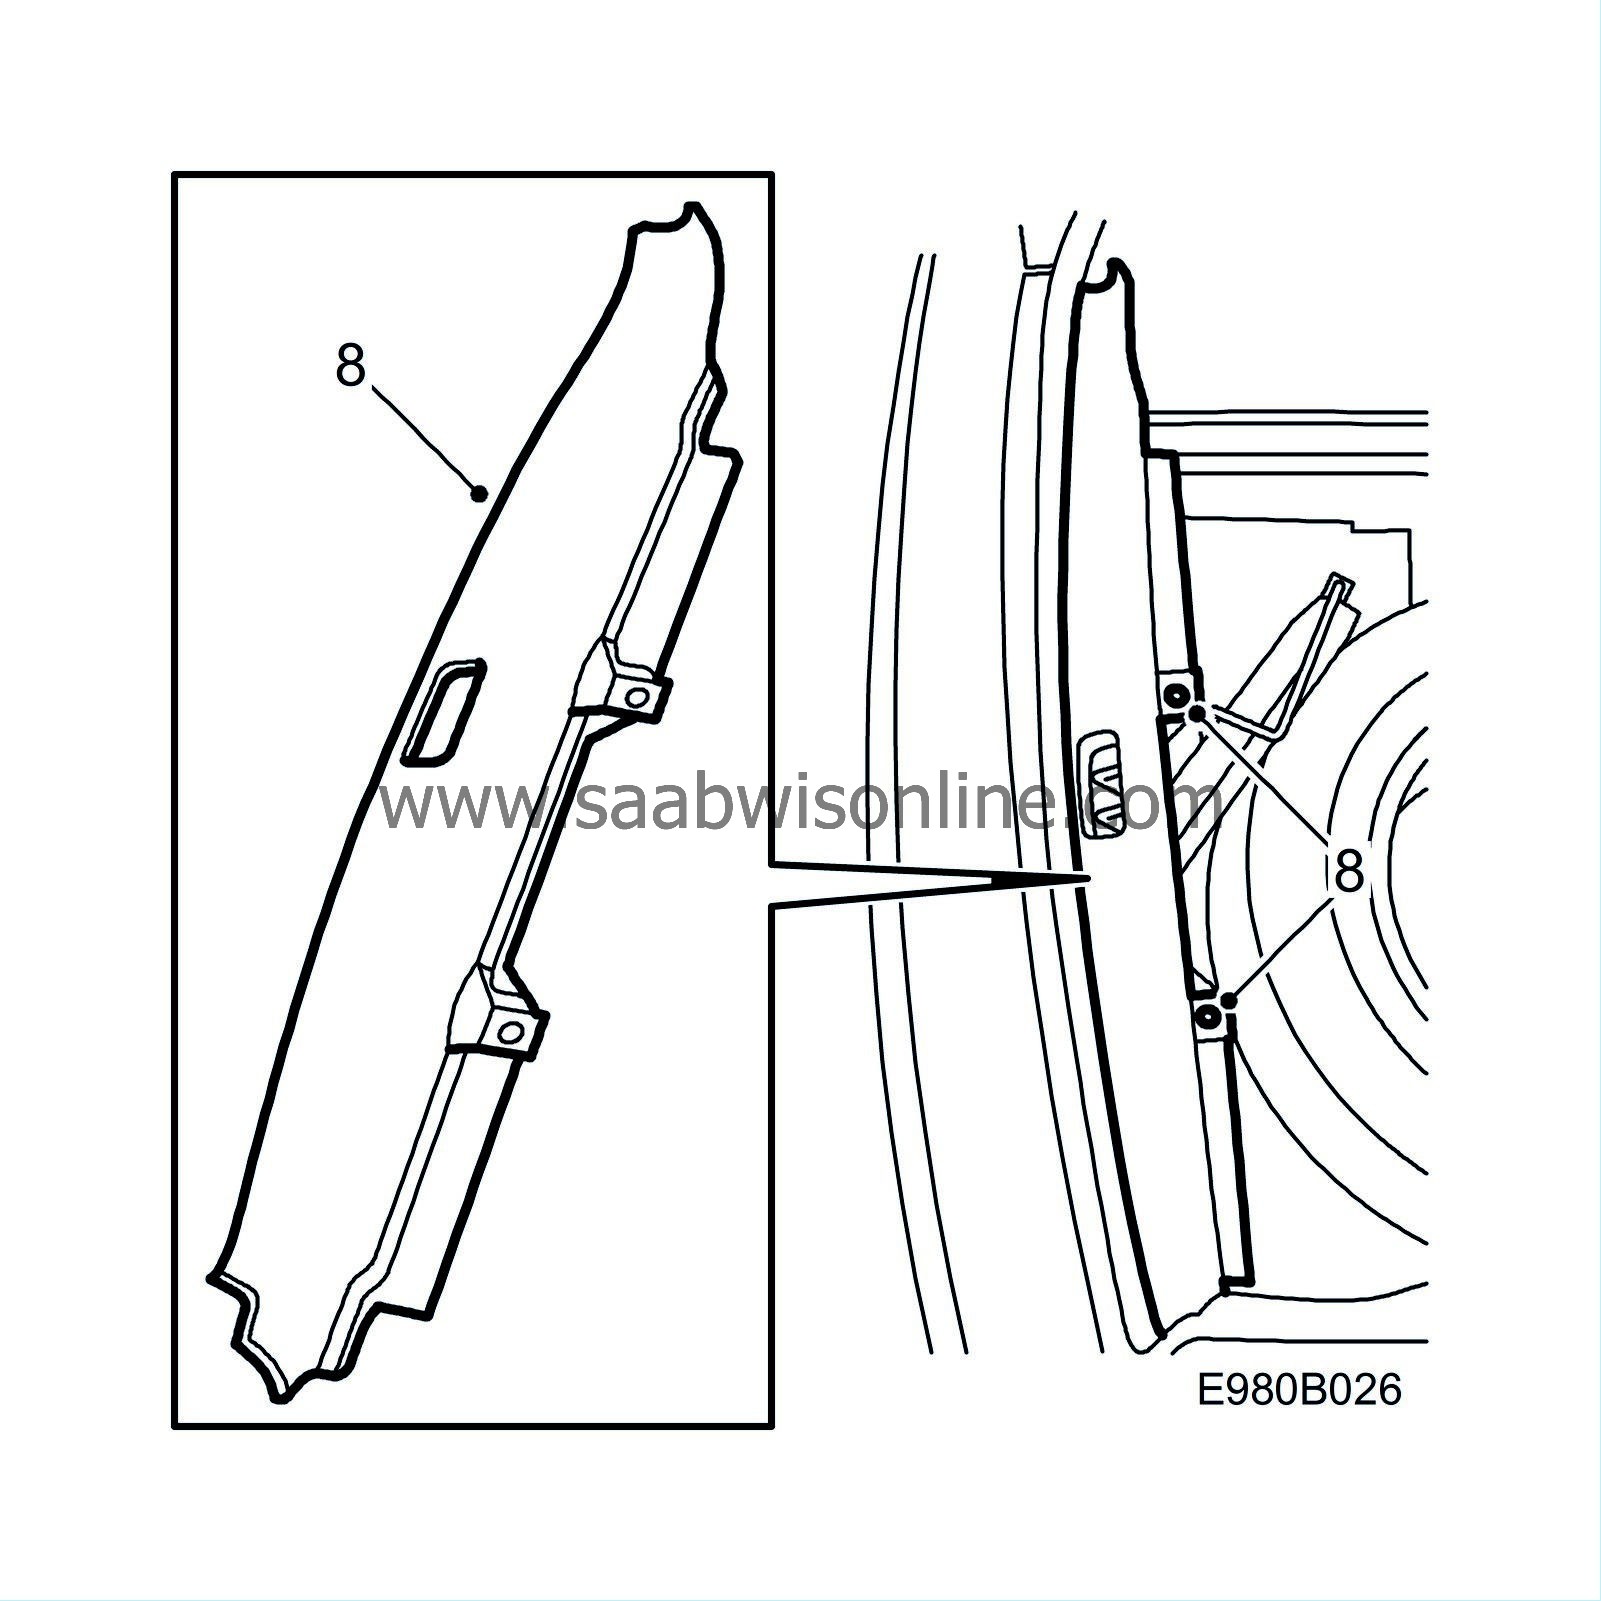
|
Fit the scuff plate.
|
|
9.
|
Fit the luggage compartment mat.
|
|
10.
|
Close the boot lid and check the fit.
|
|
1.
|
Remove the bumper in accordance with method E.
|
|
2.
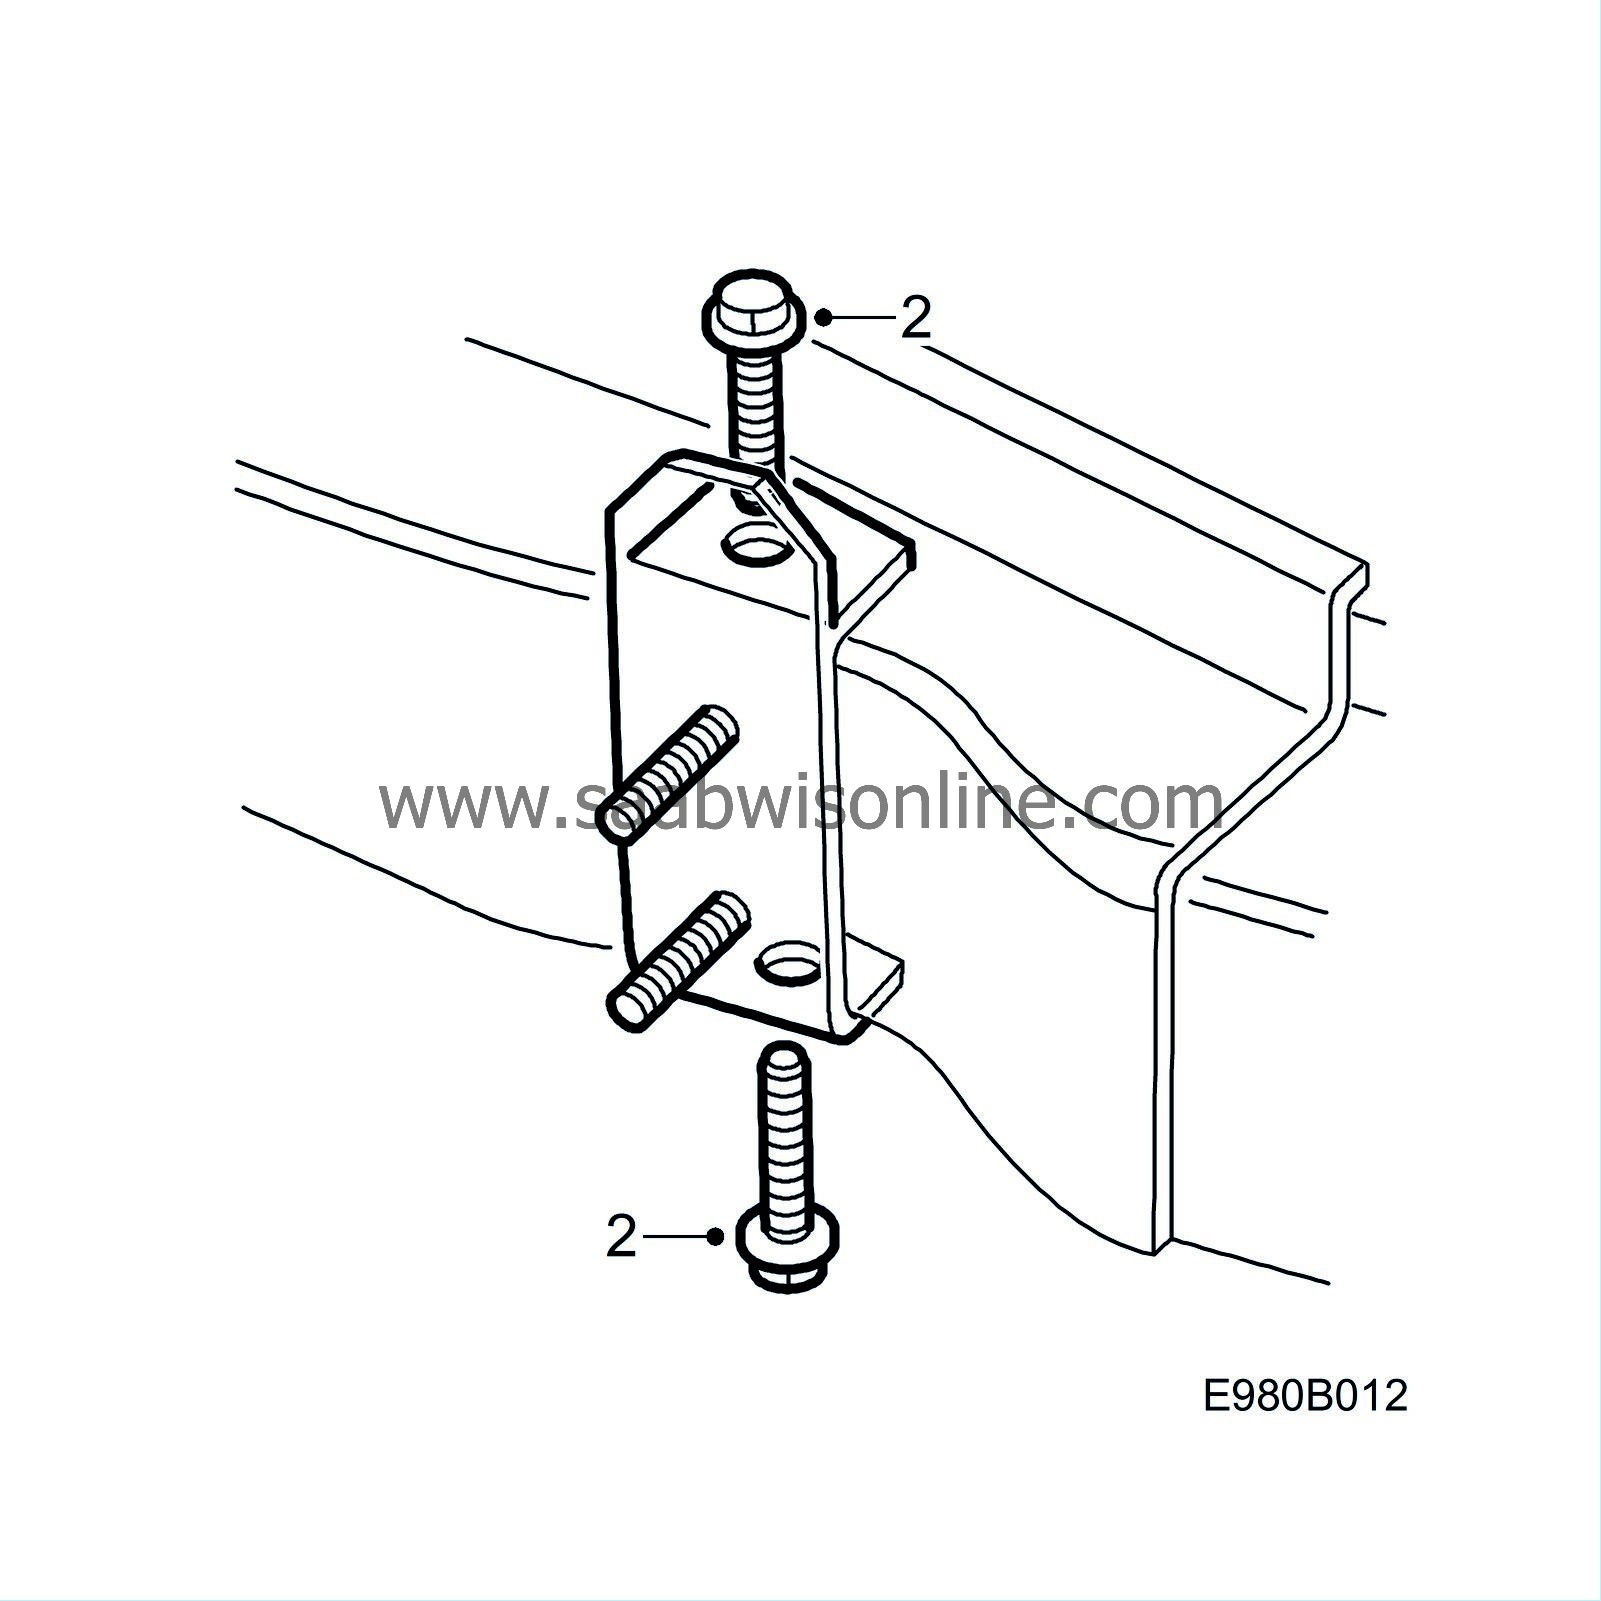
|
Remove the towbar unit and the reinforcements from the bumper rail.
|
|
3.
|
Remove the upper section of the protective shell.
Remove the bumper rail from the bumper shell.
Drill out the holes in the bumper rail for the towing bracket reinforcements with an 8.5 mm bit.

|
|
4.
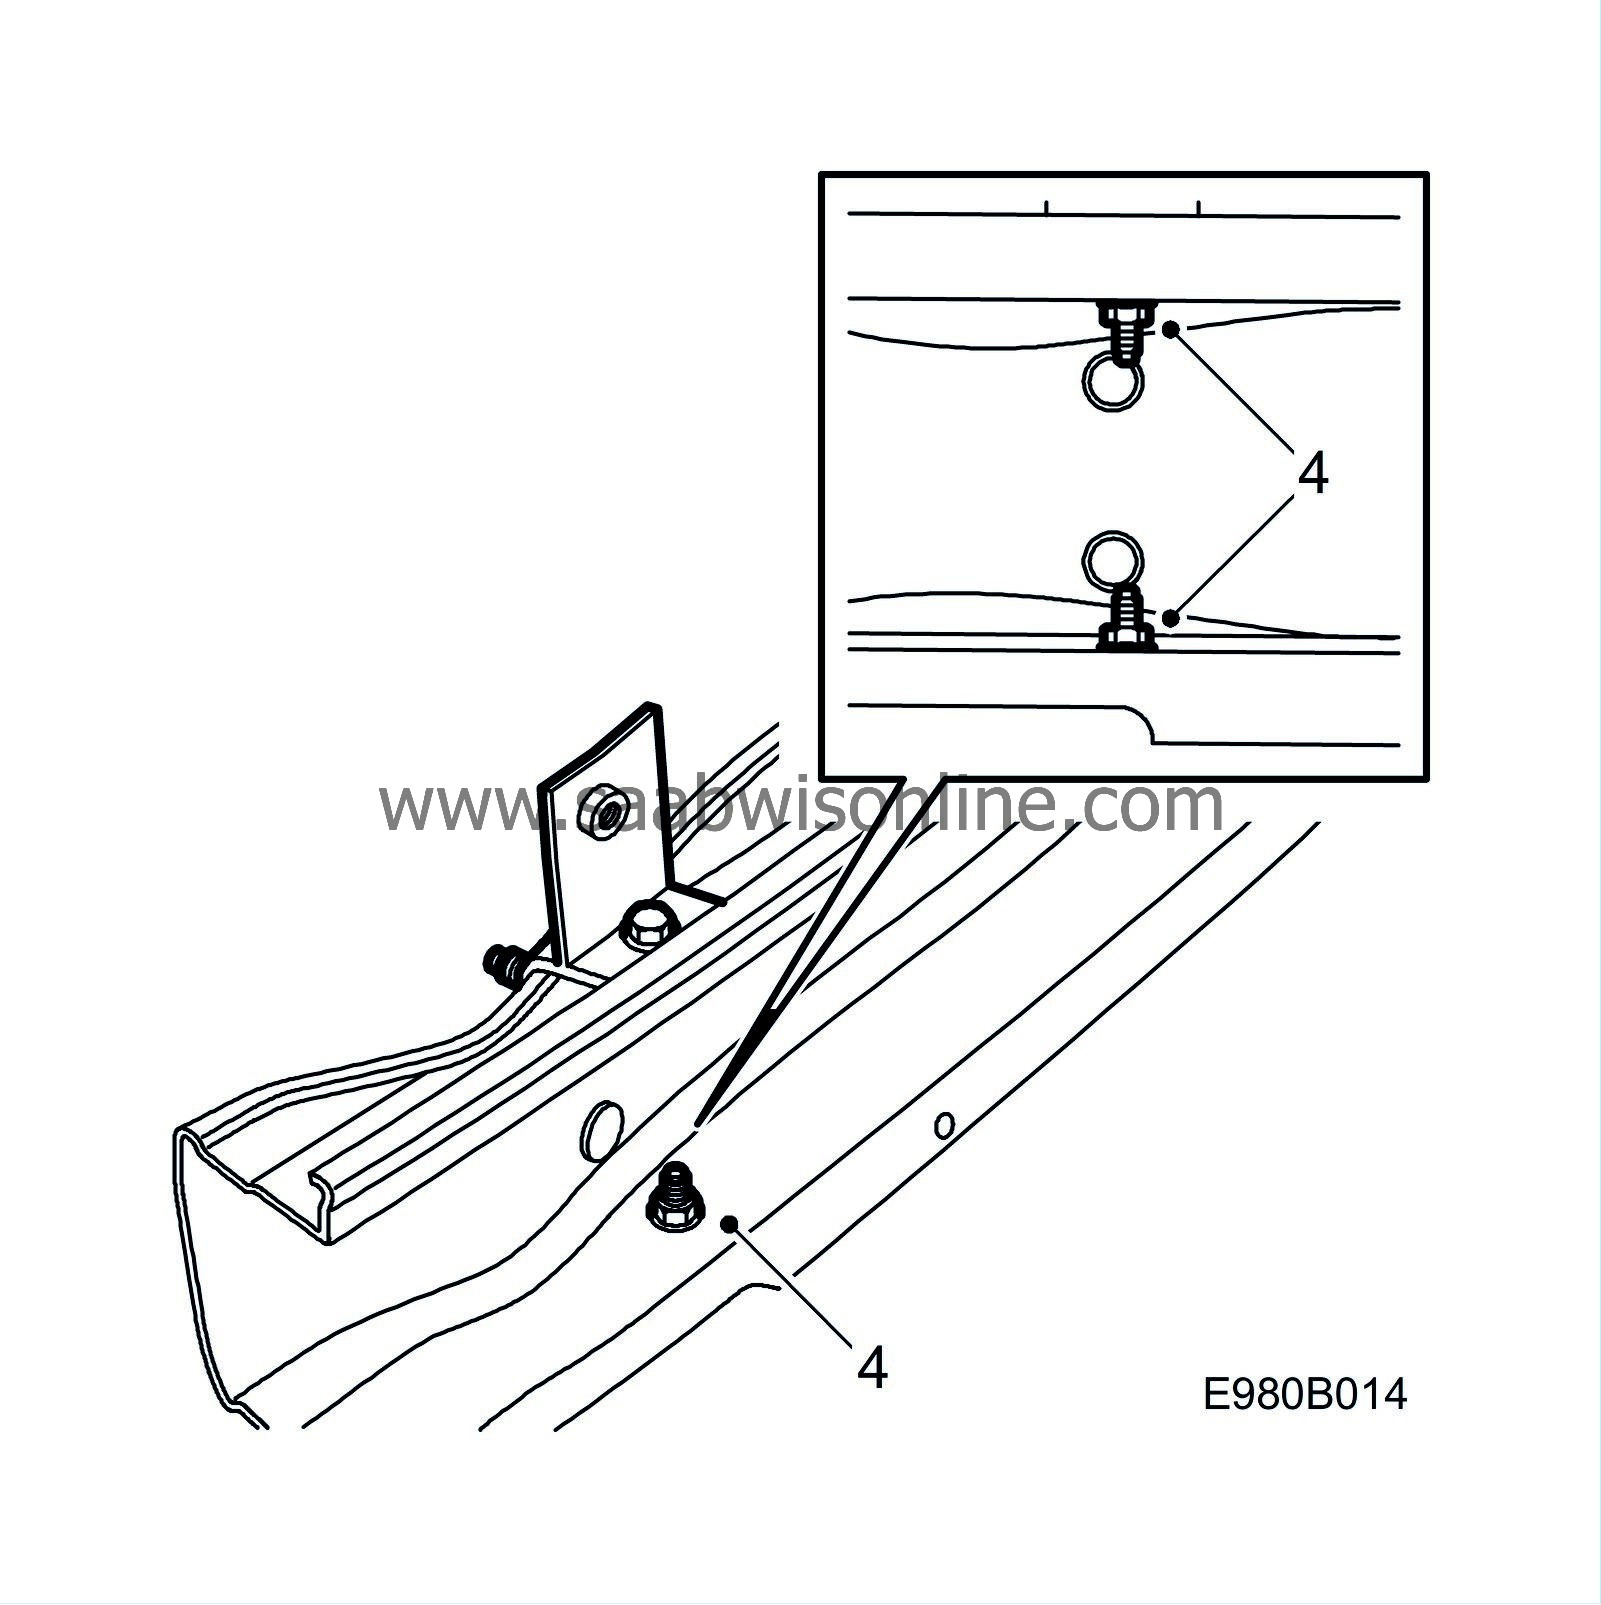
|
Fit the towing bracket reinforcements on the bumper rail. Fit the new nuts on the bolts.
Tightening torque 19 Nm (14 lbf ft)
|
|
5.
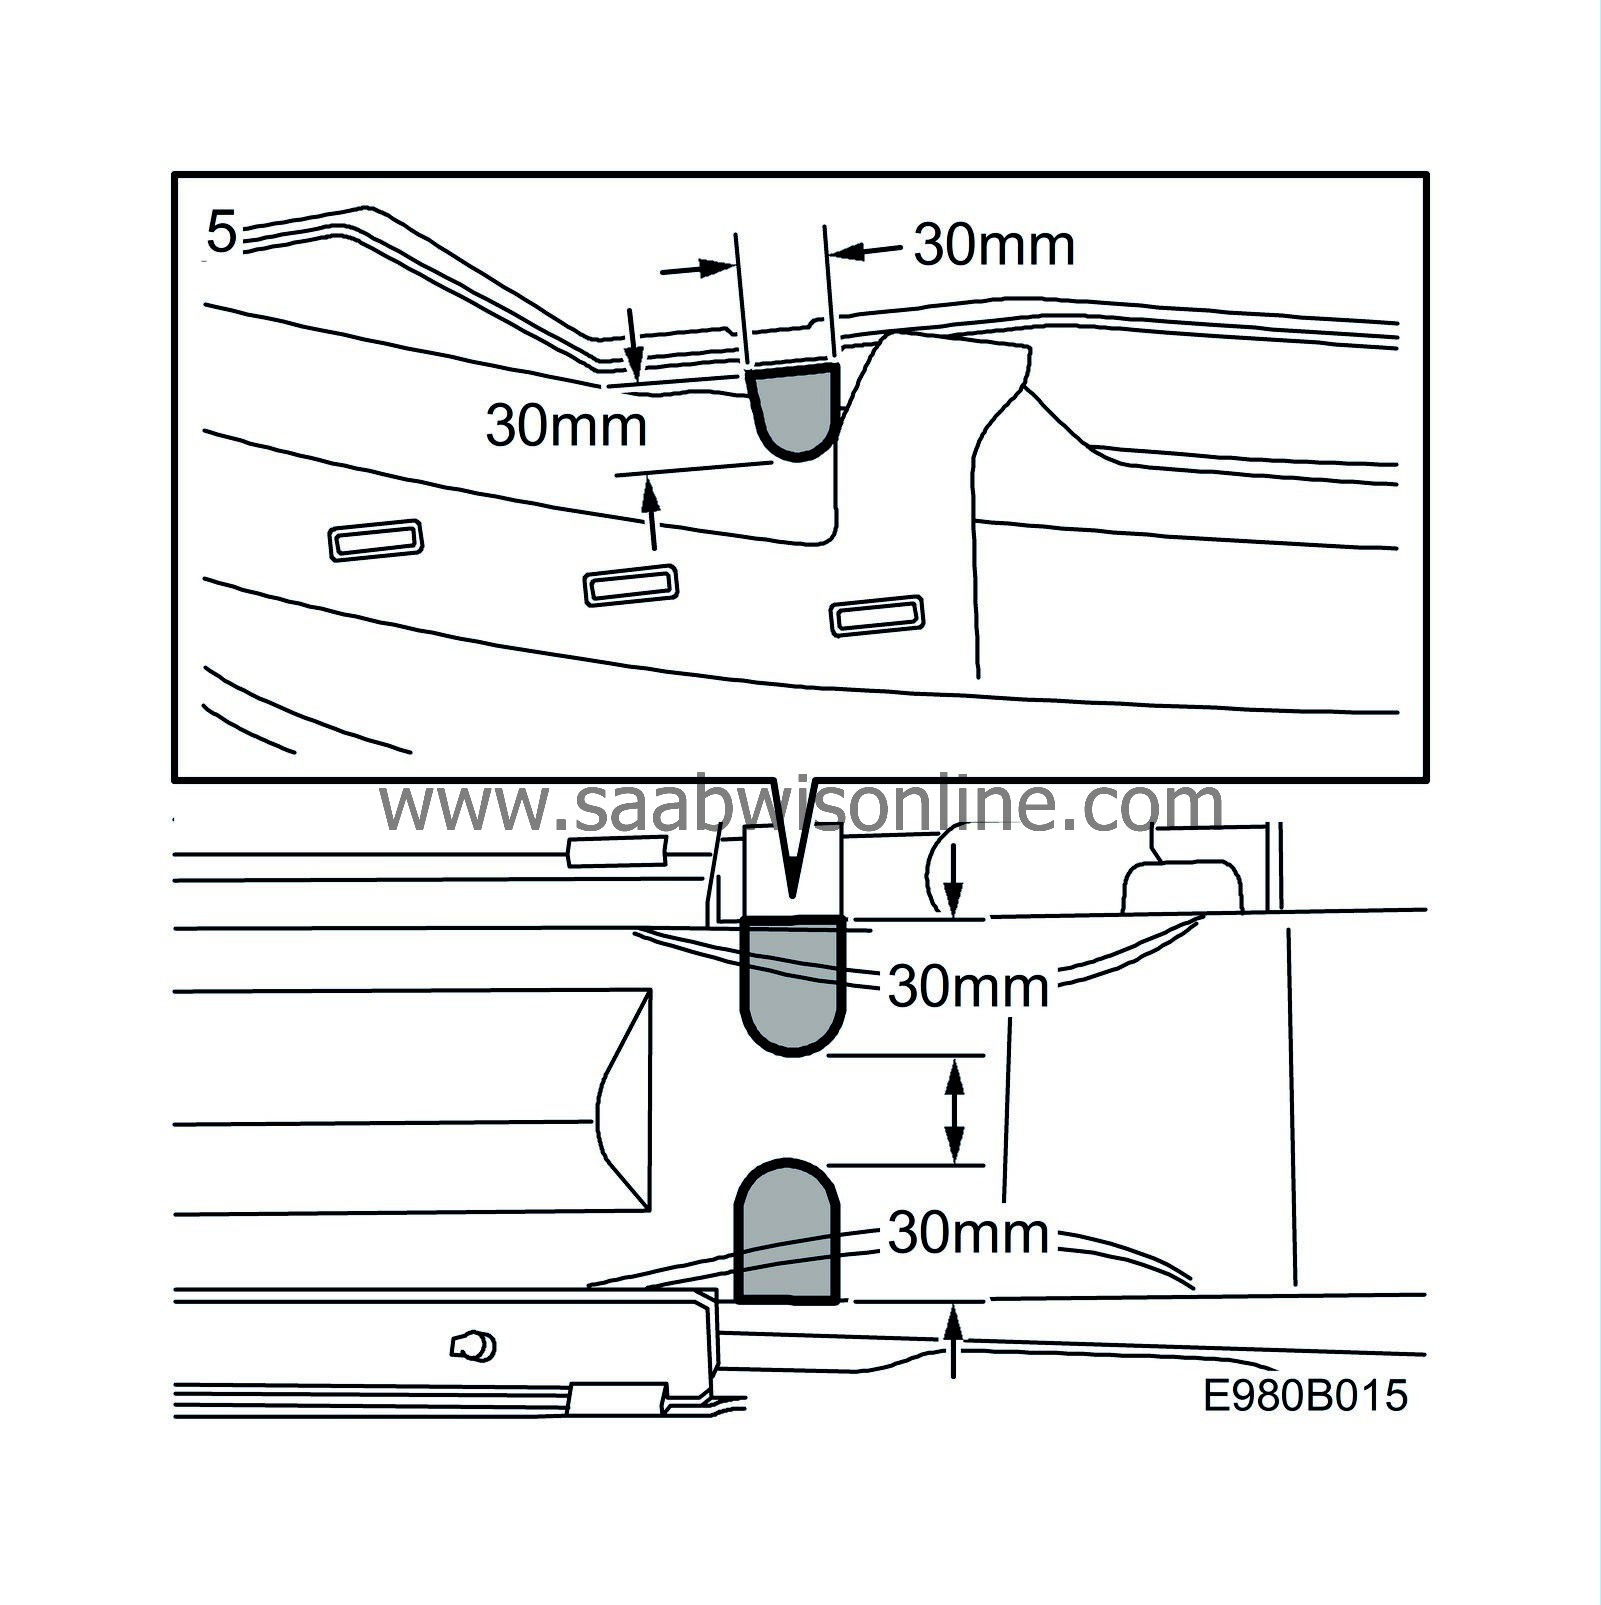
|
Cut out the cellular block approx. 30x30x30 mm so that there is space for the nuts.
|
|
6.
|
Fit the bumper rail. Fit the upper section of the protective shell.

|
|
7.
|
Fit the towbar unit to the bumper rail.
Tightening torque 40 Nm (30 lbf ft)
|
|
8.
|
Fit the bumper in accordance with method E.
|
|
Method E, removing the bumper, 5D
|
|
2.
|
Remove the bolts in the wheel housing, 2 on each side.

|
|
3.
|
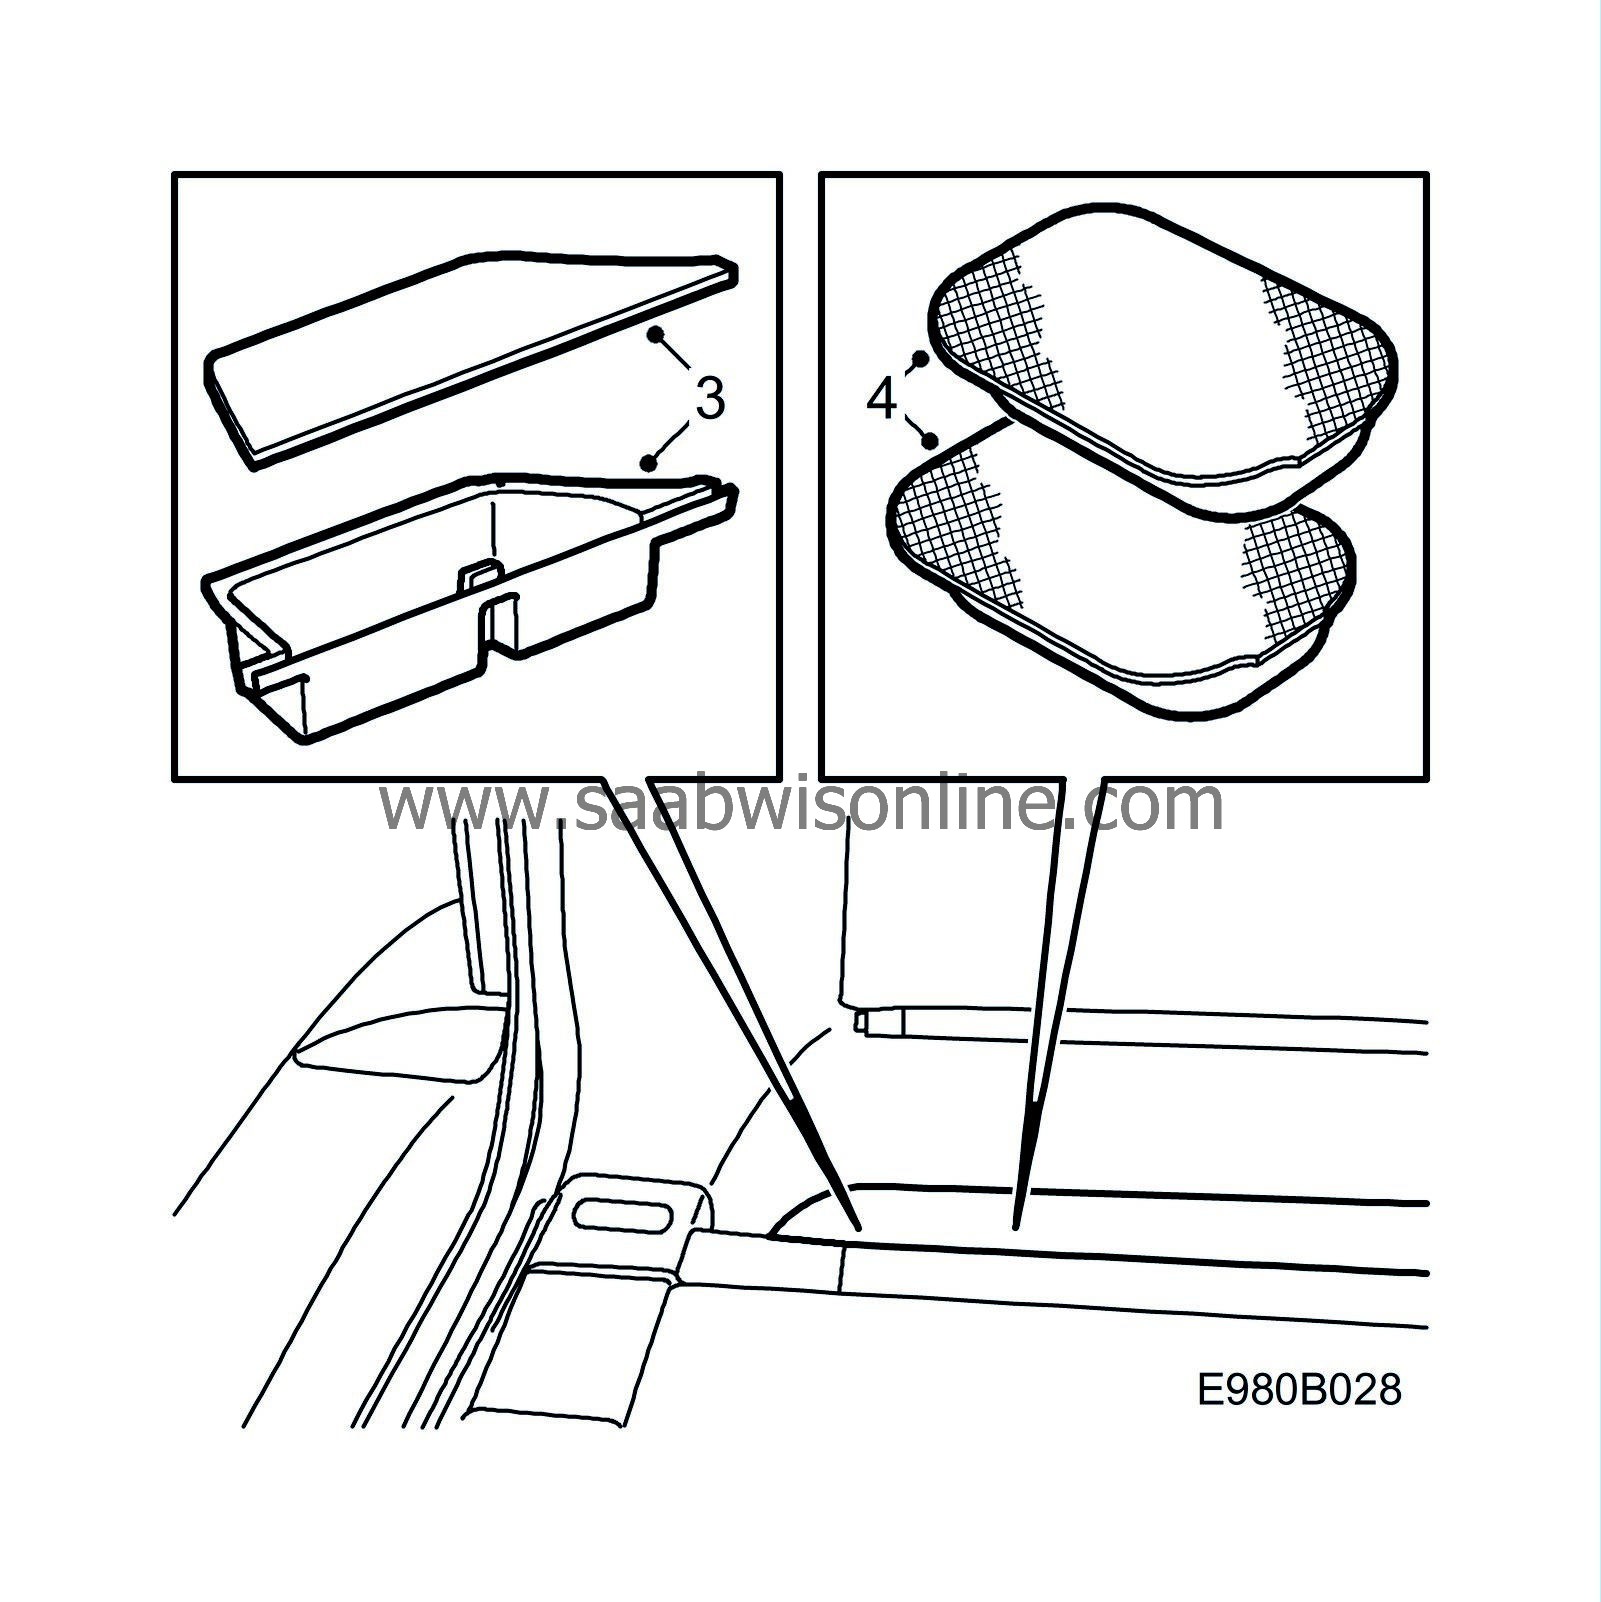
Lift out the storage compartments and the storage compartments' covers on both sides.
|
|
4.
|
Remove the insulation pads. The old ones must be discarded and replaced with new.
|
Note
|
|
No counterhold is required on the back when removing the bolt. The nut has been replaced by a press nut.
|
|
|
5.
|
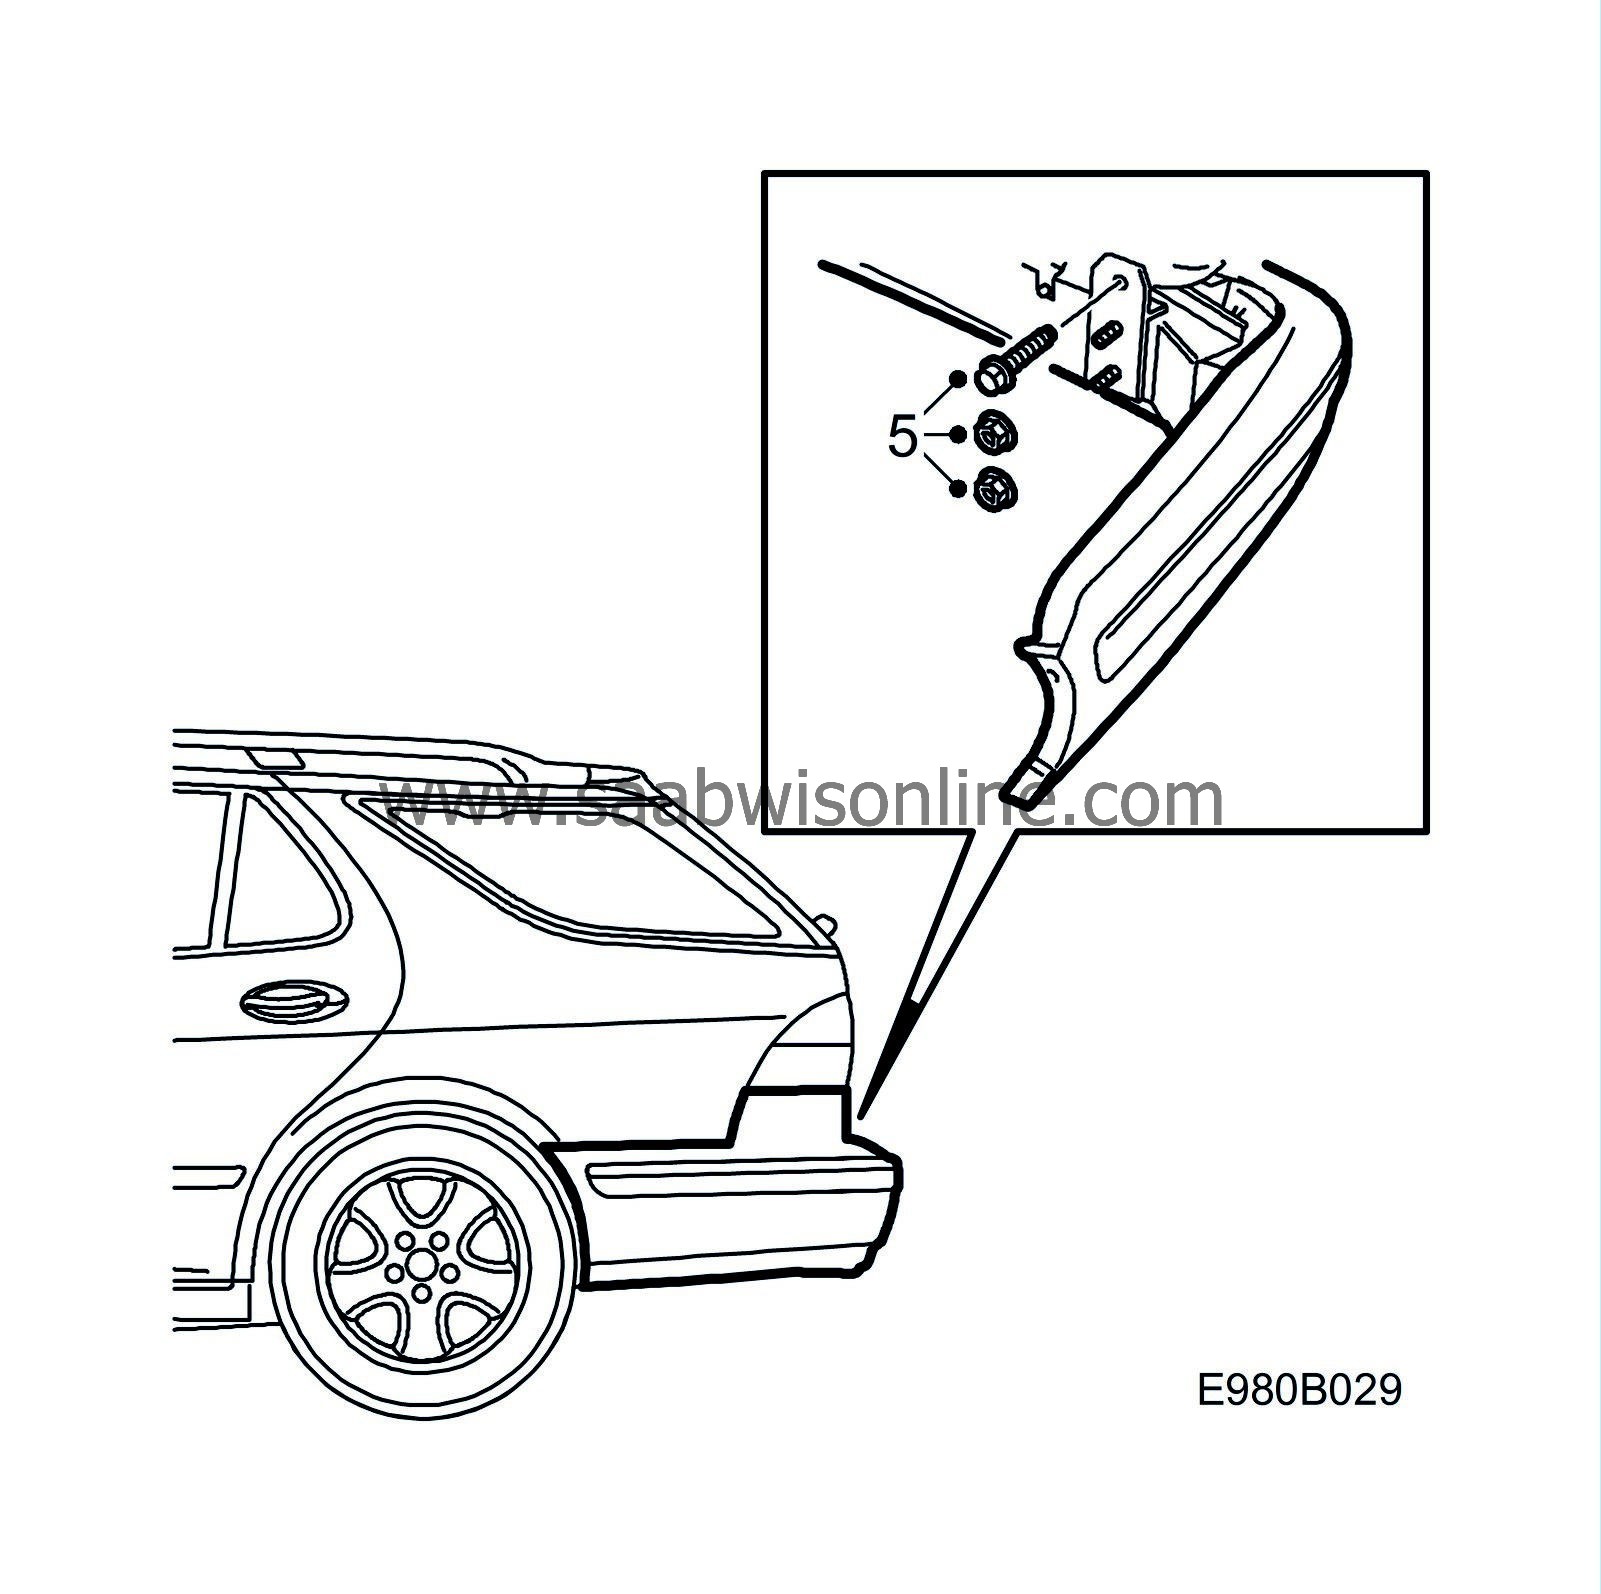
Remove the bolts and nuts on the right and left-hand sides.
|
|
6.
|
Remove the towing bracket connector. Remove the bolts and the nut plates holding the towing bracket to the body.

|
|
7.
|
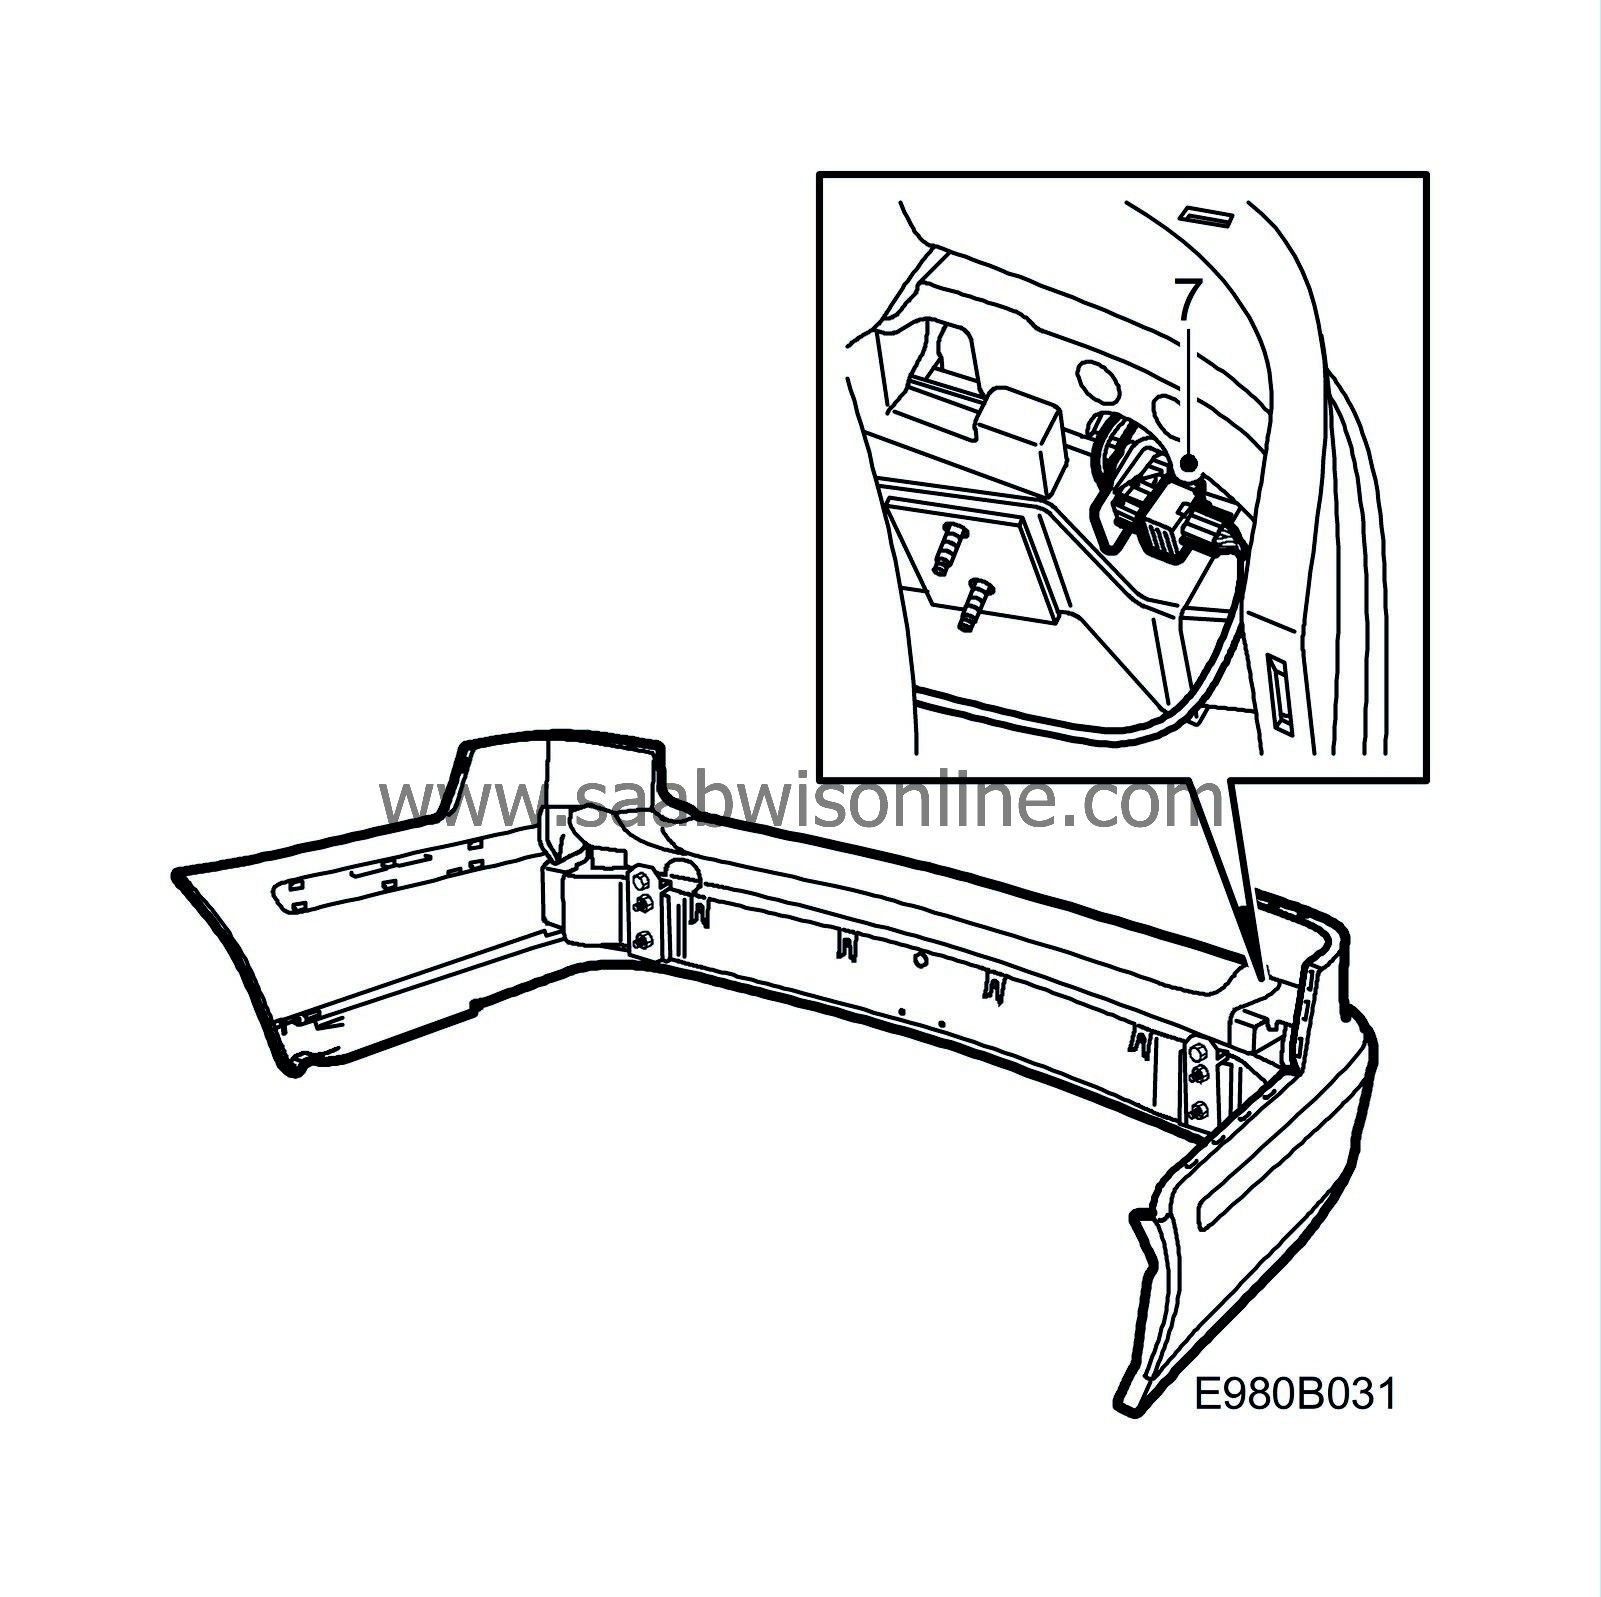
Get assistance from someone. Pull out the bumper from the edge of the wheel housing and the clips. Lift the bumper out backwards.
Cars with SPA
: Remove the connector.
|
|
Method E, fitting the bumper, 5D
|
|
1.
|
Fit the towing bracket cable connection in the bumper cavity.
|
|
2.
|
Fit the bumper in position and press it in above the edge of the wheel housing. Make sure that the clips engage correctly.
Cars with SPA
: Attach the connector.

|
|
3.
|
Fit the bolts and nuts that secure the bumper.
Tightening torque 40 Nm (30 lbf ft)

|
|
4.
|
Fit the bolts into the edge of the wheel housing.

|
|
5.
|
Fit the towing bracket connector. Fit the bolts and nut plates that hold the towing bracket on the body.
Tightening torque 40 Nm (30 lbf ft)

|
|
6.
|
Fit the new insulation pads.

|
|
7.
|
Fit the storage compartments and the compartments' covers.
|
|
8.
|
Close the tailgate and check the fit of the bumper to the tailgate.
|
|
Marking the modification identity plate
|
The modification identity plate shall not be marked.
|
Warranty/Time Information
|
See separate information.


