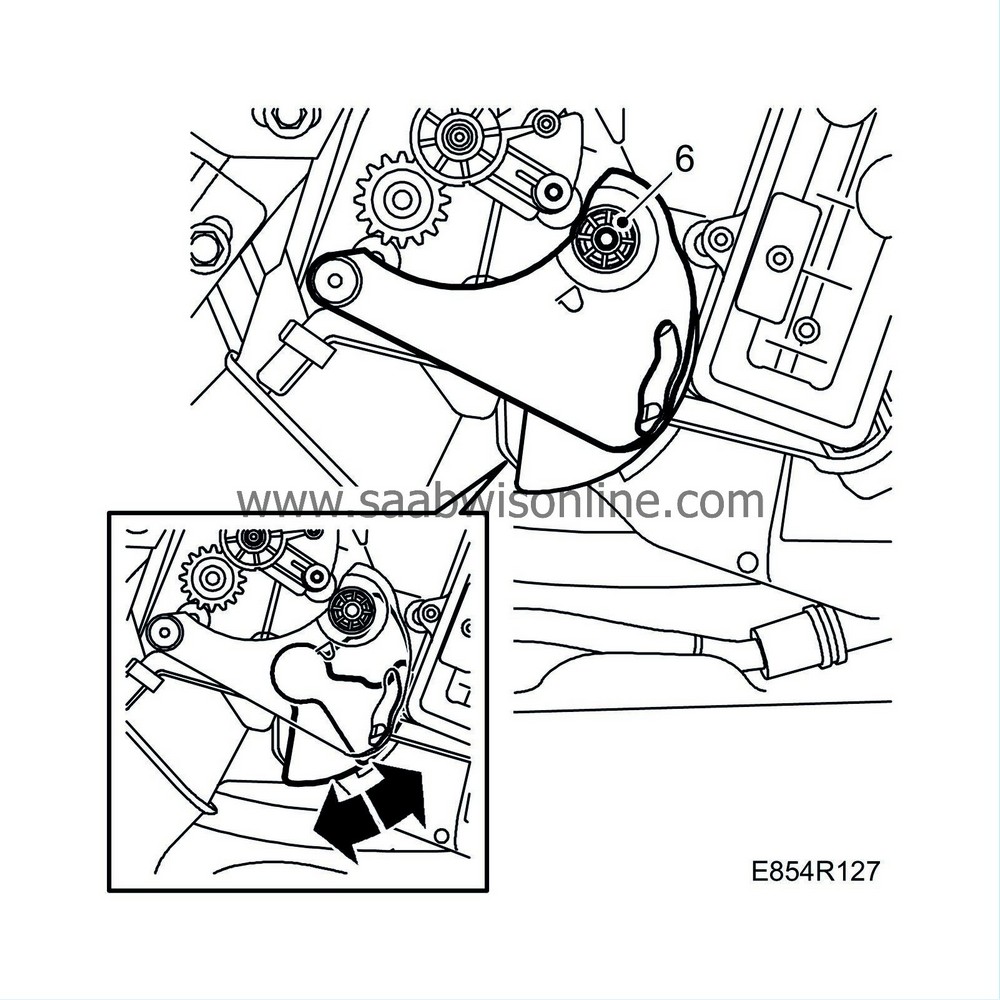
Warm air in rear, VENT
| Warm air in rear, VENT |
| To remove |
| 1. |
Turn the ignition switch to the ON position.
|
|
| 2. |
Select the VENT air distribution setting.
|
|
| 3. |
Set the temperature for the driver and passenger zones to LO.
Reduce the fan speed to one bar. Wait until the system has stabilized (approx. 30 sec). |
|
| 4. |
Turn the ignition key to the OFF position.
|
|
| 5. |
Remove the
glove box
.
|
|
| 6. |
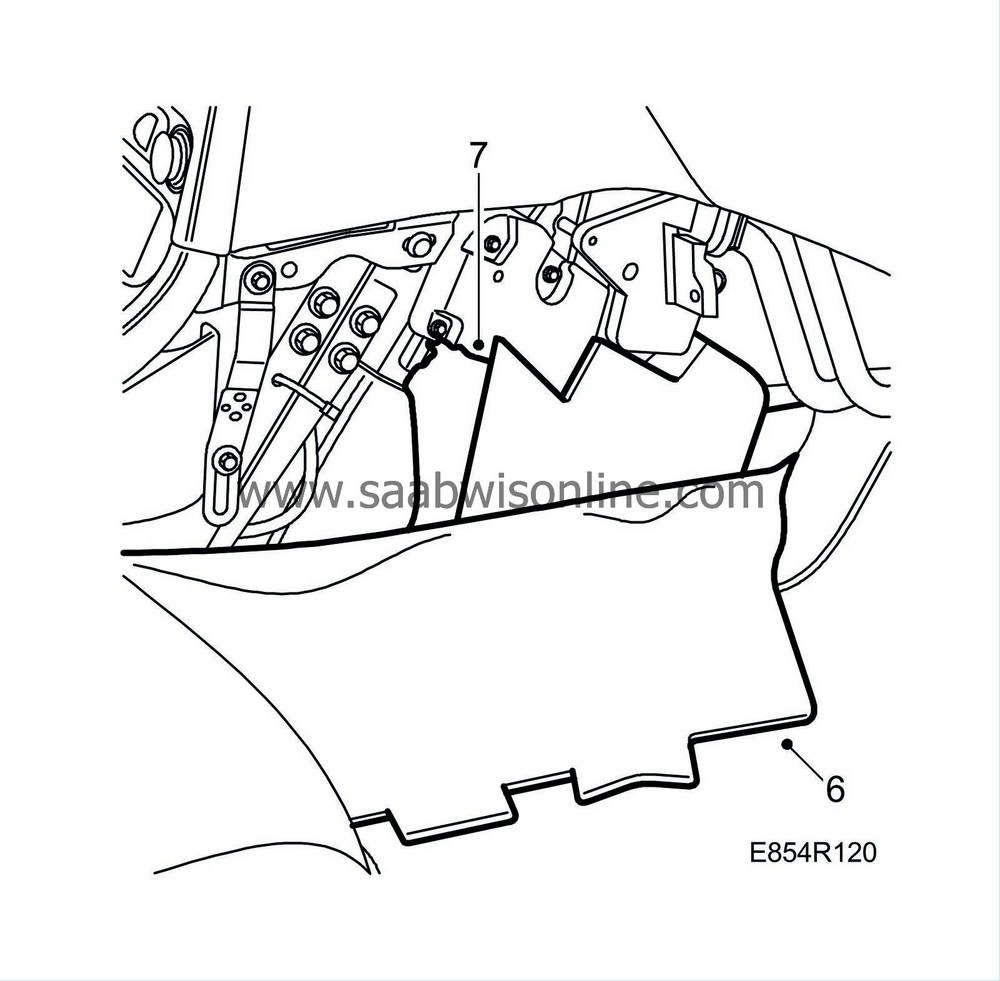
Fold aside the carpet so that the cover over the rear dampers is exposed.
|
|
| 7. |
Remove the sound insulation under the cover.
|
|
| 8. |
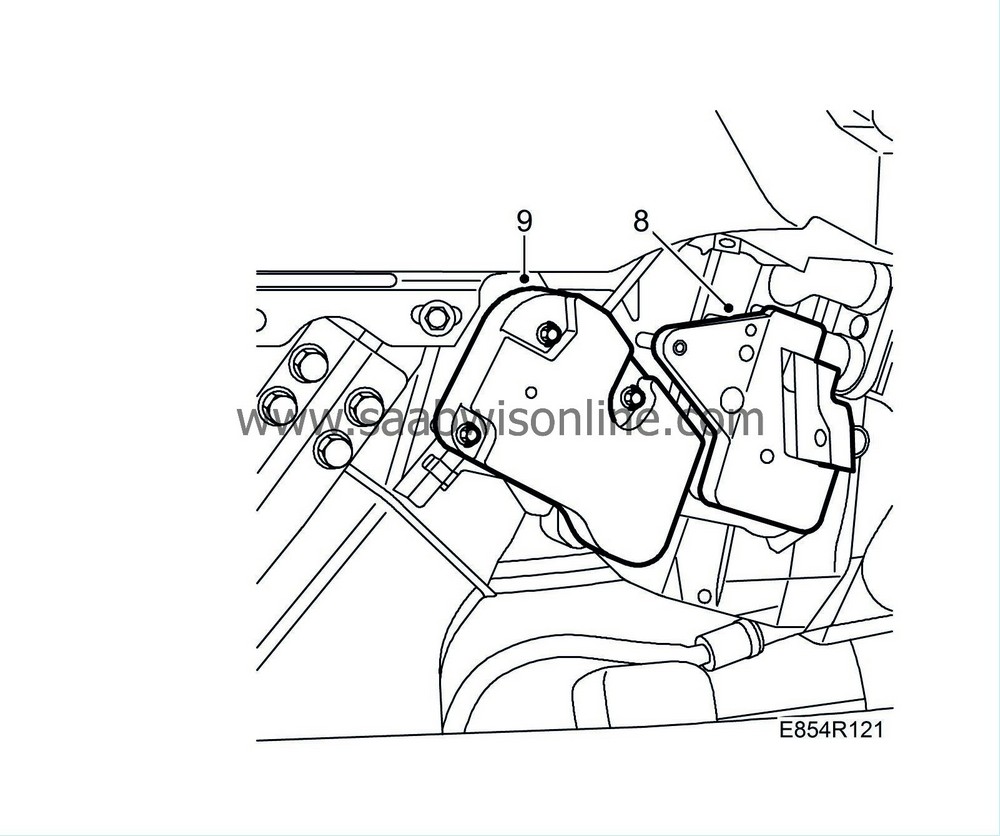
Remove the carpet attachment from the heat exchanger.
|
|
| 9. |
Remove the rear cover.
|
|||||||
| - |
Stepping motor for distribution, blue tape
|
| - |
Stepping motor for heating damper, LHD, red tape
|
| - |
Stepping motor for heating damper, RHD, brown tape
|
| 10. |
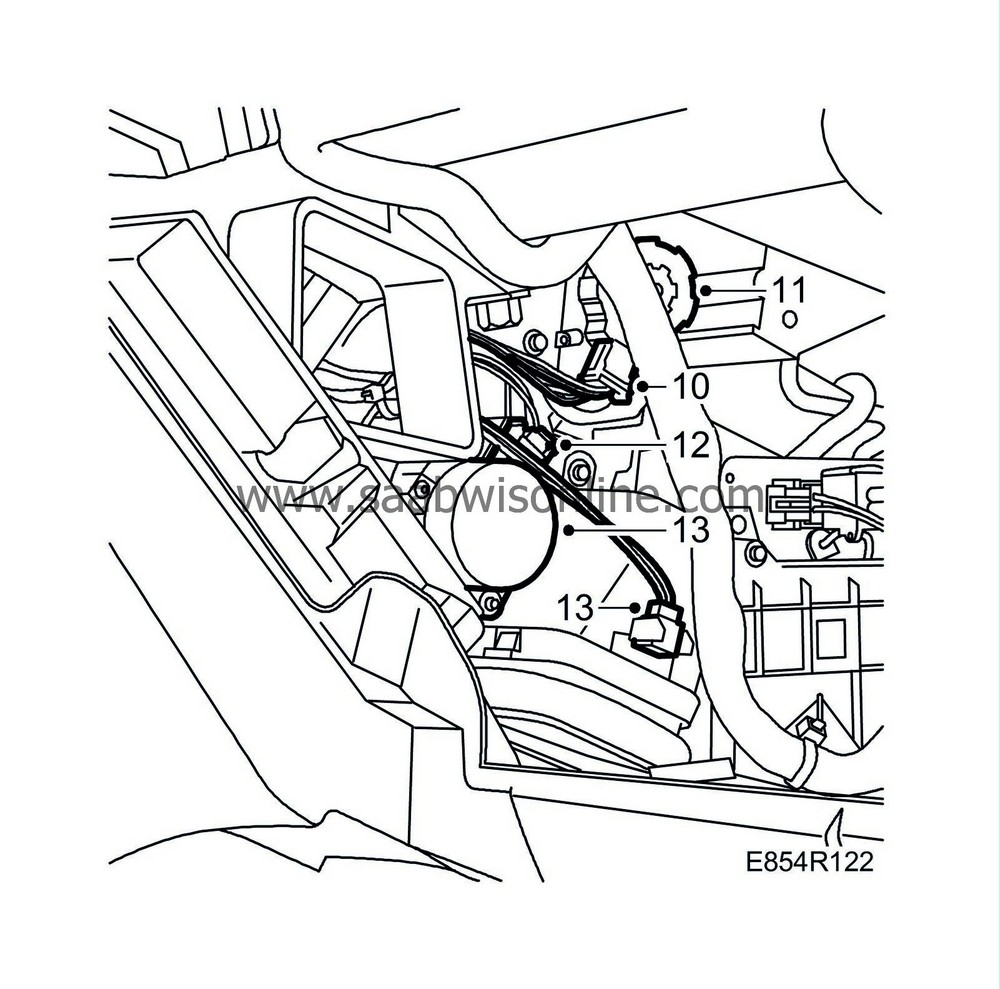
Remove the connector from the stepping motor for the distribution damper, (the top stepping motor).
|
|
| 11. |
Remove the bolts and stepping motor from the distribution damper. If necessary, remove the air duct from the outer panel vent.
|
|
| 12. |
Unplug the connector from the stepping motor for the passenger heating damper (the bottom stepping motor)
|
|
| 13. |
Remove the bolts and stepping motor from the passenger heating damper. If necessary, remove the temperature sensor.
|
|||||||
| 14. |
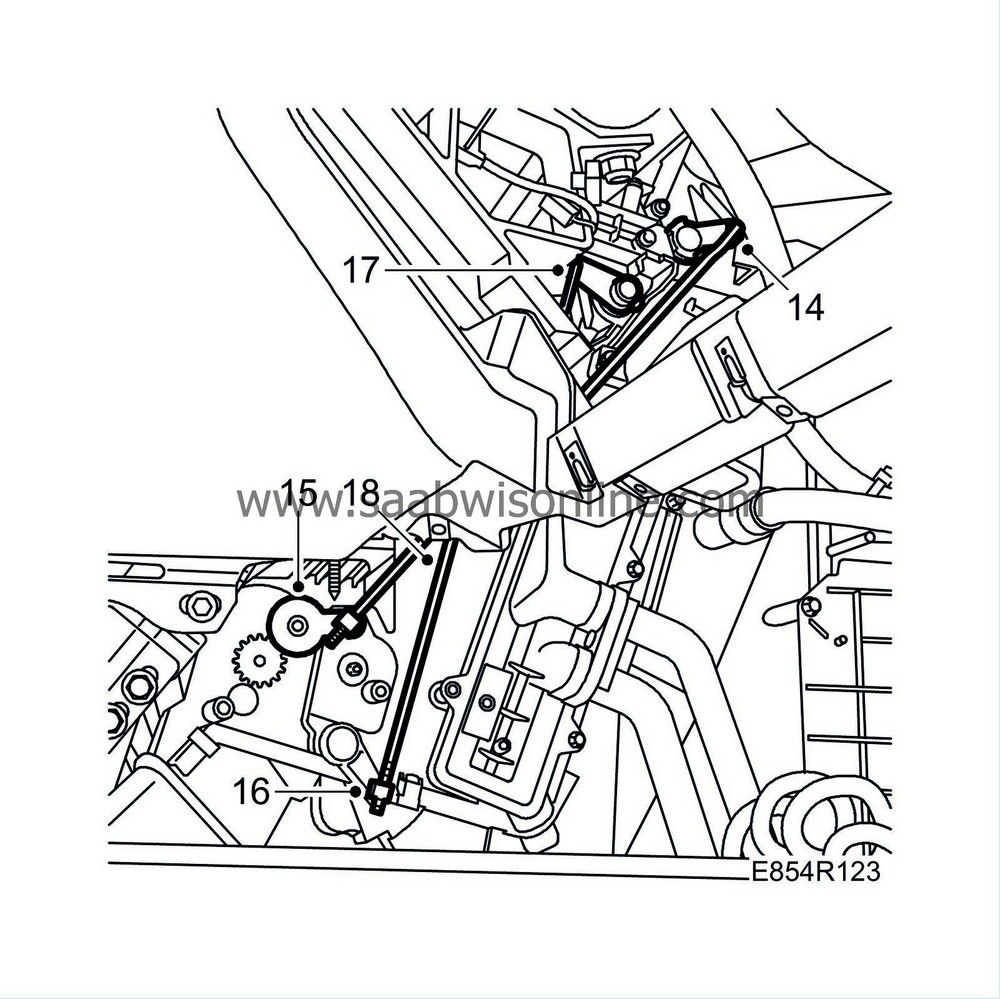
Disconnect the distribution damper control rod from the upper clip.
|
|
| 15. |
Disconnect the distribution damper control rod and pinion.
|
|
| 16. |
Carefully open the clip securing the control rod to the rear heating damper.
|
|
| 17. |
Disconnect the heating damper control rod from the upper clip.
|
|
| 18. |
Remove the heating damper control rod.
|
|
| 19. |
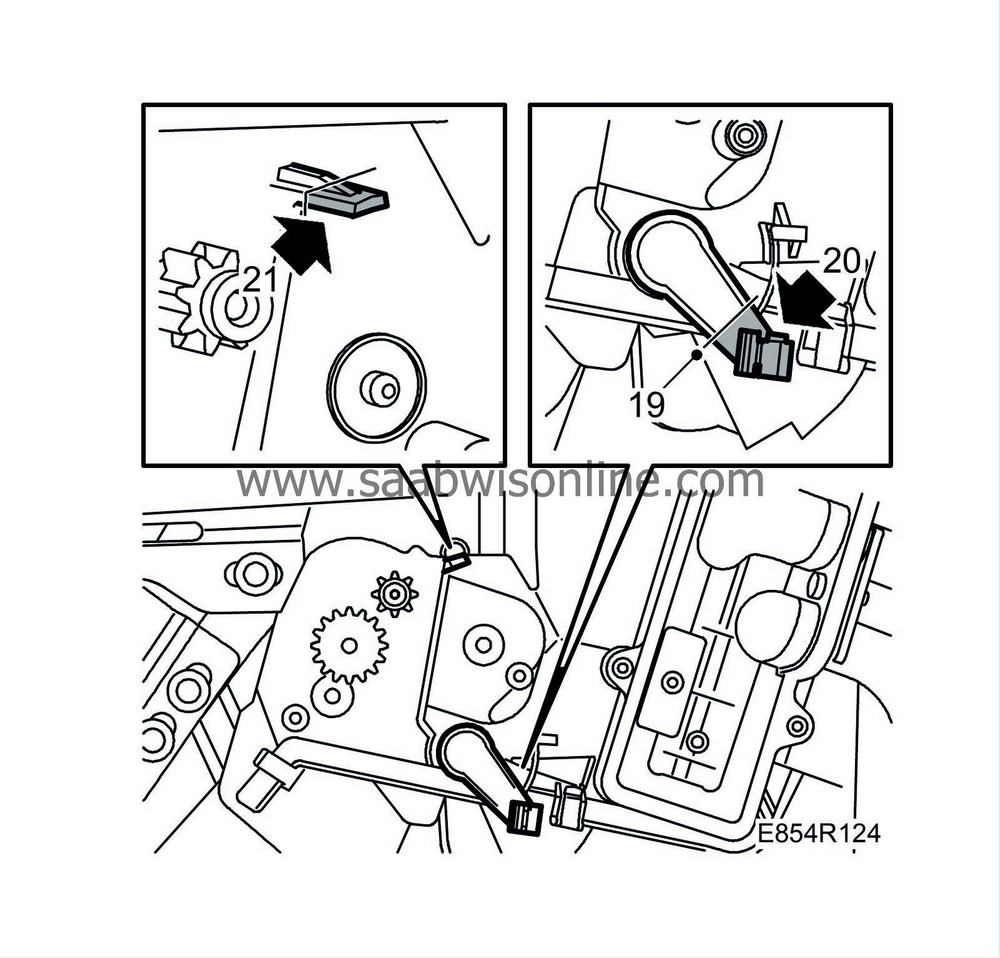
Carefully make a scores with a knife on the arm to the rear heating damper.
|
||||||||||
| 20. |
Carefully cut off the front part of the rear heating damper arm with a pair of snips.
|
|
| 21. |
Cut off the stop lug for the rear distribution damper.
|
|
| To fit |
| 1. |
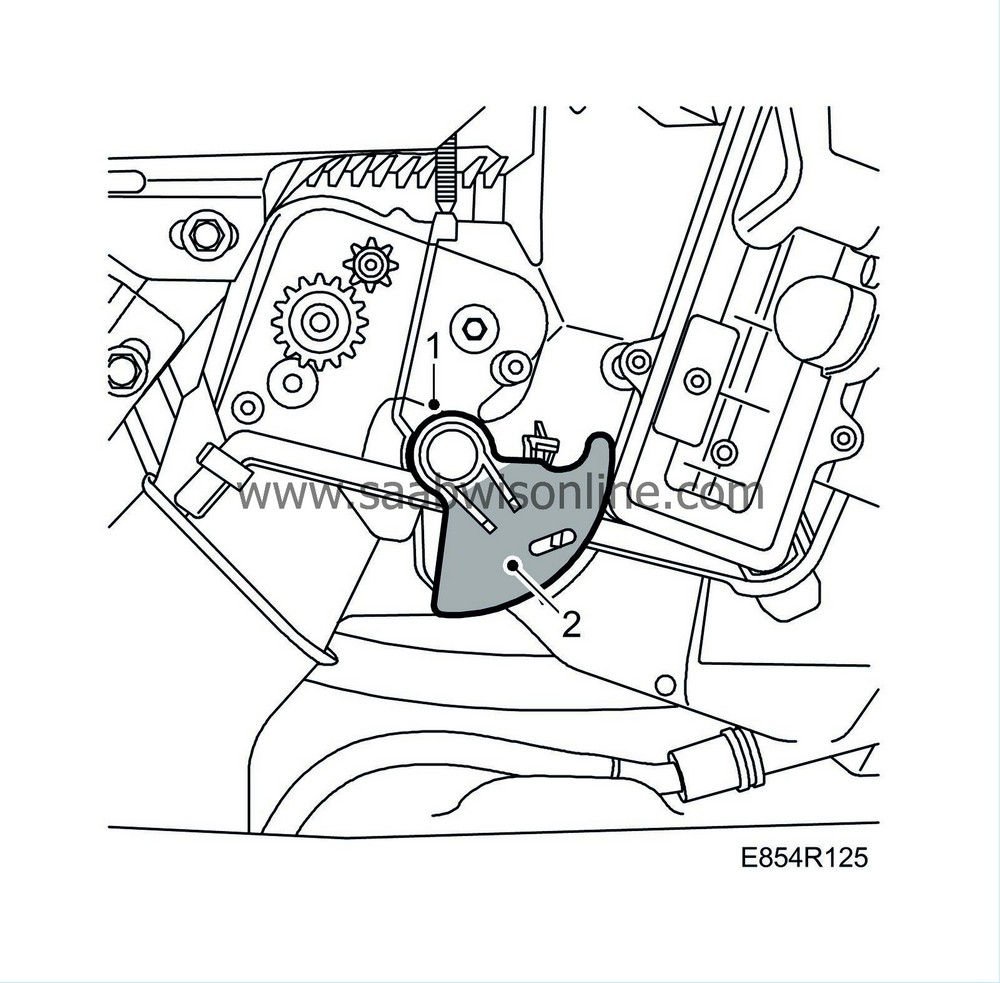
Carefully fit the connector to the rear heating damper.
|
|||||||
| 2. |
Apply a thin layer of 87 81 719 silicone grease. Use a brush to distribute the grease over the entire sliding surface.
|
|
| 3. |
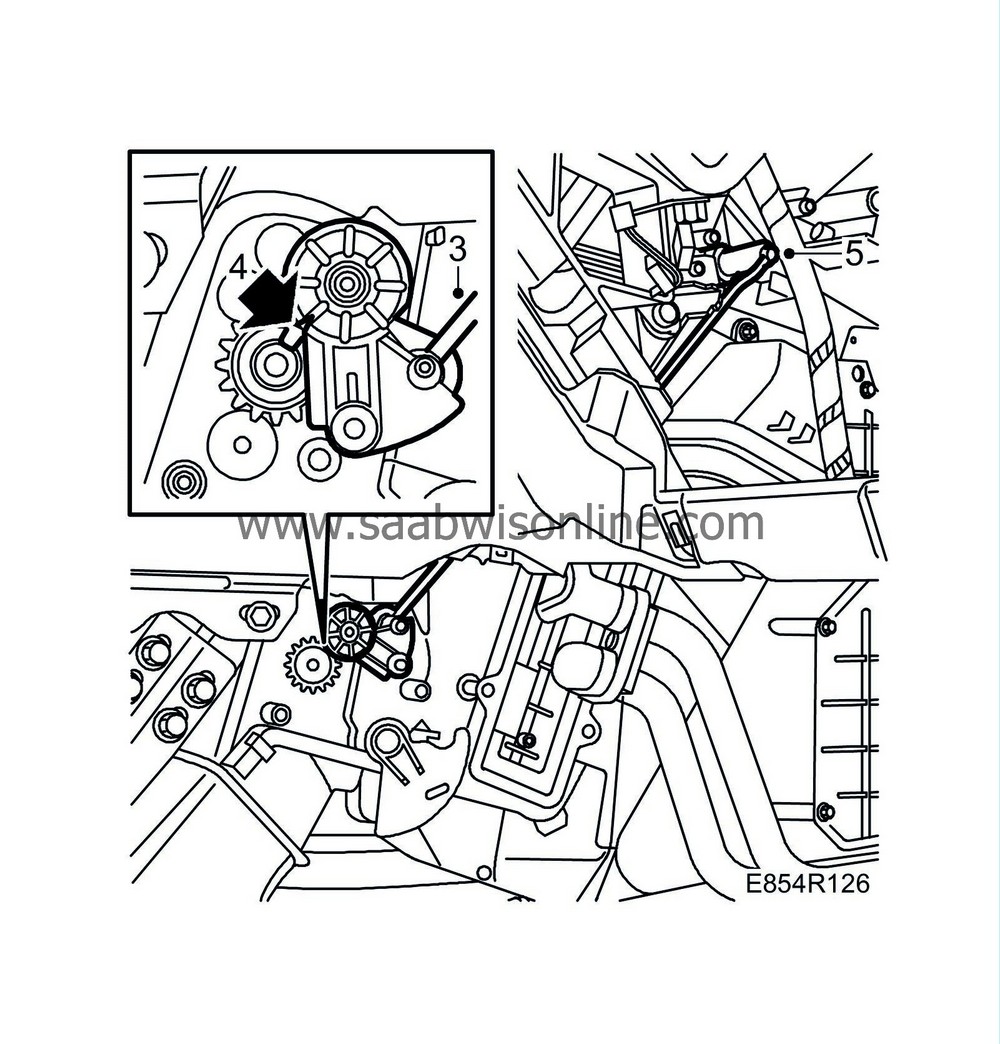
Fit the lower end of the new control rod into the smallest hole in the pinion. The end that as a single bend should be at the bottom.
|
|
| 4. |
Fit the new pinion onto the heating and ventilation unit. Make sure the markings on the gears are aligned. Turn the pinion if necessary.
|
|
| 5. |
Fit the upper part of the new control rod into its clip. If necessary, turn the pinion so that the control rod fits into the clip.
|
|
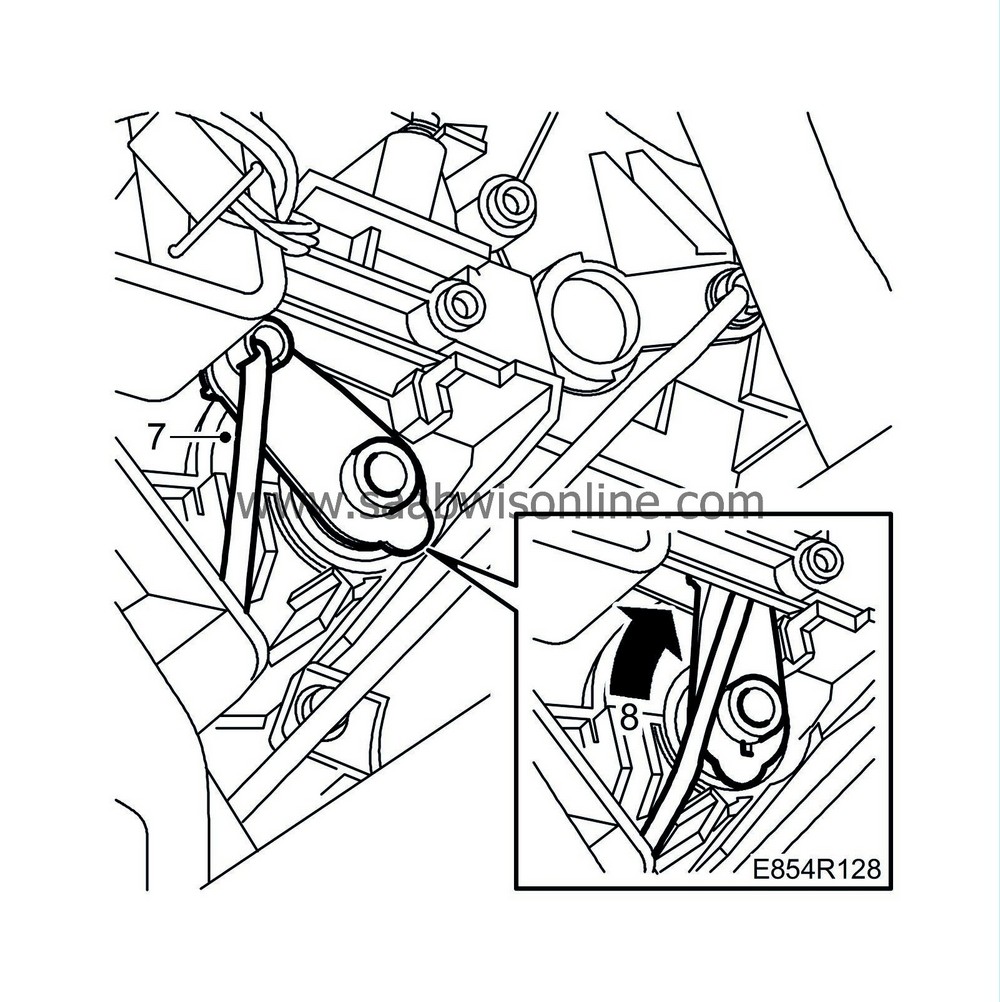
| 7. |
Fit the upper part of the new heating damper control rod to the clip. The unthreaded part should point up. The heating damper control rod should lie inside the distribution damper control rod.
|
|
| 8. |
Press the upper part of the heating damper arm to its uppermost position.
|
|
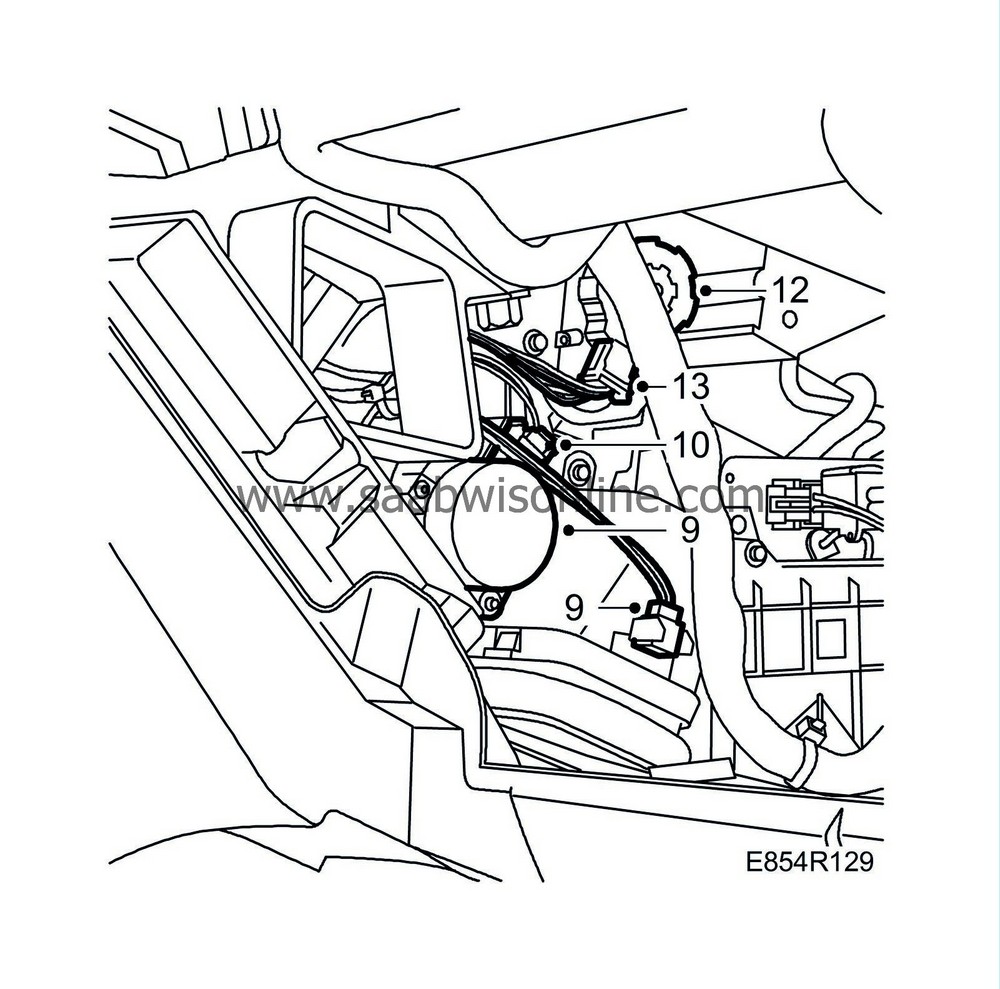
| 9. |
Fit the stepping motor for the heating damper. Where applicable, fit the temperature sensor.
|
|
| 10. |
Plug in the stepping motor connector. If the wiring for the stepping motors was already marked, the following applies:
Stepping motor for distribution, blue tape Stepping motor for heating damper, LHD, red tape Stepping motor for heating damper, RHD, brown tape |
|
| 11. |
Press the upper part of the distribution damper arm to its uppermost position.
|
|
| 12. |
Fit the distribution damper stepping motor.
|
|
| 13. |
Plug in the connector to the stepping motor. If necessary, fit the air duct to the outer panel vent.
|
|
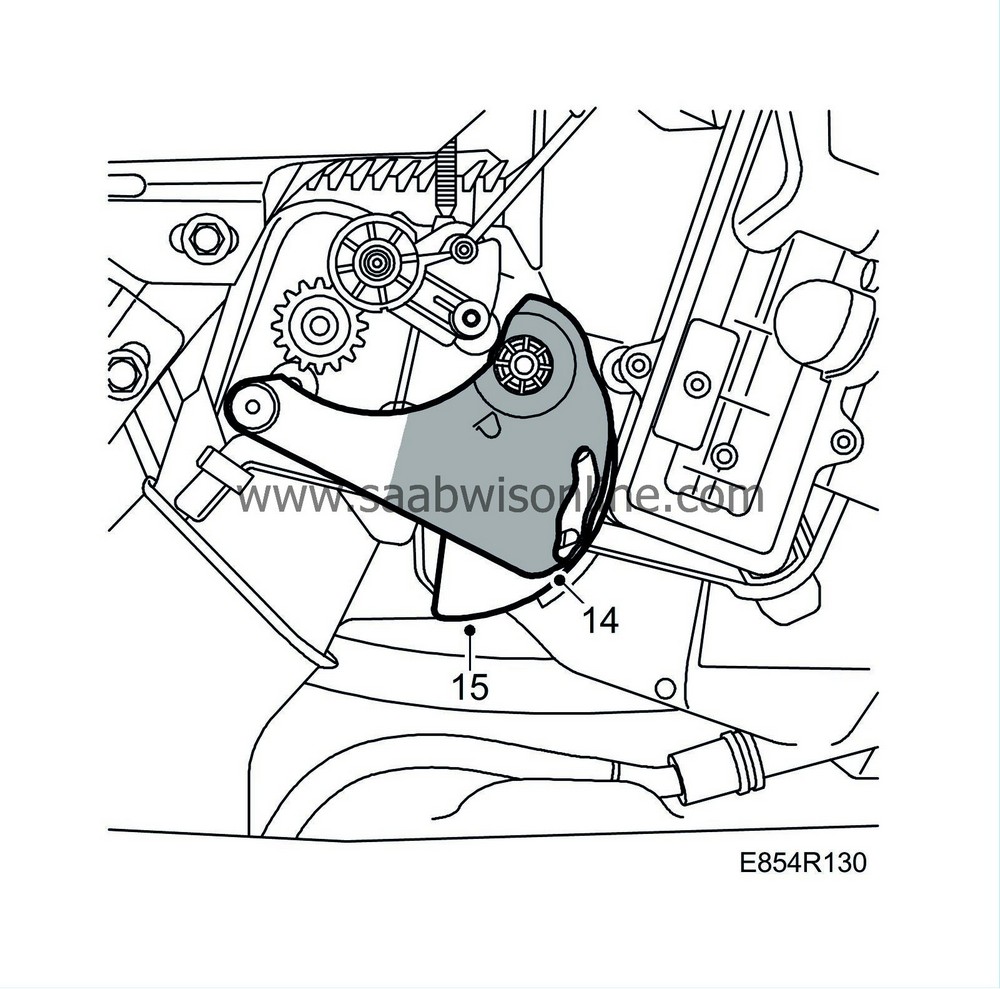
| 14. |
Apply a thin layer of 87 81 719 silicone grease to the front part of the cam base, from the front edge to the notch approx. 50 mm back and also in the groove. Apply also a thin layer of grease to the semi-circular surface around the snap connections. Use a brush to apply the grease.
|
|||||||
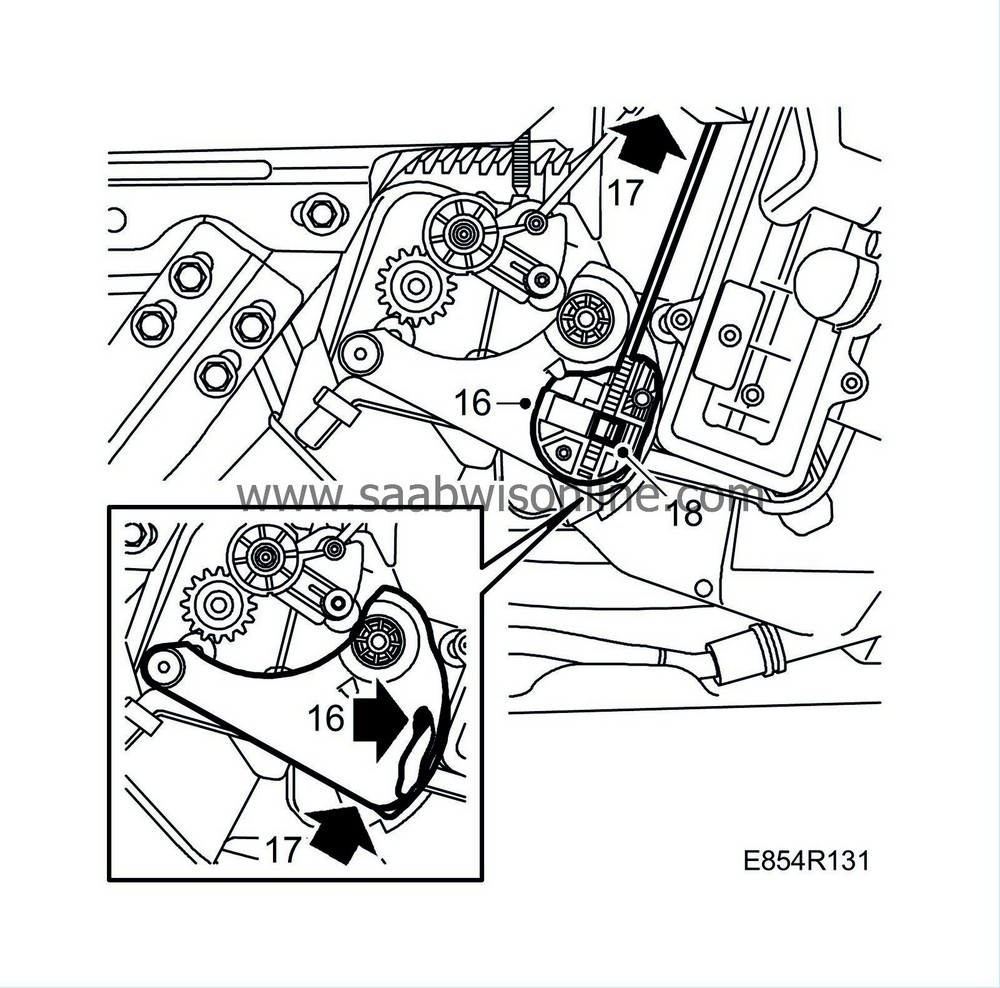
| 15. |
Move the innermost, semicircular heating damper to its upper position.
|
|
| 16. |
Fit the rear steel pin on the black actuator into the oval hole in the heating damper. Put the heating damper control rod outside the groove in the actuator.
|
|
| 17. |
Carefully press up the semicircular heating damper, actuator and control rod. Angle the actuator so that the control rod fits into the threaded groove and press home the control rod.
|
|
| 18. |
Bend over and snap the clip on the actuator into place.
|
|
| 19. |
Apply a thin layer of 87 81 719 silicone grease to the actuator. Use a brush to distribute the grease over the entire sliding surface.
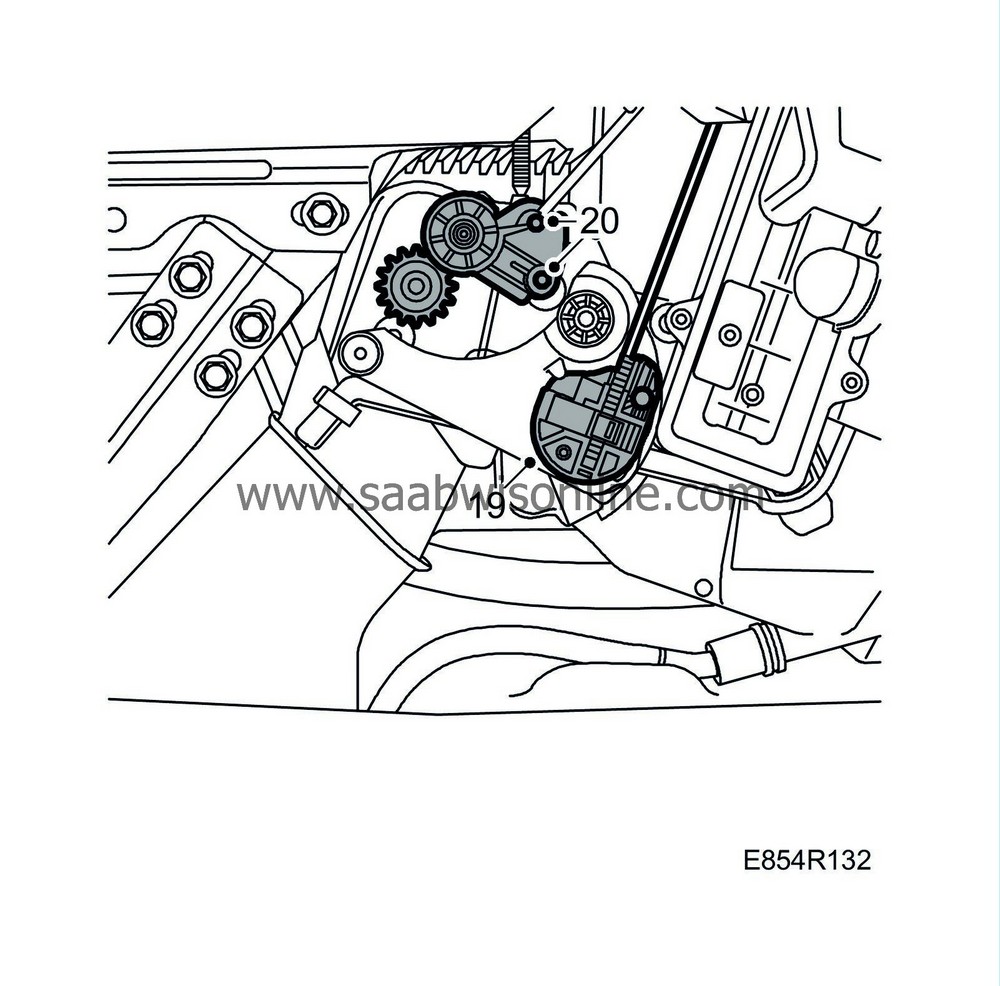
|
|
| 20. |
Apply a thin layer of grease to the distribution damper pinion. Use a brush to distribute the grease over the entire sliding surface and the 2 pins.
|
|
| 21. |
Carefully fit the cam plate. Make sure that the 3 pins are seated in the correct grooves and that the clips engage.
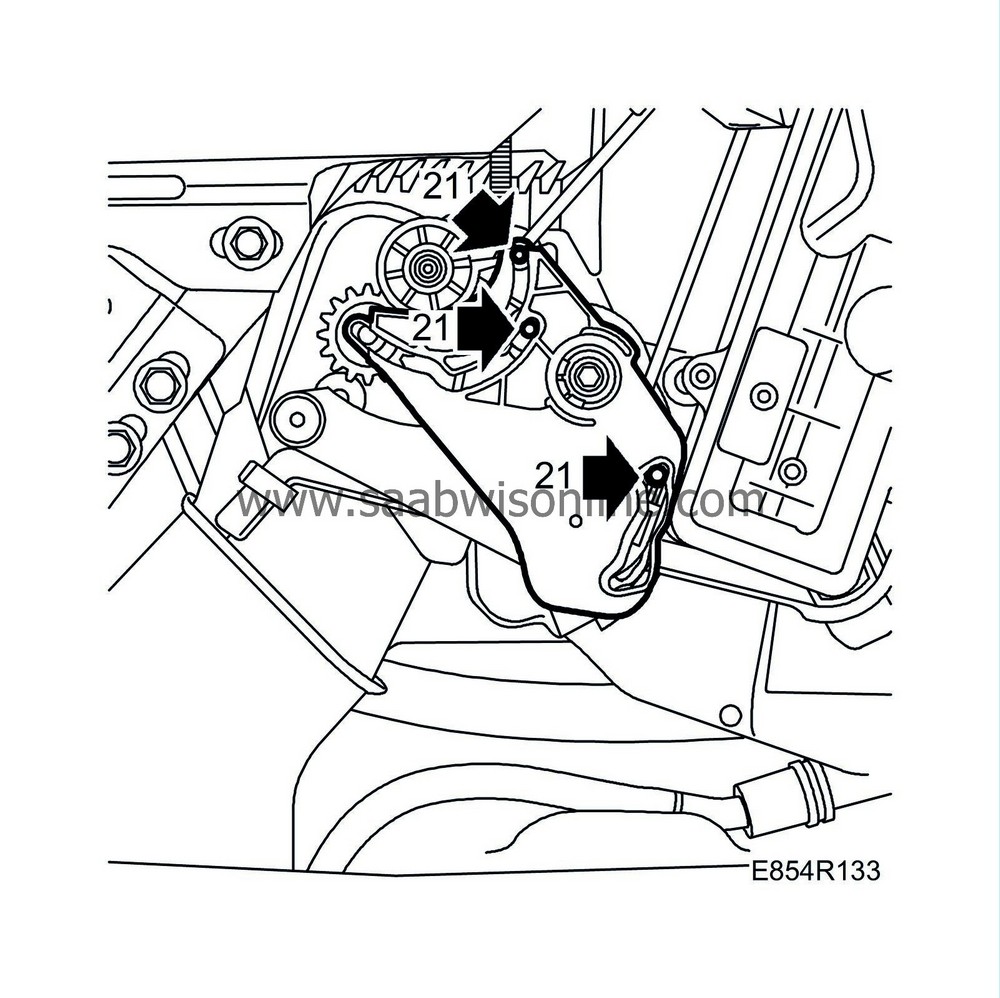
|
|
| 22. |
Apply 87 81 719 silicone grease to the three cam grooves. Use a brush.
|
|
| 23. |
Start the engine.
|
|
| 24. |
Calibrate the ACC unit by pressing the AUTO and OFF buttons on the ACC control panel at the same time. Wait until the control arms have stopped.
|
|||||||
| 25. |
Check that the damper arms move smoothly and quietly from end position to end position.
|
|
| 26. |
Turn the ignition key to the OFF position after calibration.
|
|
| 27. |
Apply a thin layer of 87 81 719 silicone grease to the turret on the rear side of the cover using a brush.
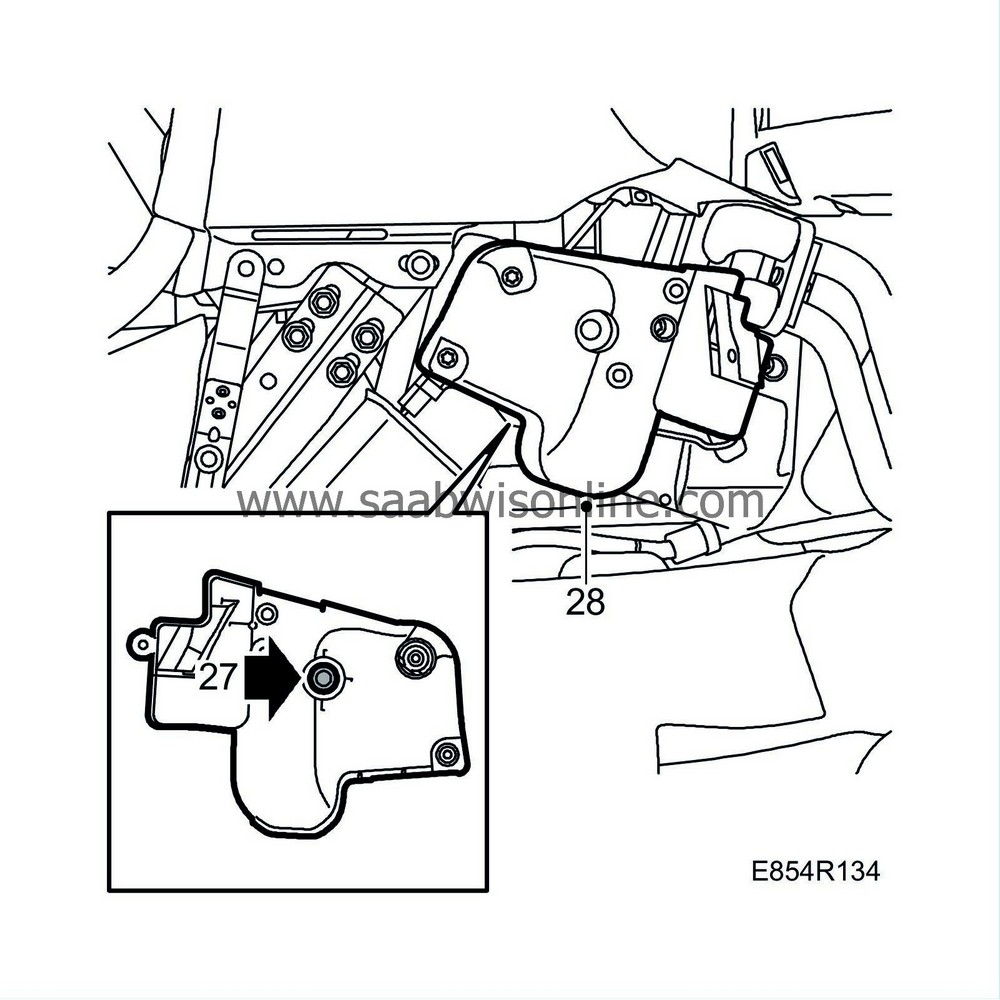
|
|
| 28. |
Fit the new cover. Start with the top rear bolt, then the bottom rear bolt and then the top front and bottom front bolts.
Tightening torque 1.4 Nm (1 lbf ft) |
|
| 29. |
Fit the sound insulation under the cover.
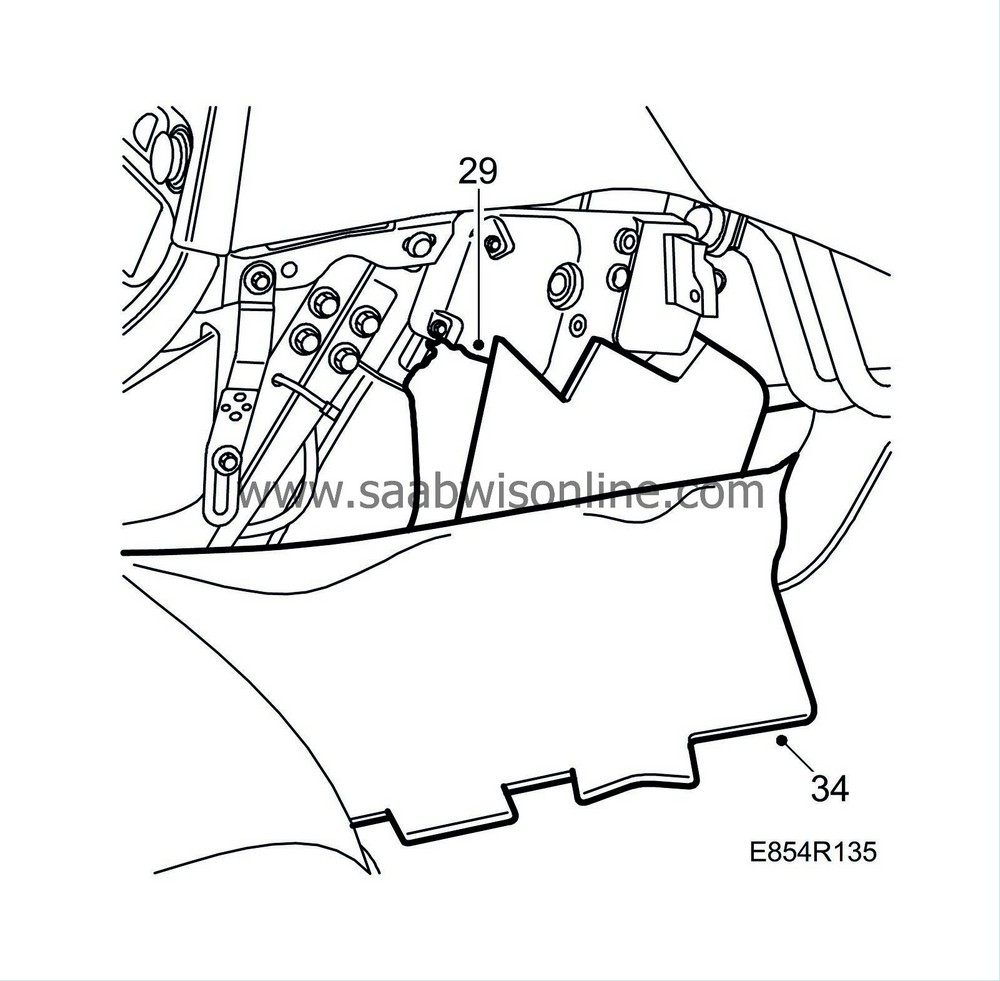
|
|||||||
| 30. |
Start the engine.
|
|
| 31. |
Calibrate the ACC unit by pressing the AUTO and OFF buttons on the ACC control panel at the same time. Wait until the control arms have stopped.
|
|
| 32. |
Check that the dampers move smoothly and quietly from end position to end position. Set the driver and passengers zones to 21°C and AUTO after calibration. Wait until the system has stabilized (approx. 30 s).
|
|
| 33. |
Turn the ignition key to the OFF position.
|
|
| 34. |
Fit the carpeting.
|
|
| 35. |
Refit the
glove box
.
|
|

