(831-2451) Lubrication/replacement of door handle
Symptom: The exterior handle does not return from open position which can make it difficult to close the door. Some door handles may be discoloured.
|
MODIFICATION INSTRUCTION
|
|
Bulletin Nbr:
|
831-2451
|
|
Date:
...........
|
Augusti 2004
|
|
Market:
|
all
|
|
|
Lubrication/replacement of door handle
|
|
Customer Satisfaction Campaign 154 29
|
Cars in stock must be rectified before delivery.
A personal communication must be sent to the owners of cars already delivered requesting them to get in touch with the nearest Saab garage as soon as possible to have the fault rectified.
Saab 9-5 M03-M04 within Vehicle Identification Number range 33026907 - 43502905
On cars within Vehicle Identification Number range 33027784 - 33043300
: the exterior door handle can bind due to lack of lubrication and in some cases be discoloured (white). The reason for the discolouring is that the material content was changed in the above Vehicle Identification Number range. All door handles within the above Vehicle Identification Number range must be replaced.
On cars within Vehicle Identification Number ranges 33026907 - 33027783 and 33043301 - 43502905
: the exterior door handle can bind due to lack of lubrication. All door handles within the above Vehicle Identification Number ranges must be lubricated.
Symptom description
The exterior handle does not return from open position which can make it difficult to close the door. Some door handles may be discoloured.
Cars within Vehicle Identification Number range 33027784 - 33043300
:
RHD
:
55 10 086 Door handle LH (x2)
53 63 742 Door handle front RH
55 10 094 Door handle rear RH
92 150 179 Rivet, 8 per car
LHD
:
55 10 094 Door handle RH (x2)
53 63 759 Door handle front LH
55 10 086 Door handle rear LH
92 150 179 Rivet, 8 per car
Cars within Vehicle Identification Number ranges 33026907 - 33027783 and 33043301 - 43502905
:
16-30 22 829 Lubricants (sufficient for approx. 50 cars)
92 150 179 Rivet, 1 per car
For fitting the modification identity plate (not US/CA)
:
12 785 148 Modification identity plate
16-30 15 815 Cleaner, Teroson FL T875, sufficient for 50-100 cars
Not US/CA: Before proceeding, check box B1 of the modification identity plate. From and including M04, and for certain markets, there is the table "Table of Modifications" in the car's Warranty and Service Book. A modification identity plate must be fitted in accordance with the section "Fitting the modification identity plate" where local directives require the marking of the car. If the box is not marked, continue as follows.
Cars within Vehicle Identification Number ranges 33026907 - 33027783 and 33043301 - 43502905
must undergo procedure
A
and
B
.
Cars within Vehicle Identification Number range 33027784 - 33043300
must undergo procedure
C
and
D
.
A Lubrication of door handle, front door
|
2.
|
Remove the door trim in accordance with WIS - 9-5 - Body - Interior equipment - Adjustment/Replacement - Door trim.
|
|
3.
|
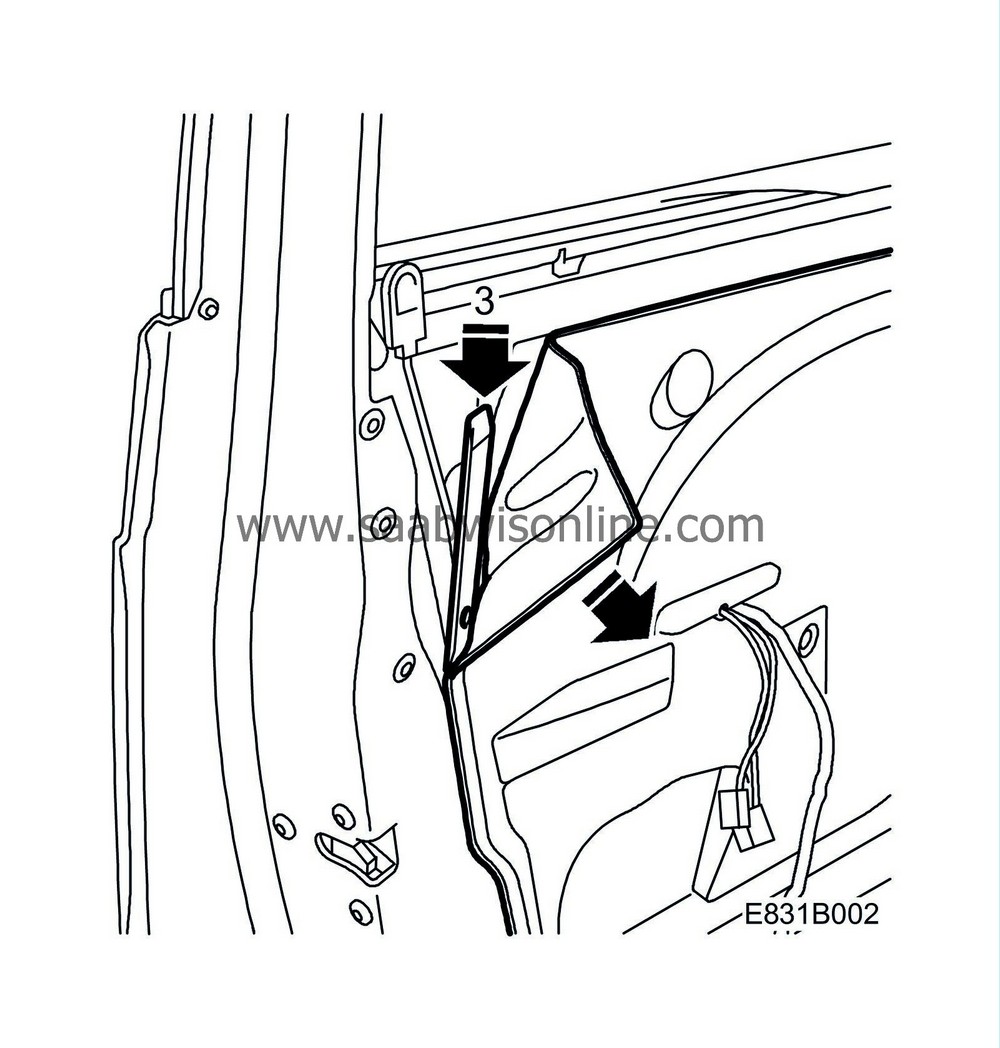
Bend the water barrier down slightly. Detach it using 82 93 474 Removal tool.
|
|
4.
|
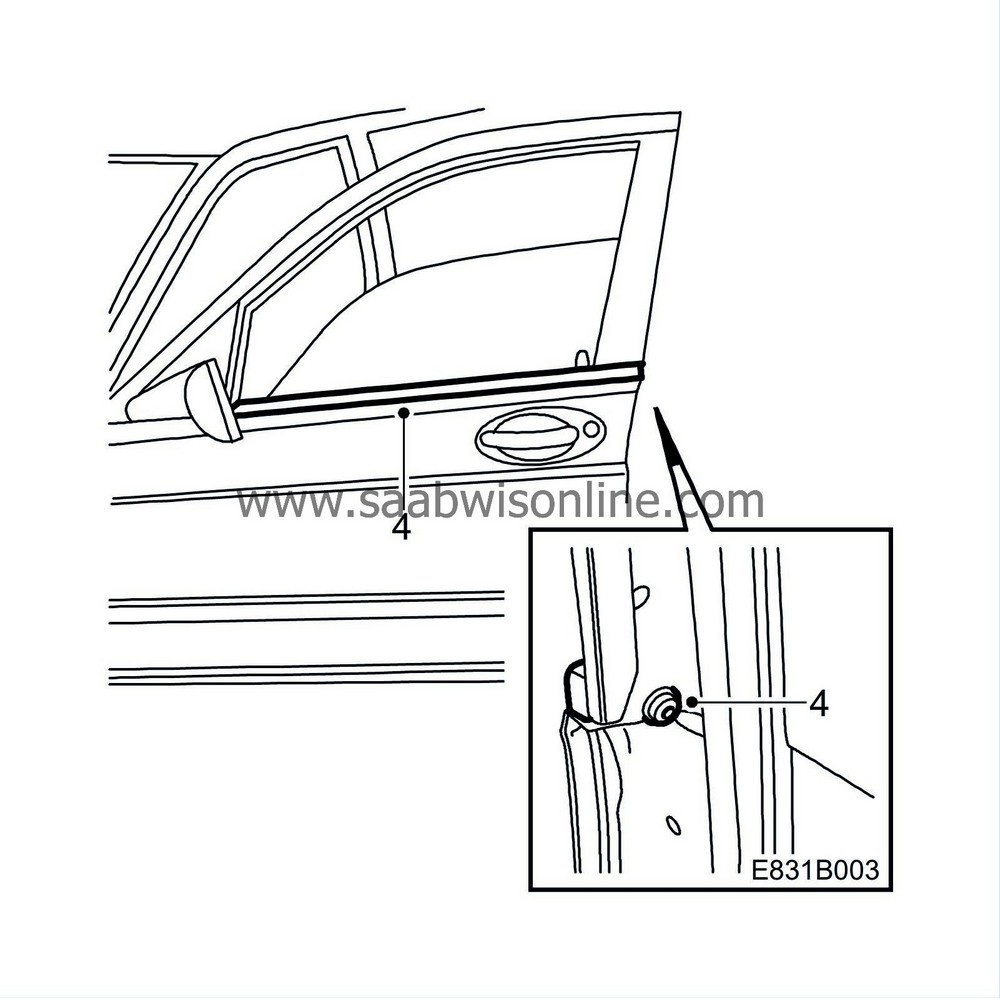
Remove the weatherstrip screw and lift away the trim.
|
|
5.
|
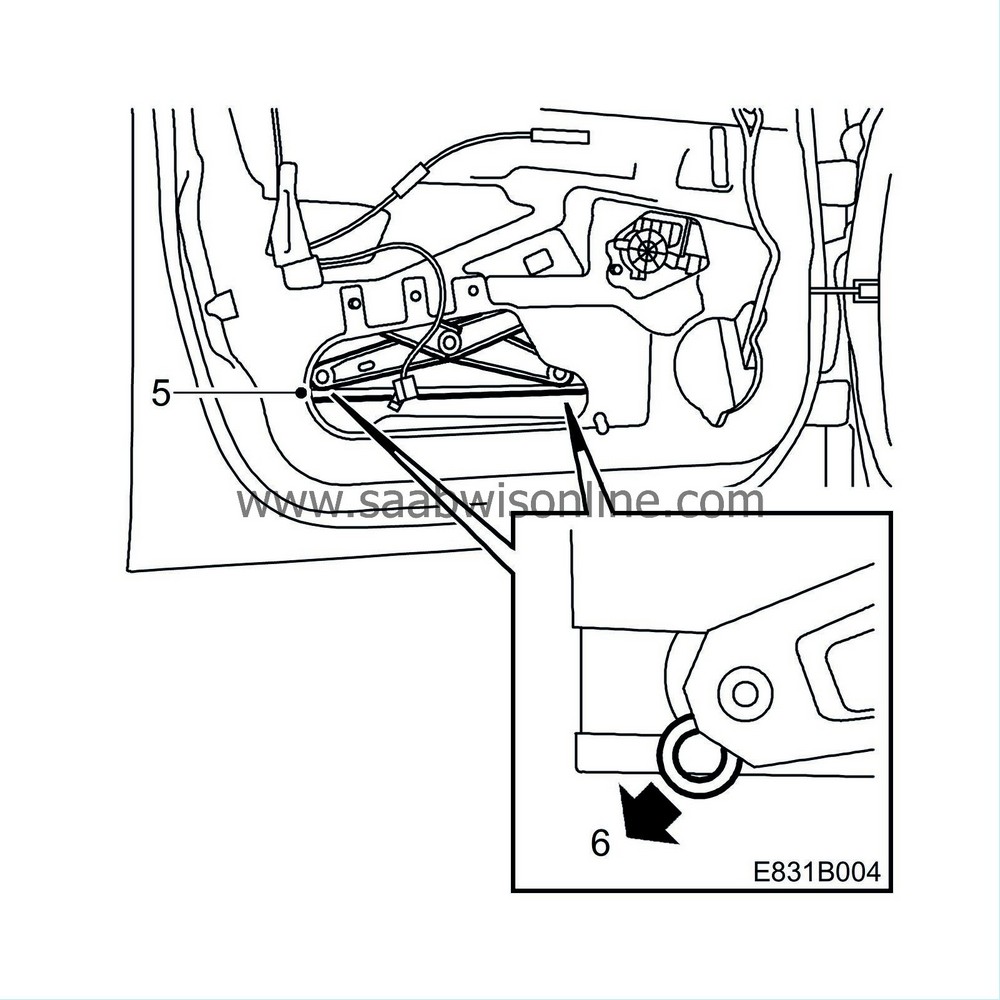
Raise the window lift so that the window mounting becomes visible at the top edge on the lower large hole. The clips on the slide rollers will then become more easily accessible.
|
|
6.
|
Detach the scissor lift braces from the window mounting by removing the clips and then prizing loose the braces from the slide rollers with a large flat chisel. Prize between the brace and the rail and close to the ball so the brace is not deformed.
|
|
7.
|
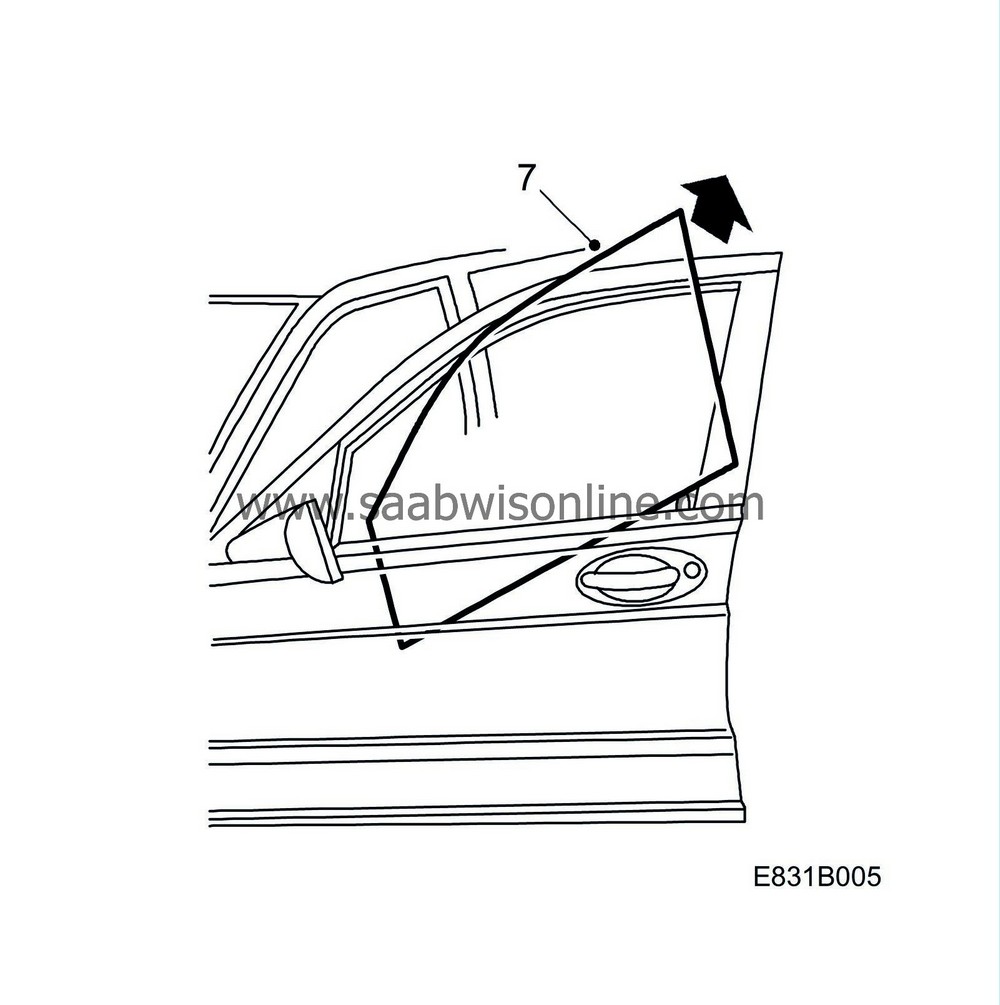
Lift out the window by tilting up the back edge.
|
|
8.
|
Driver's door
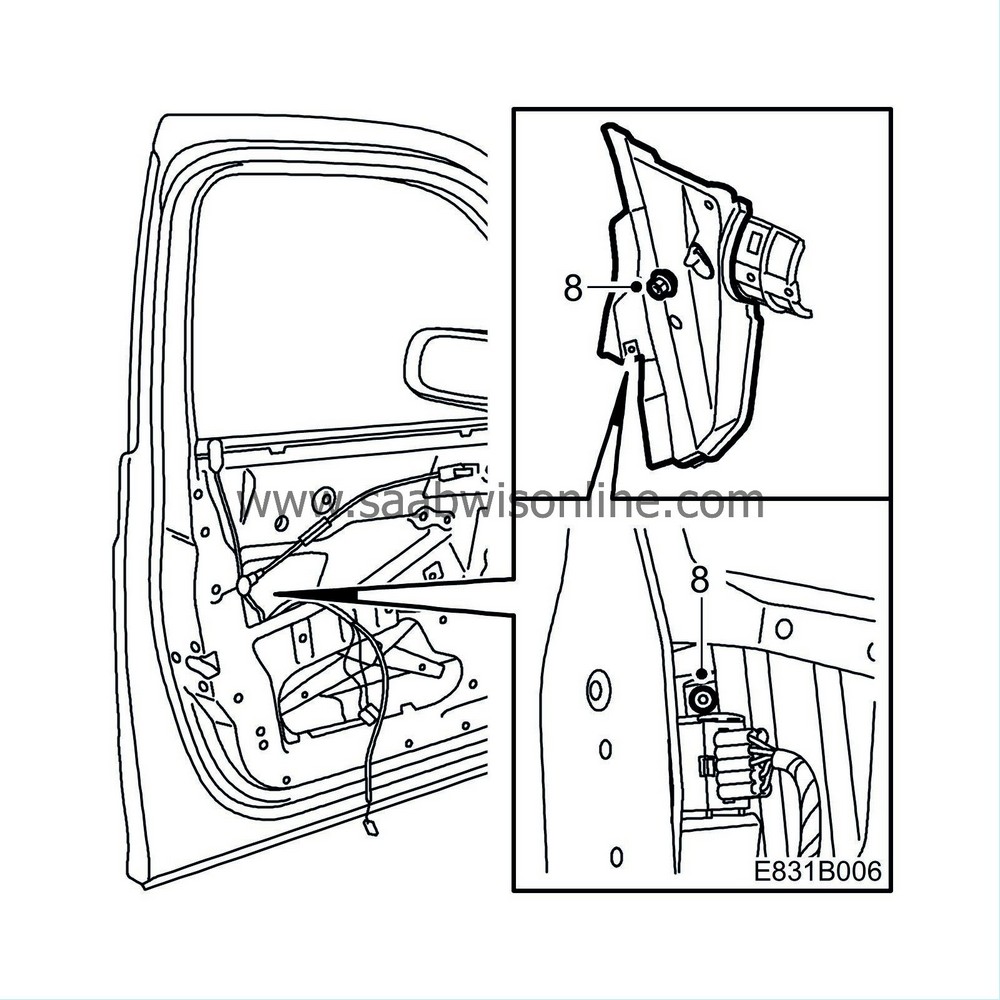
: Detach the guard by removing the rear nut for the handle and guard as well as the guard's screw.
|
|
9.
|
Driver's door
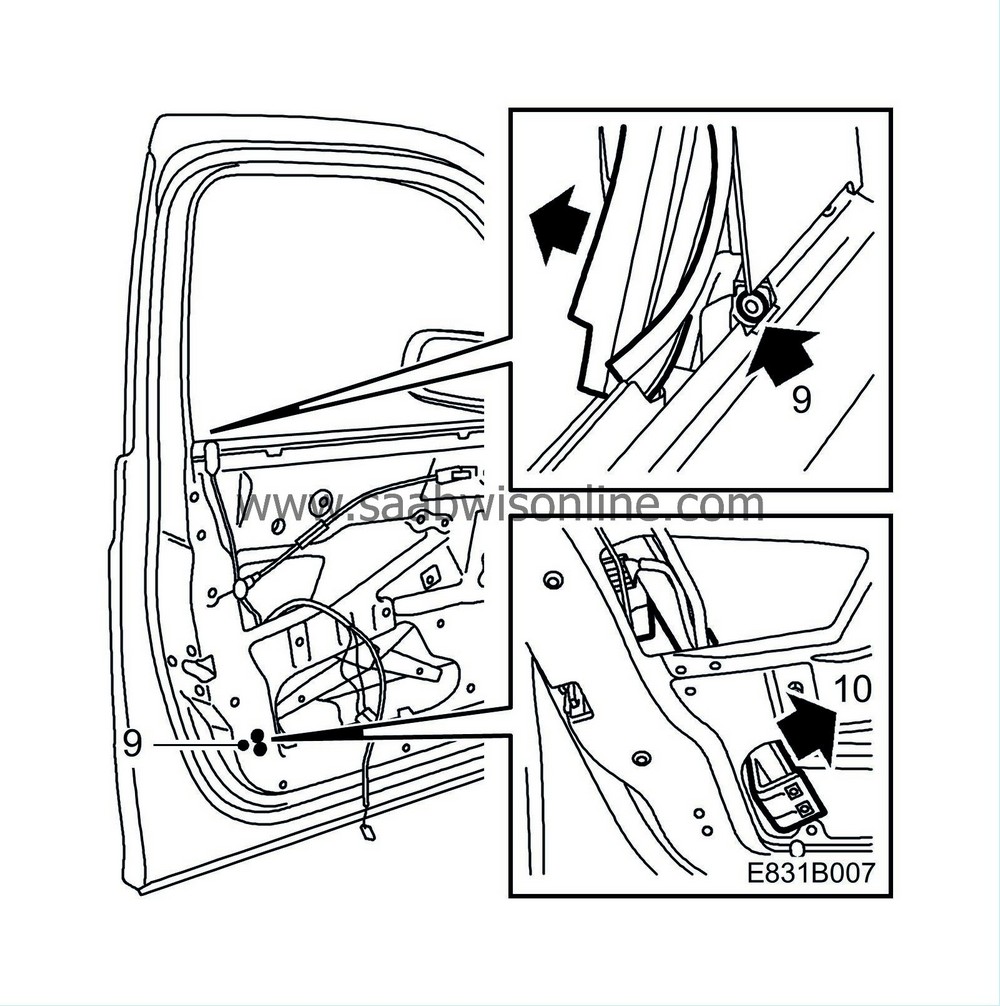
: Loosen a piece of the upper window weatherstrip and drill out the rivet. Remove the two guide rail screws.
|
|
10.
|
Driver's door
: Turn the guide rail forward.
|
|
11.
|
Driver's door
: Move the guard to access the handle.
|
|
12.
|
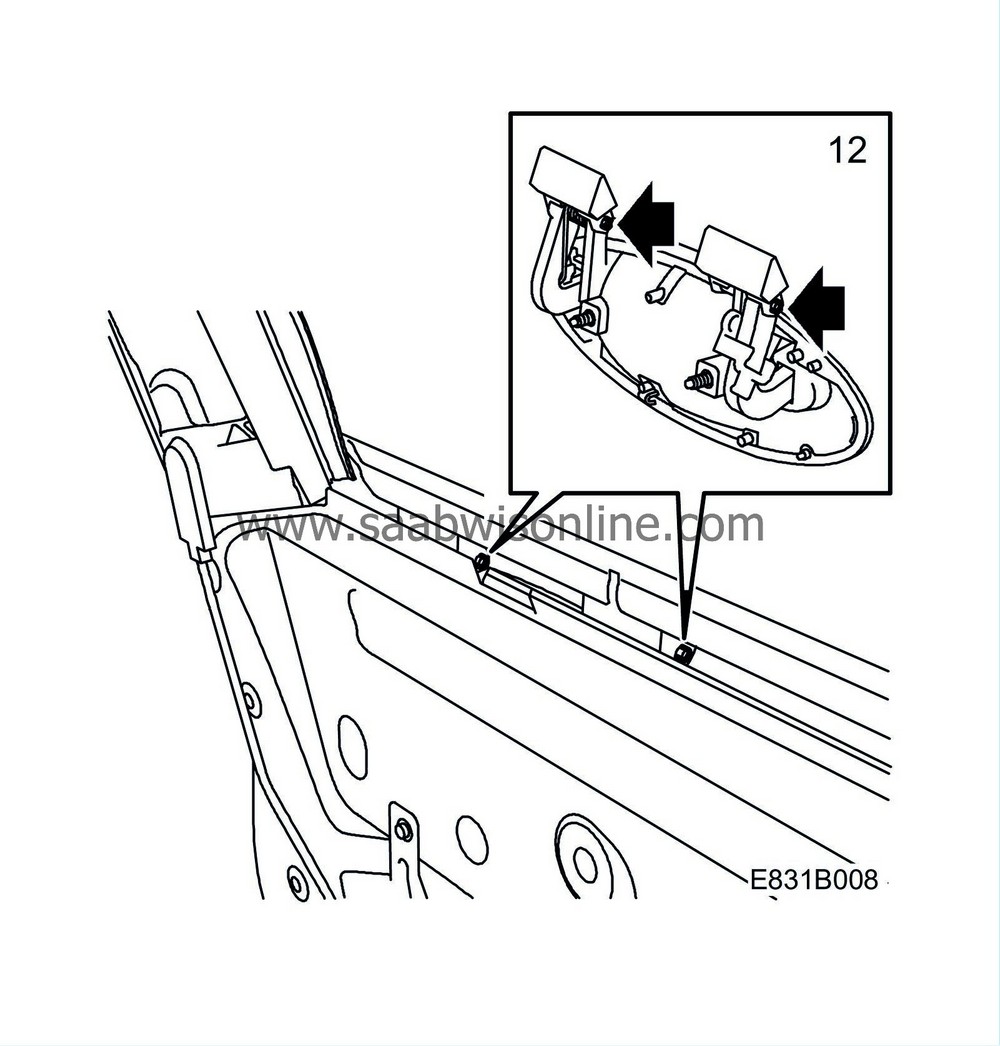
Grease the handle with 30 22 829 Lubricants. Inject into the handle's pins using the nozzle's plastic hose.
|
|
13.
|
Driver's door
: Lift the guard into place.
|
|
14.
|
Driver's door
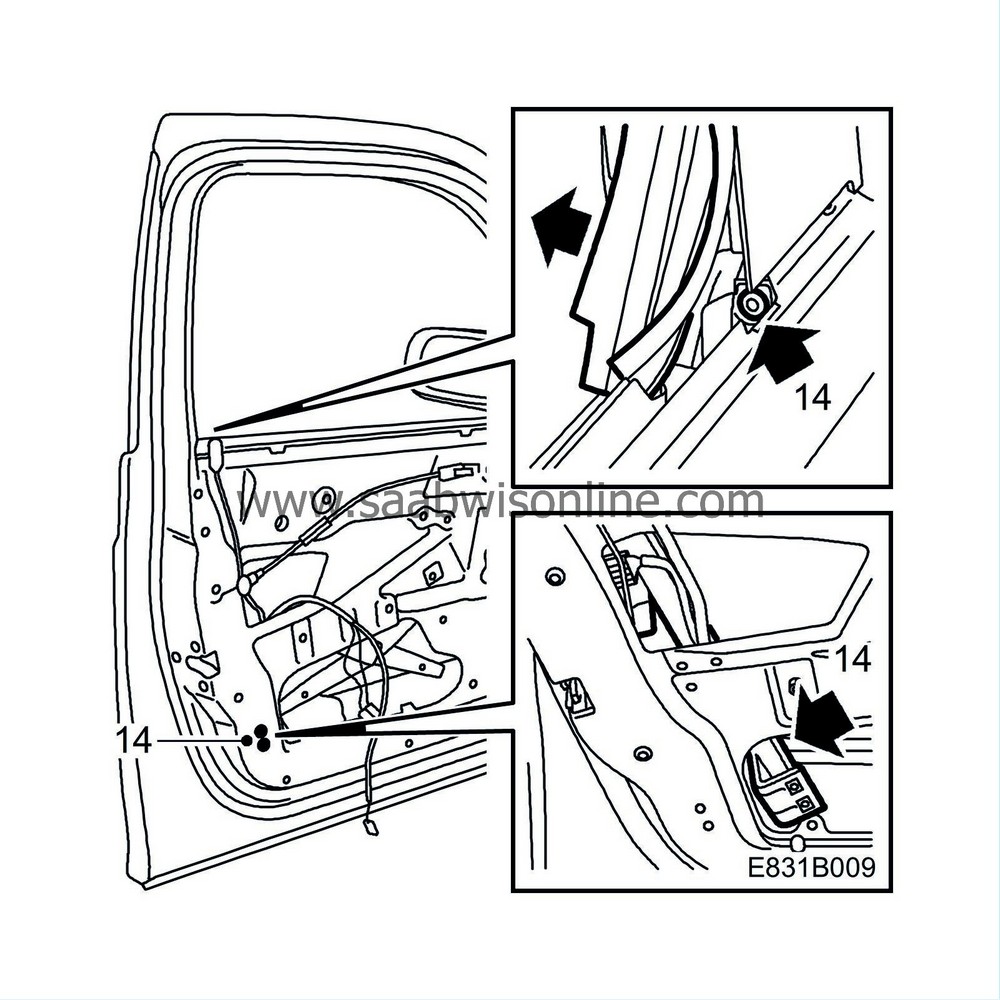
: Turn the guide rail inwards and fit its two screws. Fit the rivet and the upper window weatherstrip.
|
|
15.
|
Driver's door
: Screw the guard's nut onto the handle and the guard's screw.
|
|
16.
|
Fit the clips to the slide rollers.
|
|
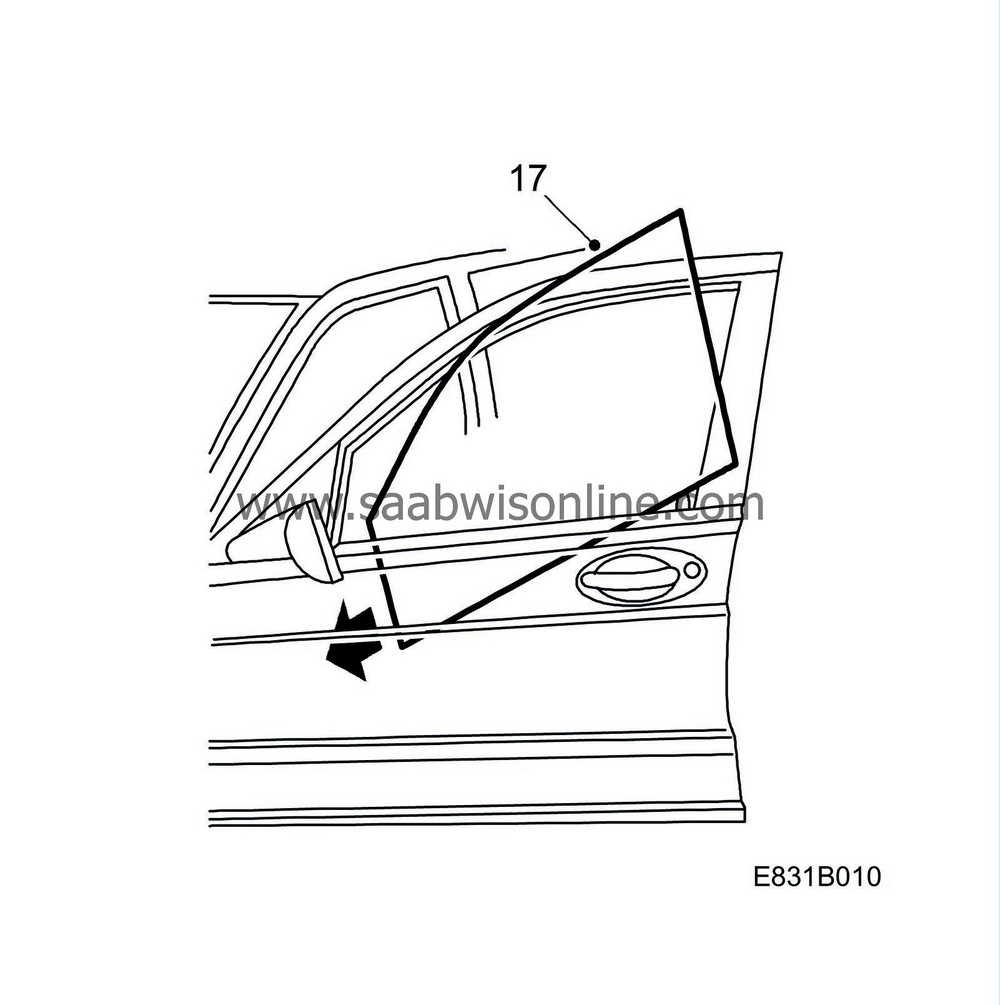
17.
|
Lift in the window by tilting it forwards. Guide the window into the front guide rail, tilt the window back and guide it into the rear rail.
|
|
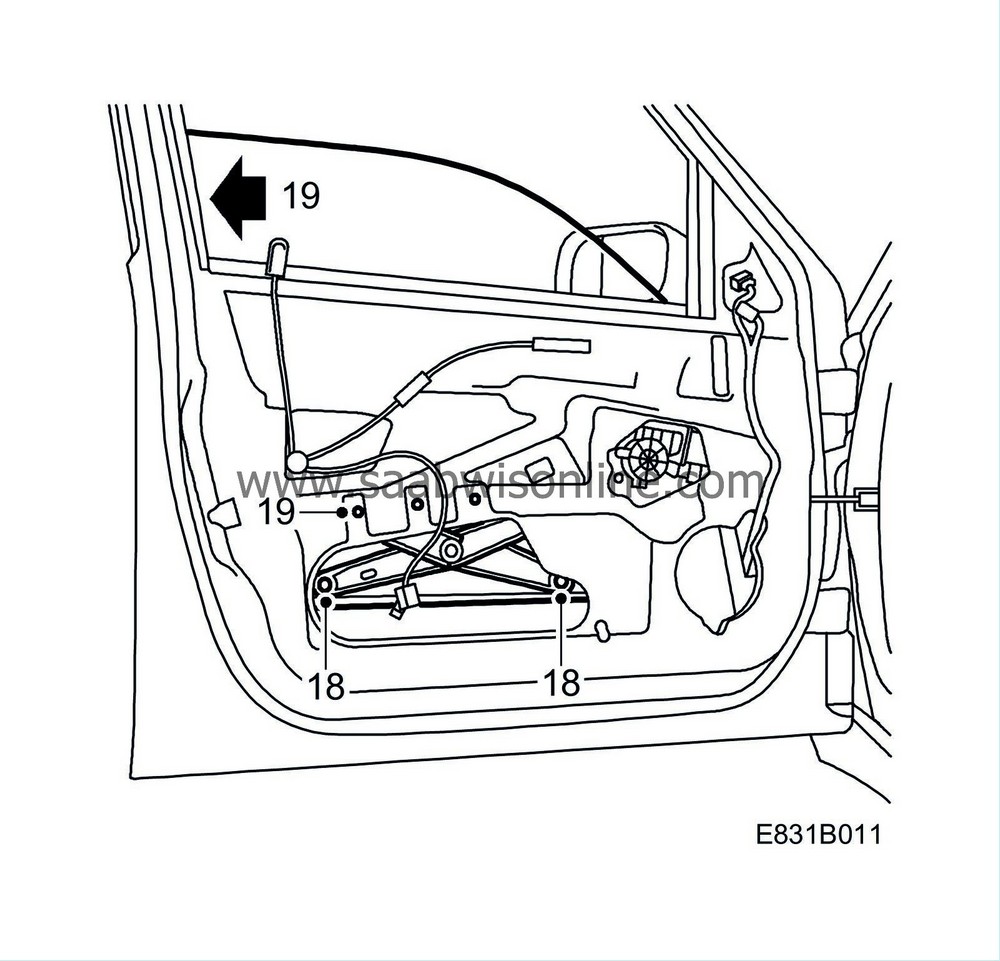
18.
|
Press the scissor lift braces into the window mounting slide rollers.
|
Note
|
|
A double click sound should be heard.
|
|
|
19.
|
Adjust the window as necessary.
|
|
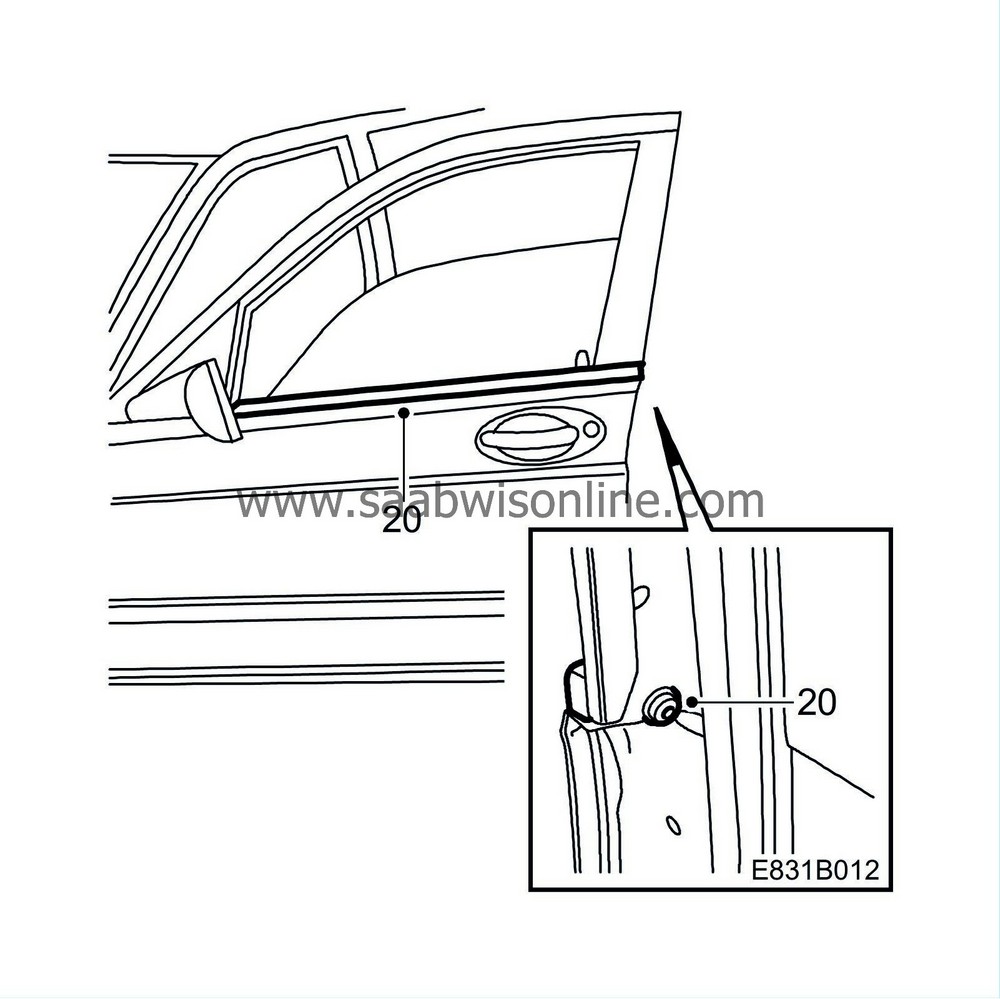
20.
|
Grease in the end of the weatherstrip to the door mirror base with soapy water. Fit the weatherstrip.
|
|
21.
|
Check the operation of the window lift.
|
|
22.
|
Fit the water barrier.
|
|
23.
|
Fit the door trim in accordance with WIS - 9-5 - Body - Interior equipment - Adjustment/Replacement - Door trim.
|
|
B Lubrication of door handle, rear door
|
|
1.
|
Remove the door trim in accordance with WIS - 9-5 - Body - Interior equipment - Adjustment/Replacement - Door trim.
|
|
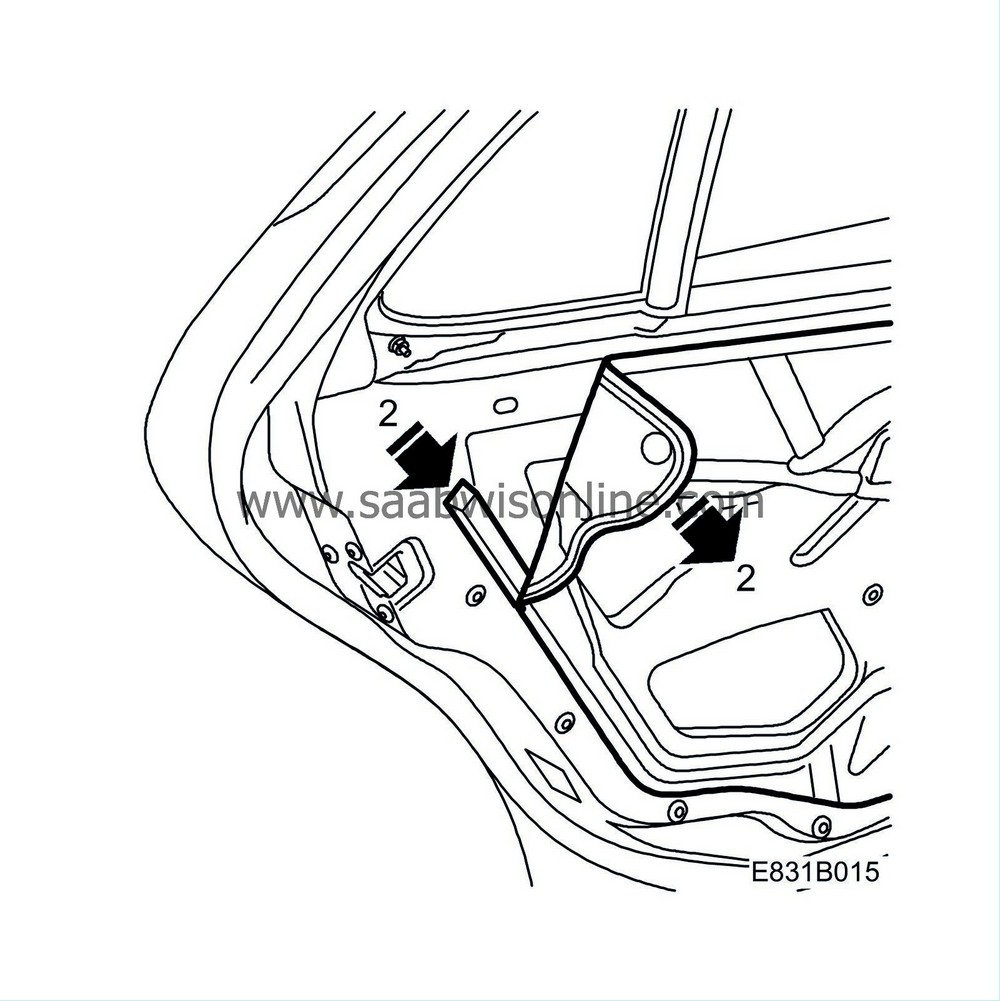
2.
|
Bend the water barrier down slightly. Detach it using 82 93 474 Removal tool
|
|
3.
|
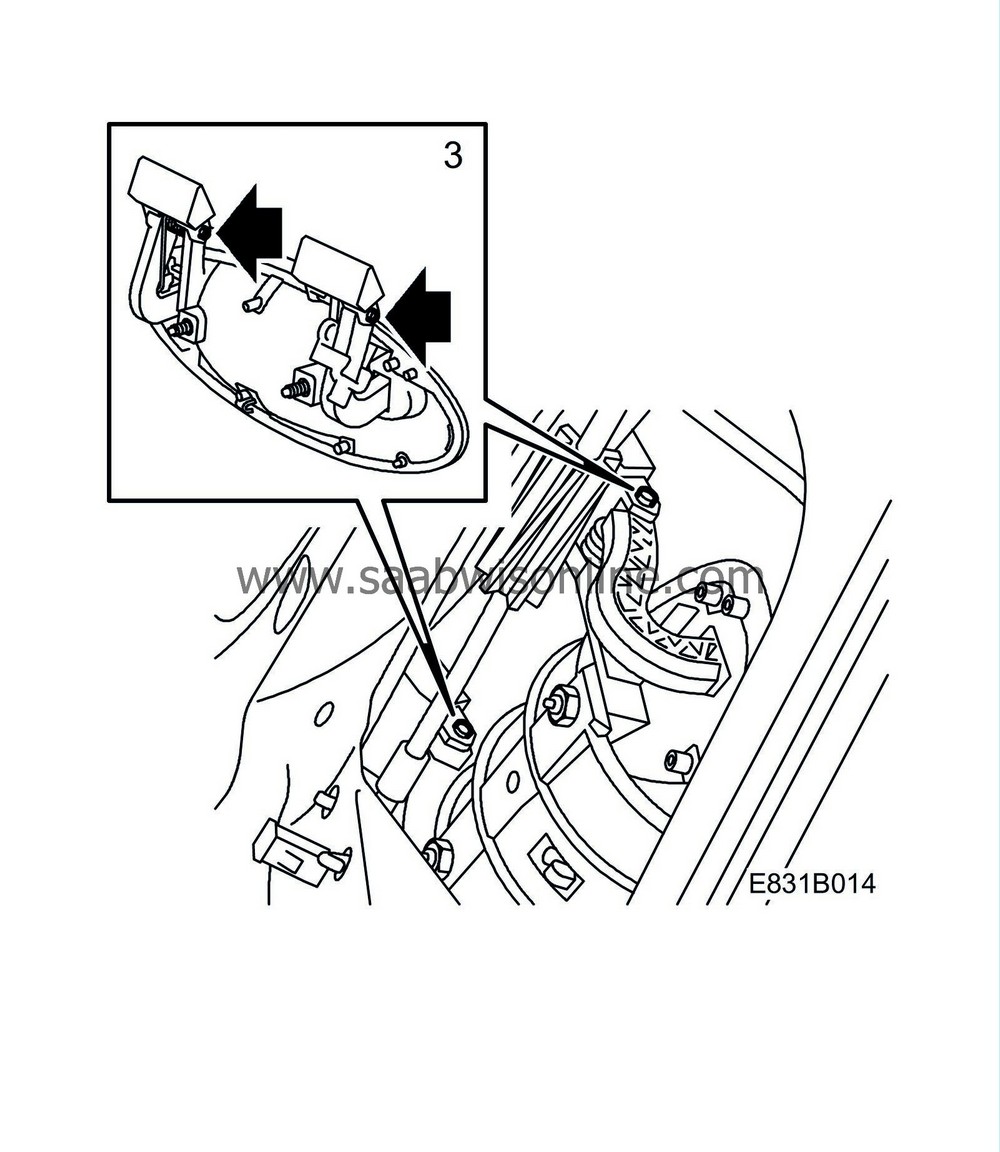
Grease the handle with 30 22 829 Lubricants. Inject into the handle's pins using the nozzle's plastic hose.
|
|
4.
|
Fit the water barrier.
|
|
5.
|
Fit the door trim, WIS - 9-5 - Body - Interior equipment - Adjustment/Replacement - Door trim.
|
|
C Replacing the door handle, front door
|
|
3.
|
Bend the water barrier down slightly. Detach it using 82 93 474 Removal tool.

|
|
4.
|
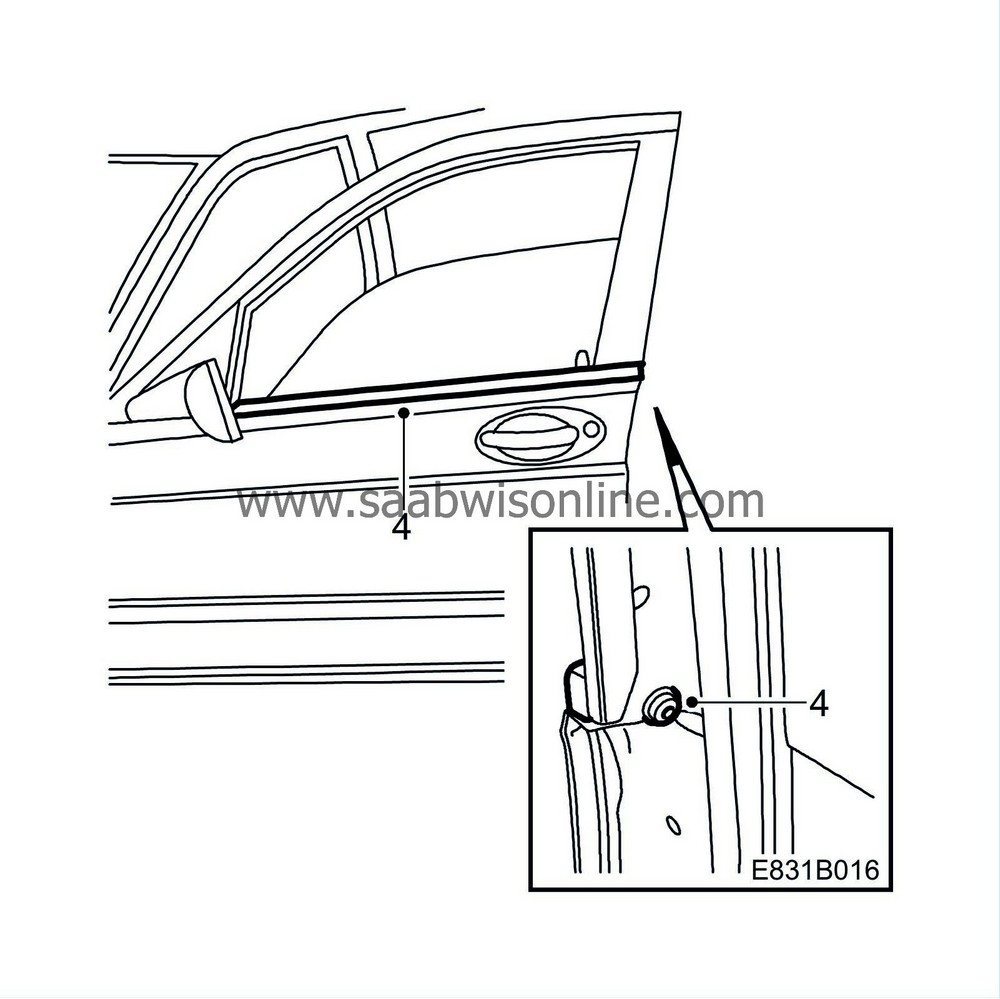
Remove the weatherstrip screw and lift away the trim.
|
|
5.
|
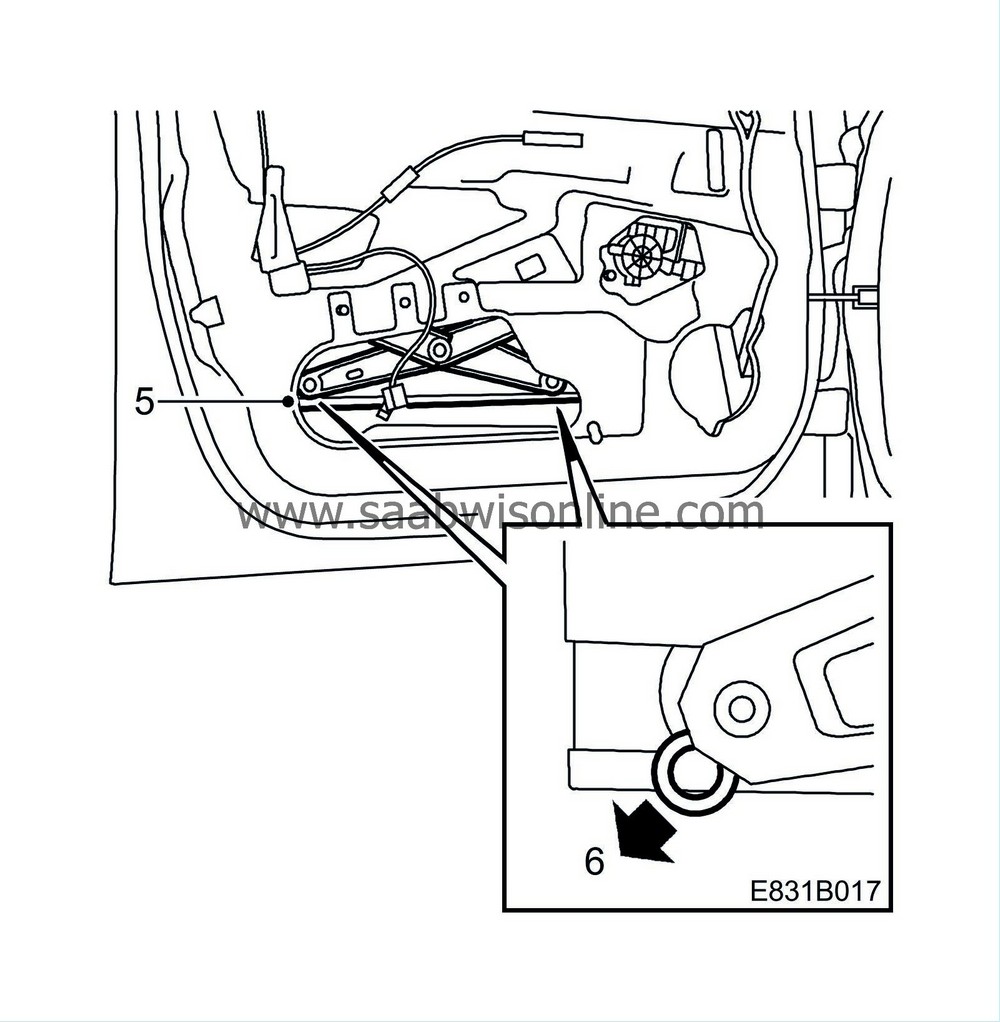
Raise the window so that the window mounting becomes visible at the top edge on the lower large hole. The clips on the slide rollers will then become more easily accessible.
|
|
6.
|
Detach the scissor lift braces from the window mounting by removing the clips and then prizing loose the braces from the slide rollers with a large flat chisel. Prize between the brace and the rail and close to the ball so the brace is not deformed.
|
|
7.
|
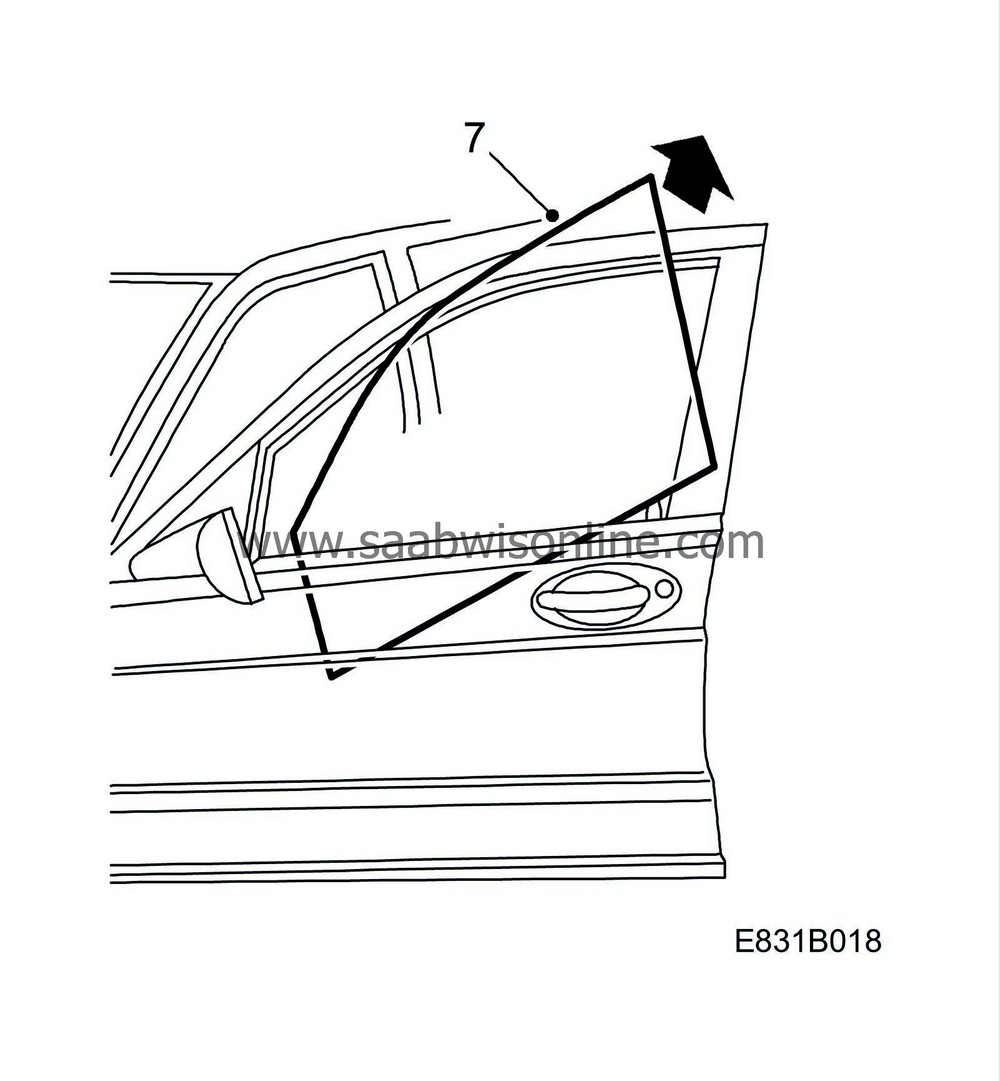
Lift out the window by tilting up the back edge.
|
|
8.
|
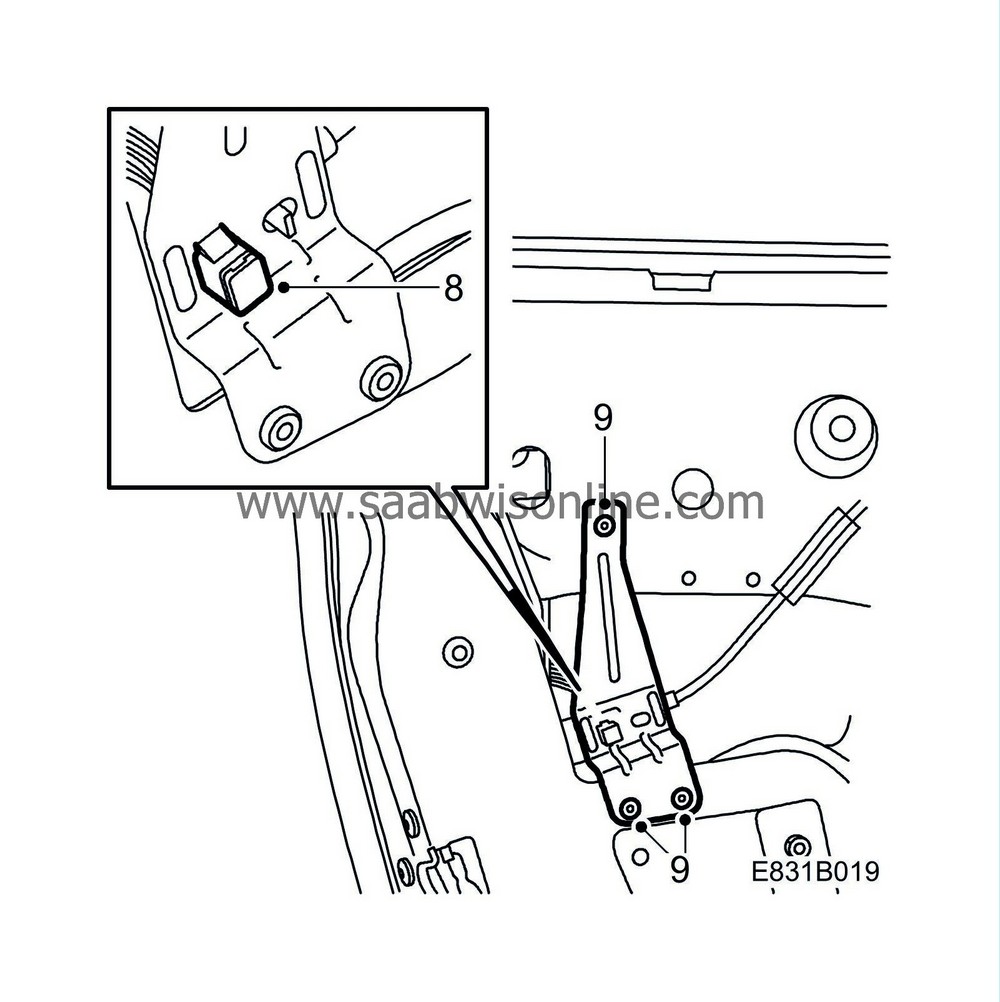
Tap in the steel cores of the rivets securing the metal finisher on the wire to the inner opening handle and detach the wire from the metal finisher.
|
|
9.
|
Drill out the rivets, lift away the metal finisher and unhook the wire from the lock.
|
|
10.
|
Driver's door
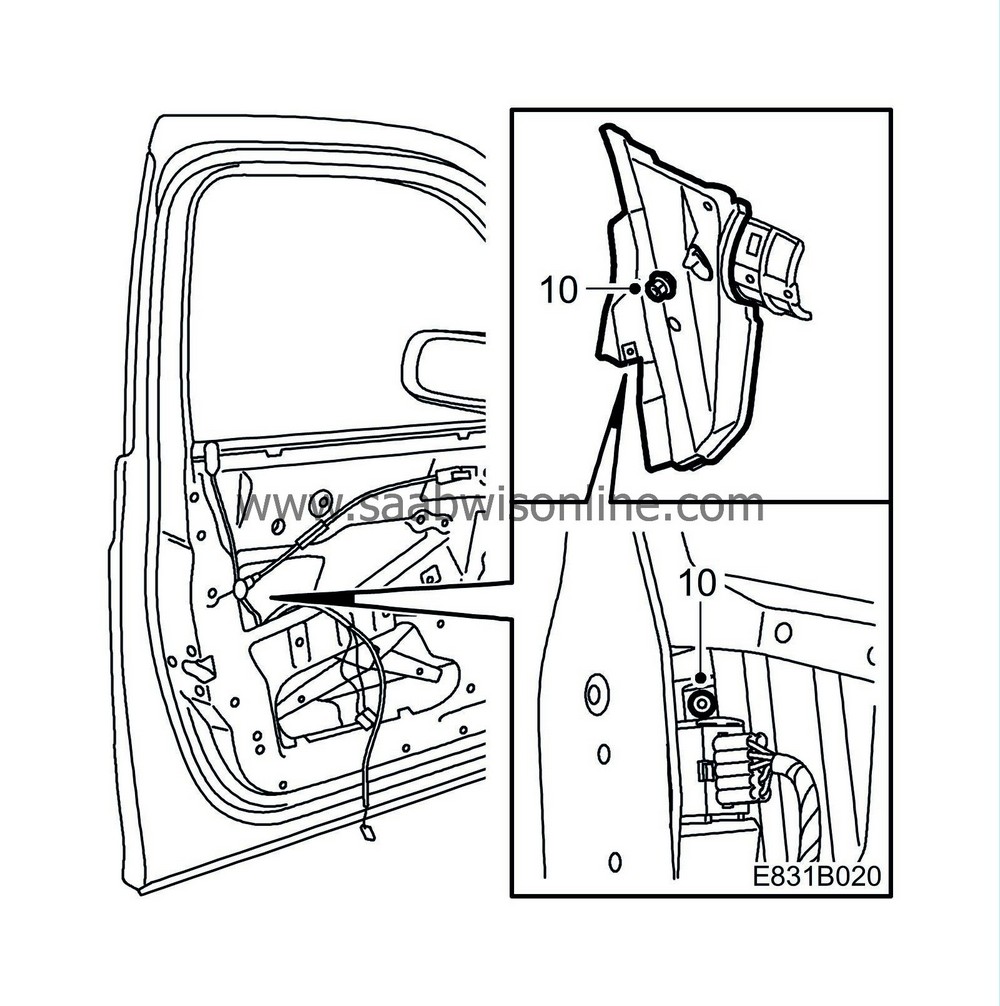
: Detach the guard by removing the rear nut for the handle and guard as well as the guard's screw.
|
|
11.
|
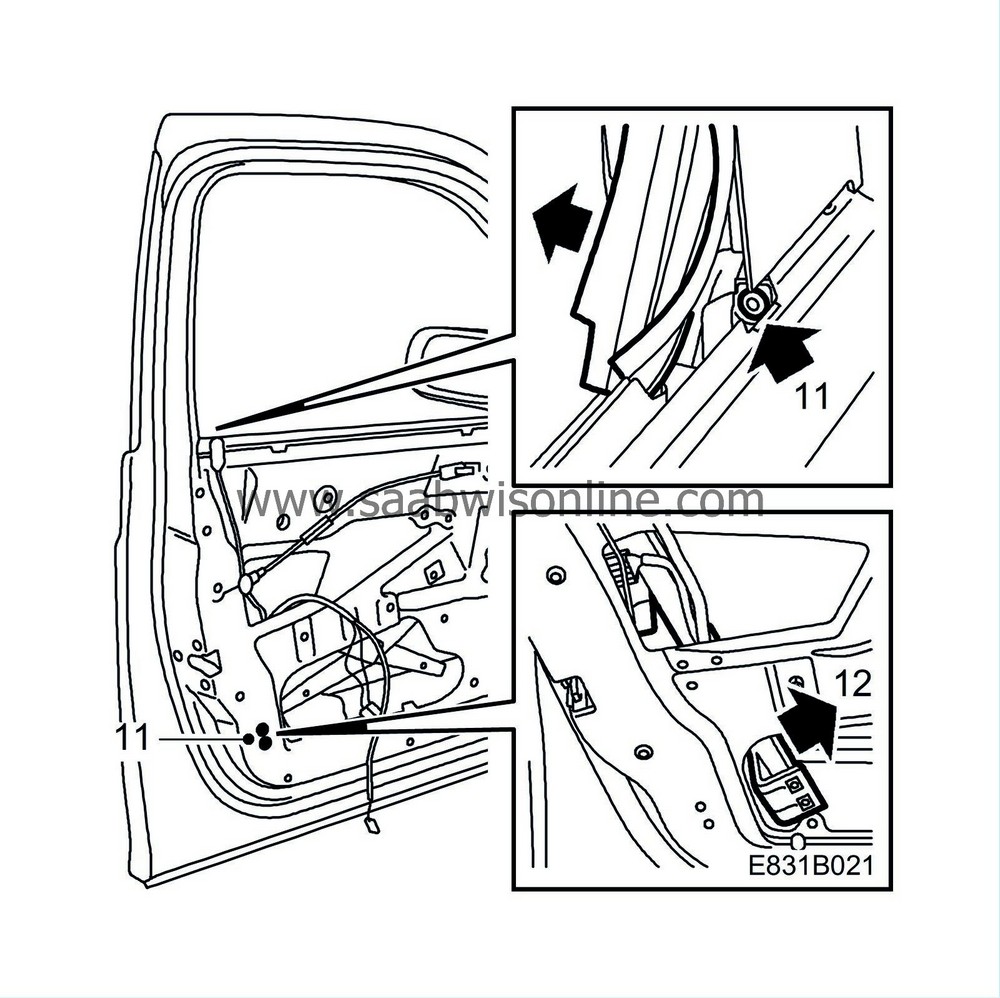
Loosen a piece of the upper window weatherstrip and drill out the rivet. Detach the bottom of the guide rail and turn the guide rail forward.
|
|
12.
|
Driver's door
: Lift out the guard.
|
|
13.
|
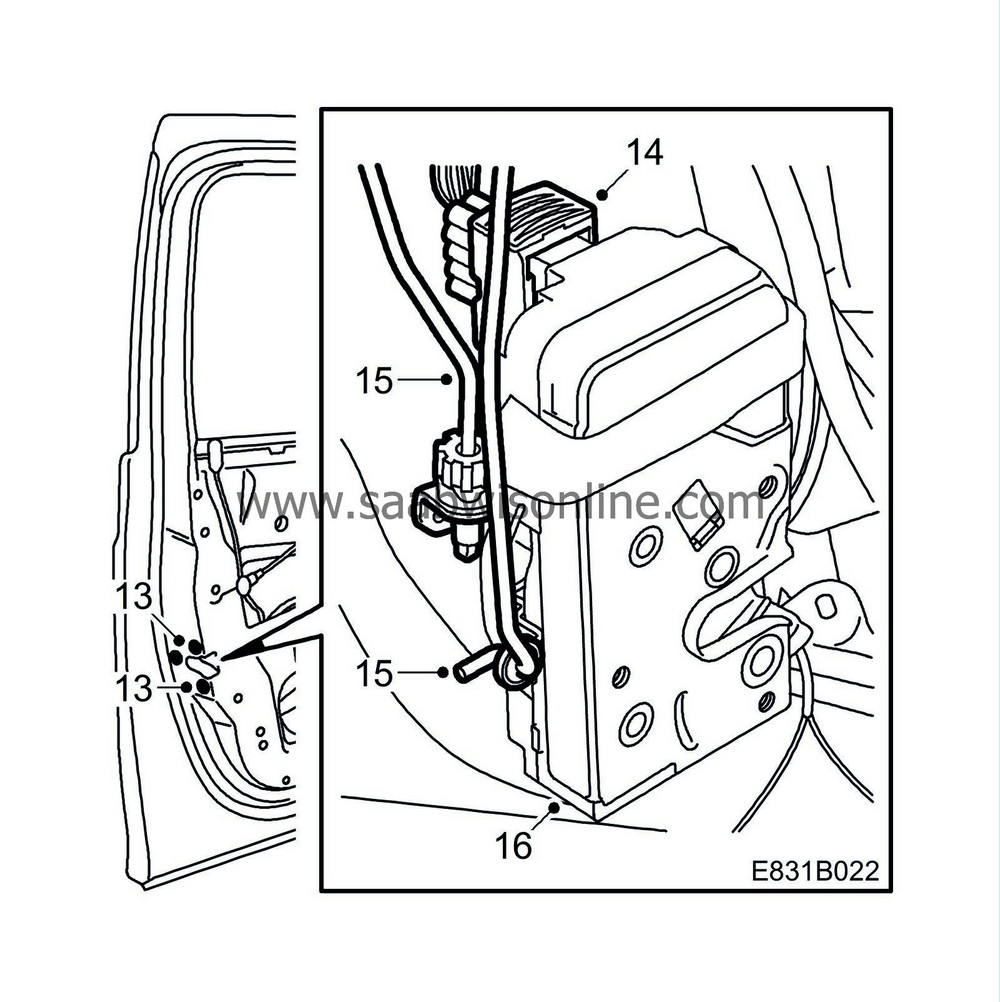
Undo the three screws holding the lock on the door.
|
|
14.
|
Unplug the connector from the lock unit.
|
|
15.
|
Detach the pull rod from the lock (driver's door only) by turning the lock while unhooking the pushrod between the exterior handle and the lock.
|
|
16.
|
Lift out the lock unit.
|
|
17.
|
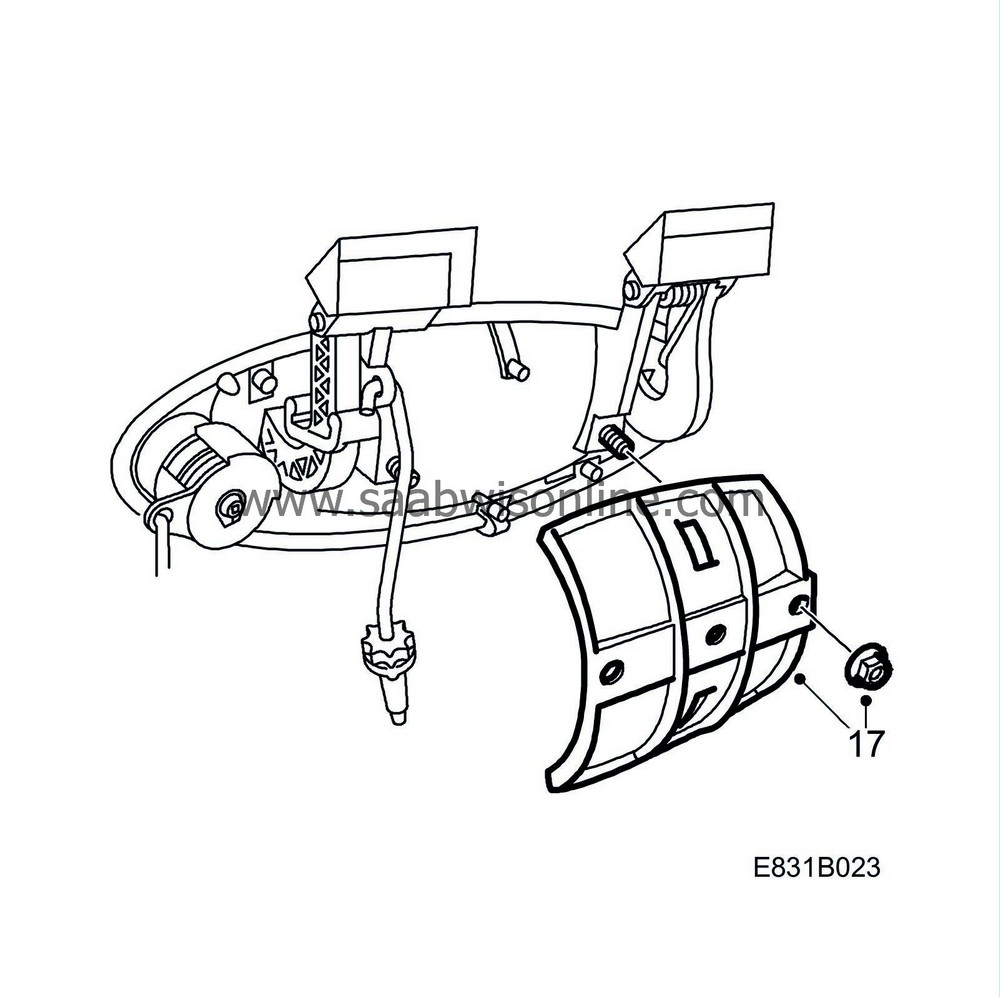
Remove the handle's nut(s) and lift out the plate.
|
|
18.
|
Driver's door
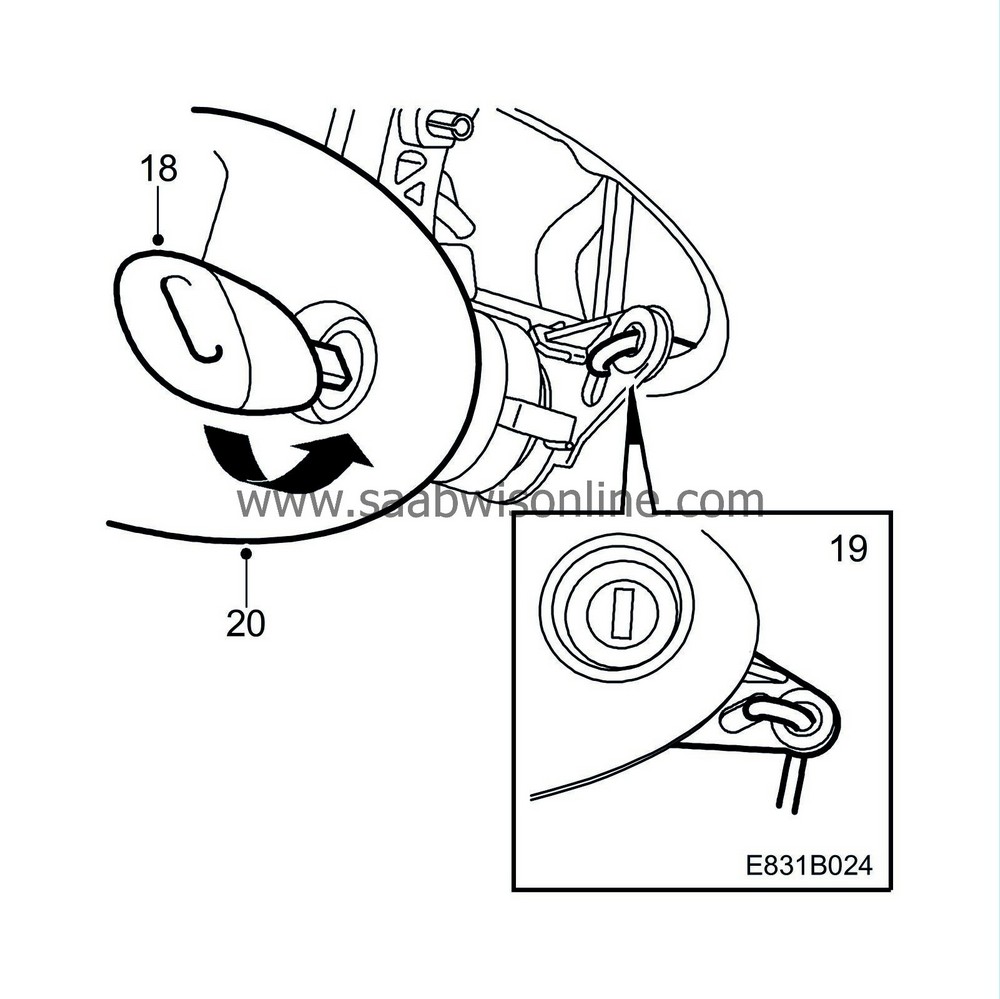
: Insert the key into the lock cylinder and turn it as illustrated.
|
|
19.
|
Driver's door
: First tilt the rear part of the handle (at the lock cylinder). Make sure that the end of the pull rod engages the correct groove so that the handle can be lifted out.
|
|
20.
|
Pull up the opening handle and lift it out.
|
|
21.
|
Driver's door
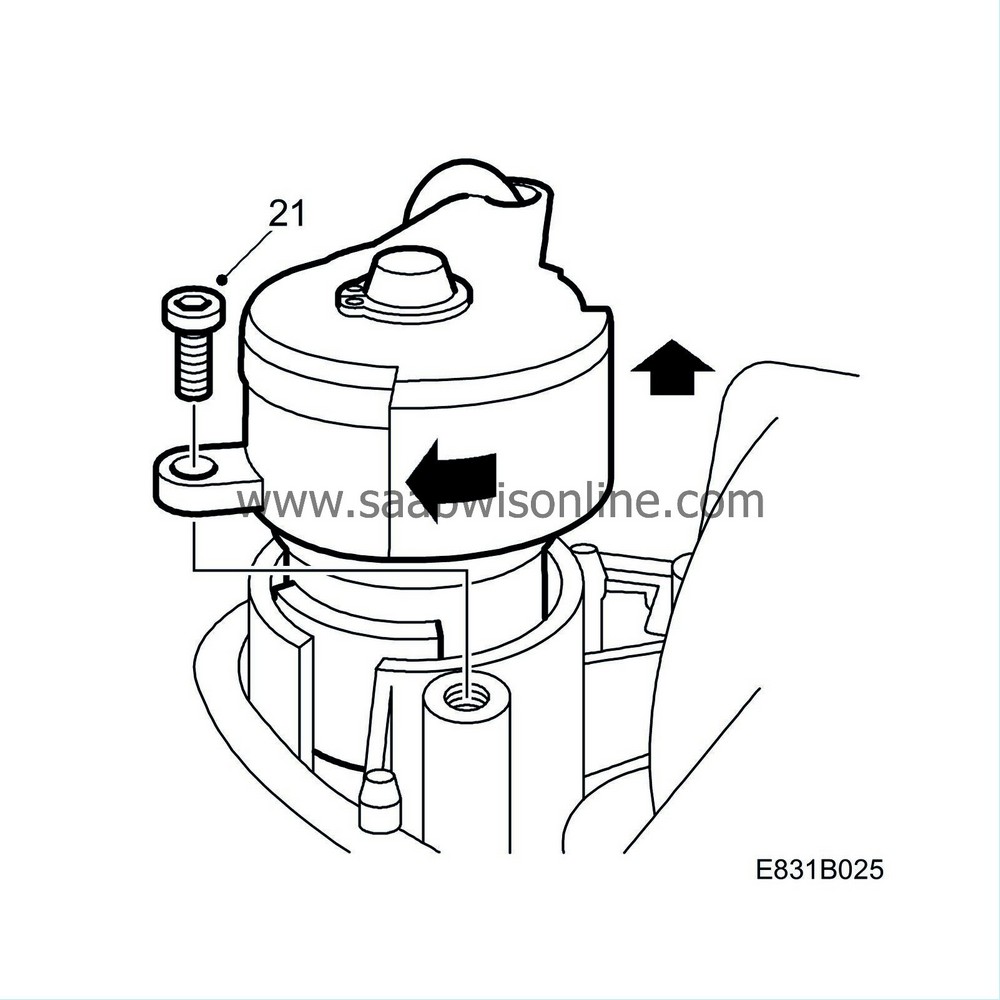
: Unscrew the lock cylinder holder. It will be easier to do with an angle screwdriver.
|
|
22.
|
Driver's door
: Rotate the holder upward from inside the door and press in the cylinder from outside (through the handle).
|
|
23.
|
Pull in the opening handle and lift it out.
|
|
24.
|
Driver's door
: Retain the handle seal and transfer the seal to the new handle. Transfer the lock cylinder and the lock cylinder holder to the handle.
|
|
25.
|
Driver's door
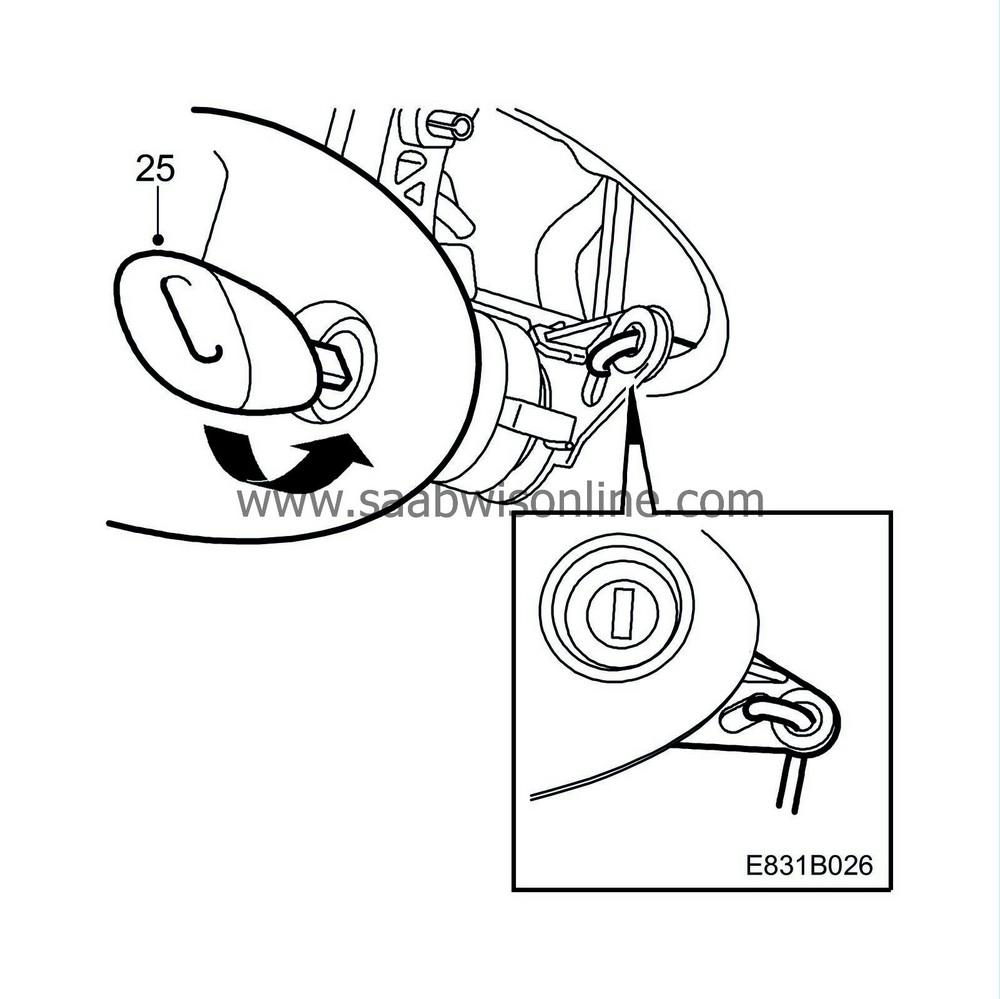
: Insert the key in the lock cylinder and turn it upward as indicated in the illustration. Make sure the curved end of the pull rod lies in the socket.
|
|
26.
|
Fit the handle in place, lift the opening handle to be able to mount it in the door. Check that the handle's seal is fitted correctly.
|
|
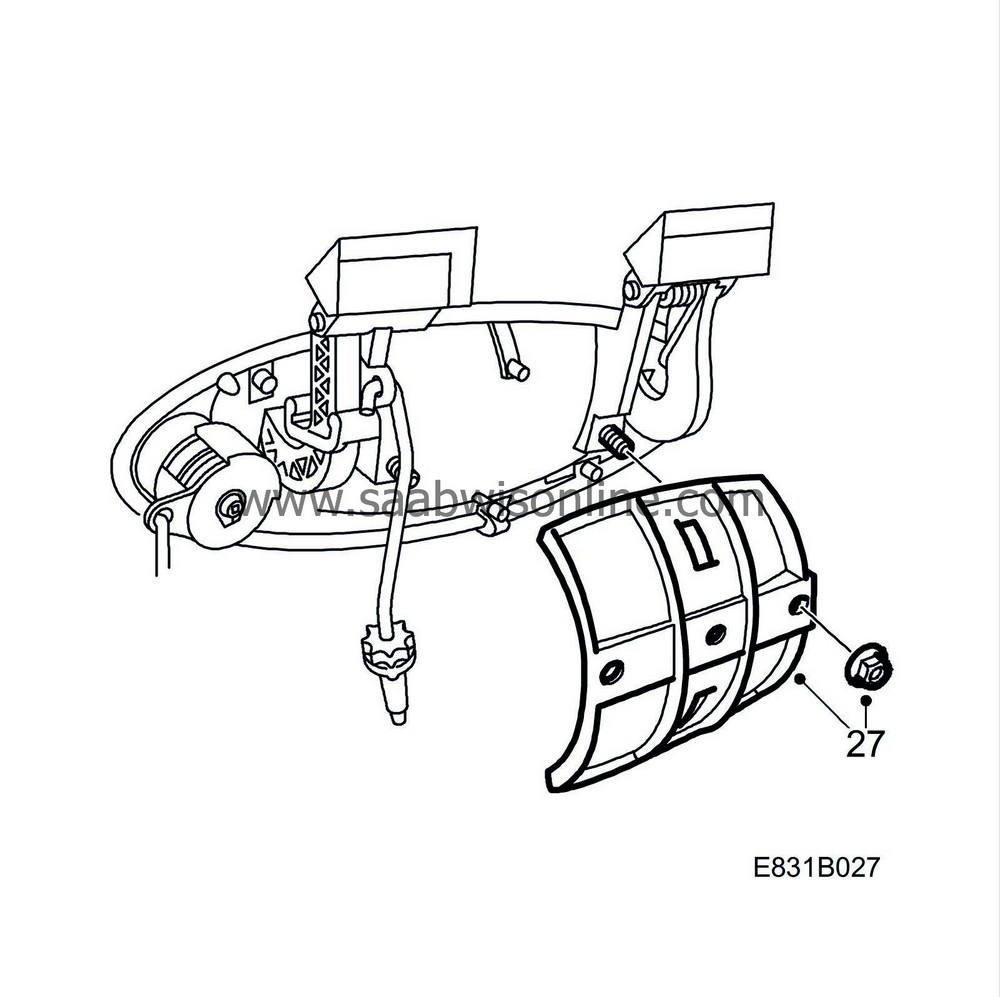
27.
|
Fit the plate and tighten the handle with the front nut (both nuts must be fitted on the passenger door). Check the fit of the handle to the outside of the door.
|
|
28.
|
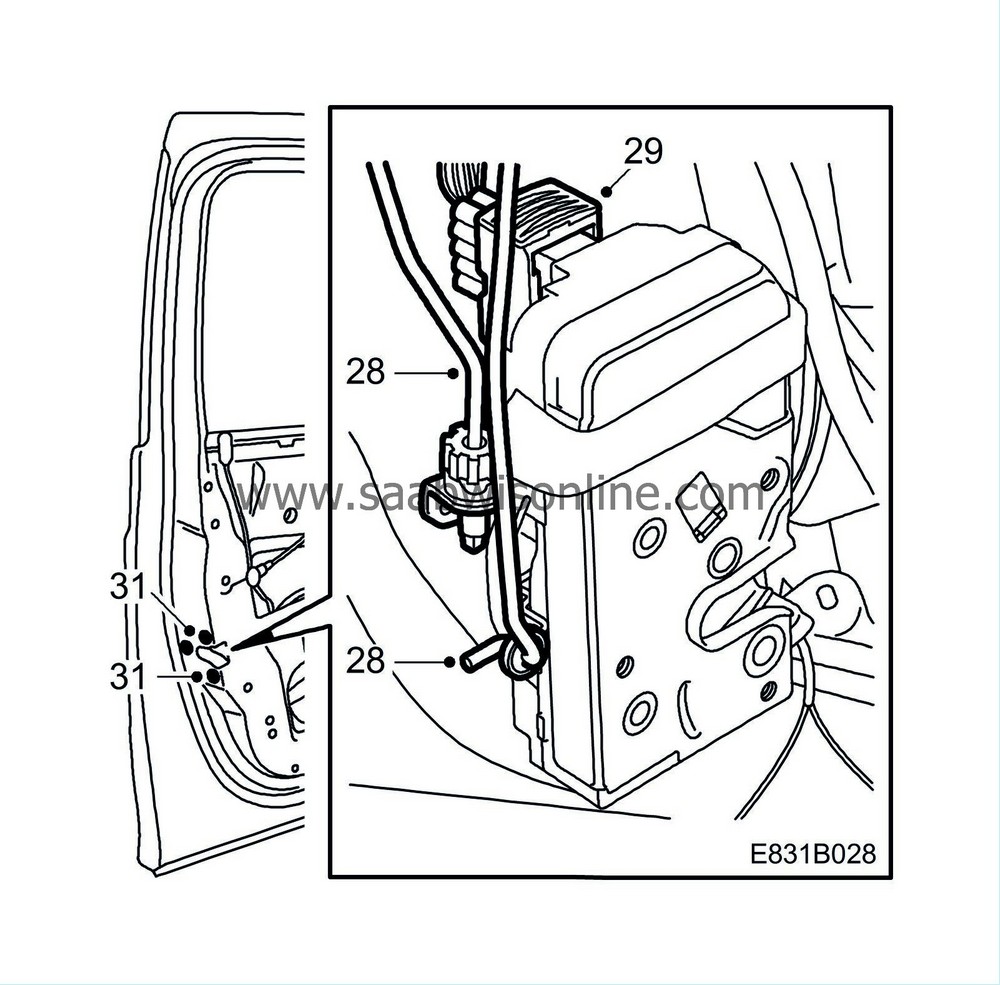
Lift the lock in place in the door. Hook the lock cylinder pull rod (driver's door) into the lock by turning the lock in place while guiding in the handle pushrod into its mounting in the lock.
|
|
29.
|
Plug in the connector to the lock unit.
|
|
30.
|
Fit the rod to the lock button and the wire for the inner opening handle.
|
|
31.
|
Screw on the lock unit.
|
Note
|
|
The lock seal to the door should be on the inside of the door.
|
|
|
32.
|
Check the operation of the handle and the lock.
|
|
33.
|
Driver's door
: Lift the guard into place.
|
|
34.
|
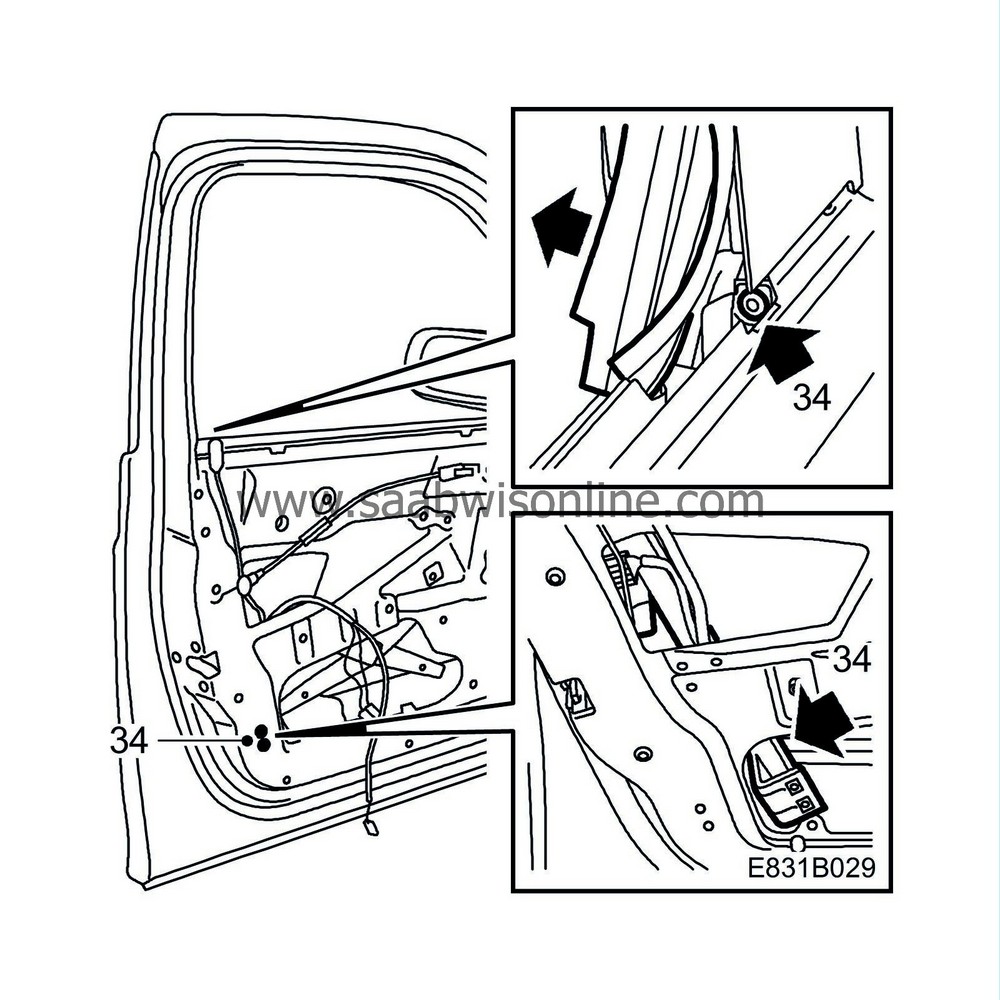
Turn the guide rail inwards and fit its lower mounting. Fit the rivet and the upper window weatherstrip.
|
|
35.
|
Driver's door
: Screw the guard's nut onto the handle and the guard's screw.
|
|
36.
|
Fit the clips to the slide rollers.
|
|
37.
|
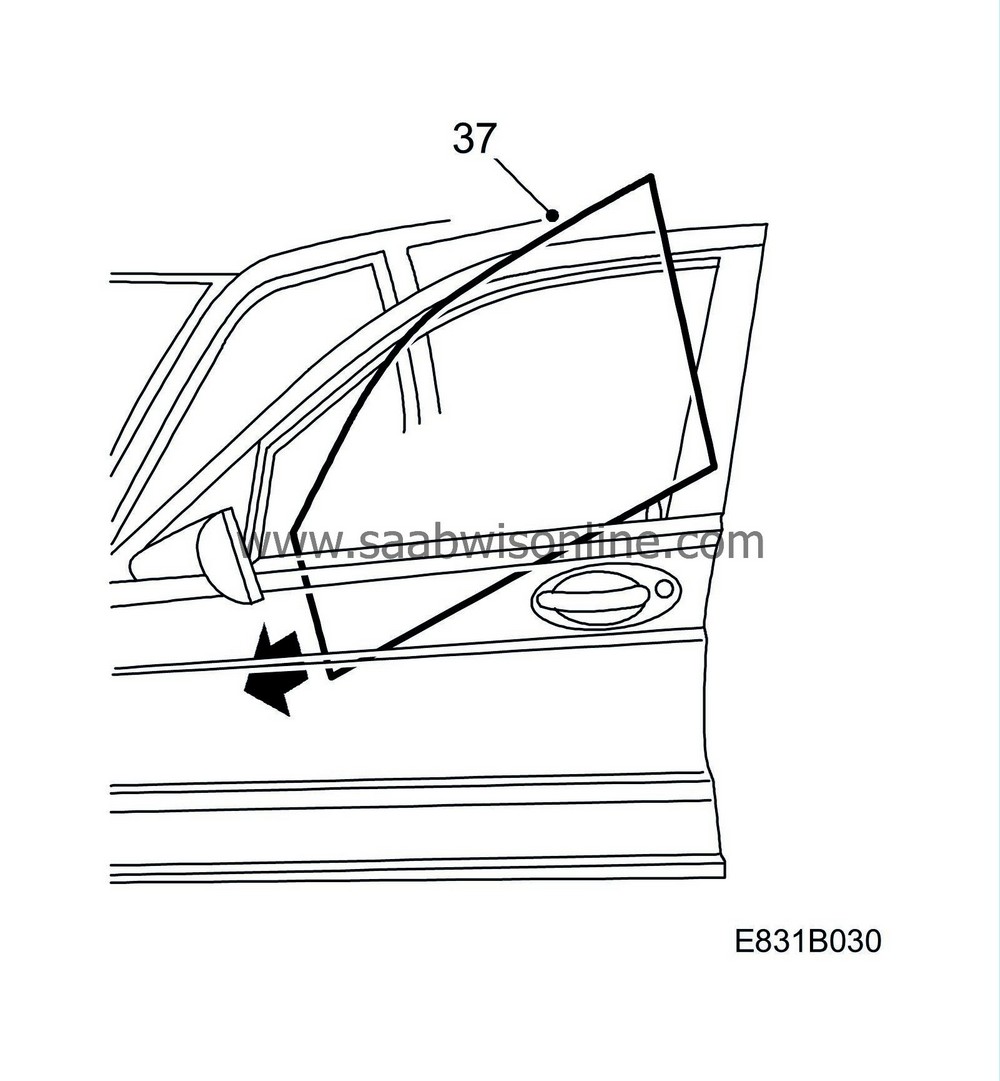
Lift in the window by tilting it forwards. Guide the window into the front guide rail, tilt the window back and guide it into the rear rail.
|
|
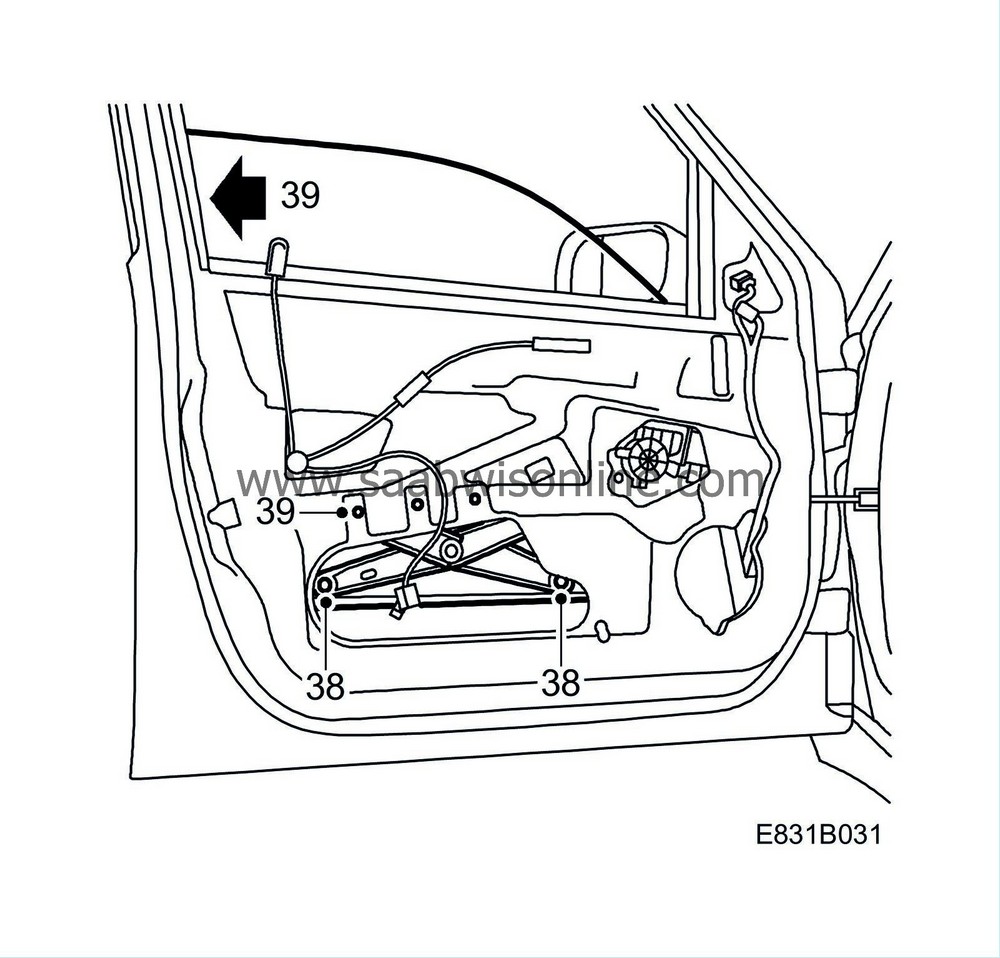
38.
|
Press the scissor lift braces into the window mounting slide rollers.
|
Note
|
|
A double click sound should be heard.
|
|
|
39.
|
Adjust the window as necessary.
|
|
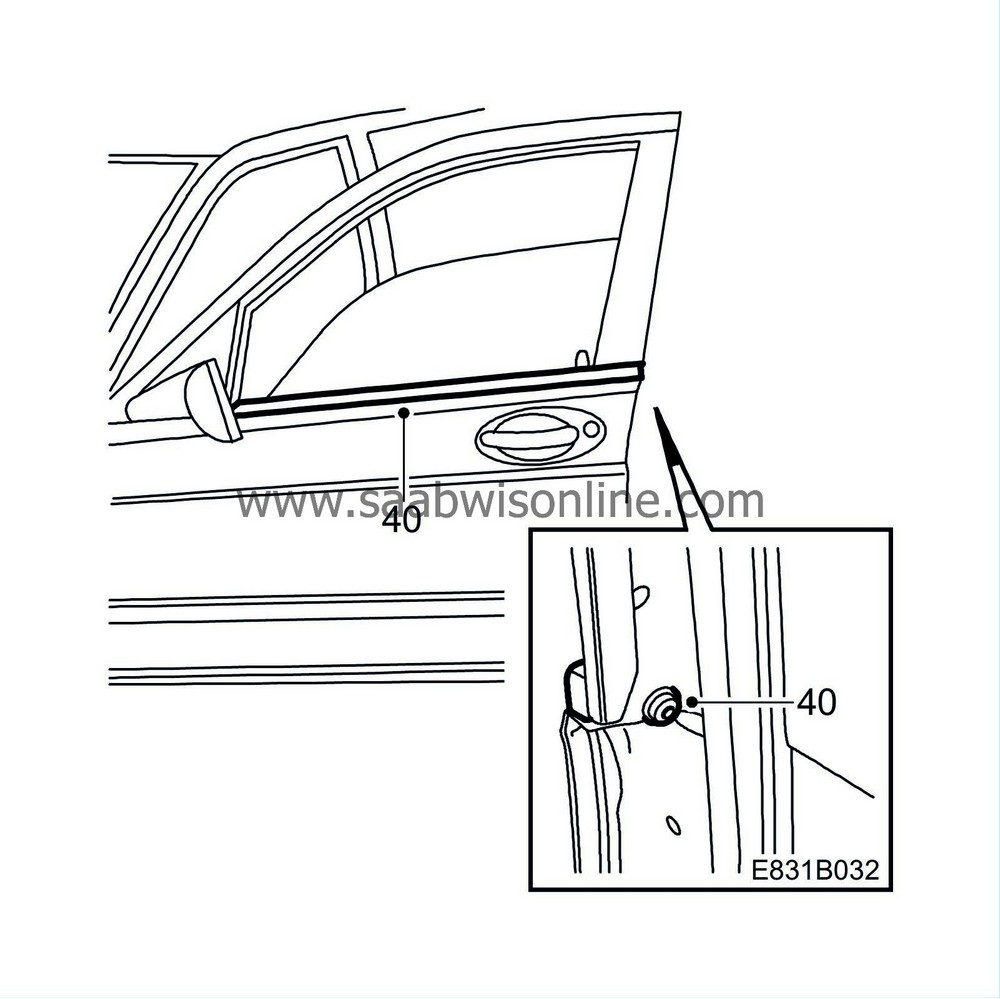
40.
|
Grease in the end of the weatherstrip to the door mirror base with soapy water. Fit the weatherstrip.
|
|
41.
|
Check the operation of the lift.
|
|
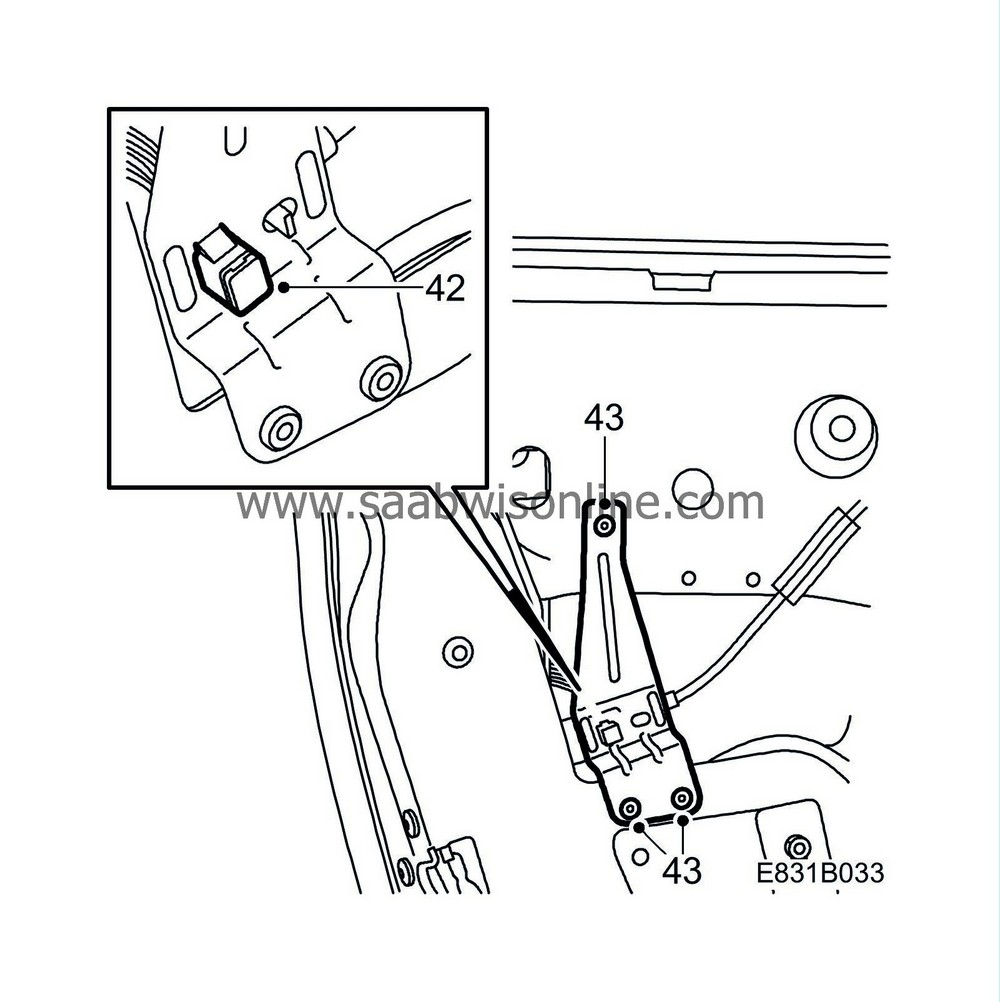
42.
|
Hook the inner opening handle wire into the lock and metal finisher.
|
|
43.
|
Rivet on the metal finisher securing the wire to the inner opening handle.
|
|
44.
|
Fit the water barrier.
|
|
45.
|
Fit the door trim in accordance with WIS - 9-5 - Body - Interior equipment - Adjustment/Replacement - Door trim.
|
|
D Replacing the door handle, rear door
|
|
1.
|
Remove the door trim in accordance with WIS - 9-5 - Body - Interior equipment - Adjustment/Replacement - Door trim.
|
|
2.
|
Bend the water barrier down slightly. Detach it using 82 93 474 Removal tool.

|
|
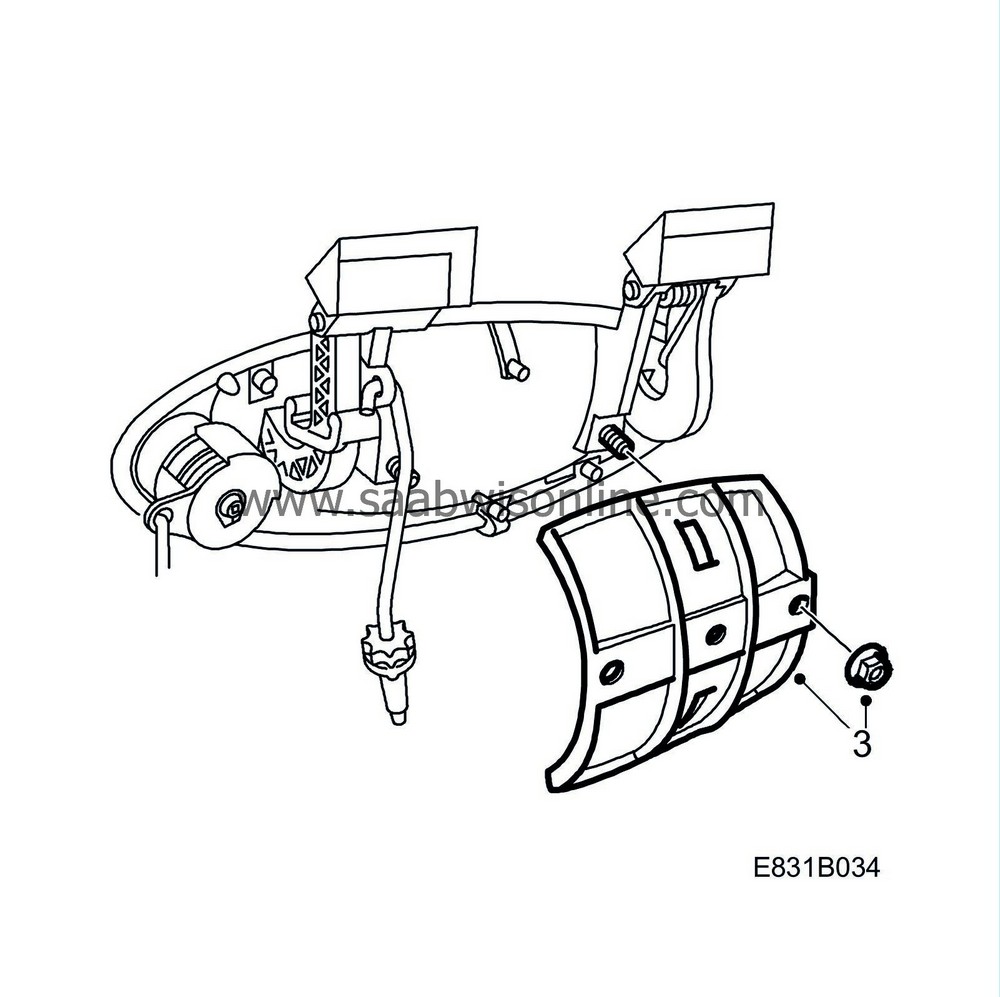
3.
|
Remove the handle's nuts with the plate from the rear of the handle.
|
|
4.
|
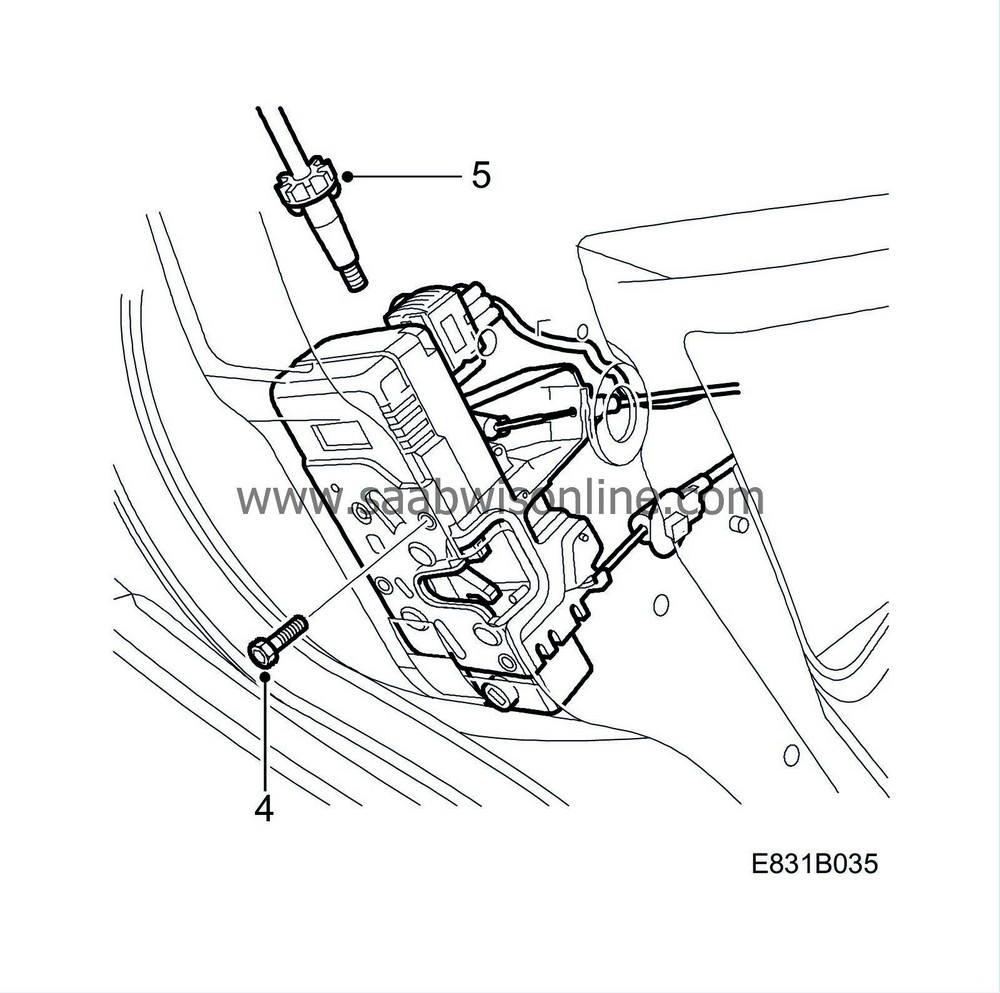
Undo the three screws holding the lock unit.
|
|
5.
|
Lower the lock unit slightly so that the pushrod comes out from the lock unit.
|
|
7.
|
Fit the handle in place.
|
|
8.
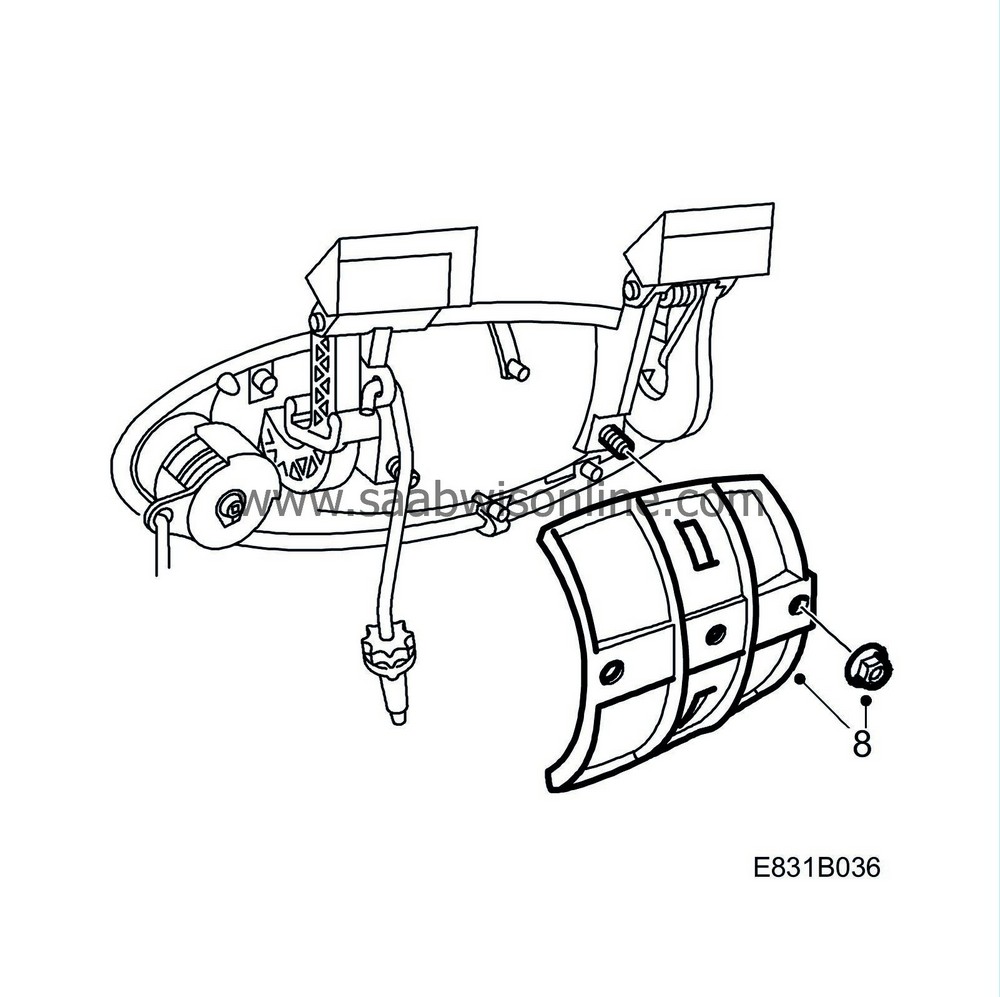
|
Fit the plate and tighten the handle with the nuts.
|
|
9.
|
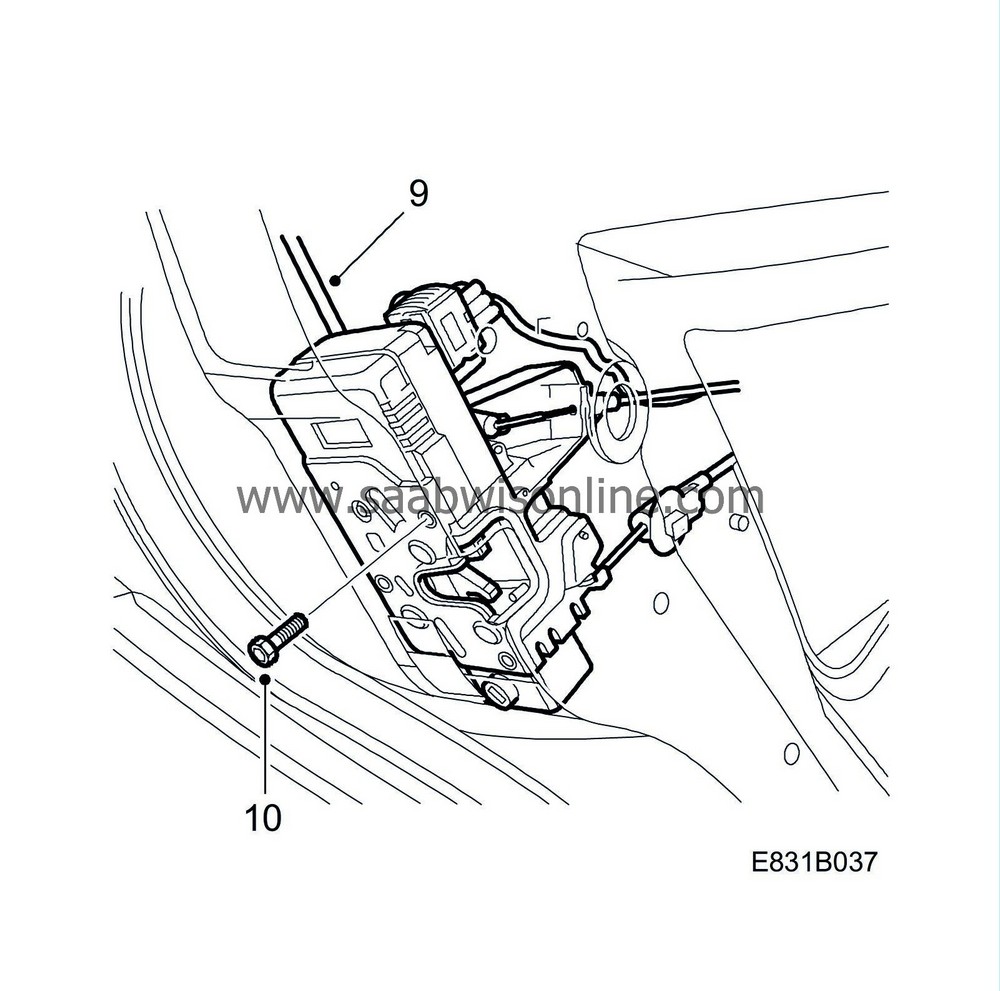
Guide the pushrod into the lock unit and fit it in the door.
|
|
10.
|
Screw on the lock unit.
|
|
11.
|
Fit the water barrier.
|
|
12.
|
Fit the door trim in accordance with WIS - 9-5 - Body - Interior equipment - Adjustment/Replacement - Door trim.
|
|
Marking the modification identity plate (not US/CA)
|
After carrying out the procedure, box B1 on the modification identity plate must be marked. From and including M04 there is the table "Table of Modifications" in the car's Warranty and Service Book. Mark the box with the number "7" if the procedure was carried out by the importer or with the number "8" if carried out by the dealer.
|
Fitting the modification identity plate (not US/CA)
|
|
Note
|
|
A modification identity plate must only be fitted where local directives require the marking of the car.
|
|
1.
|
Fit the modification identity plate in accordance with WIS - 9-5 - M04 - General - General - Technical data - Plates and labels.
|
|
Warranty/Time Information
|
See separate information.


