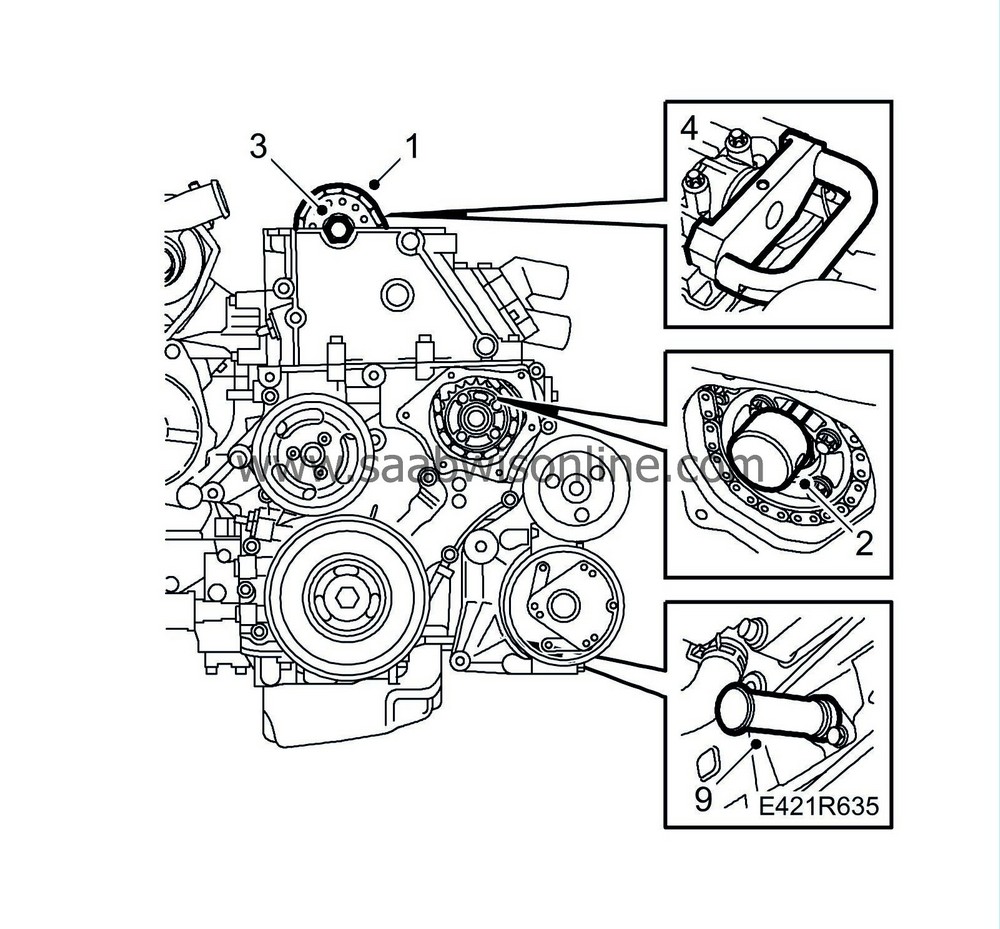
Upper timing chain
| Upper timing chain |
| To remove |
| 1. |
Raise the car and remove the front right wheel.
|
|
| 2. |
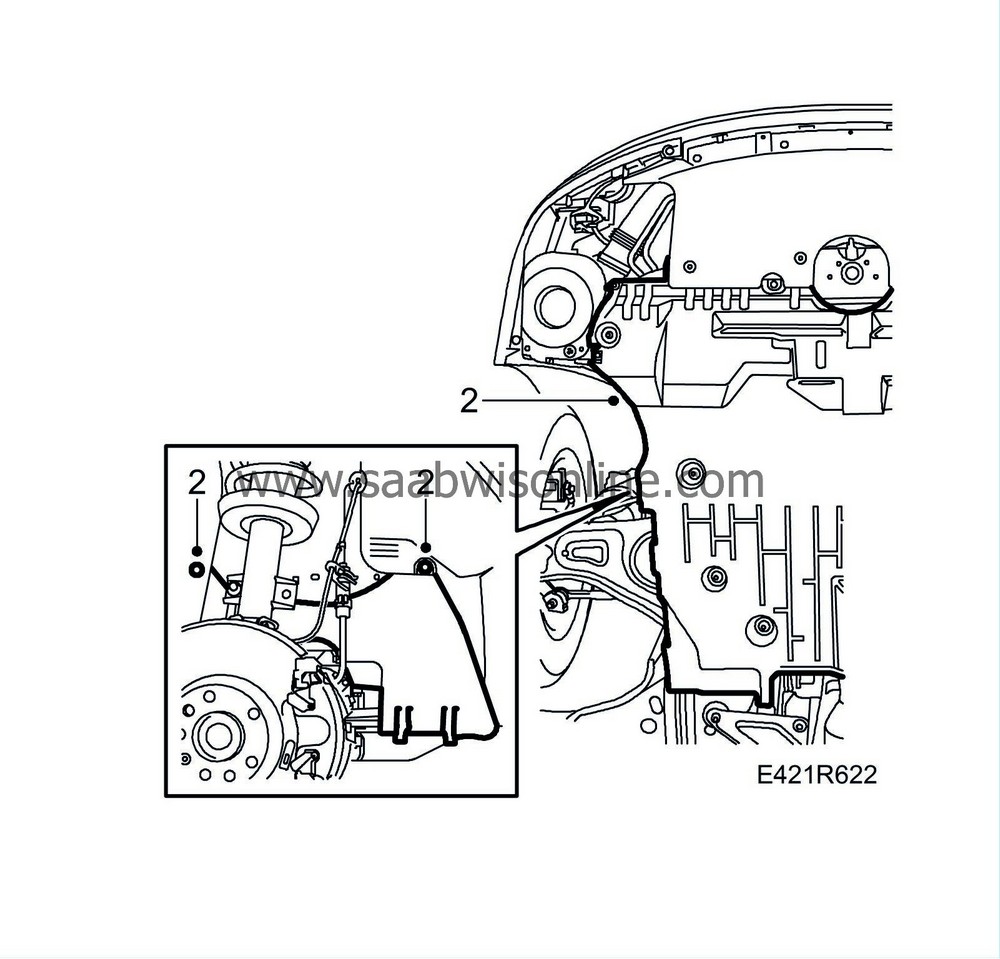
Remove the lower engine cover and drive belt cover.
|
|
| 3. |
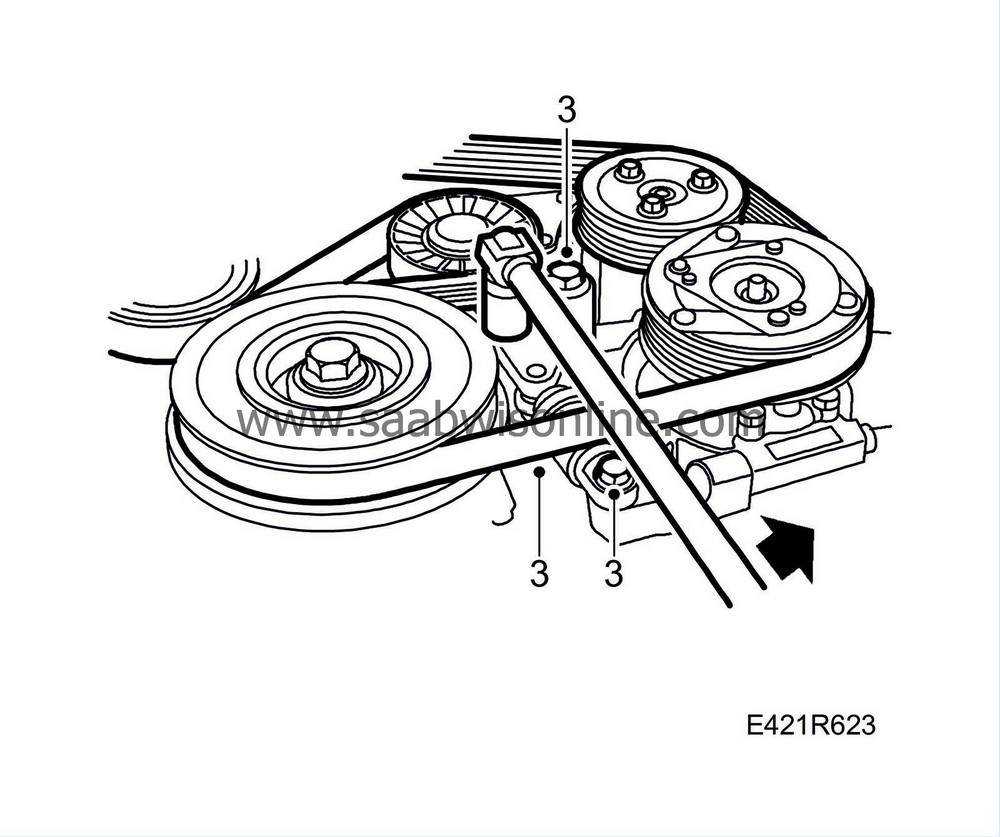
Mark up the multigroove belt rotation, relieve and remove the belt and belt tensioner.
|
|
| 4. |
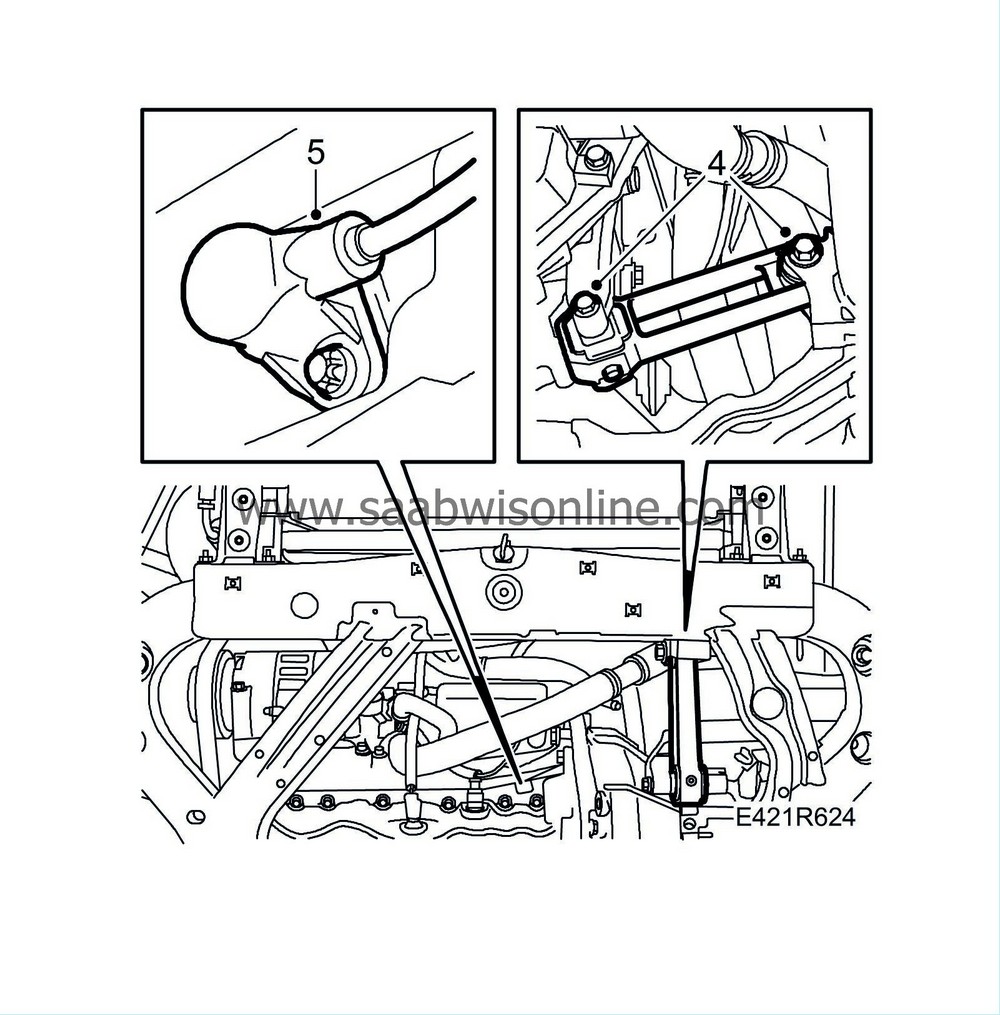
Remove the front bolt on the torque arm and undo the rear one.
|
|
| 5. |
Remove the crankshaft position sensor.
|
|
| 6. |
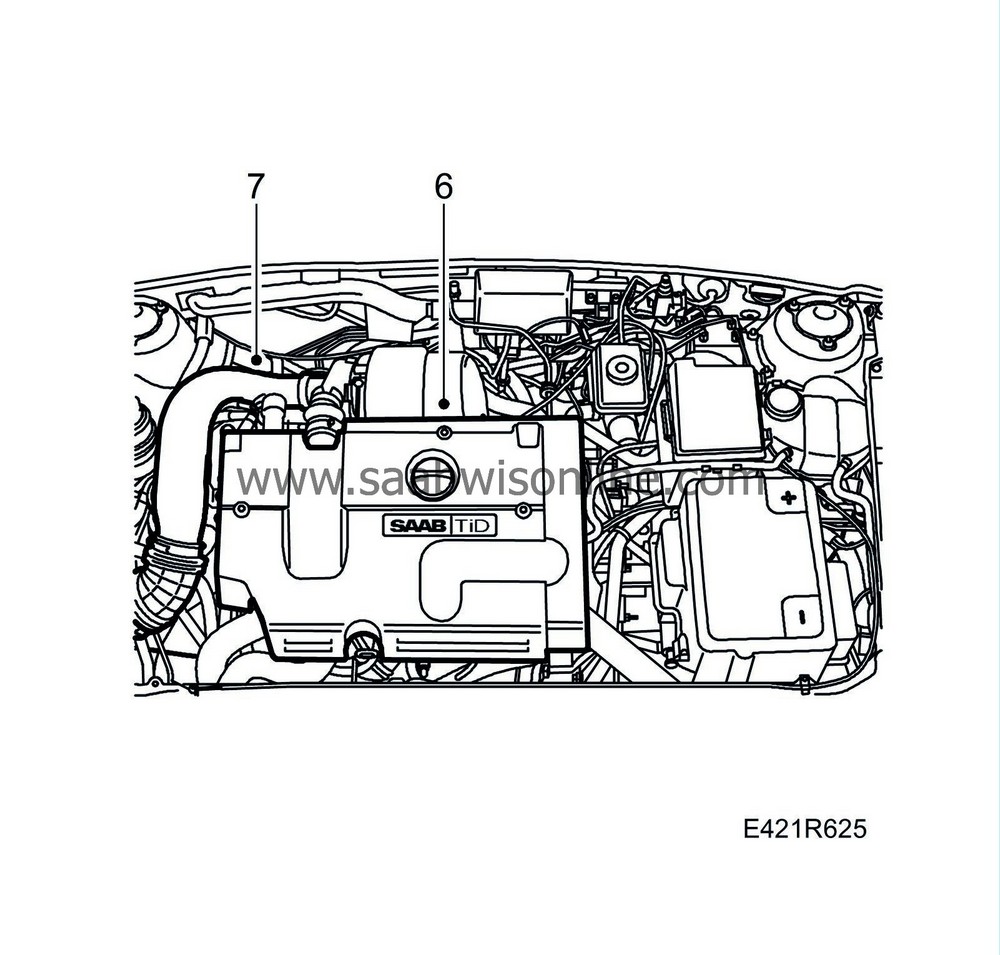
Lower the car and remove the upper engine cover.
|
|
| 7. |
Remove the intake manifold from the mass air flow sensor to the turbocharger and camshaft cover.
|
|
| 8. |
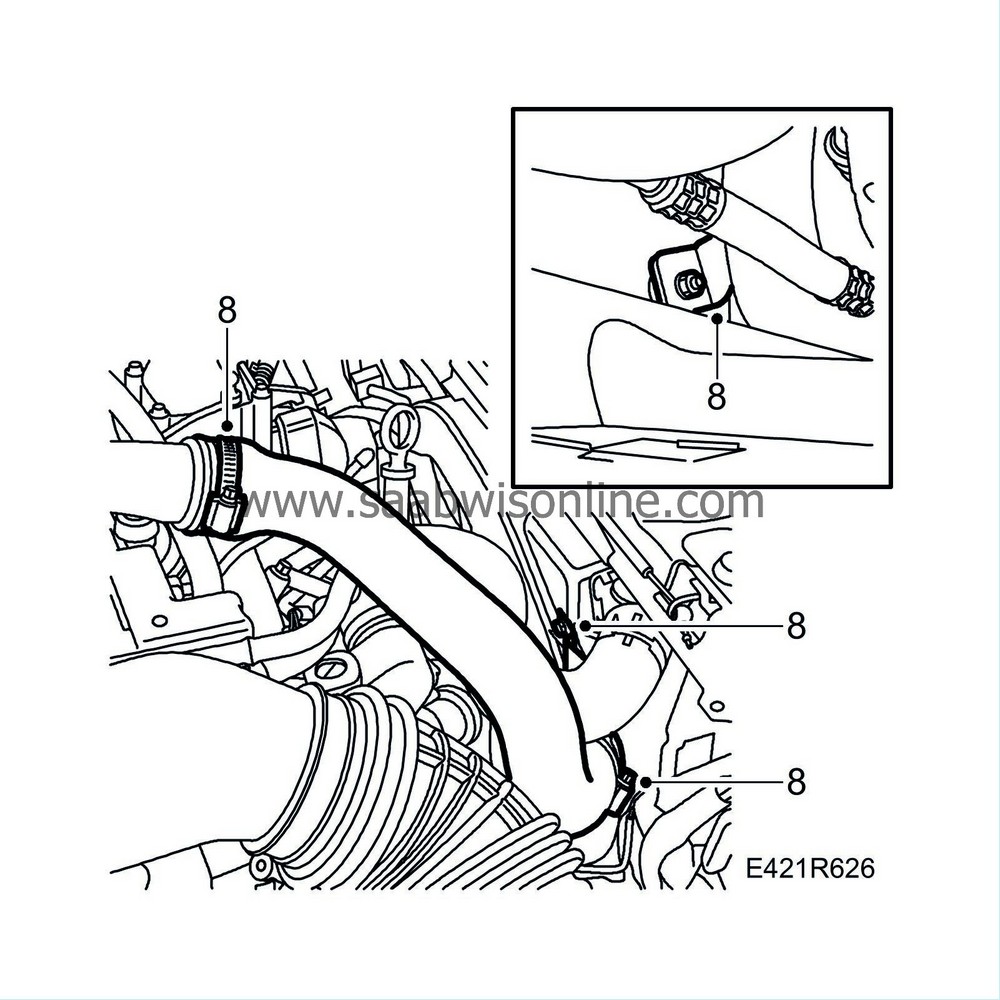
Remove the charge air hose with charge air pipe from the turbo and the charge air pipe on the fan cowling. Plug the connections.
|
|
| 9. |
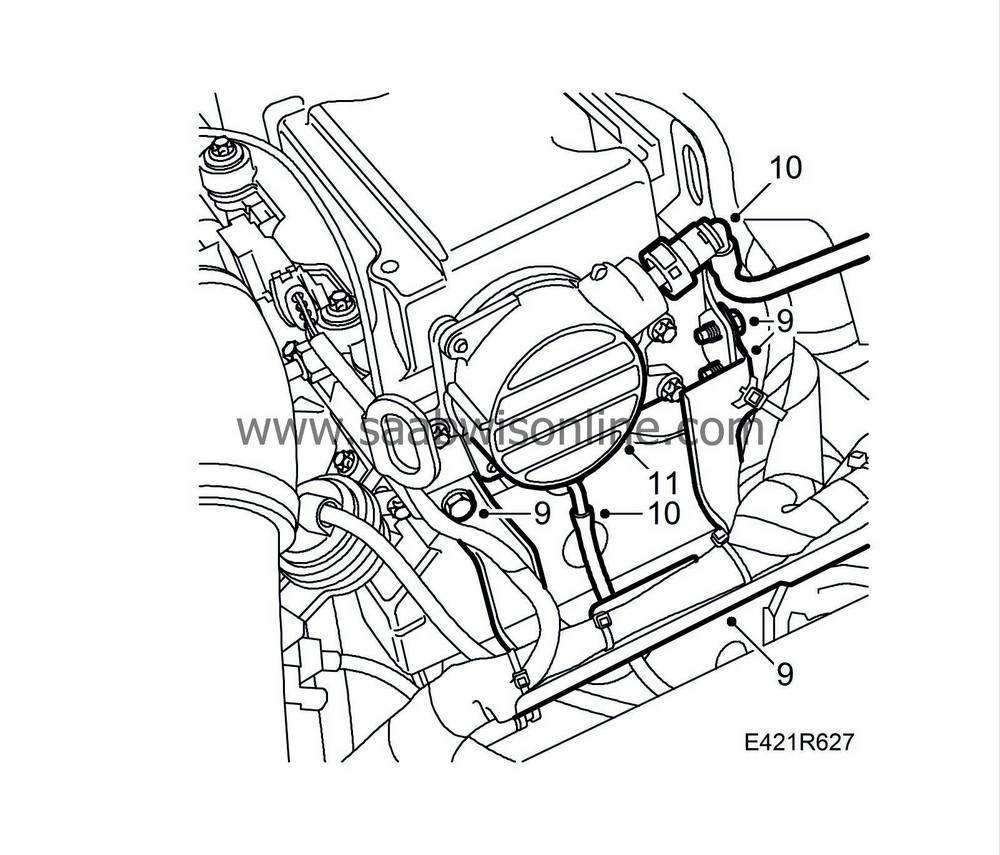
Undo the cable rail and move it aside.
|
|
| 10. |
Undo the vacuum hose to the brake servo and the vacuum hose connected to the bottom of the vacuum pump.
|
|
| 11. |
Take away the four vacuum pump retaining bolts and carefully lift off the vacuum pump and its adapter. Be prepared with a rag or similar to collect any spilled oil.
|
|
| 12. |
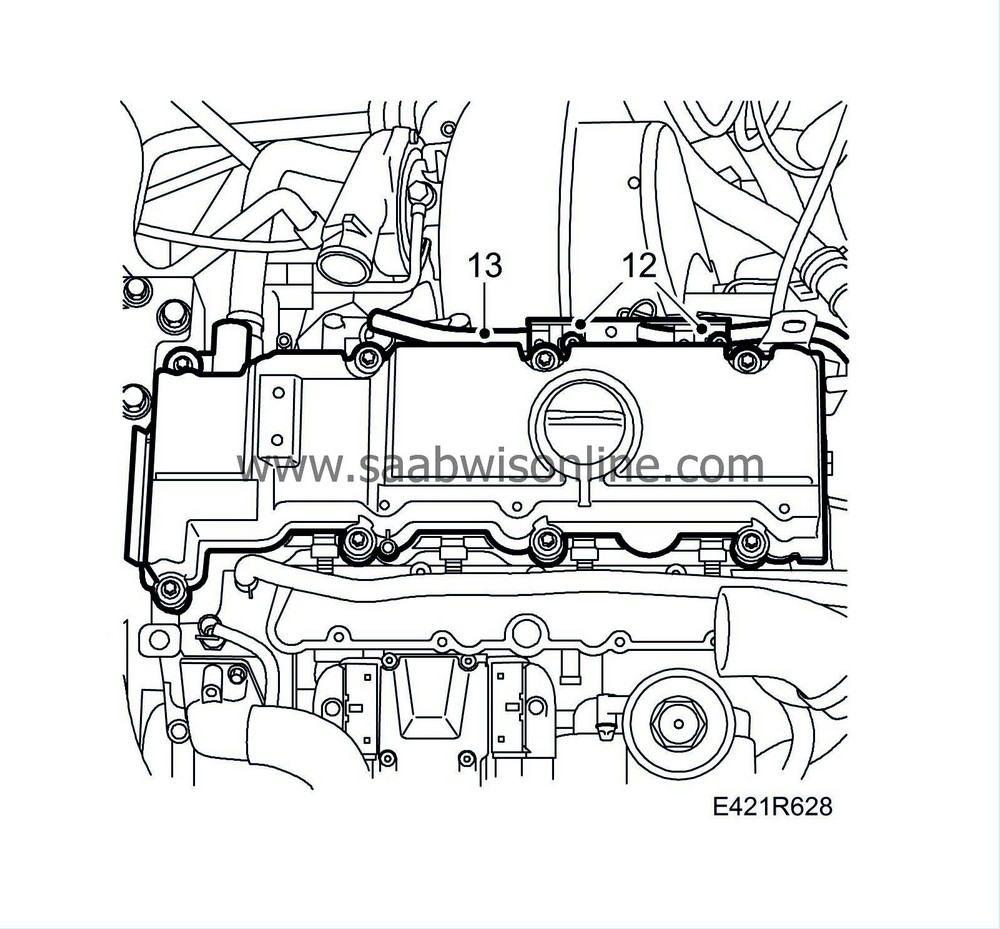
Undo the rear cable harness mounting on the camshaft cover.
|
|
| 13. |
Remove the camshaft cover.
|
|
| 14. |
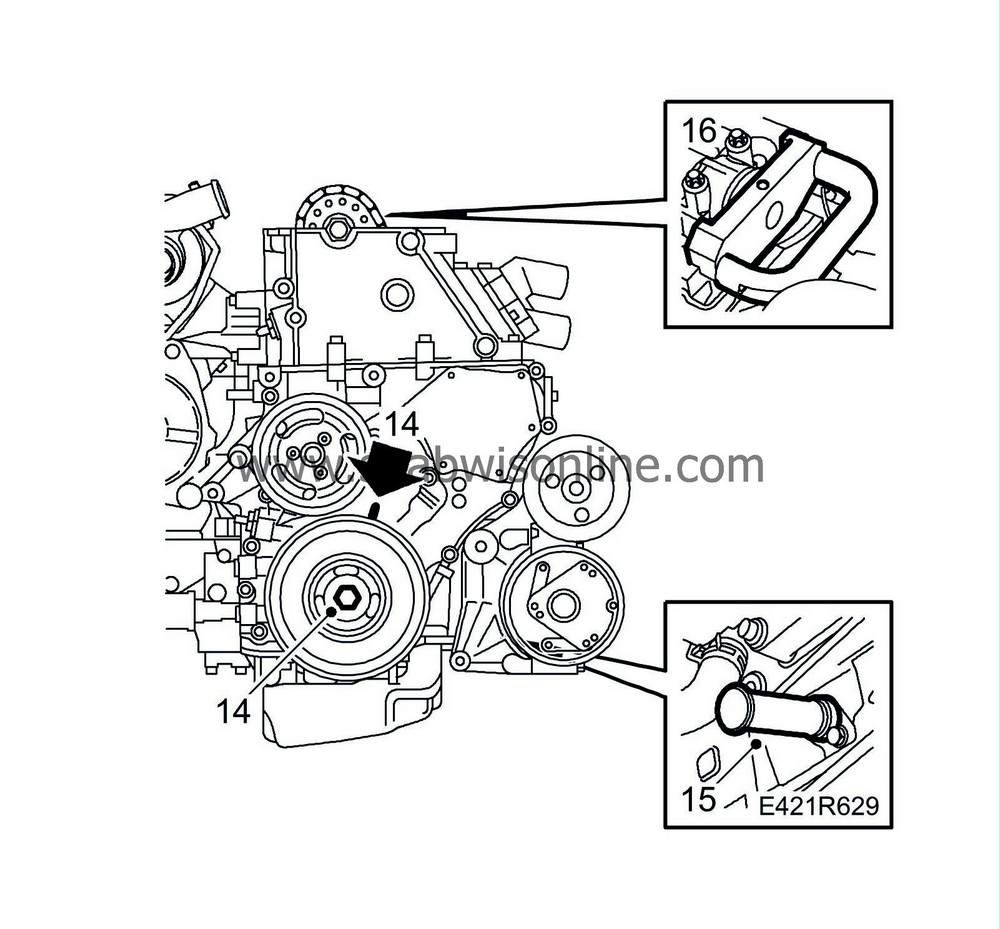
Turn the crankshaft to just before the mark for top dead centre in cylinder 1. Make sure both cam lobes for cylinder 1 are pointing up.
|
|
| 15. |
Insert
83 95 352 Setting tool, crankshaft
into the hole for the crankshaft position sensor. Push the tool somewhat inward at the same time as the crankshaft is turned to the zero point. The tool will then go into a recess in the crankshaft and lock it.
|
|
| 16. |
Position
83 95 386 Setting tool, camshaft
on the camshaft and cylinder head.
|
|
| 17. |
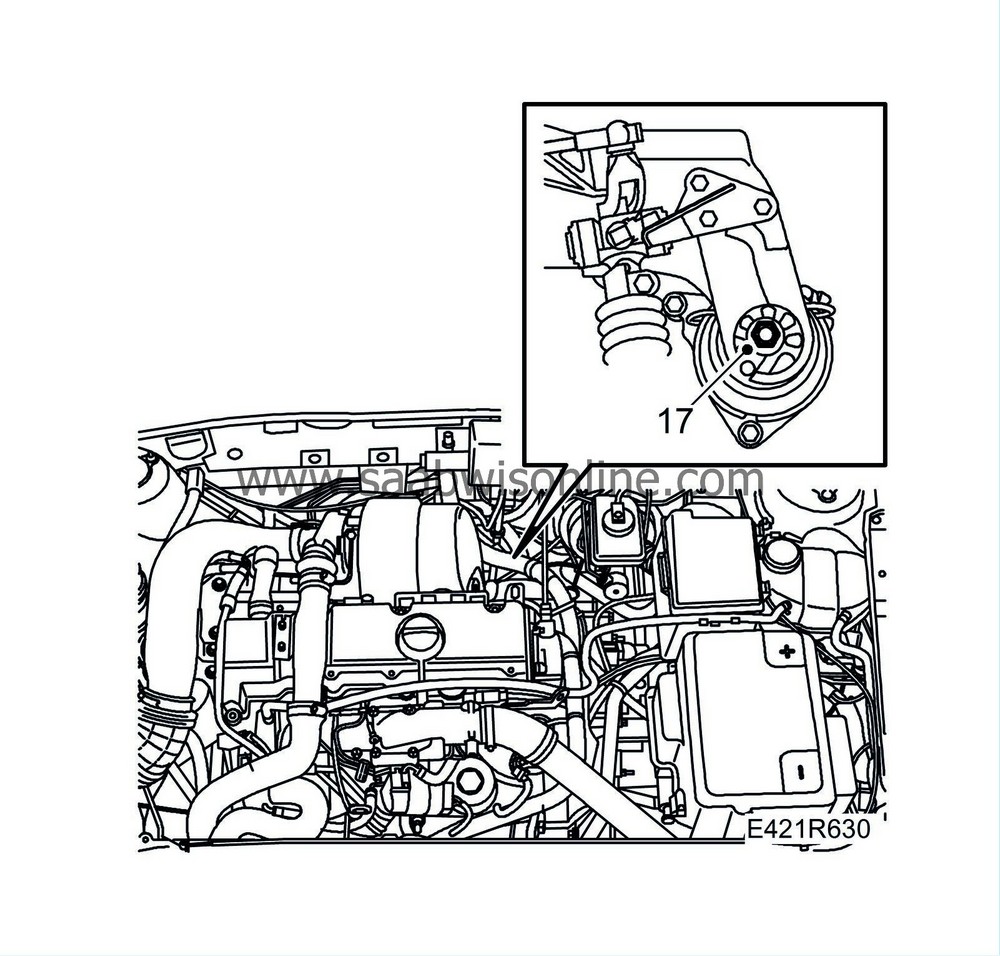
Remove the nut on the rear engine mounting.
|
|
| 18. |
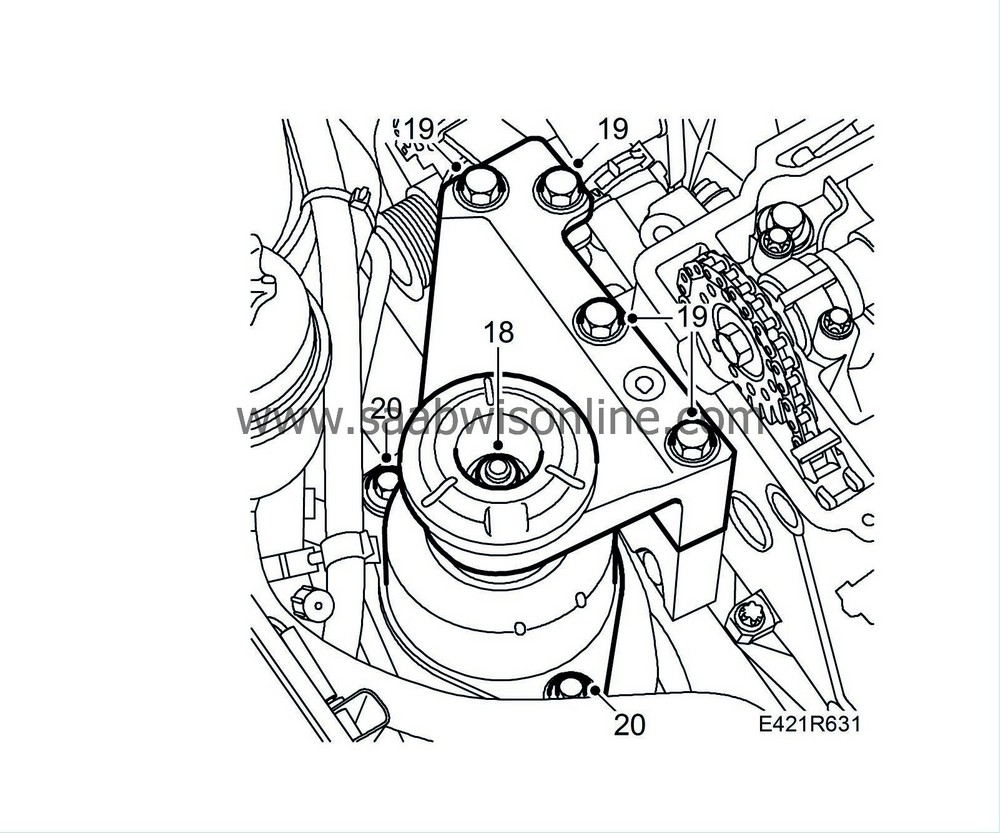
Remove the nut and the vibration damper on the right-hand engine mounting.
|
|
| 19. |
Take the weight of the engine carefully with a jack and remove the upper right engine bracket.
|
|
| 20. |
Dismantle the right-hand engine mounting.
|
|
| 21. |
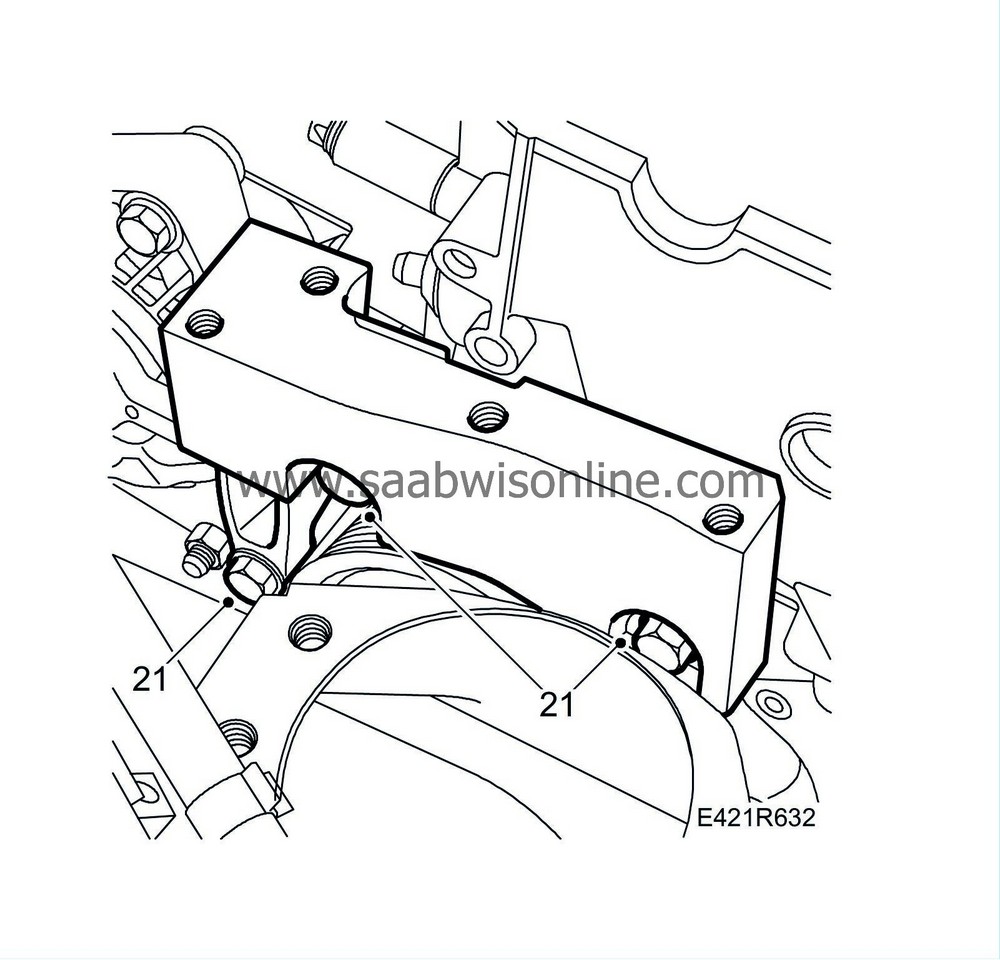
Raise the engine with the jack and remove the lower bracket. Lower the engine slightly.
|
|
| 22. |
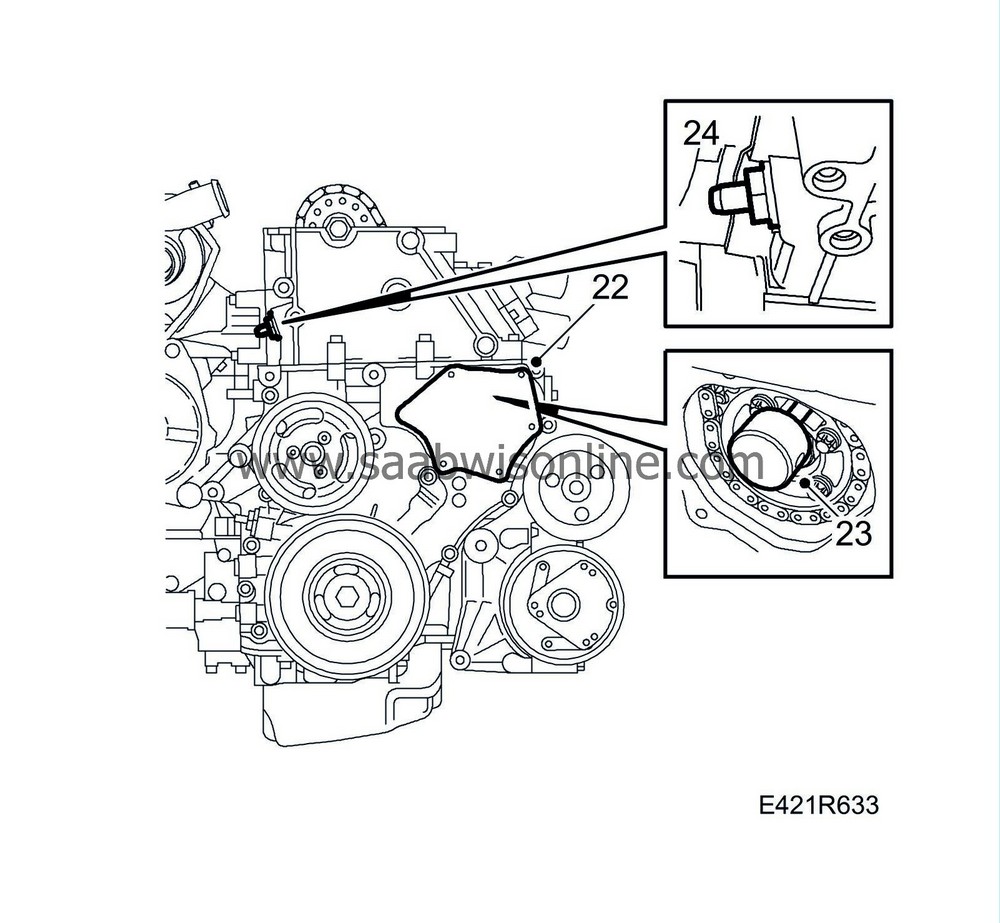
Remove the bolts on the timing cover plate, carefully insert a spatula behind the plate and prise it loose.
|
||||||||||
| 23. |
Insert
83 95 337 Installation tool, fuel pump
in the fuel distribution pump recess.
|
|
| 24. |
Remove the upper timing chain tensioner.
|
|
| 25. |
Remove
83 95 337 Setting tool, fuel pump
from the fuel pump recess.
|
|
| 26. |
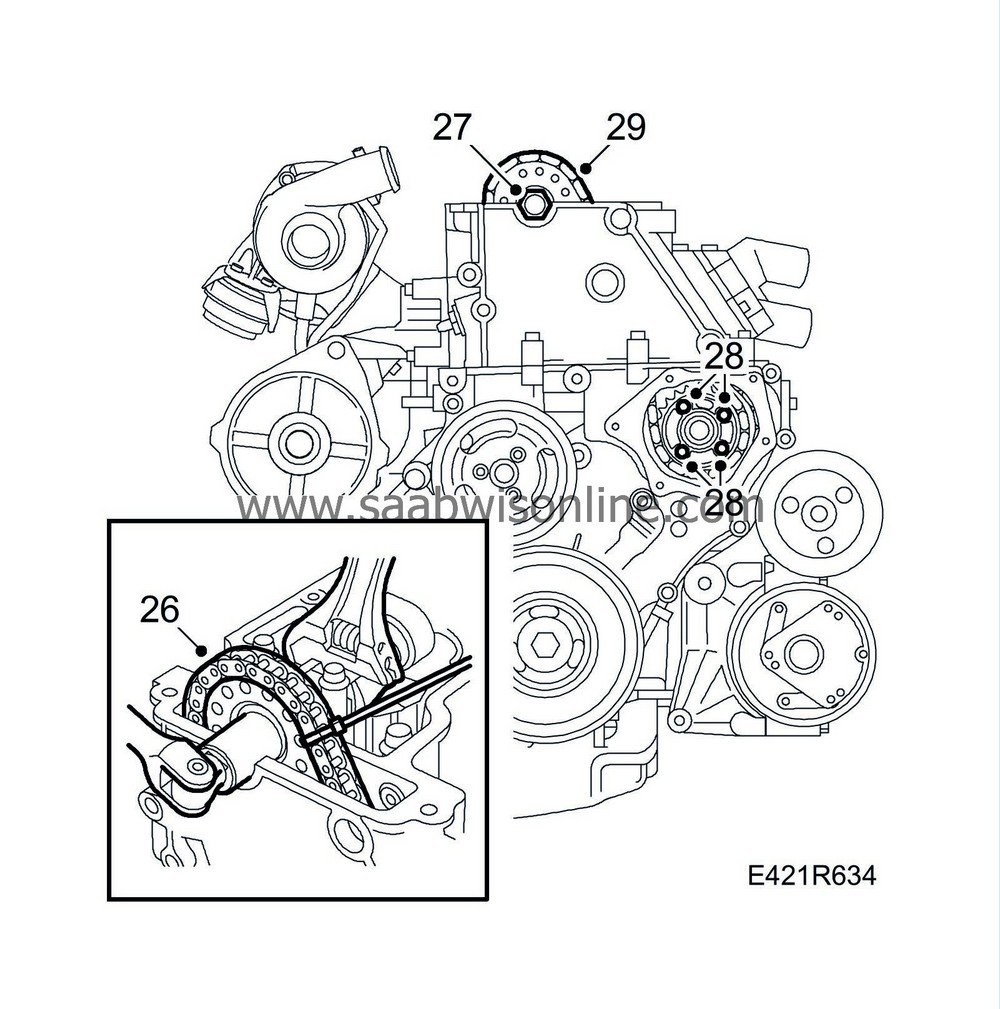
Fasten the upper timing chain to the camshaft sprocket with a cable tie.
|
|
| 27. |
Remove the camshaft sprocket using an open spanner for support in the hexagonal recess on the camshaft.
|
|
| 28. |
Remove the bolts for the fuel distribution pump chain pinion and remove the pinion.
|
||||||||||
| 29. |
Pull up the chain and remove it.
|
|
| To fit |
| 2. |
Reposition
83 95 337 Setting tool, fuel pump
in the fuel distribution pump recess.
|
|
| 3. |
Position the camshaft sprocket on the camshaft.
|
|
| 4. |
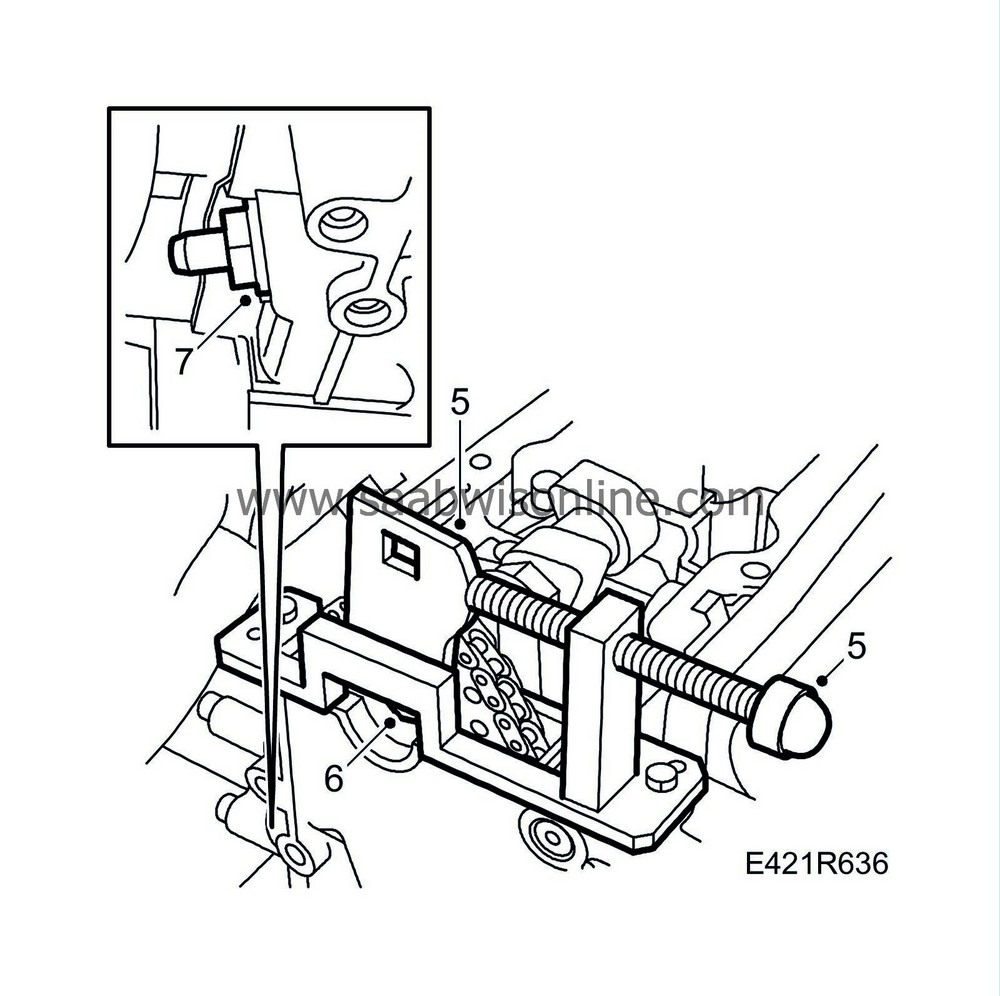
Fit the adapter for
83 95 394 Setting tool, timing chain
onto the camshaft sprocket and fit the adjusting tool onto the cylinder head.
|
|
| 5. |
Fix the position for the adapter on the camshaft sprocket by lightly twisting it counter-clockwise with a ratchet handle. Tighten the adjustment screw on the tool.
|
||||||||||
| 6. |
Tighten the bolt for the camshaft sprocket using an open spanner for support in the hexagonal recess on the camshaft.
Tightening torque: 90 Nm + 60° (67 lbf ft + 60°) |
|
| 7. |
Replace the chain tensioner for the upper timing chain using a new gasket.
Tightening torque: 60 Nm (44 lbf ft). |
|
| 8. |
Remove all setting tools.
|
|
| 9. |
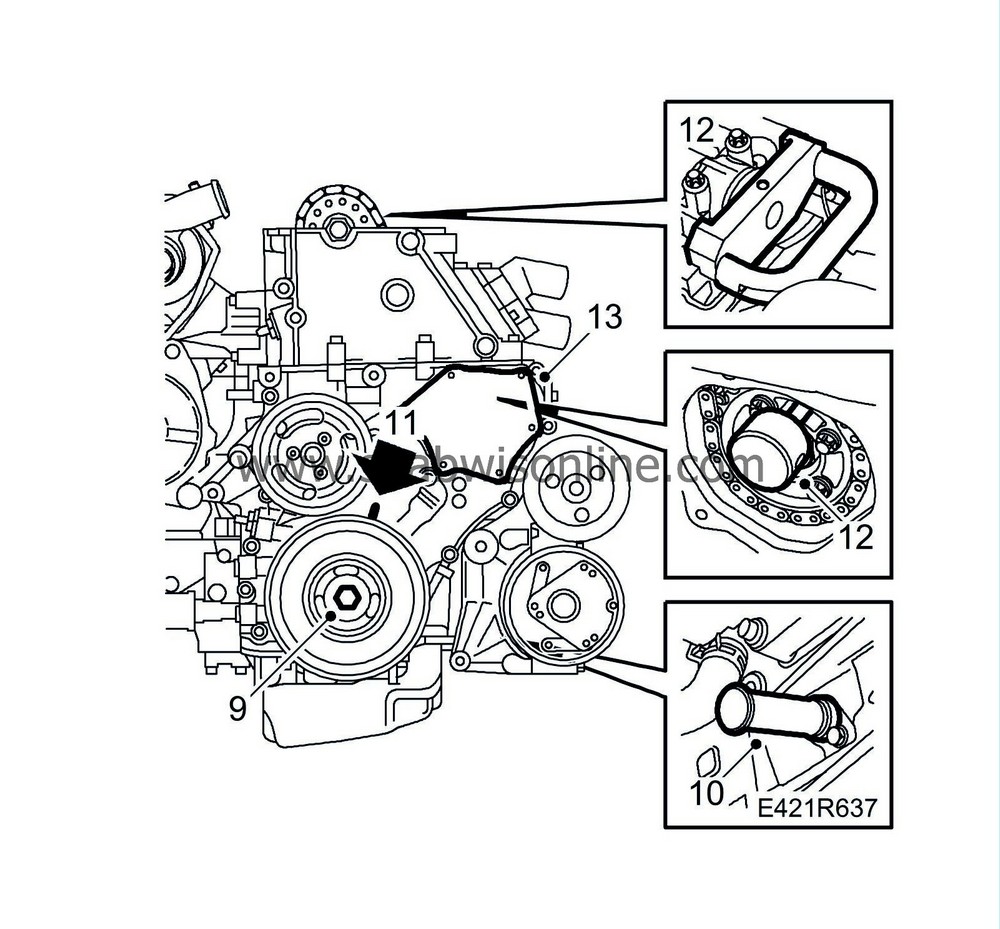
Turn the crankshaft with the help of the belt pulley's central screw to just before the mark for top dead centre in cylinder 1. Make sure that both camshaft lobes for cylinder 1 are pointing up.
|
|
| 10. |
Insert
83 95 352 Setting tool, crankshaft
into the crankshaft hole. Push the tool somewhat inward at the same time as the crankshaft is turned to the zero point. The tool will then go into a recess in the crankshaft and lock it.
|
|
| 11. |
Make sure the markings on the crankshaft pulley and the timing cover are in line. The arrow on the single timing chain pulley on the fuel distribution pump must also be in line with the recess in the pump.
|
|
| 12. |
Insert
83 95 337 Installation tool, fuel pump
in the fuel distribution pump recess. Position
83 95 386 Setting tool, camshaft
on the camshaft and cylinder head. Remove all setting tools.
|
|
| 13. |
Cover the opening in the timing cover with a lint-free rag clean the sealing surface from any remnants of gasket. Clean the sealing surface on the cover plate as well. Apply a bead of
87 81 841 Silicon flange sealant
about 2mm thick on the cover plate, remove the rag from the timing cover and fit the cover plate.
Tightening torque: 6 Nm (4 lbf ft). |
|
| 14. |
Fit the lower right engine bracket.
Tightening torque: 40 Nm + 90° (30 lbf ft + 90°) 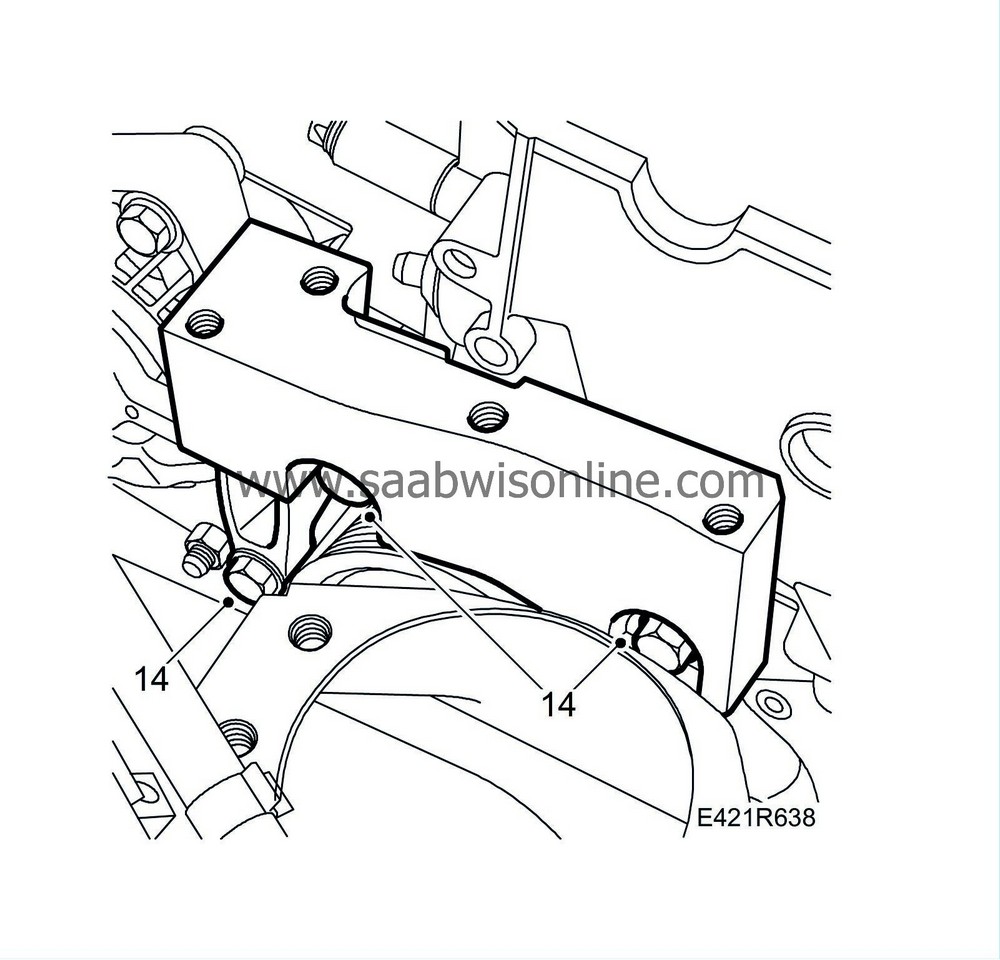
|
|
| 15. |
Fit the right-hand engine mounting.
Tightening torque: 40 Nm + 30°(30 lbf ft + 30°) |
|
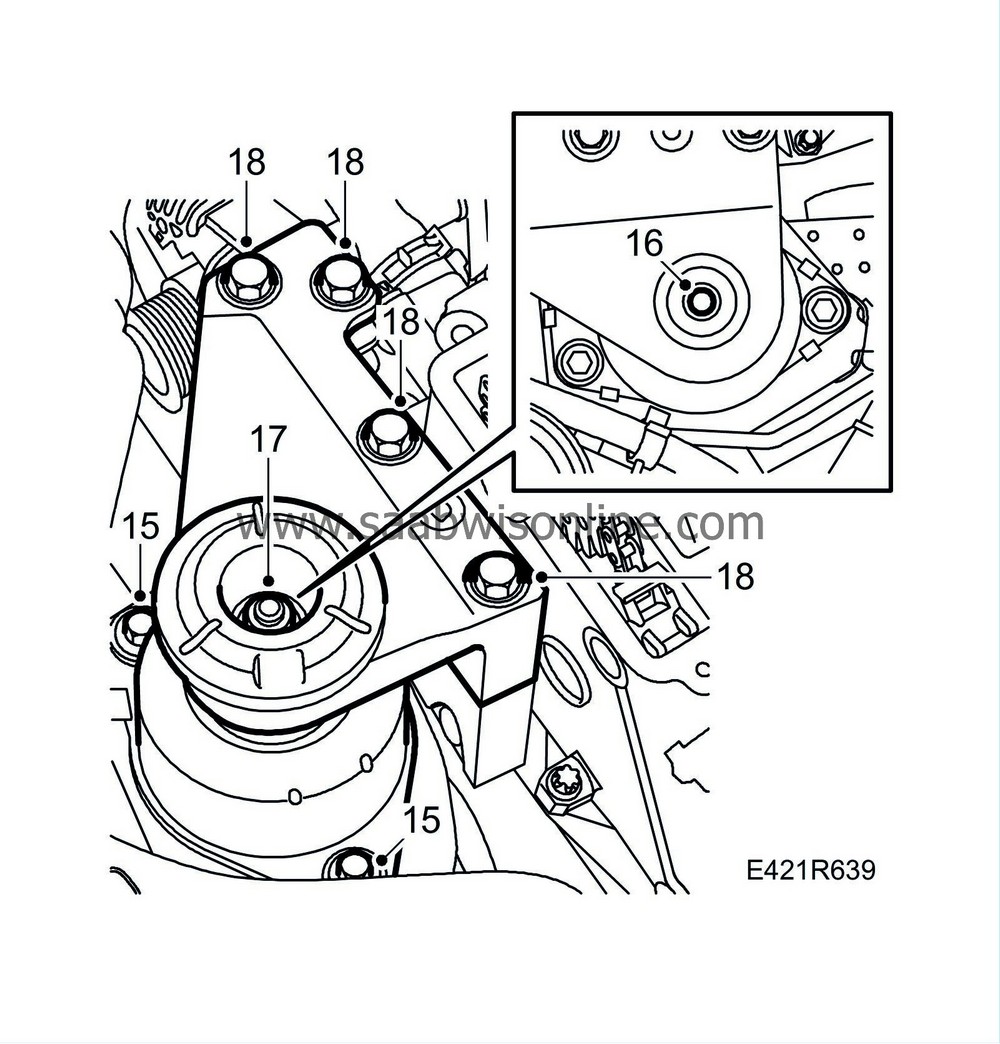
| 16. |
Fit the upper bracket without tightening the bolts completely. Lower the jack until the upper bracket comes in contact with the engine mounting. Adjust the position of the upper bracket so that the engine mounting stud is situated as close as possible to the middle of the upper bracket hole.
|
|
| 17. |
Fit the engine mounting vibration damper and nut and tighten the upper bracket retaining bolts.
Tightening torque: 40 Nm + 60° (30 lbf ft + 60°) |
|
| 18. |
Lower the car completely and remove the jack. Tighten the nut to the right of the engine mounting.
Tightening torque: 105 Nm (77 lbf ft) |
|
| 19. |
Fit the nut on the rear engine mounting.
Tightening torque: 47 Nm (35 lbf ft) 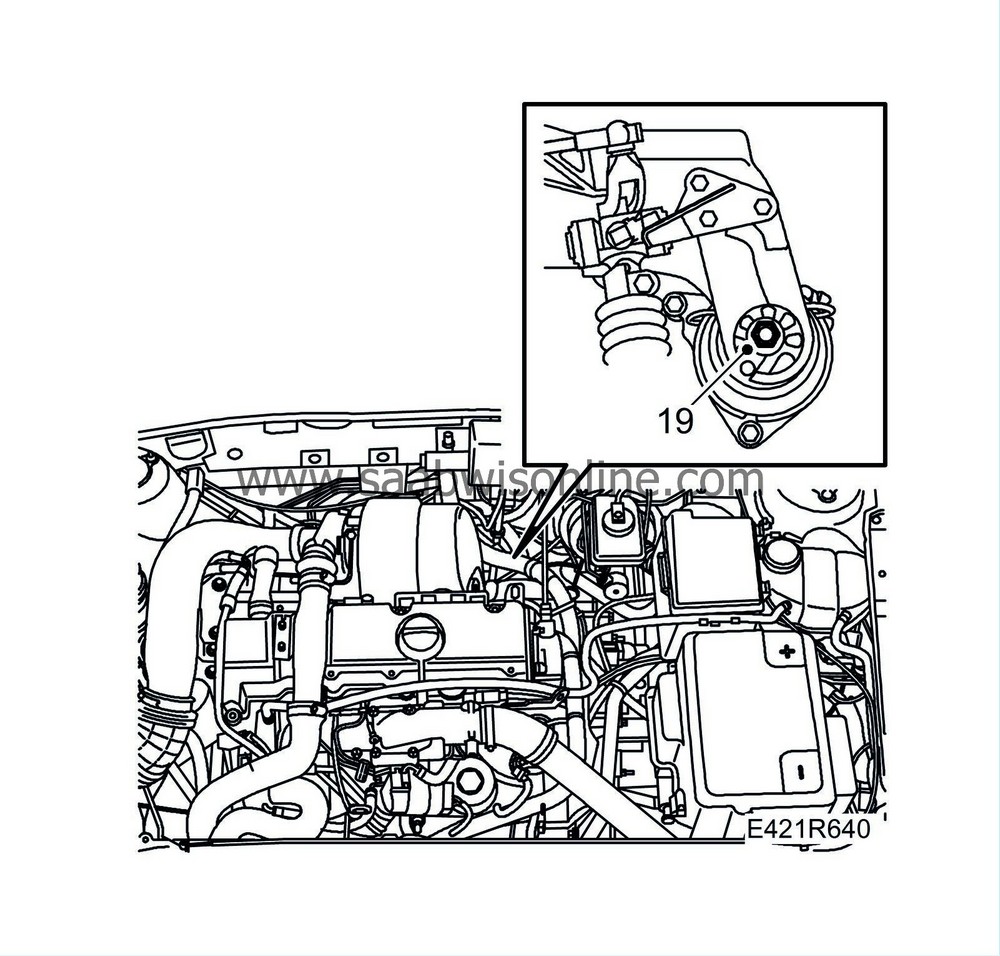
|
|
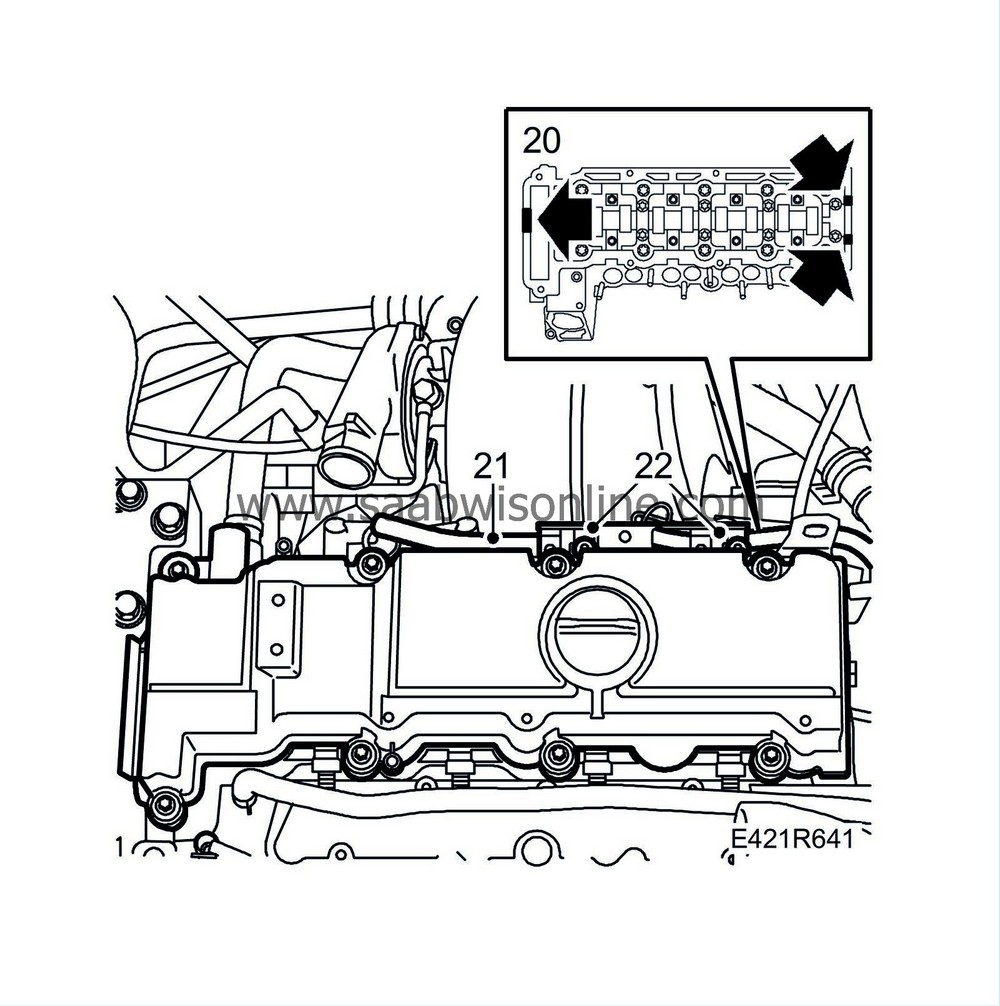
| 20. |
Clean the camshaft cover sealing surfaces from any gasket remnants. Position a new gasket on the camshaft cover. Guide the gasket onto the guide sleeves. Apply
87 81 841 Silicon flange sealant
to the sealing surface, see illustration.
|
|
| 21. |
Position the camshaft cover on the cylinder head and tighten the bolts.
Tightening torque: 8 Nm (6 lbf ft) |
|
| 22. |
Fit the rear cable harness mounting on the camshaft cover.
|
|
| 23. |
Clean the sealing surfaces on the vacuum pump and cylinder head. Place a new gasket on the vacuum pump, apply
87 81 841 Silicon flange sealant
as illustrated and fit the pump together with the adapter.
Tightening torque: 8 Nm (6 lbf ft) 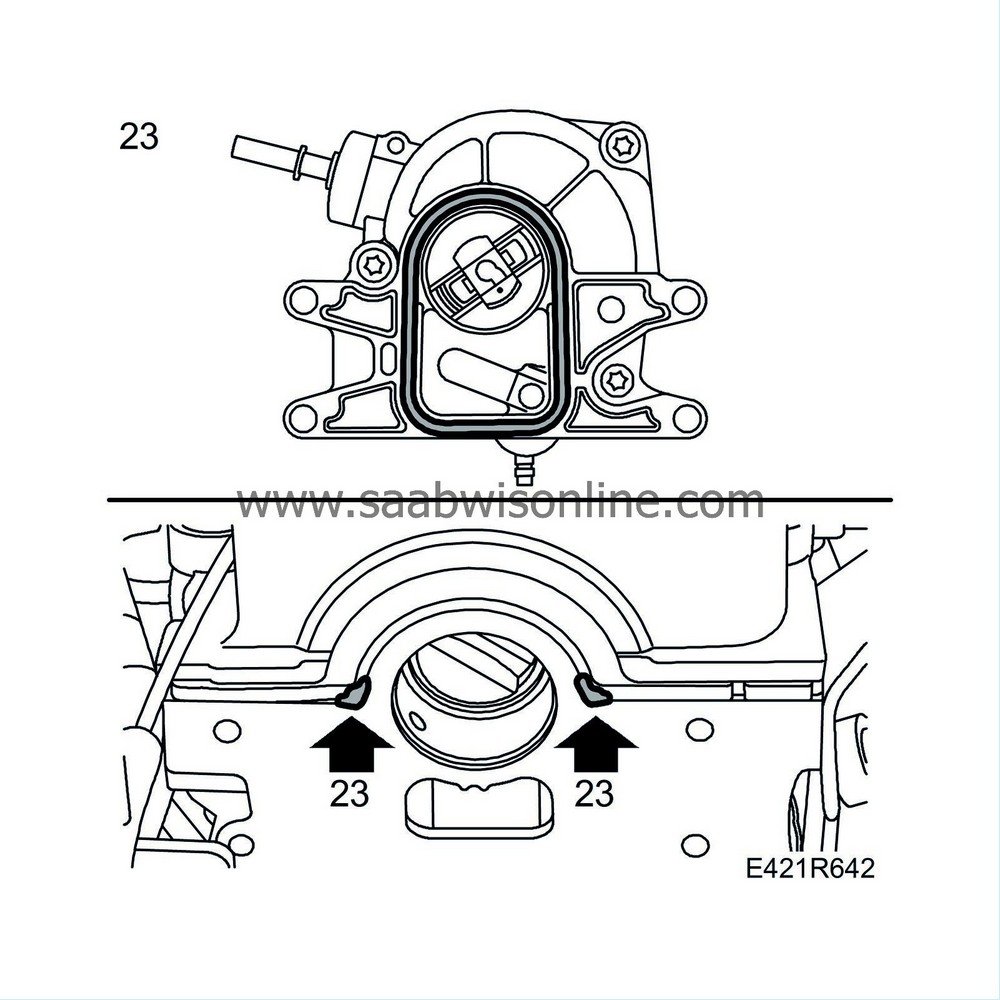
|
|
| 24. |
Fit the cable rail and connect the vacuum hose to the vacuum pump.
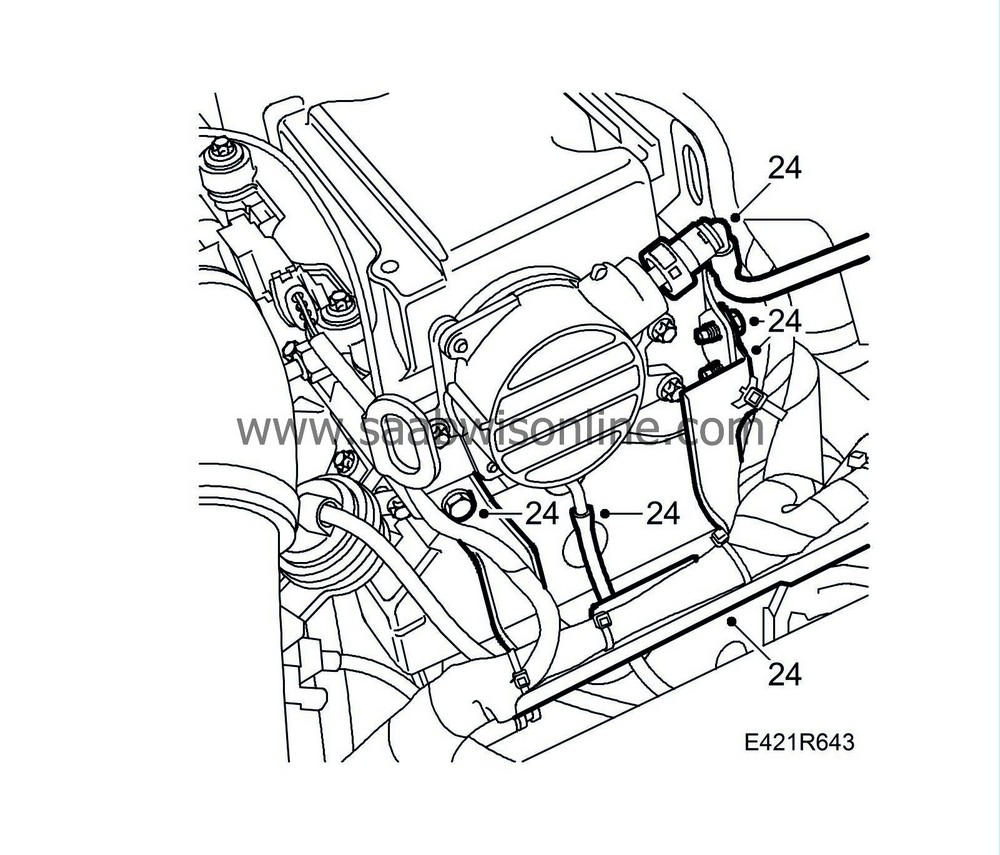
|
|
| 25. |
Adjust the fuel lines to the recess in the camshaft cover.
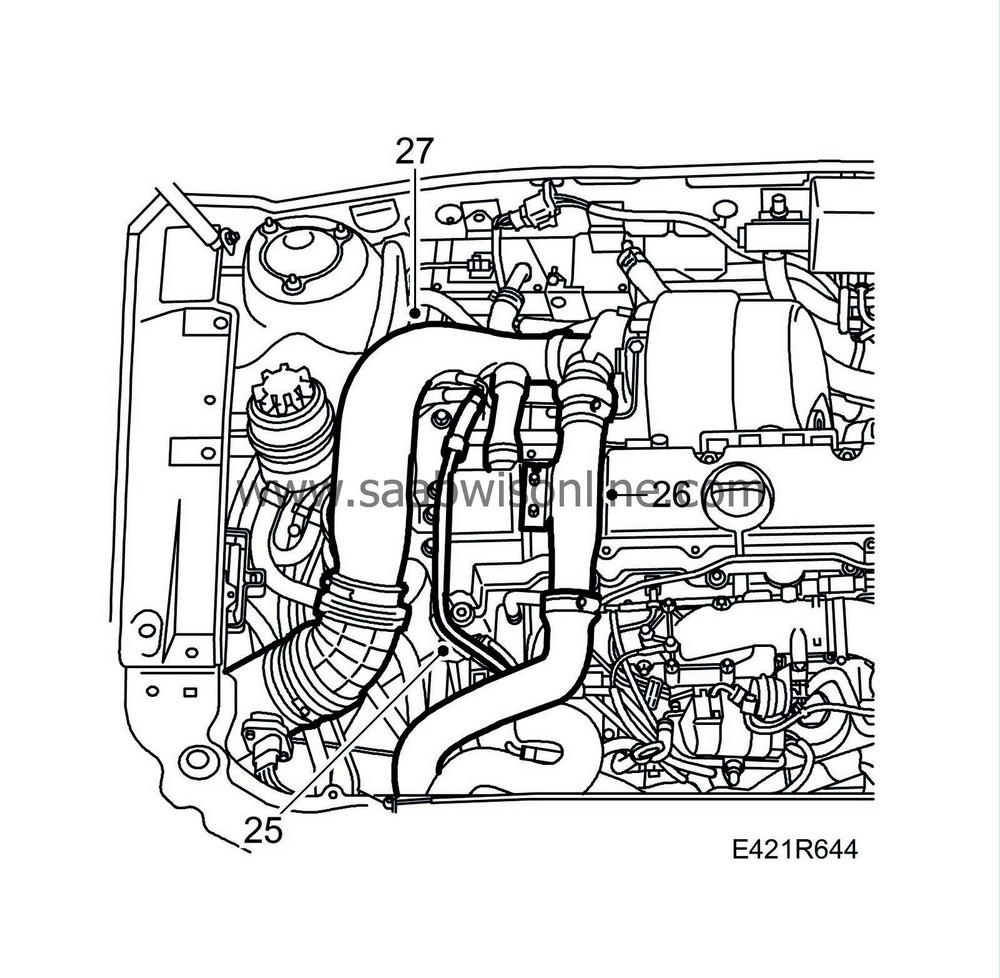
|
|
| 26. |
Remove the plugs, connect and fit the turbocharger delivery pipe with hose to the turbocharger, camshaft cover and turbocharger delivery pipe on the fan cowling.
|
|
| 27. |
Fit the intake manifold from the mass air flow sensor to the turbo and the hose for the crankcase ventilation.
Tightening torque, mass air flow sensor: 3.5 Nm (2.5 lbf ft) |
|
| 28. |
Raise the car and fit the crankshaft position sensor with a new O-ring.
Tightening torque: 8 Nm (6 lbf ft) 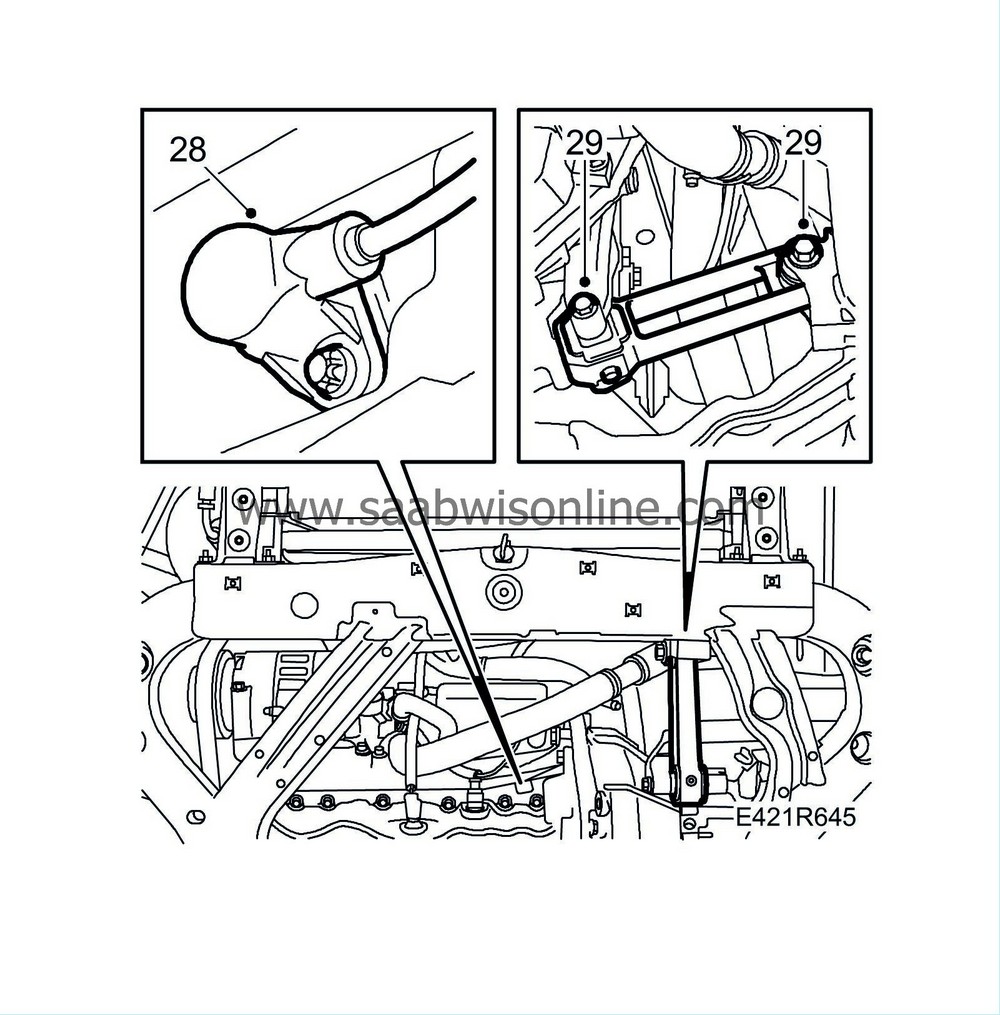
|
|
| 29. |
Fit the front torque arm bolt and tighten the rear one.
Tightening torque, front bolt 90 Nm + 90° (66 lbf ft + 90°) Tightening torque, rear bolt 50 Nm + 120° (37 lbf ft + 120°) |
|
| 30. |
Fit the belt tensioner and tighten the upper bolt first.
Tightening torque: 42 Nm (31 lbf ft). 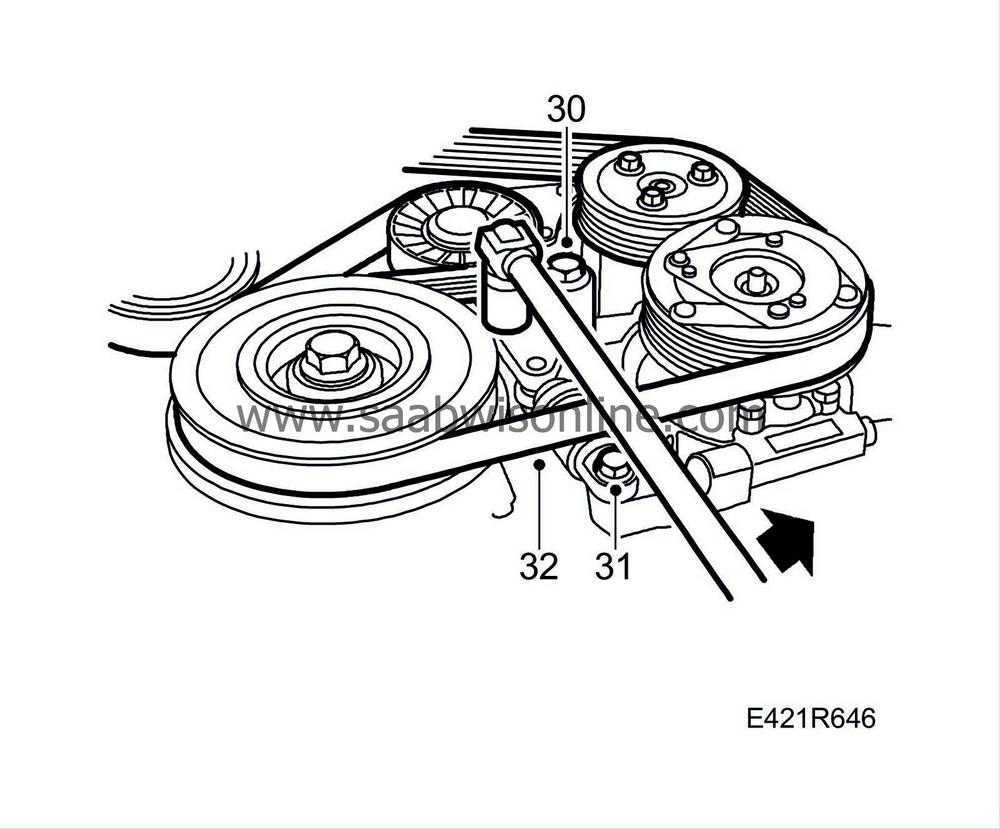
|
|
| 31. |
Tighten the lower bolt.
Tightening torque: 23 Nm (17 lbf ft). |
|
| 32. |
Fit the multigroove belt so that it corresponds with the previously marked direction of rotation.
|
|
| 33. |
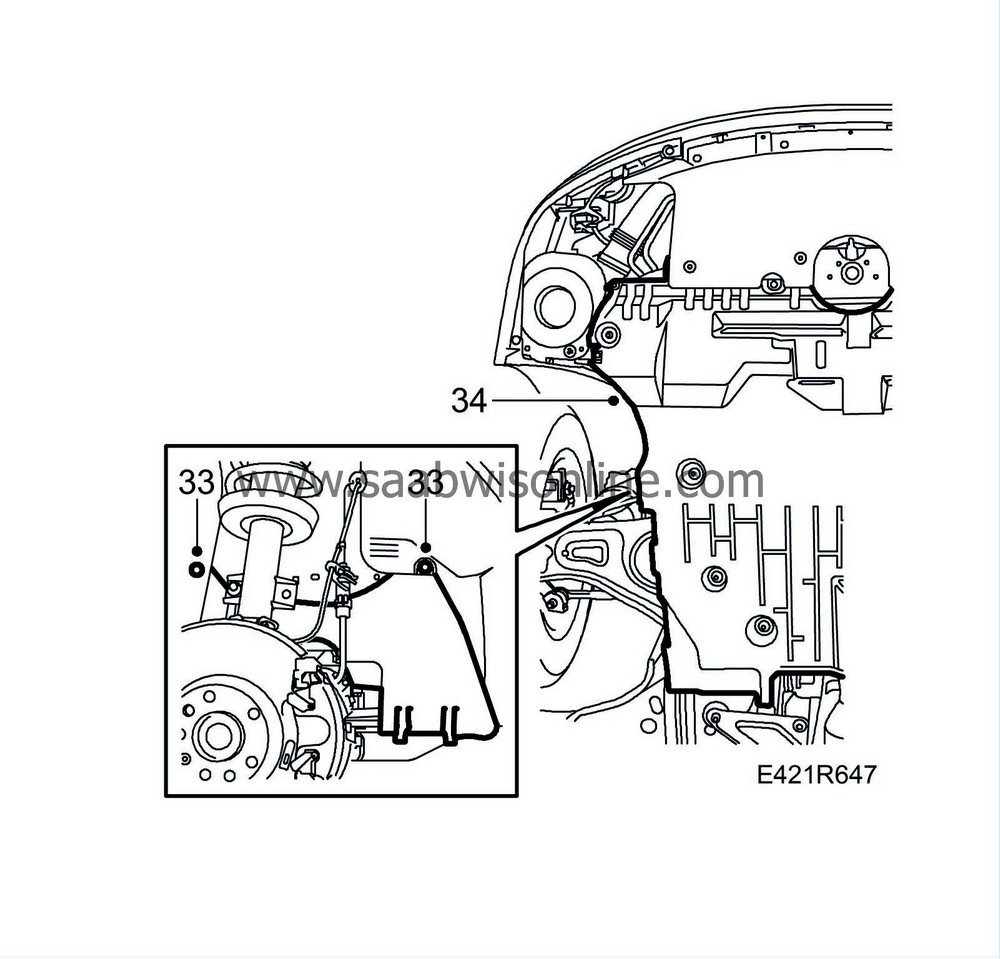
Fit the drive belt cover.
|
|
| 34. |
Fit the lower engine cover.
|
|
| 35. |
Fit the wheel, see
Wheels
Tightening torque: 110 Nm (81 lbf ft). |
|
| 36. |
Lower the car and make sure the multigroove belt is positioned correctly on the pulleys.
|
|
| 37. |
Fit the upper engine cover.
|
|

