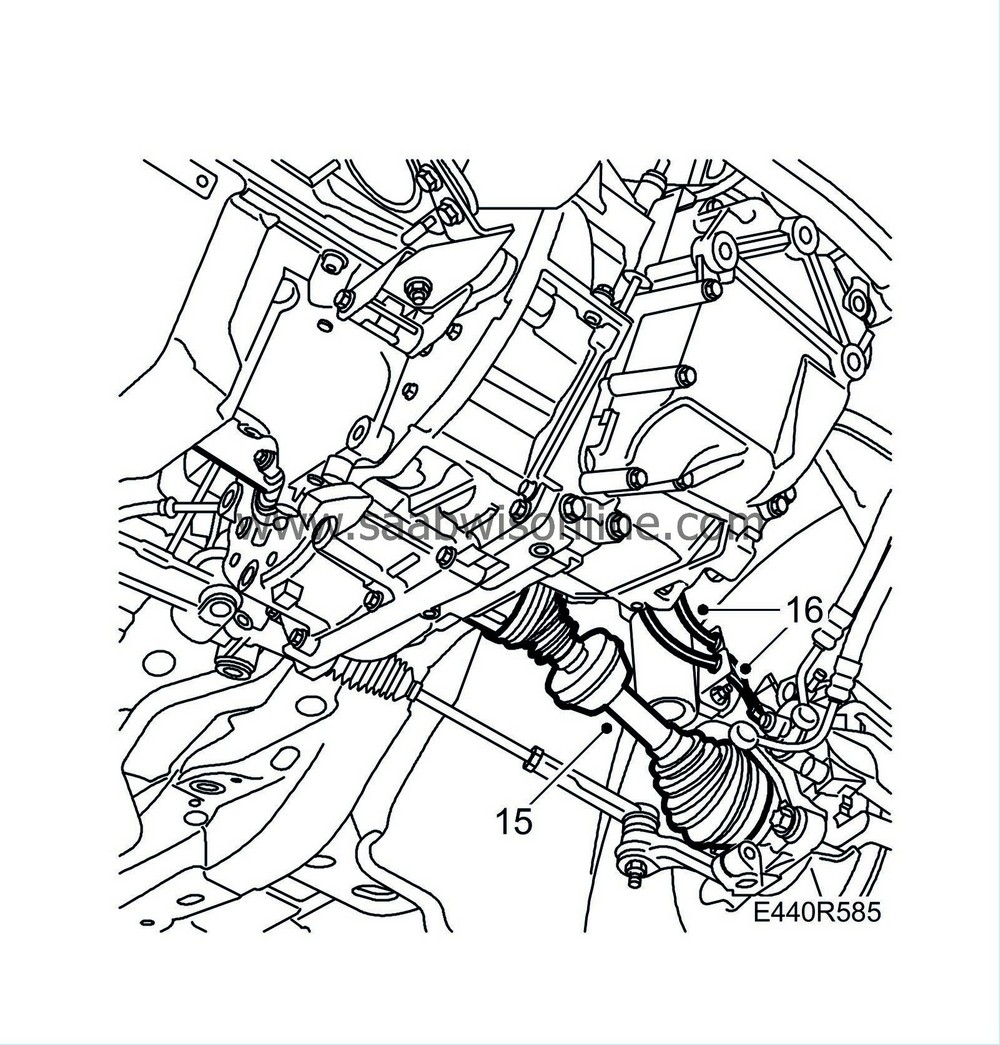
Complete gearbox, Z19
| Complete gearbox, Z19 |
| To remove |
| 1. |
Place drapes over the wings and front to keep the paintwork clean and to protect it from damage.
|
|
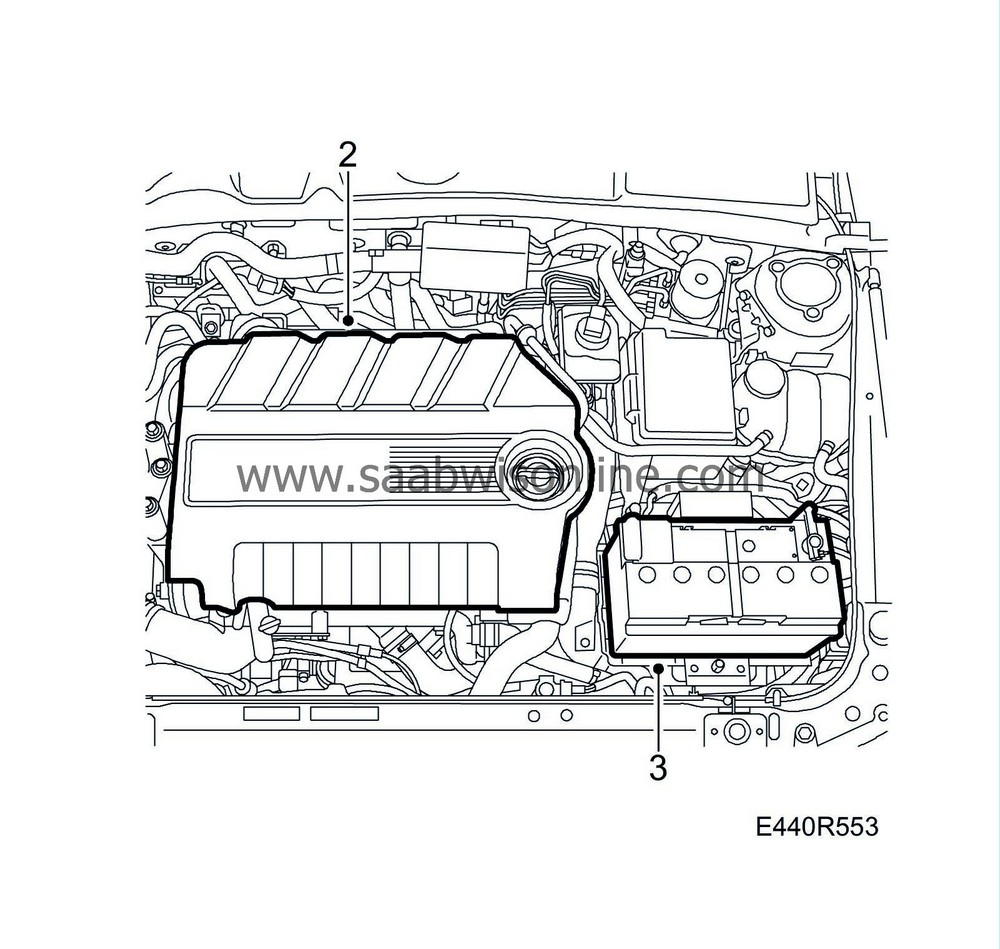
| 2. |
Remove the upper engine cover.
|
|
| 3. |
Remove the battery.
|
|
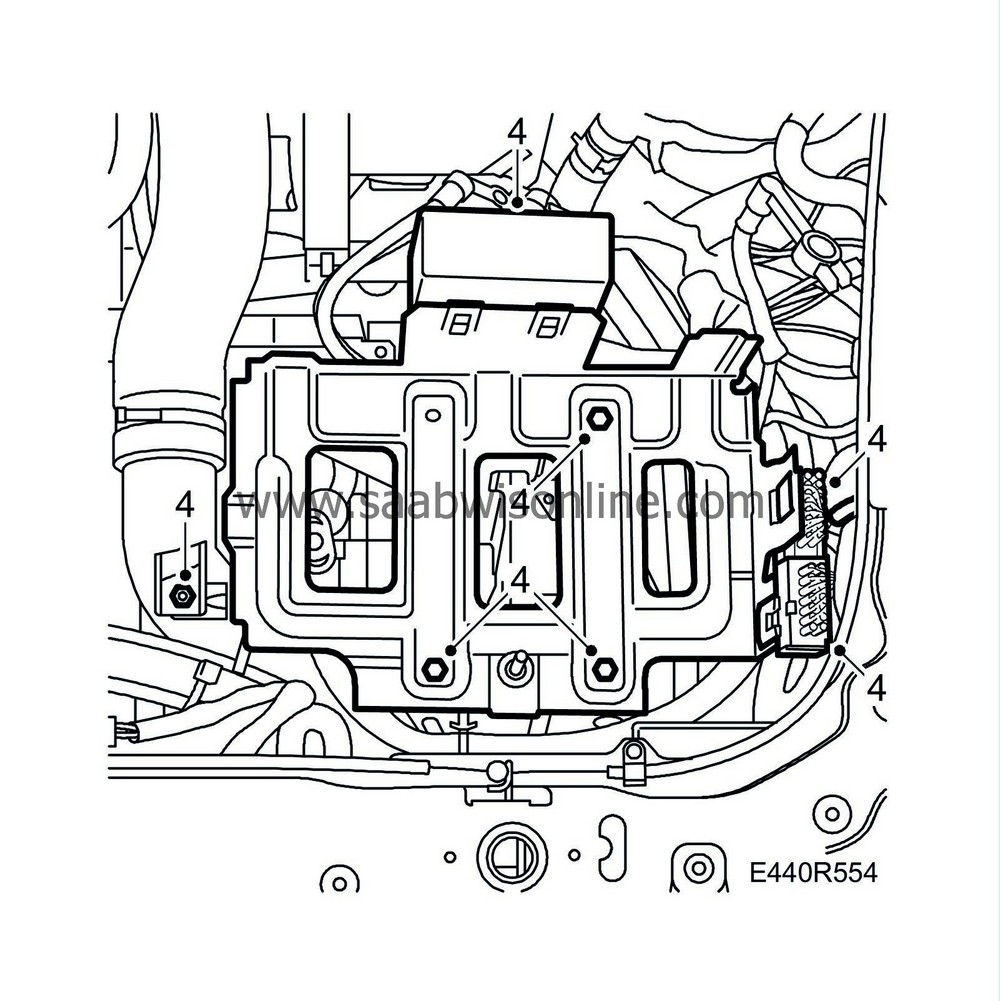
| 4. |
Detach the maxifuse holder and remove the battery tray.
Transversely mounted battery:
Unplug the gearbox wiring harness and unplug the connectors from the battery tray.
|
|
| 5. |
Remove the cable clip.
Longitudinally mounted battery:
Unplug the gearbox wiring harness and unplug the connectors from the battery tray.
|
|
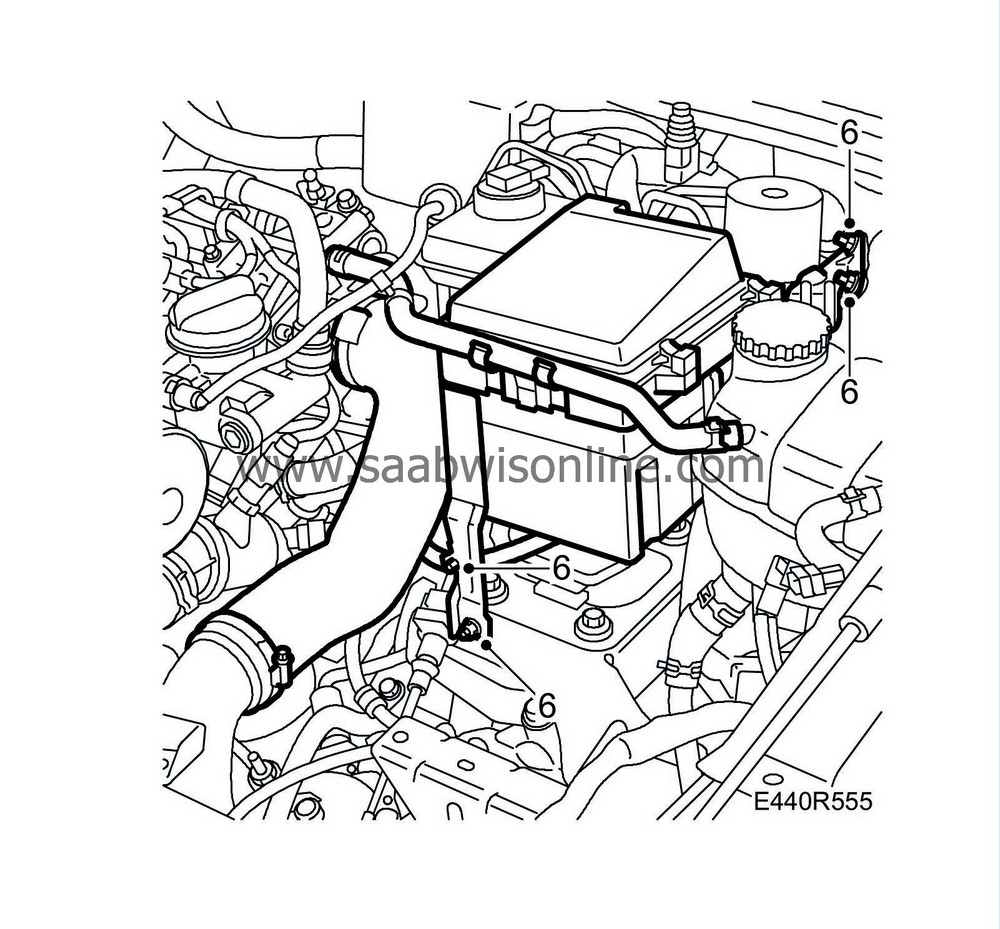
| 6. |
Detach the electrical distribution unit. Remove the air exhaust hose clip from the electrical distribution unit base. Move the electrical distribution unit aside.
|
|
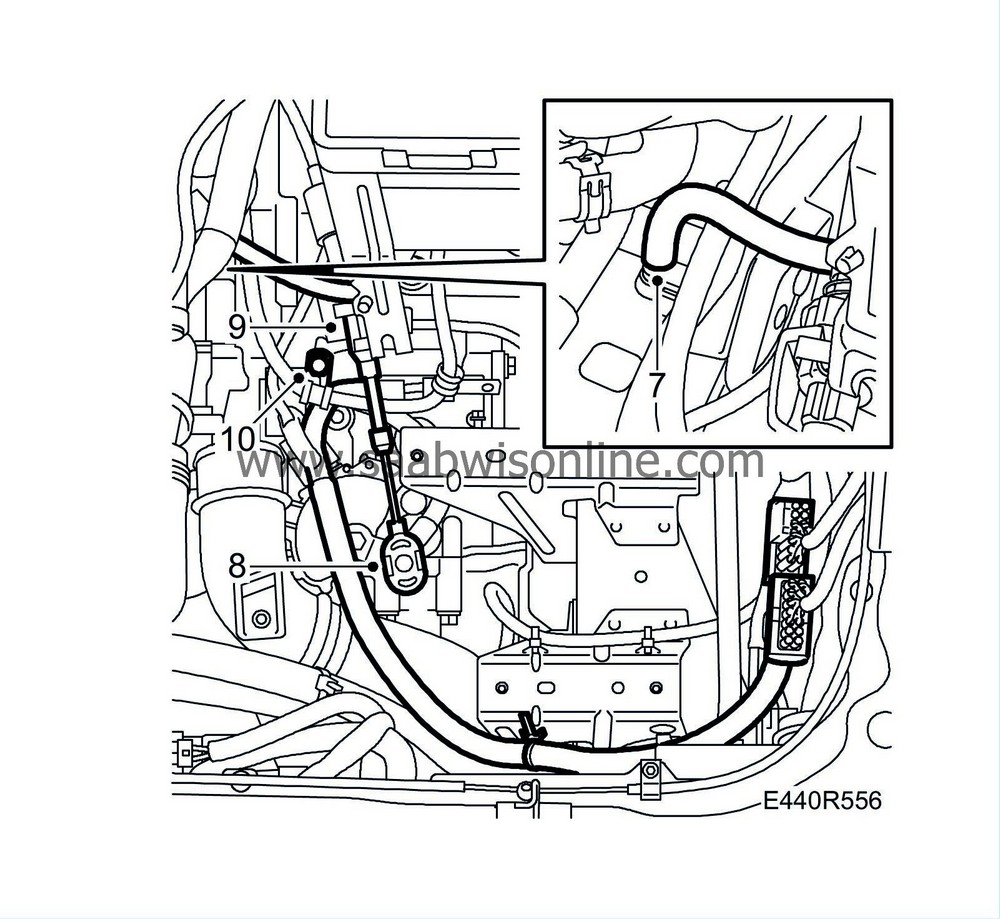
| 7. |
Remove the ventilation hose from the gearbox.
|
|
| 8. |
Remove the selector lever cable from the selector lever.
|
|
| 9. |
Remove the locking clip and carefully bend in the selector cable locking tabs with a suitable screwdriver. Remove the cable from the mounting.
|
|
| 10. |
Remove the cable clamps for the positive battery cable.
|
|
| 11. |
Remove the upper bolts of the starter motor.

|
|
| 12. |
Remove the bracket from the coolant pipes and the positive cable clamp.
|
|
| 13. |
Remove the starter motor connection cables.
|
|
| 14. |
Remove the upper bolts from the gearbox. To simplify removal, use
87 92 723 Access tool, bolt in joint between automatic transmission and engine
for the front bolt.

|
|
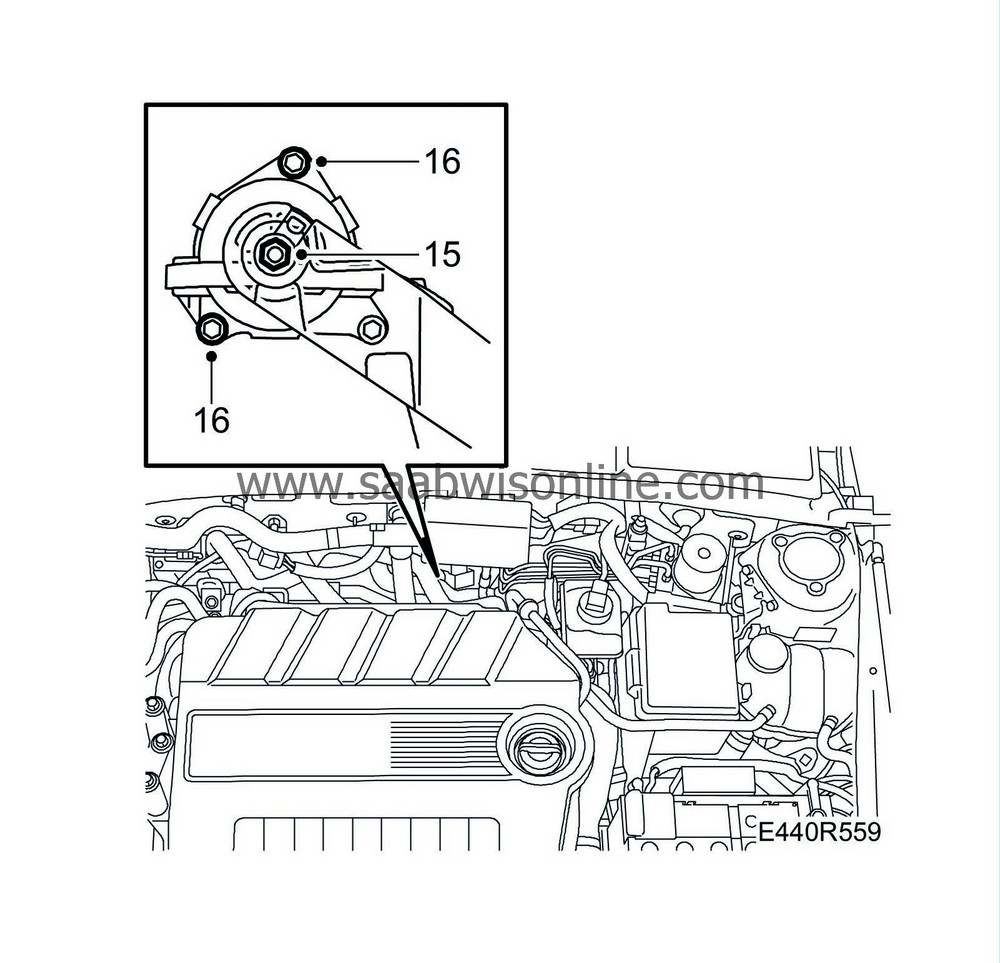
| 15. |
Remove the nut for the rear engine mounting.
|
|
| 16. |
Undo the two visible bolts which hold the rear engine pad. Do not remove the bolts. The third bolt is removed from underneath.
|
|
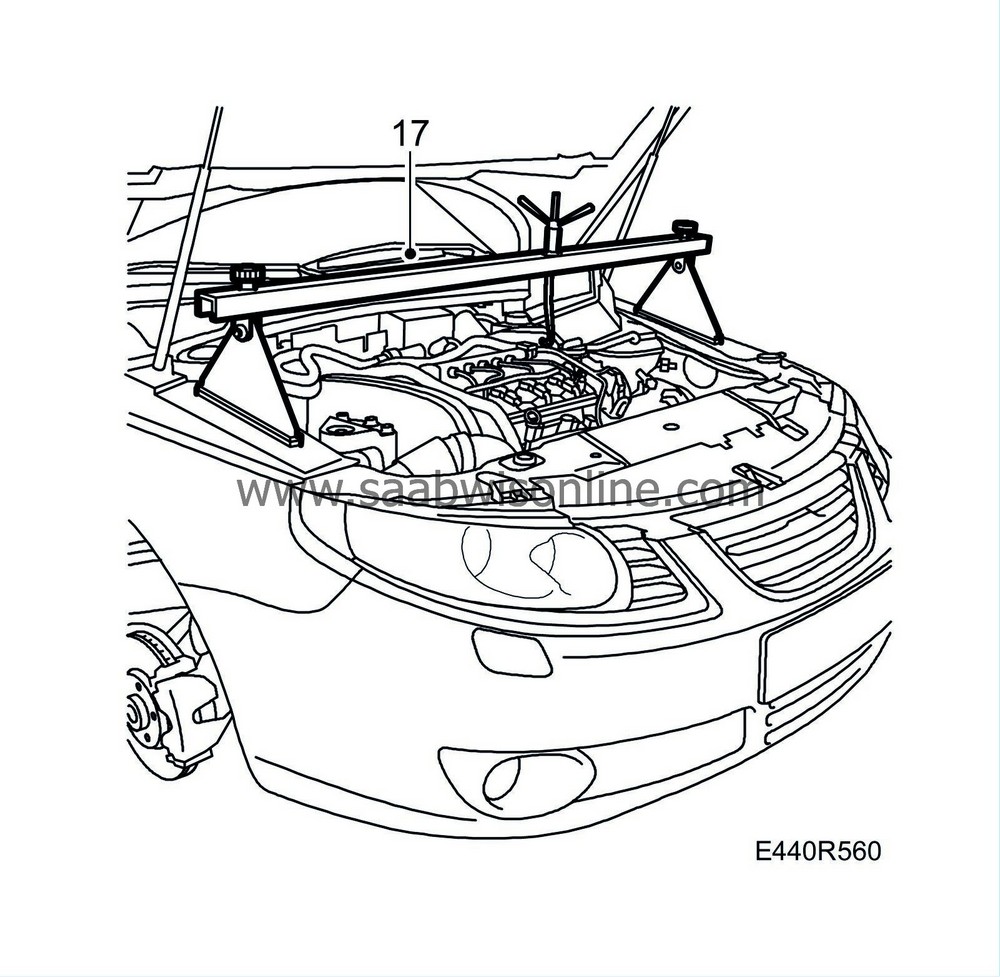
| 17. |
Position
83 94 850 Lifting beam
and relieve the weight of the engine and gearbox.
|
|
| 18. |
Remove the bolts and rivets from the upper mounting of the bumper shell. Use
84 71 179 Removal tool, clips
. Loosely fit two
83 95 212 Straps
over the radiator member.
|
|
| 19. |
Raise the vehicle and remove the front wheels.
|
|
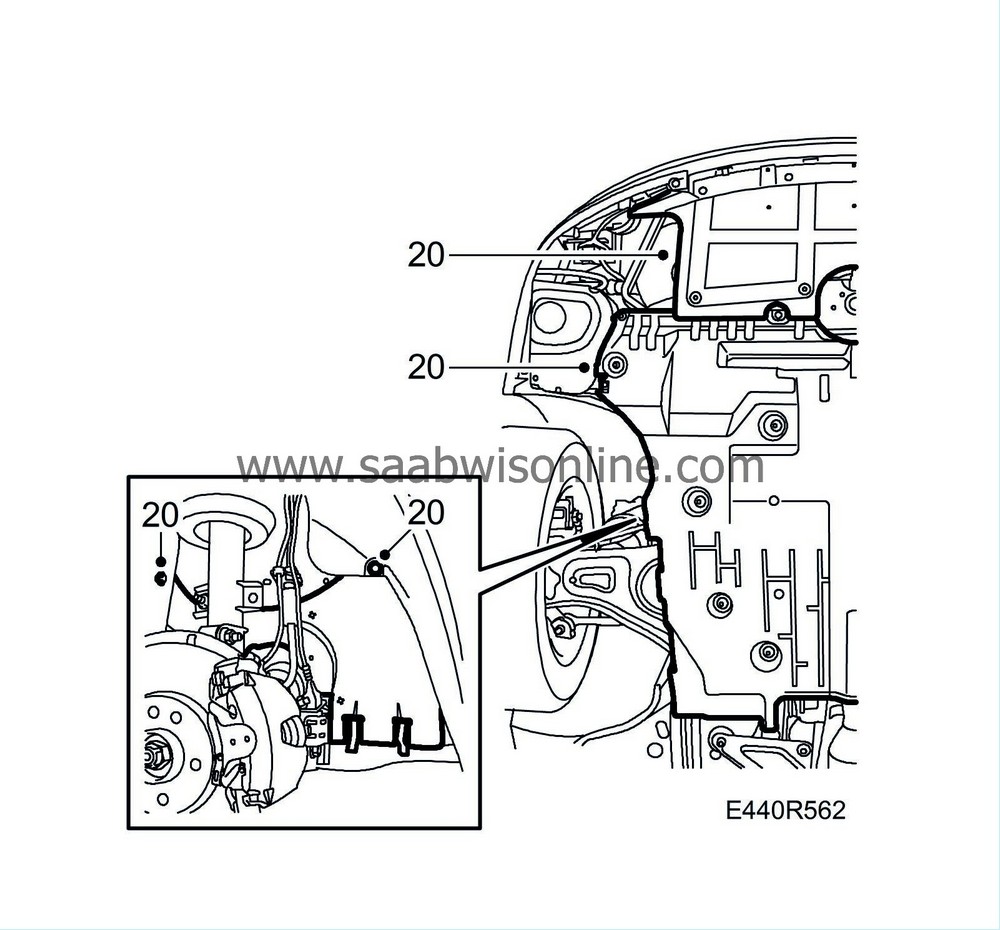
| 20. |
Remove the lower engine cover, the spoiler shield and both side covers.
|
|
| 21. |
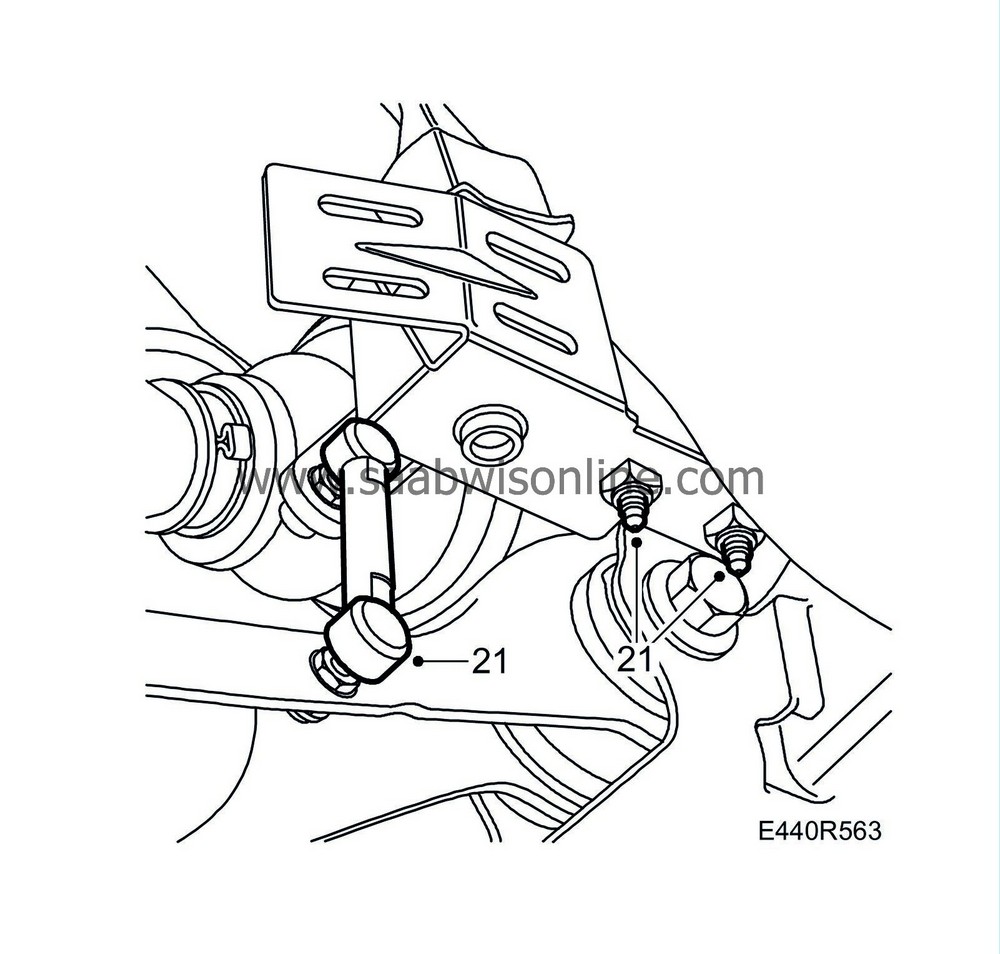
Remove the headlamp level sensor (option).
|
|
| 22. |
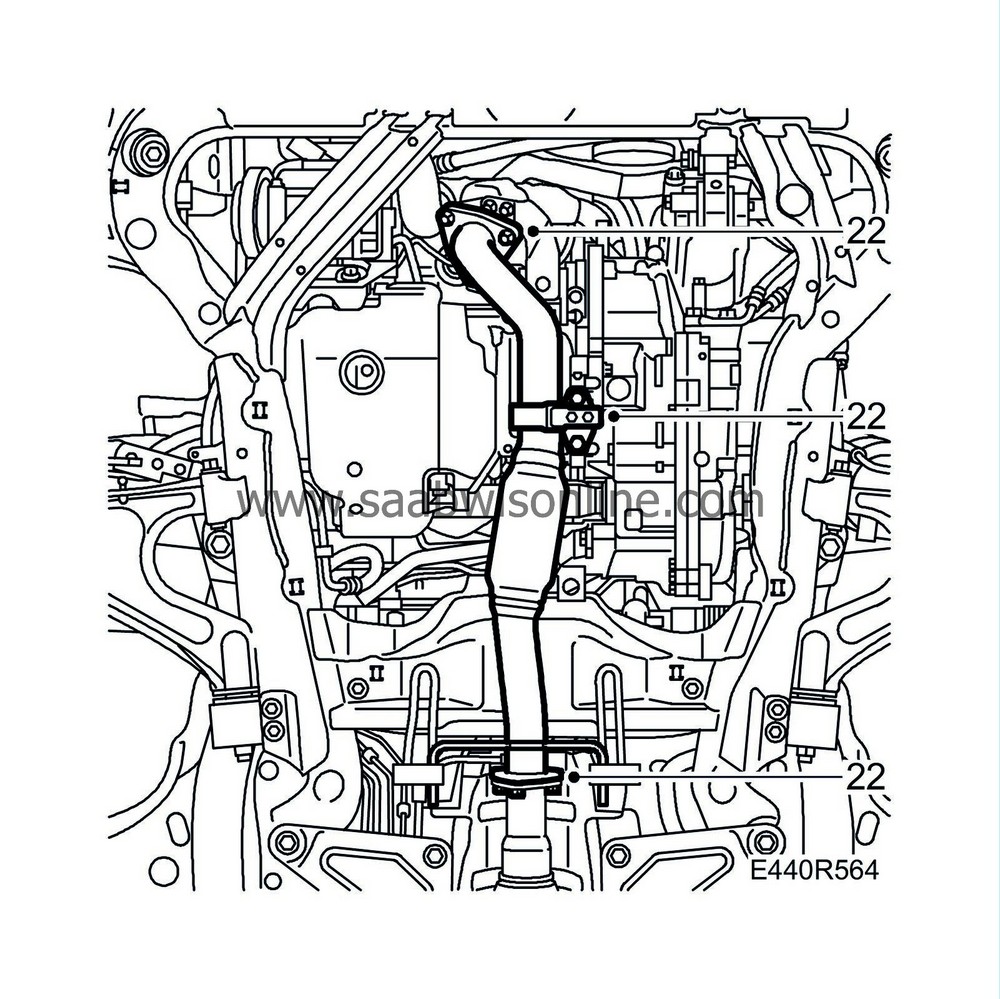
Remove the front section of the exhaust system. See
Front exhaust pipe
.
|
|
| 23. |
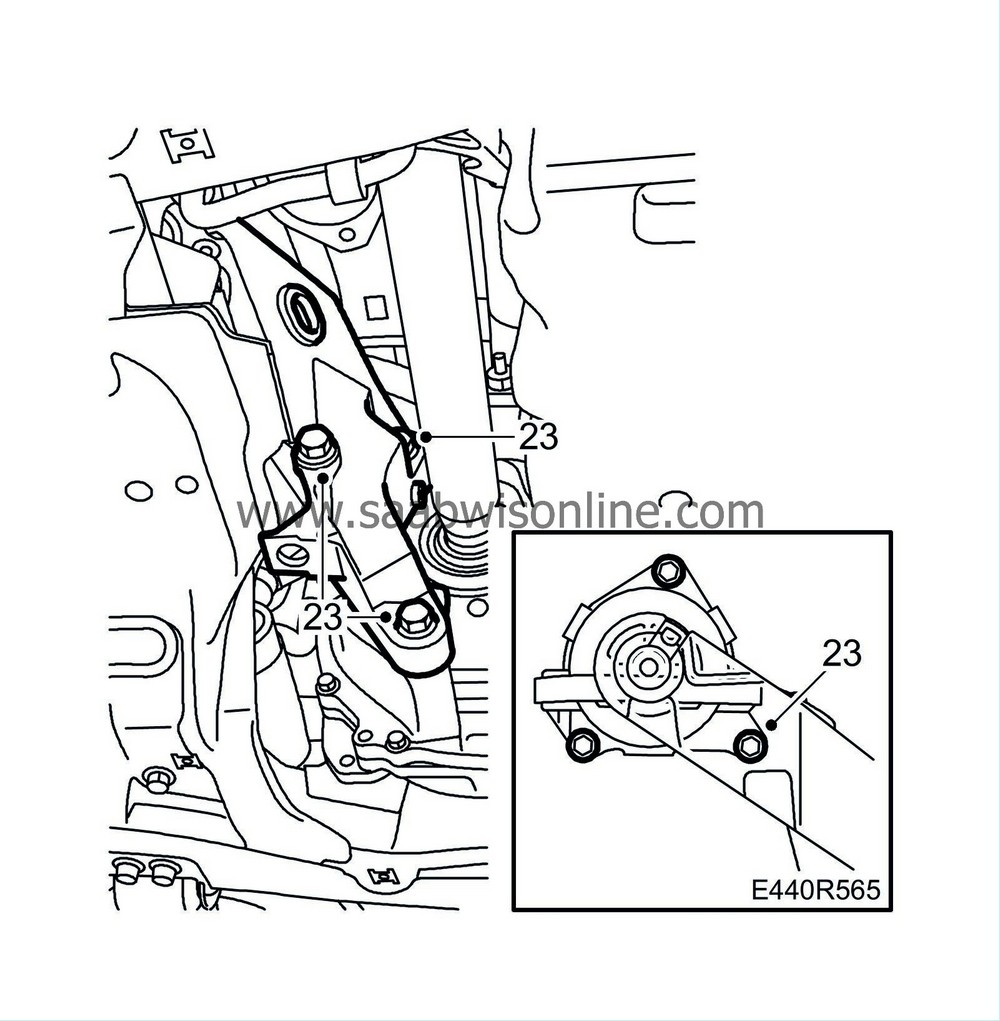
Remove the rear engine bracket and the engine pad.
|
|
| 24. |
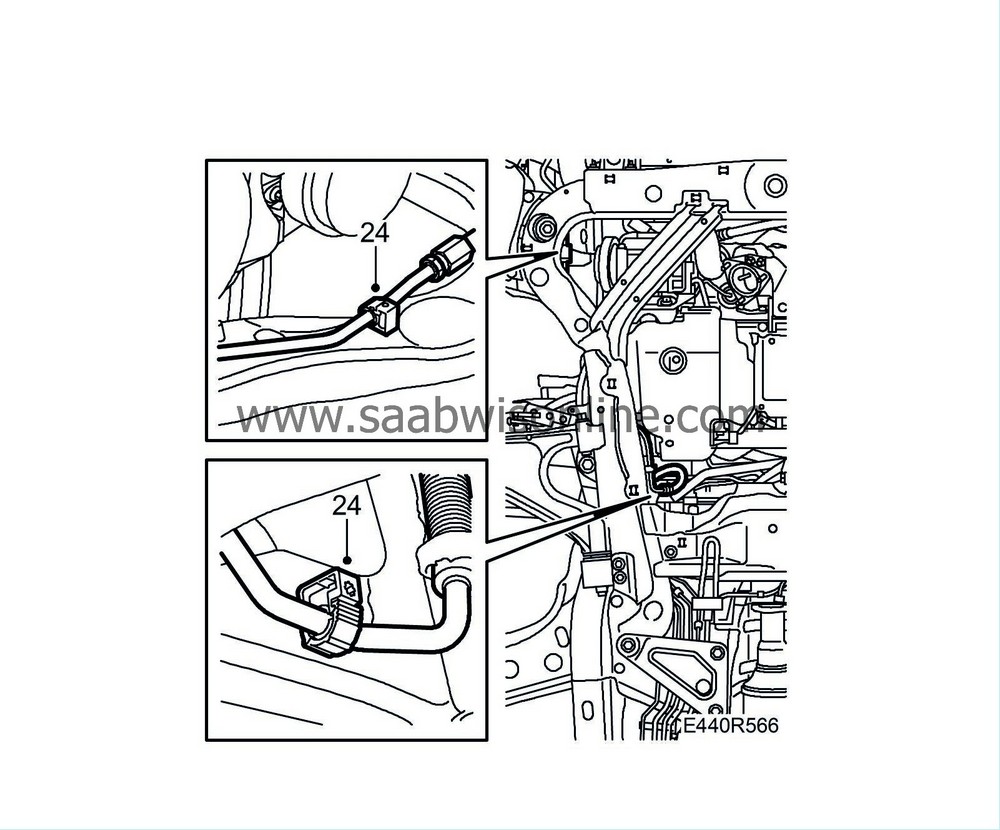
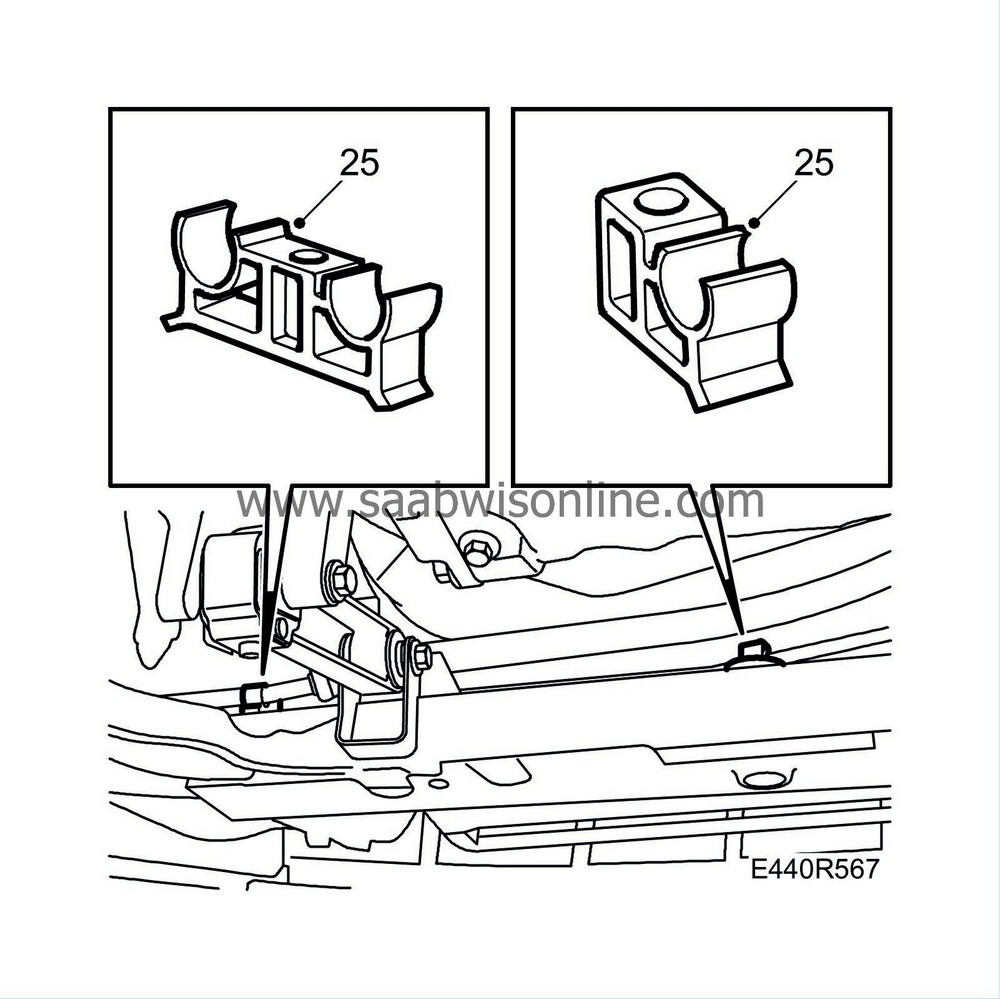
Remove the two clamps securing the power steering delivery pipe to the subframe.
|
|
| 25. |
At the same time free the AC pipes from the plastic clips on the subframe.
|
|
| 26. |
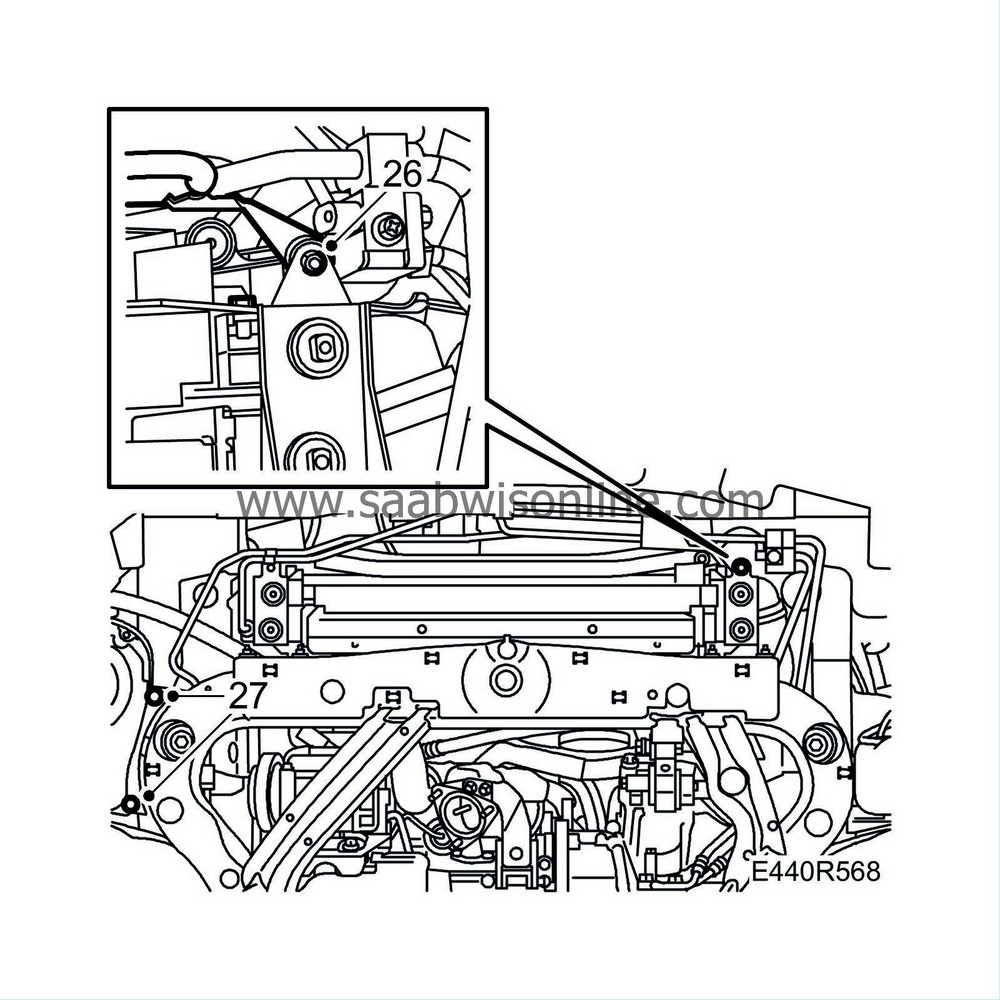
Detach the power steering cooling coil. Suspend the pipe with a
83 95 212 Strap
.
|
|
| 27. |
Remove the air cleaner casing from the subframe.
|
|
| 28. |
Position two
83 95 212 Straps
around the radiator core and radiator member.
|
|
| 29. |
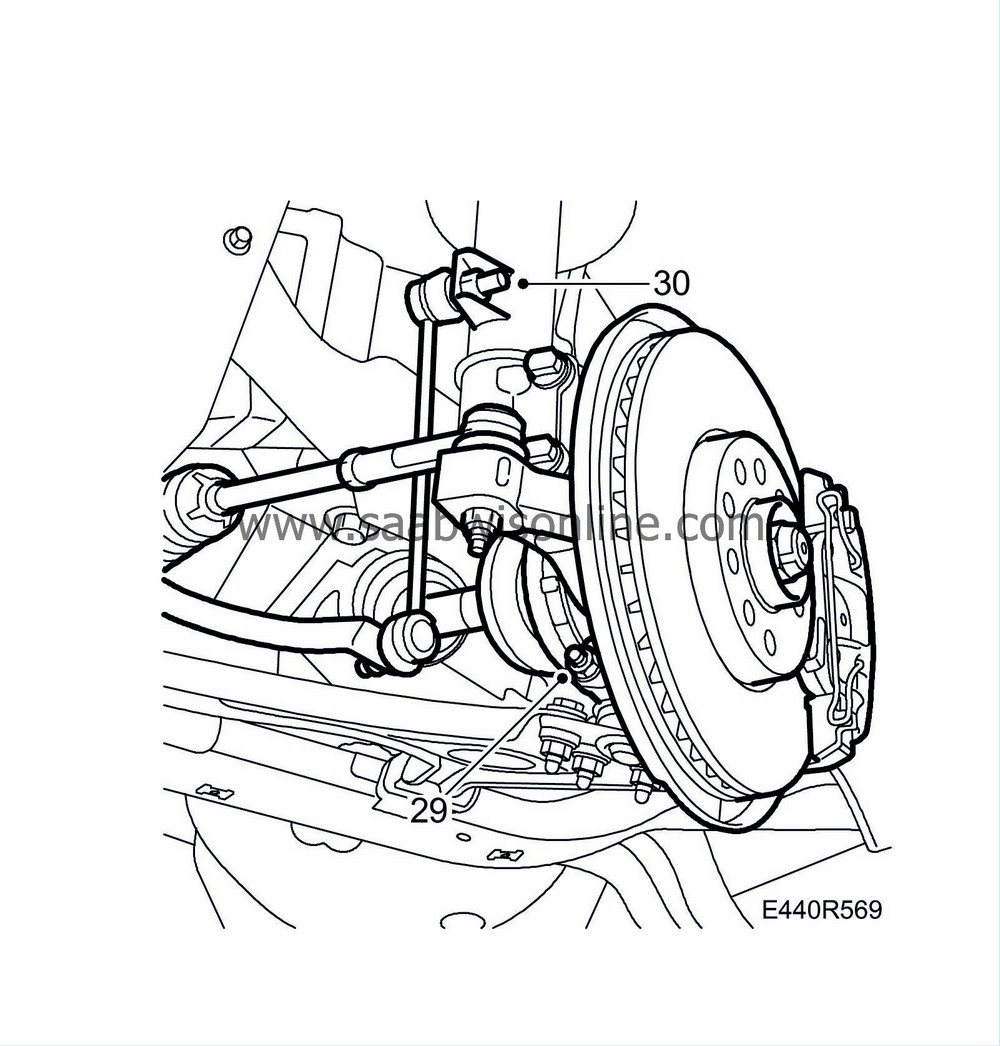
Remove the bolts securing the outer ball joints to the steering swivel member on both sides.
|
|
| 30. |
Detach the upper ball joints of the anti-roll bar.
|
|
| 31. |
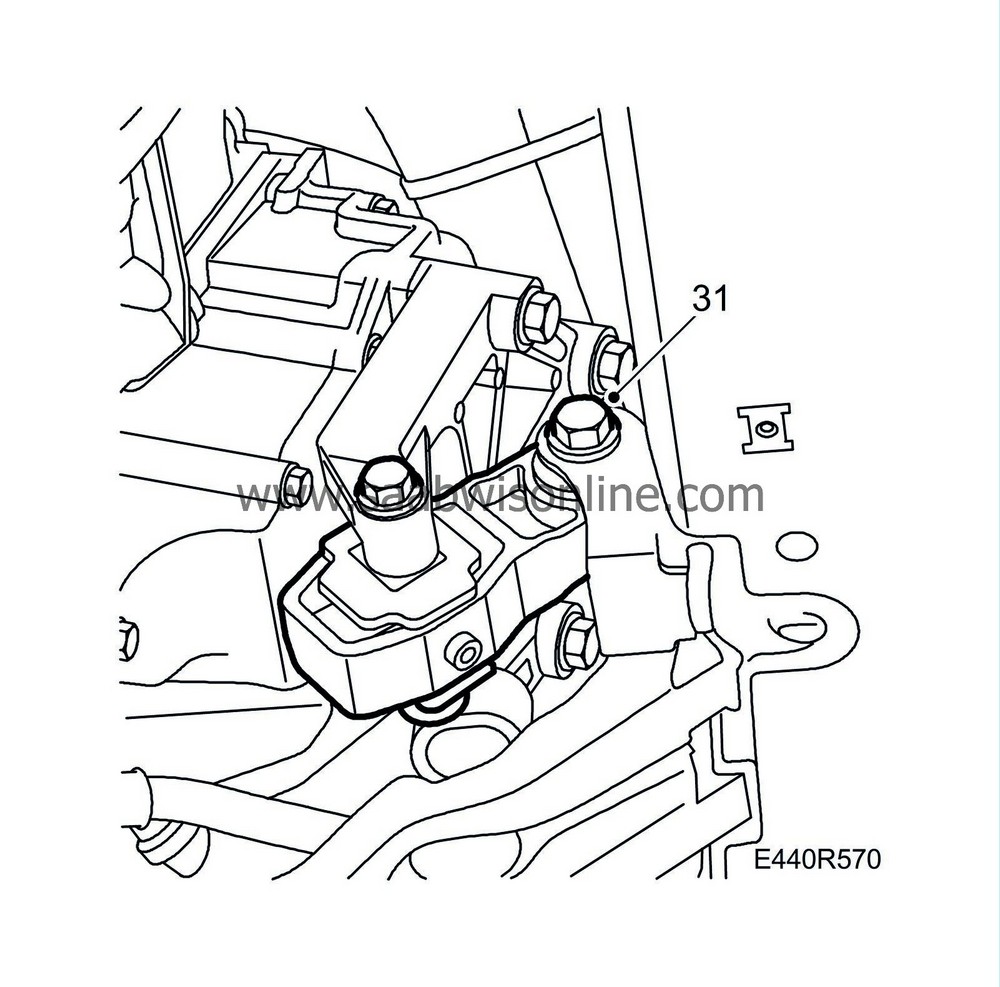
Remove the front bolt of the torque rod.
|
|
| 32. |
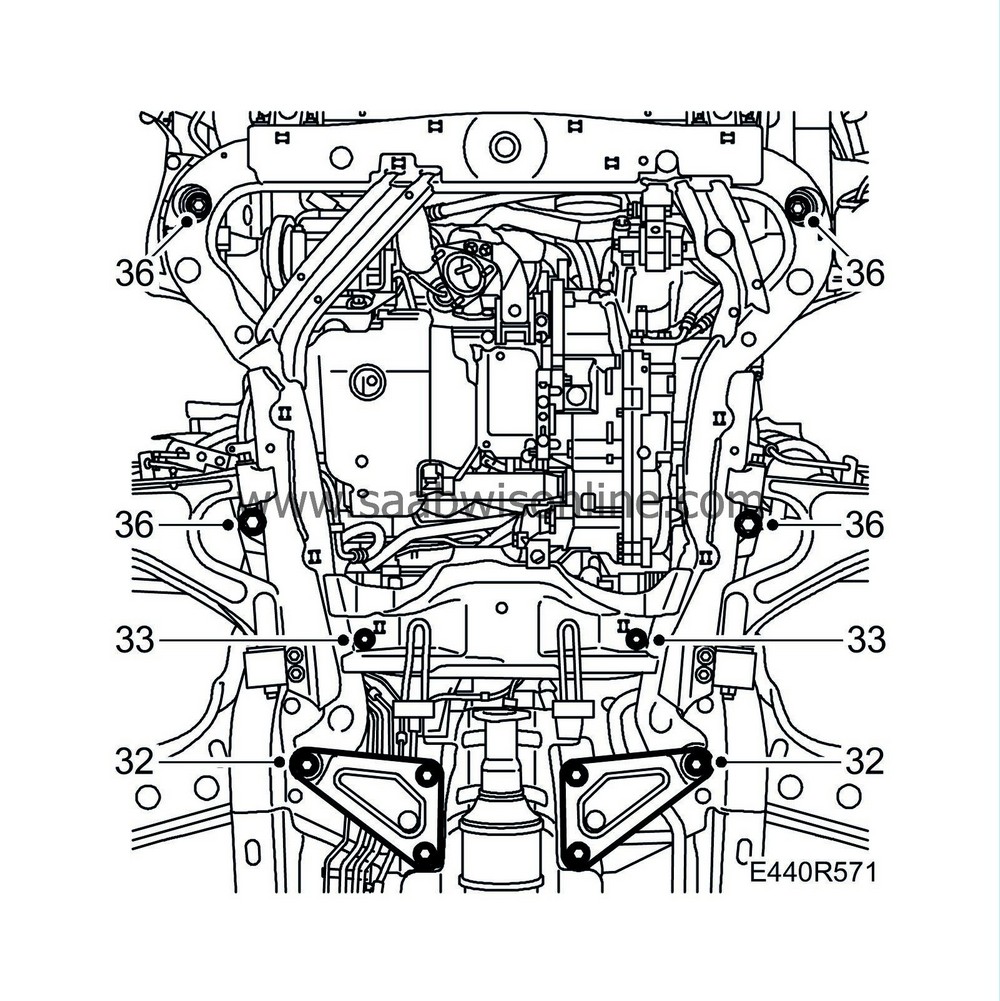
Remove the rear support plates.
|
|
| 33. |
Remove the steering gear bolts.
|
|
| 34. |
Assemble the holder, use
83 95 170 Adapter
,
83 95 196 Holder, front
and
83 95 188 Basic fixture
. Put the assembled tool on a
83 95 311 Lifting trolley
.
|
|
| 35. |
Place the lifting trolley with lifting table and holder under the subframe. Lift up the lifting table, being careful to position it correctly.
|
|
| 36. |
Remove the last 4 bolts securing the subframe.
|
|
| 37. |
Detach the suspension arms from the steering swivel member, lower the subframe and remove the lifting trolley.
|
|
| 38. |
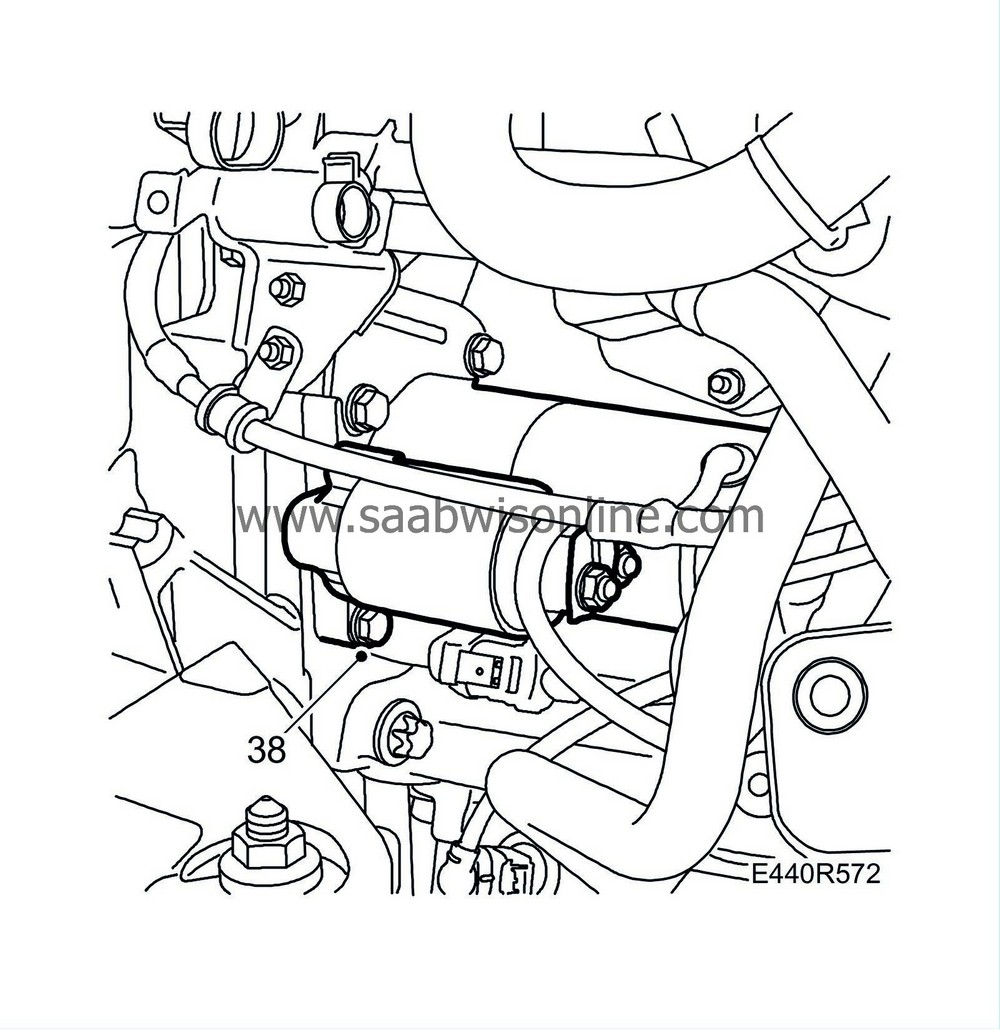
Remove the starter motor bolts and remove the starter motor.
|
|
| 39. |
Undo the 6 bolts securing the torque converter to the drive plate. Rotate the engine in the normal rotational direction using the belt pulley.

|
|
| 40. |
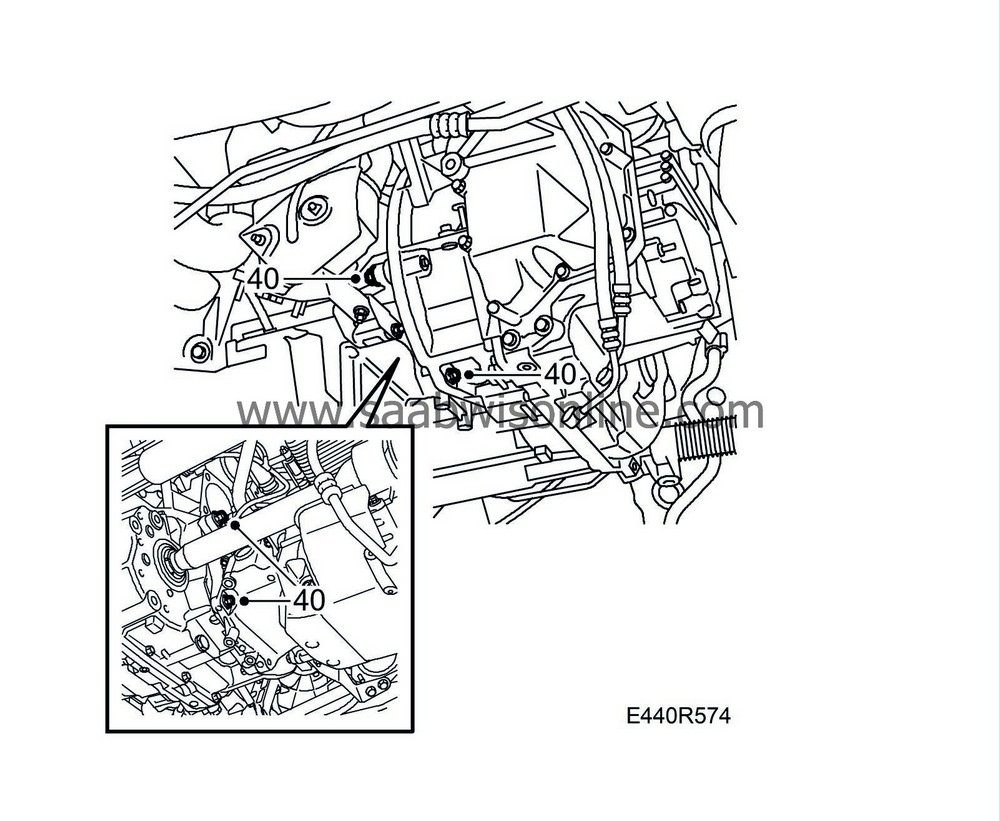
Remove all but one of the remaining bolts holding the gearbox.
|
|
| 41. |
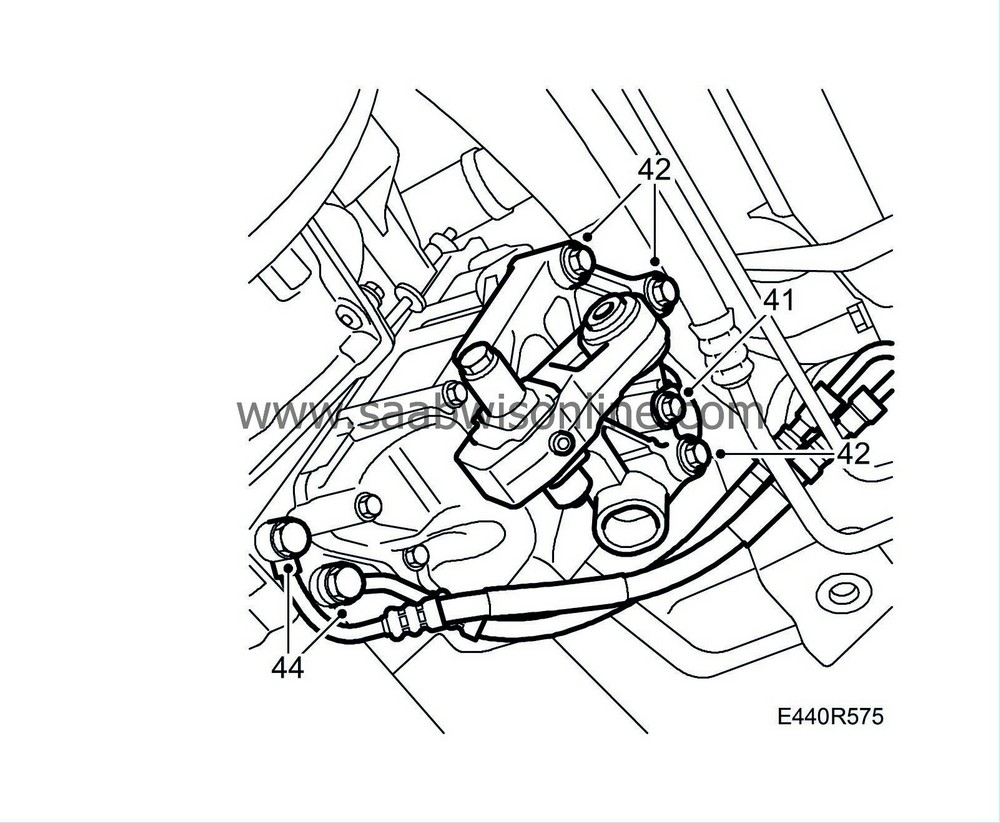
Remove the ground lead.
|
|
| 42. |
Remove the torque arm together with the bracket.
|
|
| 43. |
Drain the transmission fluid, fit the drain plug with a new sealing washer.
Tightening torque 40 Nm (30 lbf ft) |
|
| 44. |
Disconnect the oil cooler inlet and outlet hoses. Plug the inlet and outlet passages on the gearbox and also plug the hoses. Use plug no. (10) 91 32 929 and seal no. (10) 91 32 937.
|
|
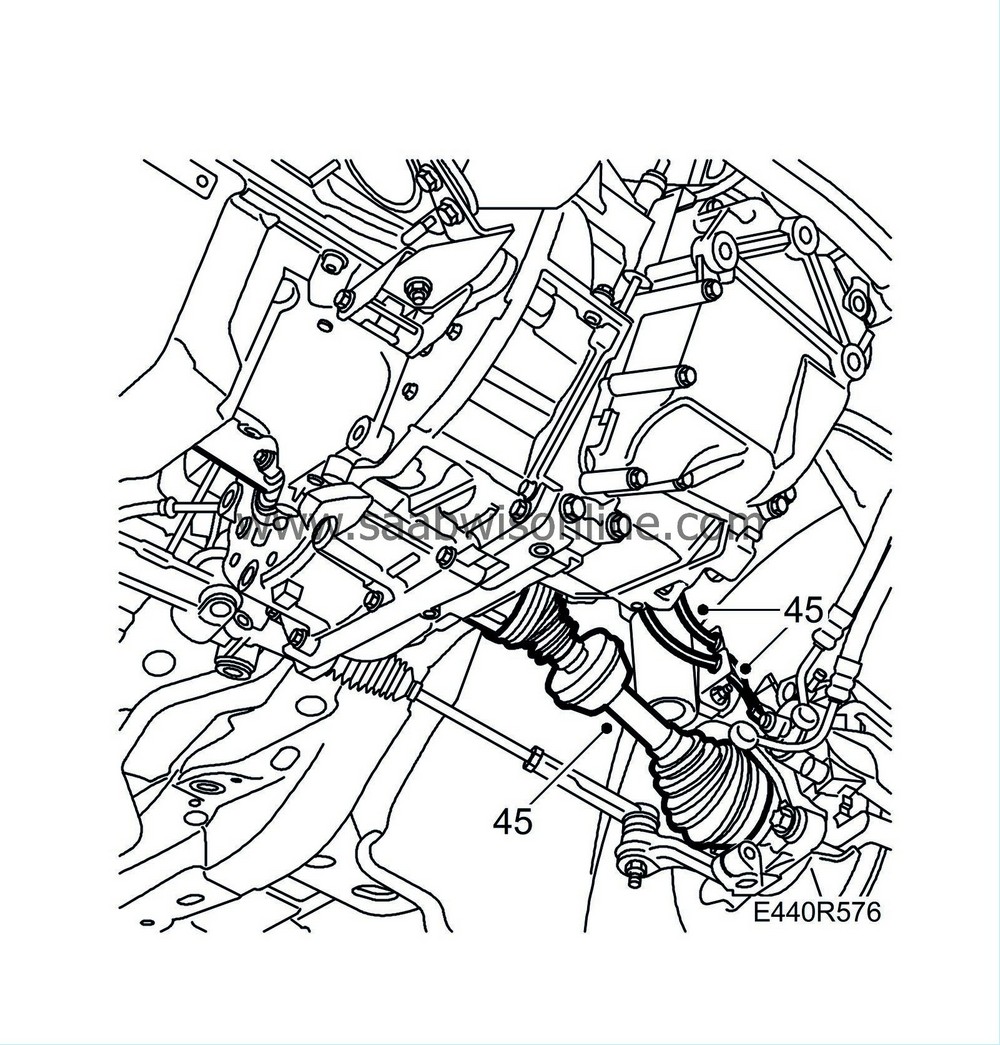
| 45. |
Detach the left-hand drive shaft with
87 92 616 Removal tool, drive shafts
. Detach the ABS cable and the brake hose from the holder.
|
|
| 46. |
Suspend the shaft by means of a
83 95 212 Strap
.
|
|
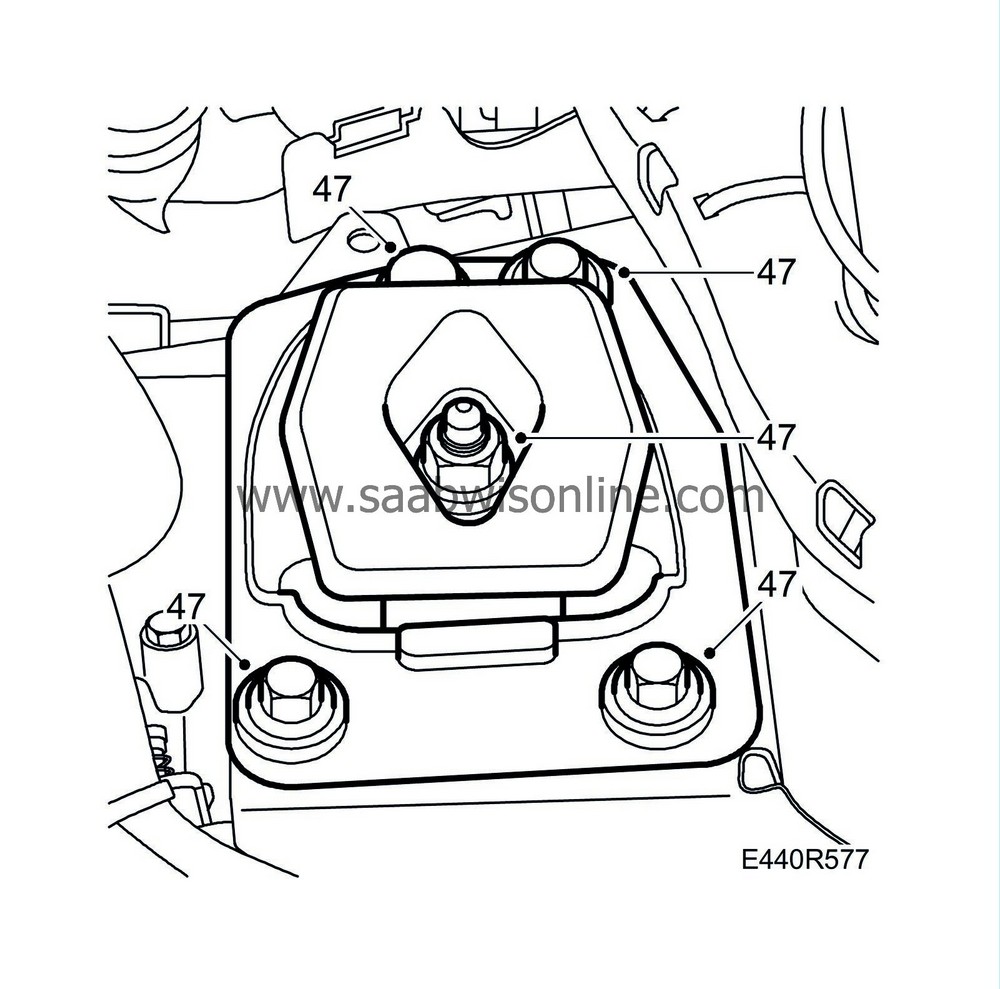
| 47. |
Lower the car and mark the position of the bolts at the engine pad. Remove the left engine pad.
|
|
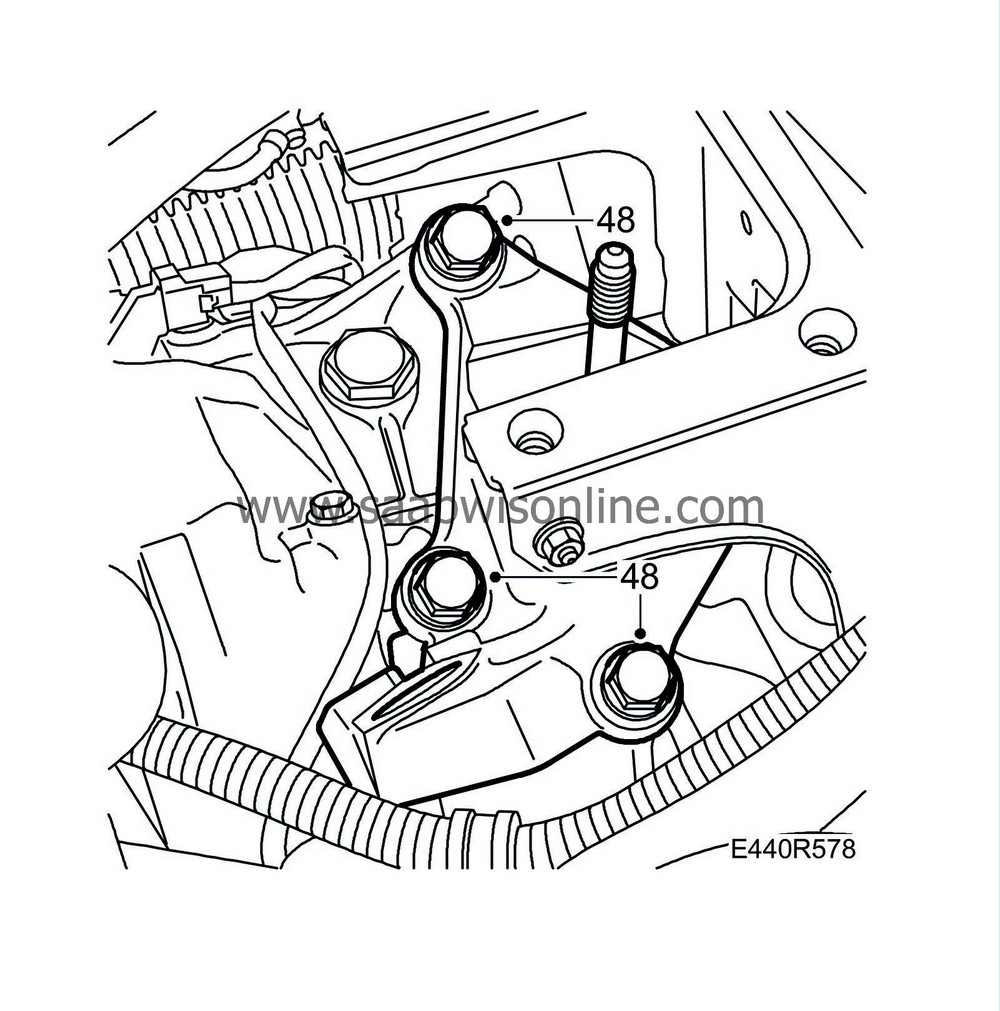
| 48. |
Lower the unit about 70 mm measured at the gearbox mounting bracket. Remove the mounting bracket from the gearbox.
|
|
| 49. |
Raise the car. Fit
87 92 608 Holder for single-column lift
on a single-column lift. Adjust and secure the tool to the gearbox as illustrated.

|
|
| 50. |
Remove the remaining bolts securing the gearbox to the engine.
|
|
| 51. |
Pull the gearbox out approx. 10 mm. Remove the rubber plug, push the torque converter toward the gearbox and fit
87 92 574 Holder
to hold the torque converter in place while the gearbox is removed. It may be necessary to turn the torque converter when fitting the tool.
|
|
| 52. |
Pull out and lower the gearbox.
|
||||||||||
| 53. |
Lift down the gearbox from the pillar jack using an engine hoist and
87 92 442 Lifting cable
while removing the lifting tool from the gearbox.
|
|
| Fitting |
When fitting a new gearbox, transfer the plugs and torque converter holder from the old gearbox to the new one.
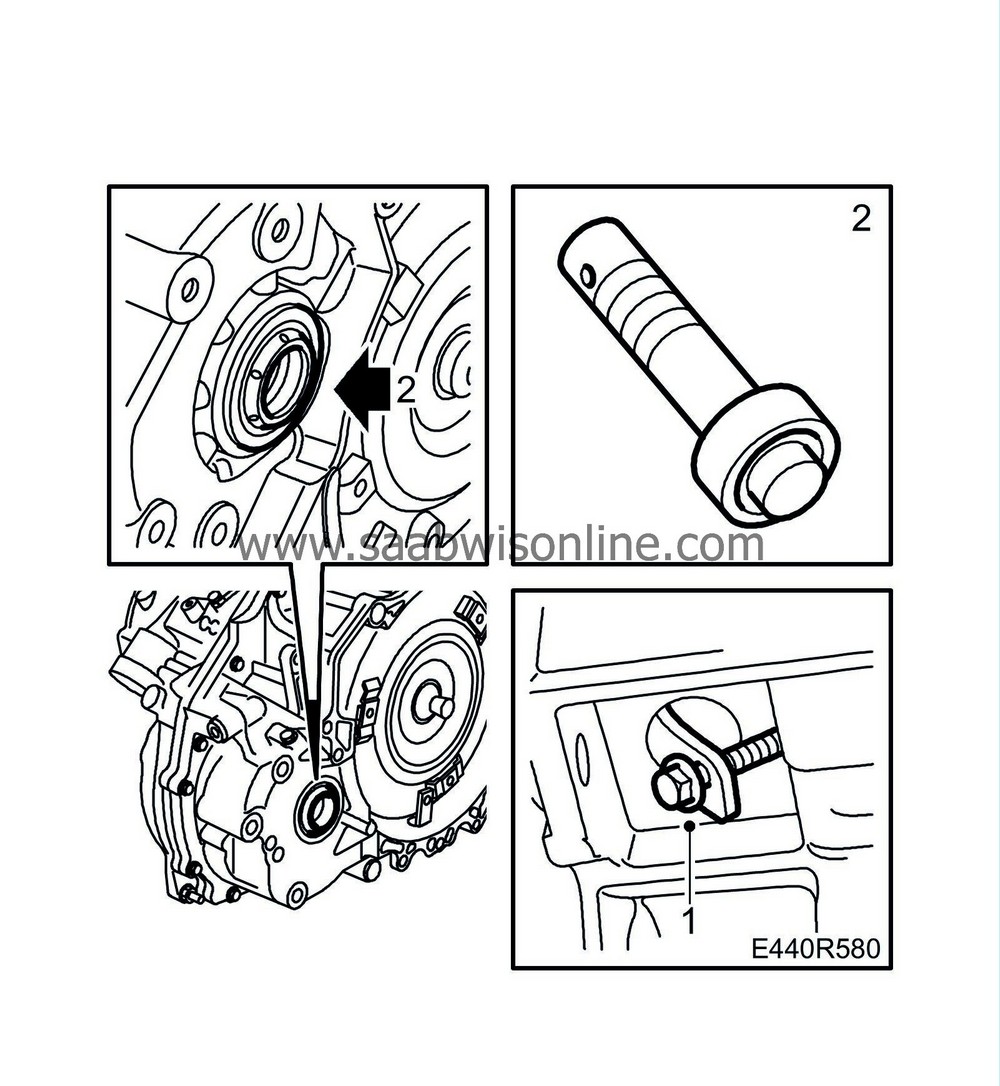
| 1. |
Rotate the engine so that the oval hold on the driver plate aligns with the starter motor recess. Fit
87 92 574 Holder
in order to hold the torque converter in place during installation.
|
|
| 2. |
Make sure the two guide sleeves are on the engine and apply anti-corrosion agent to the sleeves. Fit new drive shaft seals, lubricate them before fitting. Use
87 92 657 Fitting drift, drive shaft seals
.
|
|
| 3. |
Lift up the gearbox using an engine hoist and
87 92 442 Lifting cable
.
|
|
| 4. |
Fit
87 92 608 Holder for pillar jack
on a pillar jack.
|
|
| 5. |
Secure the tool to the gearbox as described for removal.
|
||||||||||
| 6. |
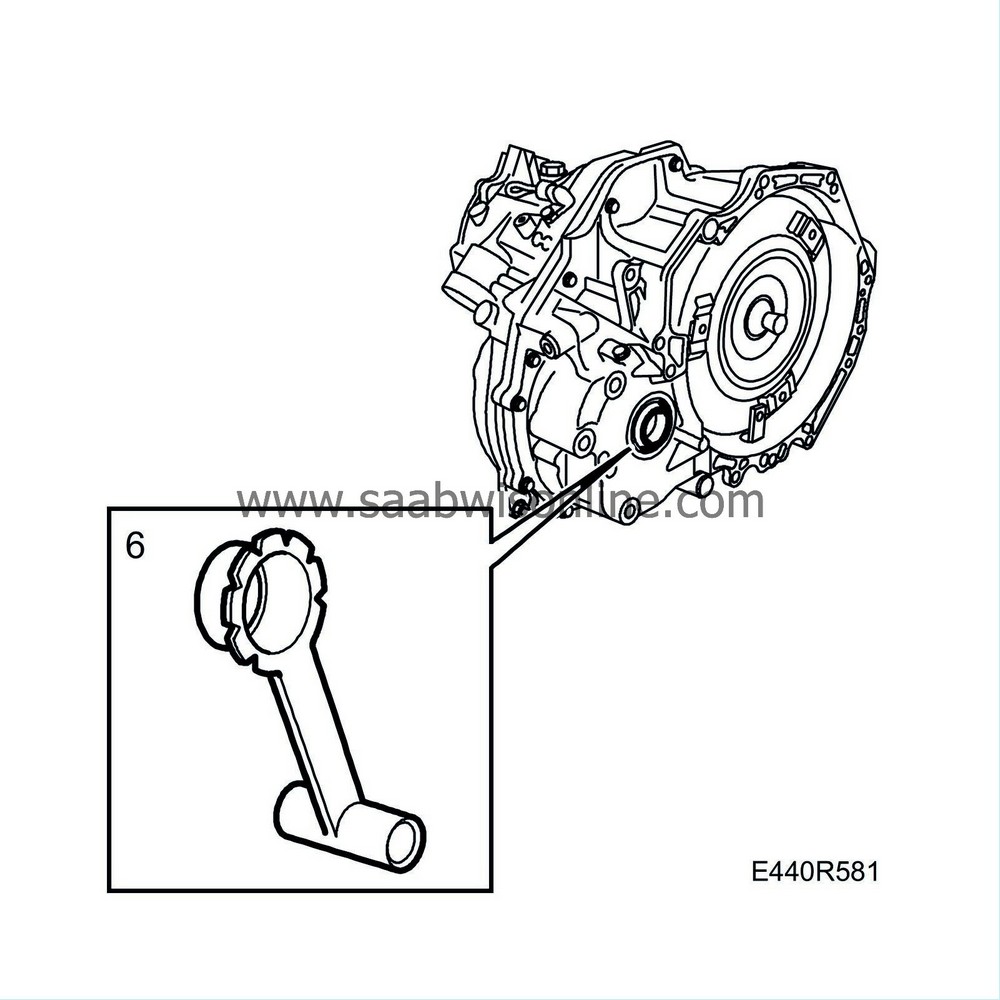
Fit
83 95 162 Protective collar, drive shafts
in the right-hand shaft seal in the gearbox to protect the seal when the gearbox is being fitted. Lubricate the seal.
|
|
| 7. |
Fit the gearbox to the engine. Remove
87 92 574 Holder
just before the gearbox is in place.
|
||||||||||
| 8. |
Push the torque converter into place and fit the plug.
|
|
| 9. |
Tighten the bottom bolts between the engine and the gearbox.
Tightening torque, M12, 60 Nm (44 lbf ft) Tightening torque, M10, 40 Nm (30 lbf ft) 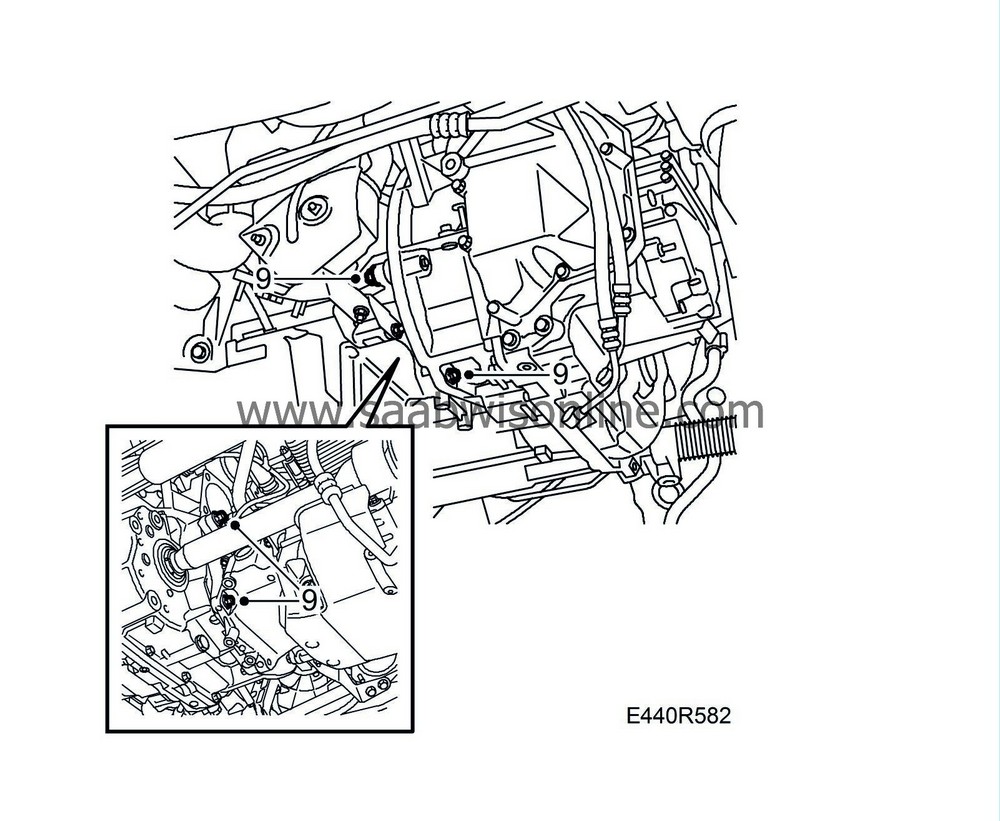
|
|
| 10. |
Remove the lifting tool from the gearbox and put away the jack.
|
|
| 11. |
Lower the car and fit the engine pad mounting on the gearbox.
Tightening torque 60 Nm + 60° (44 lbf ft + 60°) 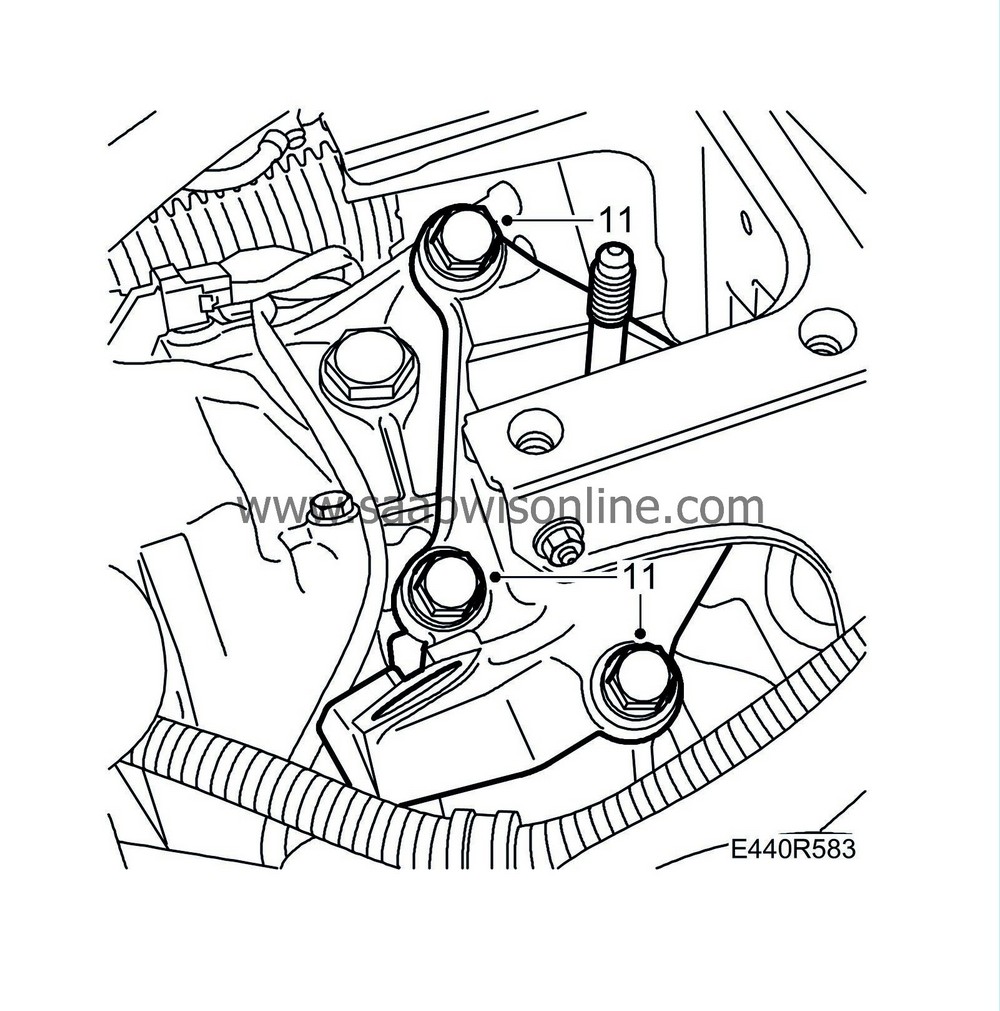
|
|
| 13. |
Remove the lifting beam.
|
|
| 14. |
Fit
83 95 162 Protective collar, drive shafts
into the sealing ring. Replace and lubricate the sealing ring with vaseline.
|
|
| 16. |
Push in the rest of the shaft until the circlip clicks in. Fit the ABS cable and brake pipe into the clips.
|
|
| 17. |
Raise the car and apply
74 96 268 Thread locking adhesive
to the new bolts that secure the torque converter to the driver plate.
|
|||||||
| 18. |
Fit the torque converter bolts. Tighten one at a time starting at the oval hole. Rotate the engine in its rotational direction at the pulley.
Tightening torque: 20 Nm + 45° (15 lbf ft +45°) 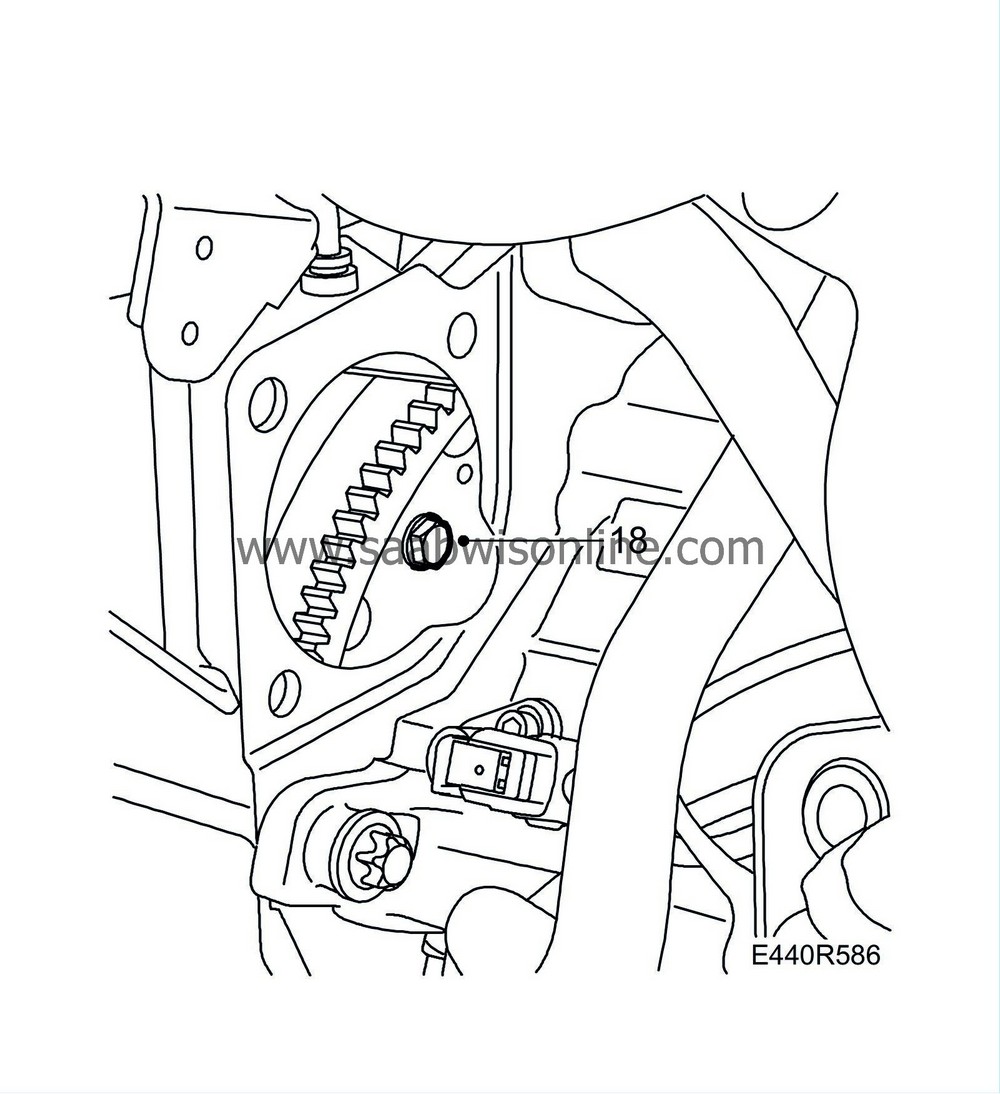
|
|
| 19. |
Fit the starter motor and tighten the lower bolt.
Tightening torque 22 Nm (16 lbf ft) 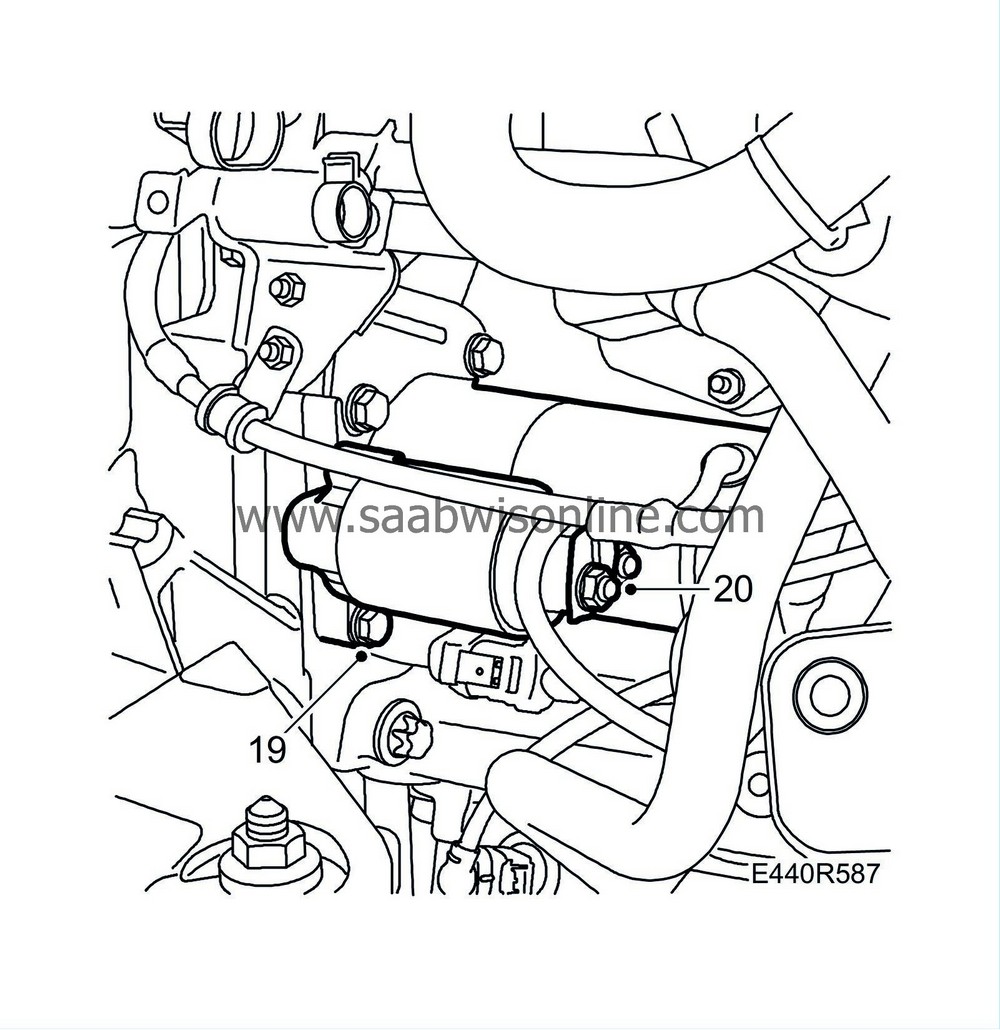
|
|
| 20. |
Re-connect the starter motor connections.
|
|
| 21. |
Fit the oil cooler hoses. The hoses should be horizontal so that they do not chafe against the subframe. Use new seals greased with petroleum jelly.
Tightening torque 27 Nm (20 lbf ft) 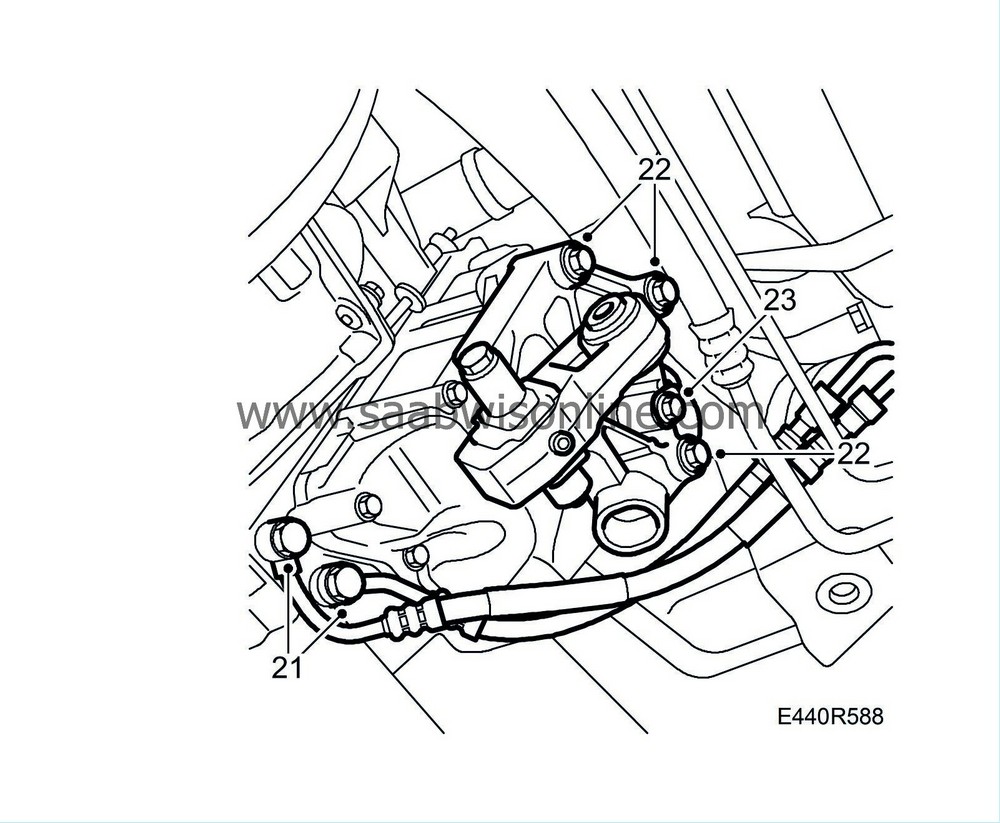
|
|
| 22. |
Fit the bracket for the torque arm on the gearbox.
Tightening torque, up to and including Vehicle Identification Number 73514478: 47 Nm (34 lbf ft) Tightening torque, from and including Vehicle Identification Number 73514479: 38 Nm (28 lbf ft) |
|
| 23. |
Attach the ground cable to the mounting on the gearbox.
|
|
| 24. |
Place the subframe on the lifting trolley, lubricate the rubber bushes for the radiator core studs with vaseline and raise the subframe slightly.
|
|
| 25. |
Lift up the subframe, whilst guiding it into place with the help of the pins on the holder. At the same time guide in:
|
|
| • |
The radiator core's studs
|
| • |
The power steering pipe
|
| • |
The AC pipes
|
| • |
Air filter housing
|
| • |
Outer ball joints
|
| 26. |
Fit the bolts to the subframe and fit the rear support plates. Adjust the subframe so that the guide pins on the holder are aligned with the holes in the body before tightening the bolts.
Tightening torque, subframe bolts 100 Nm + 45° (74 lbf ft + 45°) Tightening torque, support plate bolts 60 Nm (44 lbf ft)

|
|||||||||||||
| 27. |
Lower and remove the trolley lift.
|
|
| 28. |
Fit the steering gear bolts.
Tightening torque 90 Nm (66 lbf ft) |
|
| 29. |
Fit the bolts holding the outer ball joint to the steering swivel member. Use a new nut. Tighten the nut.
Tightening torque 50 Nm (37 lbf ft)
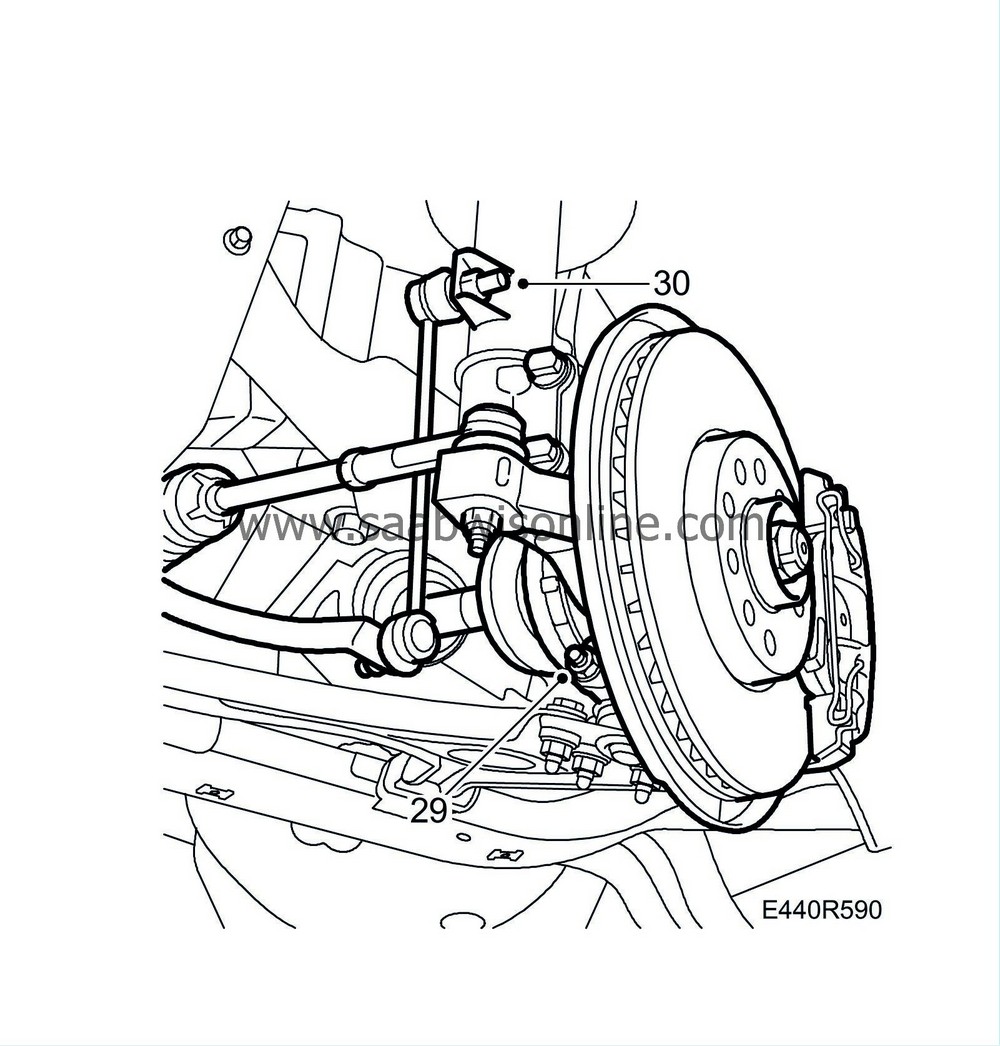
|
||||||||||
| 30. |
Tighten the anti-roll bar links.
Tightening torque 92 Nm (68 lbf ft) |
|
| 31. |
Fit the air filter housing nuts to the subframe. Remove the strap round the radiator core. Attach the cooling coil of the power steering cooling pipe.
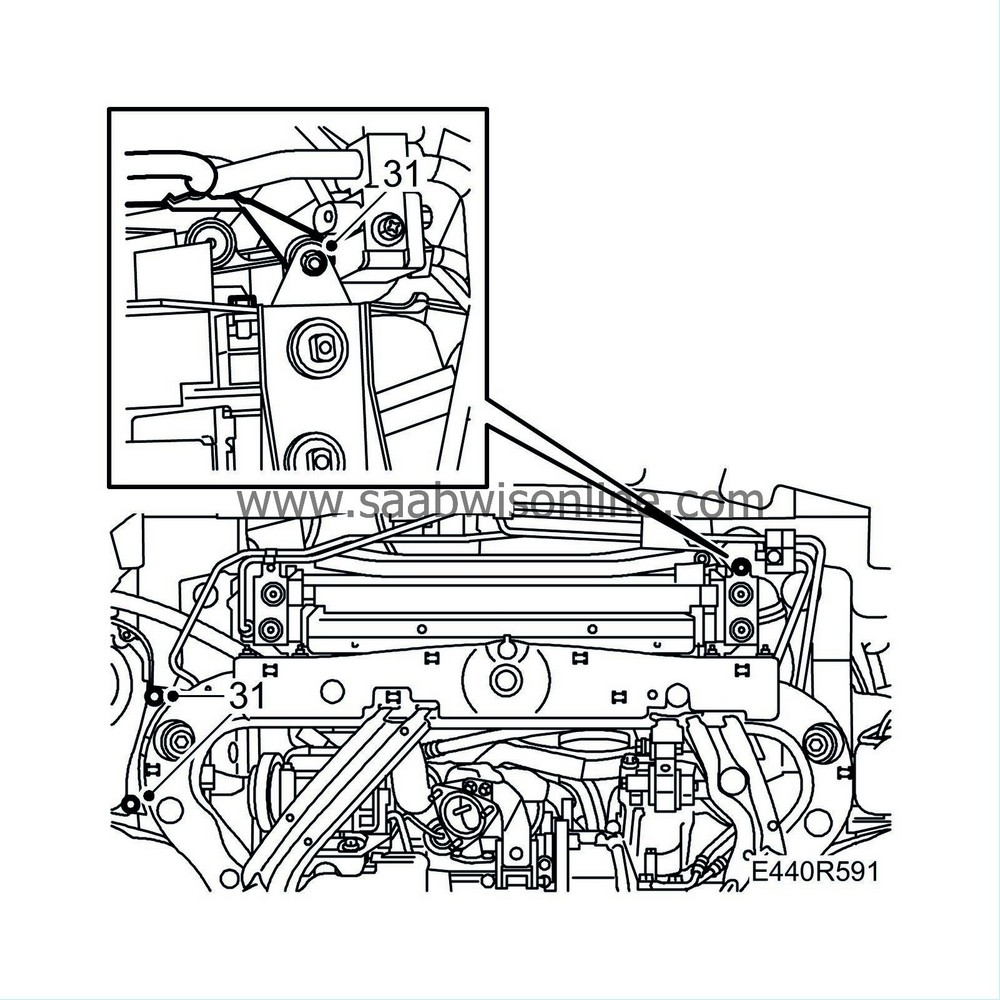
|
|
| 32. |
Fit the nut on the battery cooling pipe (only cars with cooling pipe).
|
|
| 33. |
Fit the rear engine pad and position the bolts. Lower the vehicle and tighten the pad bolts from above.
Tightening torque 24 Nm (18 lbf ft) 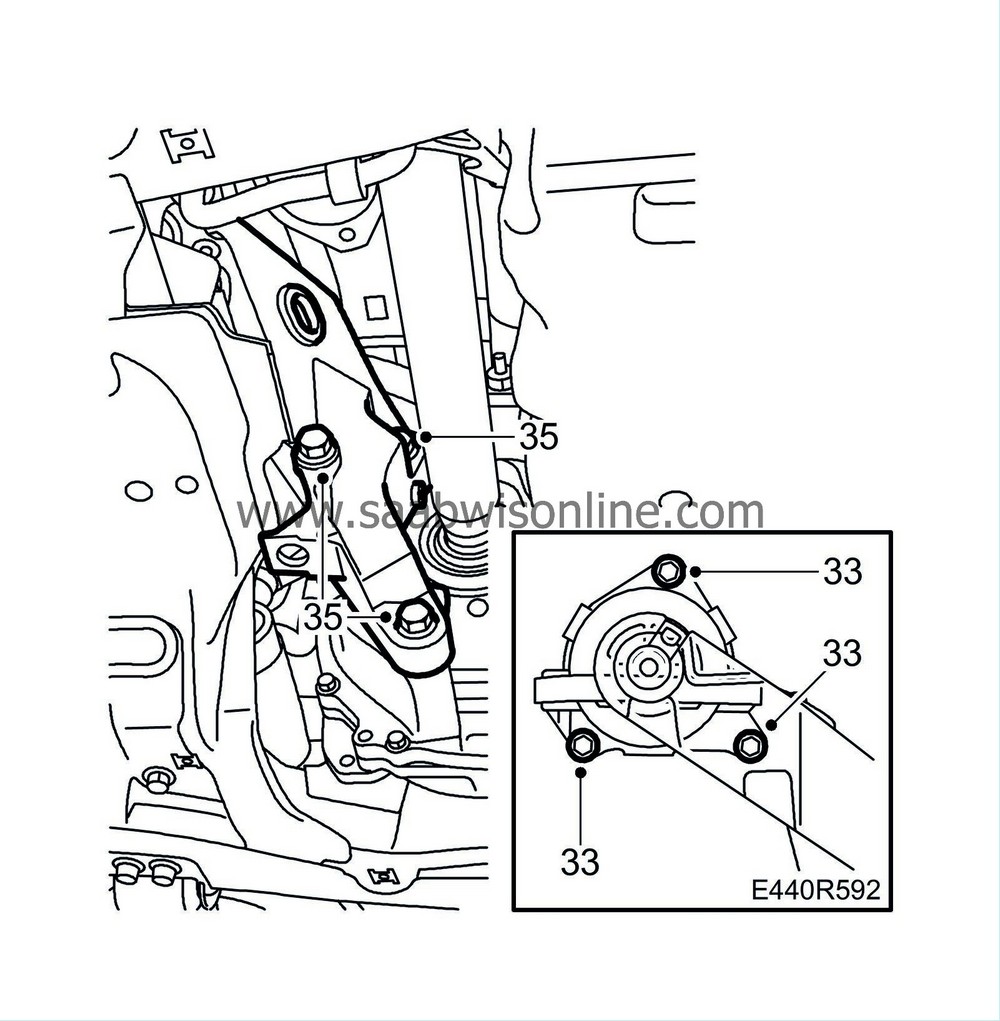
|
|
| 34. |
Check that the upper radiator core locating pins are correctly positioned with respect to the core and the radiator crossmember.
|
|
| 35. |
Lift the vehicle and fit the engine bracket to the gearbox.
Tightening torque 60 Nm + 60°(44 lbf ft +60°) |
|
| 36. |
Tighten the torque arm on the subframe.
Tightening torque 90 Nm + 90°(66 lbf ft +90°) 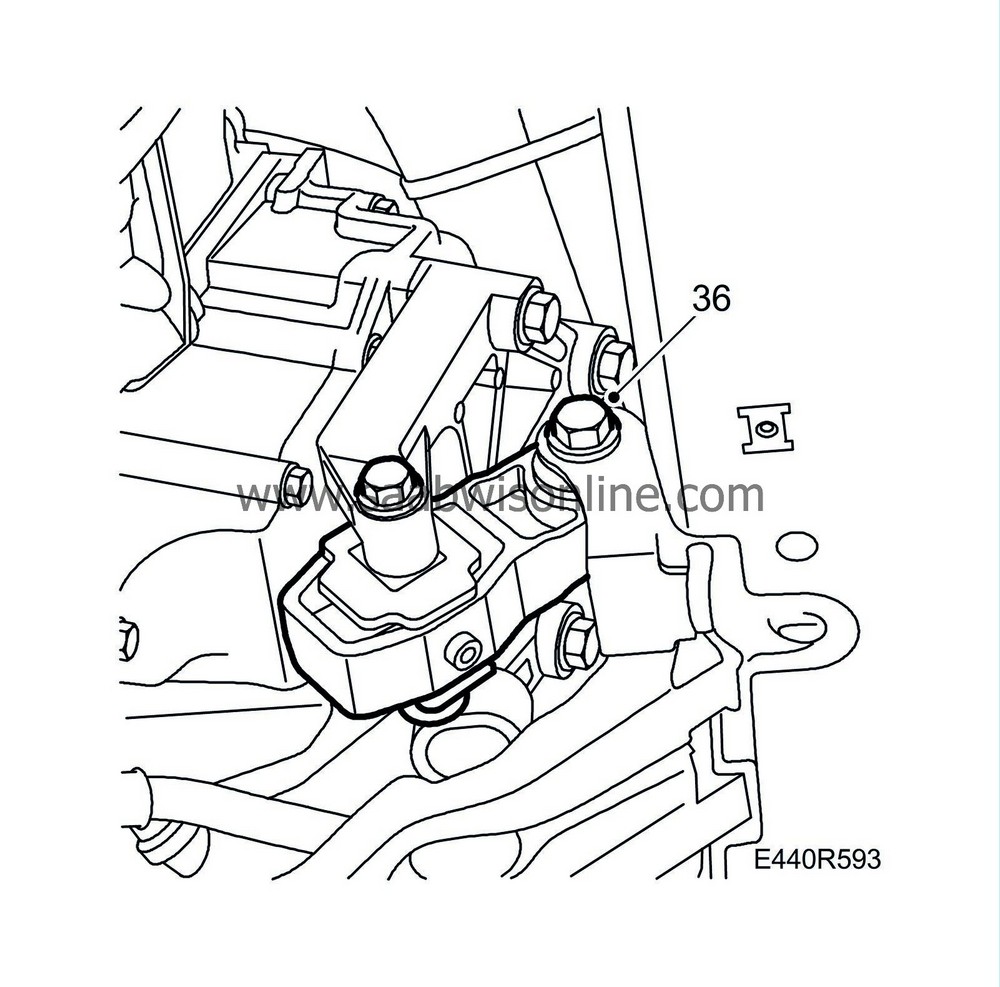
|
|
| 37. |
Lubricate the studs with
90 513 210 Universal paste
and fit the pipe between the front and rear catalytic converter. Use new gaskets and new nuts.
Tightening torque 25 Nm (18 lbf ft)
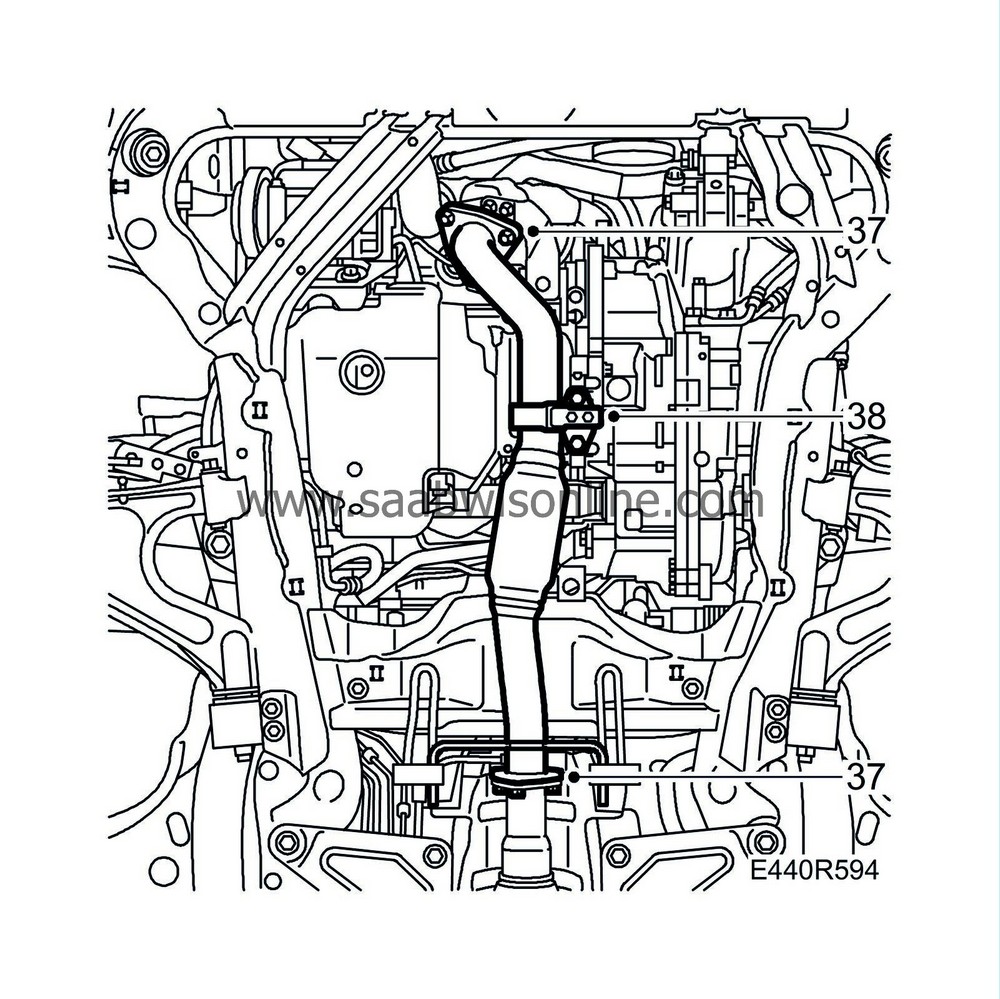
|
||||||||||
| 38. |
Fit the mounting in the oil sump. Tighten the nuts.
Tightening torque 25 Nm (18 lbf ft) |
|
| 39. |
Lower the car to the floor.
|
|
| 40. |
Shake the unit to ensure there is no tension in the engine pads. Tighten the rear engine pad nuts.
Tightening torque 47 Nm (35 lbf ft) 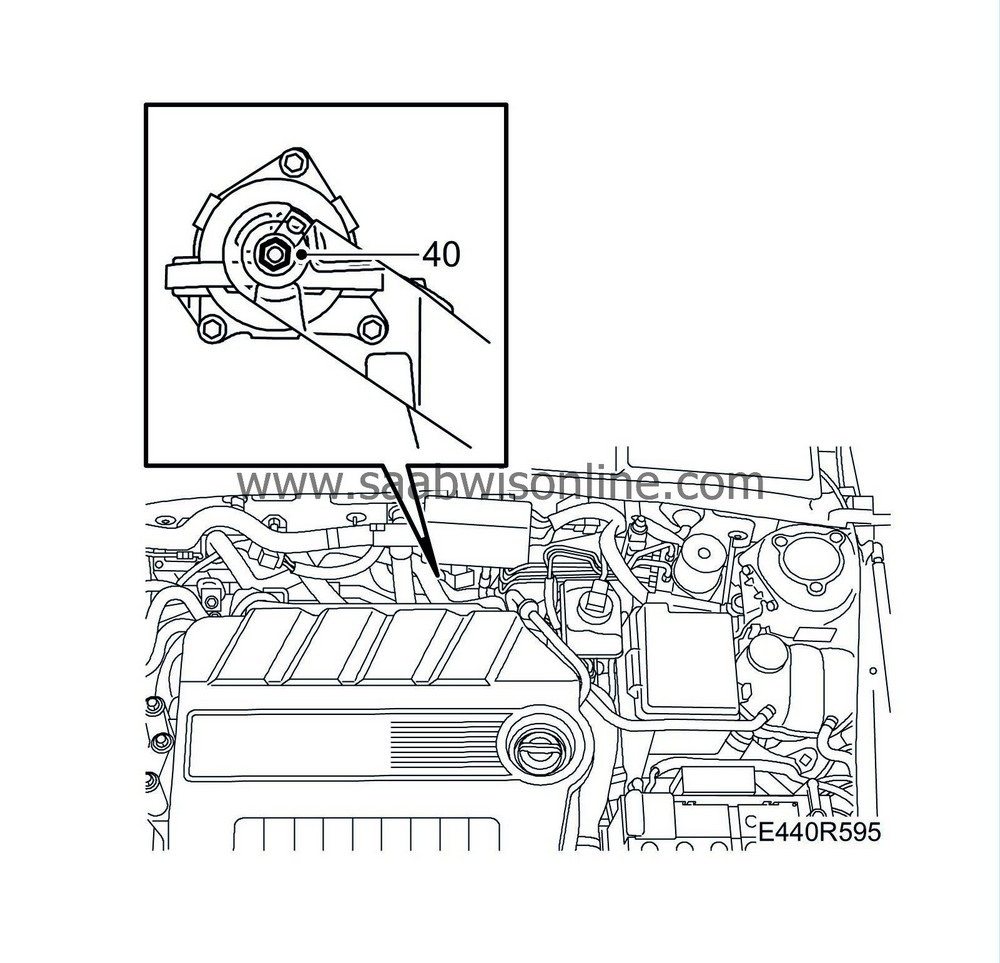
|
|
| 41. |
Fit the bolts securing the gearbox to the engine and tighten them.
Tightening torque 70 Nm (52 lbf ft) 
|
|
| 42. |
Fit the bracket and the upper screws of the starter motor.
Tightening torque 24 Nm (18 lbf ft) 
|
|
| 43. |
Attach the positive cable clamp and tighten the bracket nuts.
|
|
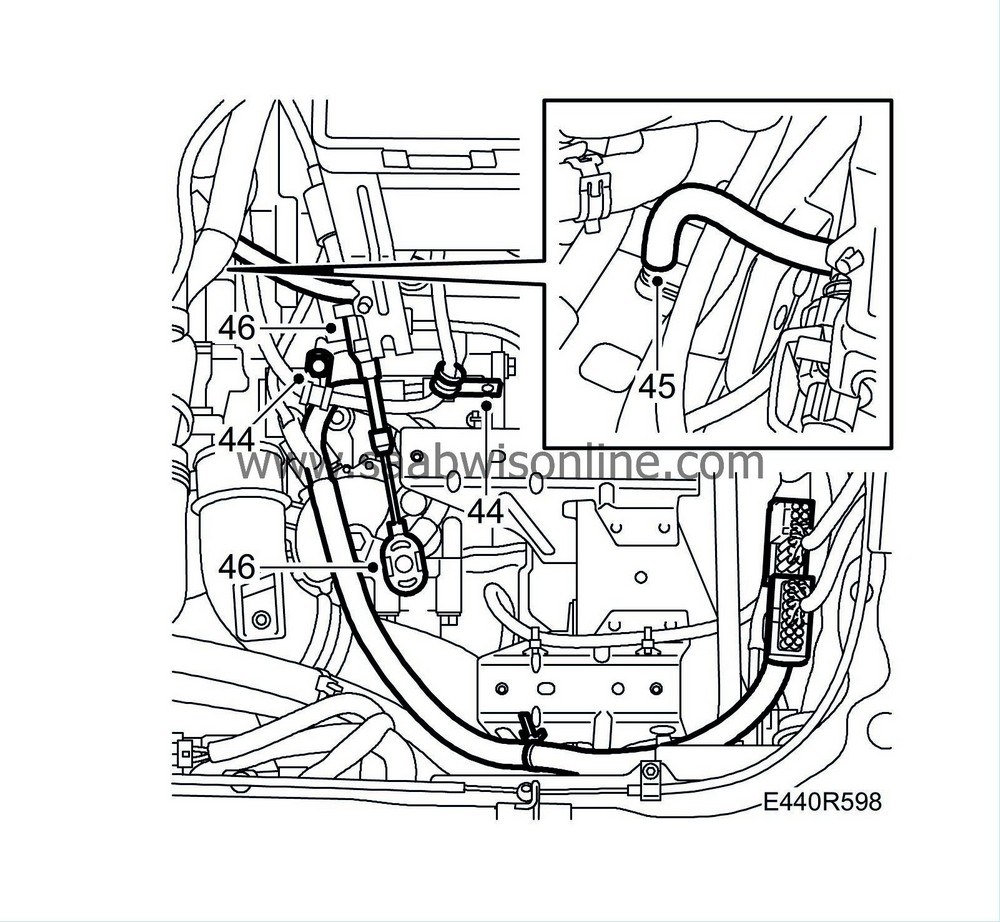
| 44. |
Fit the clamps for the positive battery cable.
|
|
| 45. |
Fit the gearbox air exhaust hose.
|
|
| 46. |
Fit the selector cable to the bracket on the gearbox. Fit the clamp and attach the cable to the selector lever.
|
|
| 47. |
Check the position of the selector lever and adjust if necessary, see
Adjustment of gear selector position sensor
.
|
|
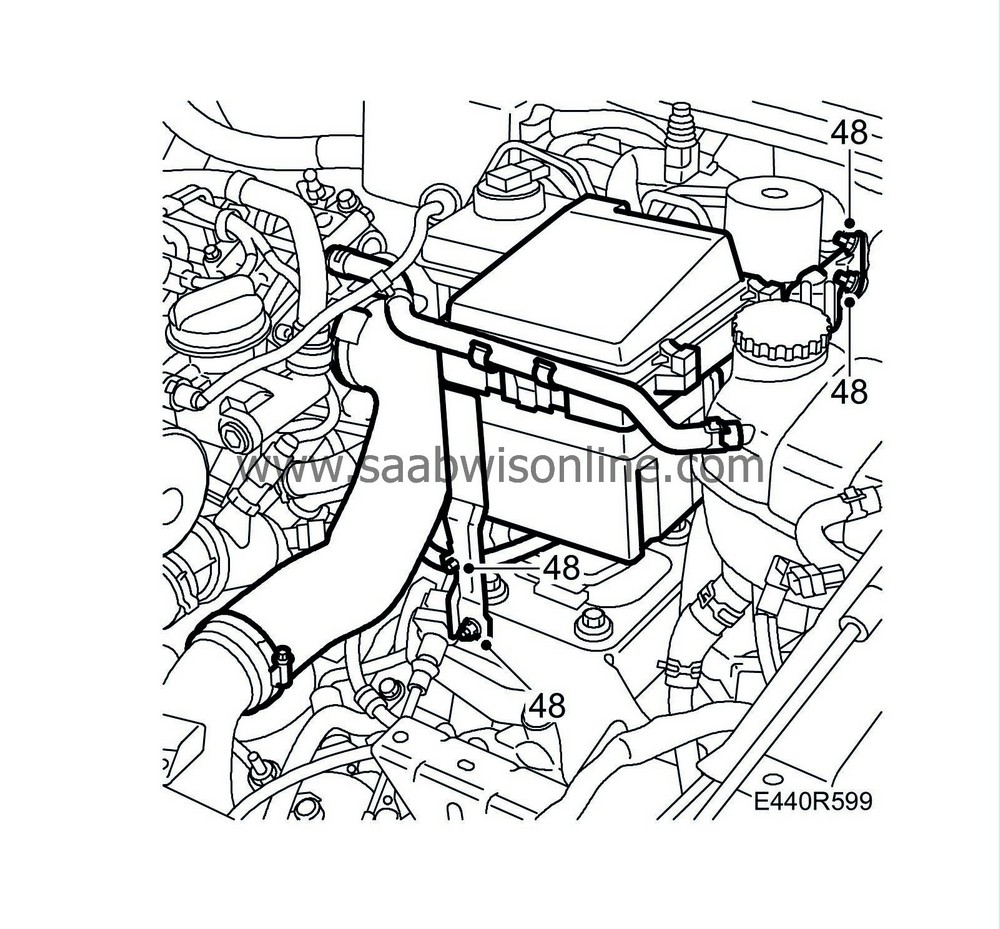
| 48. |
Fit the electrical distribution unit and fit the ventilation hose clip.
|
|
| 49. |
Longitudinally mounted battery:
Fit the clip of the gearbox wiring harness.
|
|
| 50. |
Fit the battery tray, maxifuse holder and battery.
Transversely mounted battery:
Fit the wiring harness of the automatic transmission.

|
|
| 51. |
Fit the upper engine cover.
|
|
| 52. |
Raise the car. Slacken the bolt securing the front torque arm and centre the rubber pad in the arm. Tighten the bolt.
Tightening torque 50 Nm + 120° (37 lbf ft + 120°) |
|
| 53. |
Fit the front wheels
.
|
|
| 54. |
Fill the gearbox with fluid to the correct level. See
Filling with gearbox oil.
|
|
| 55. |
If the gearbox has been changed and the oil is contaminated
87 91 824 Flushing equipment
must be connected before starting the vehicle.
|
|
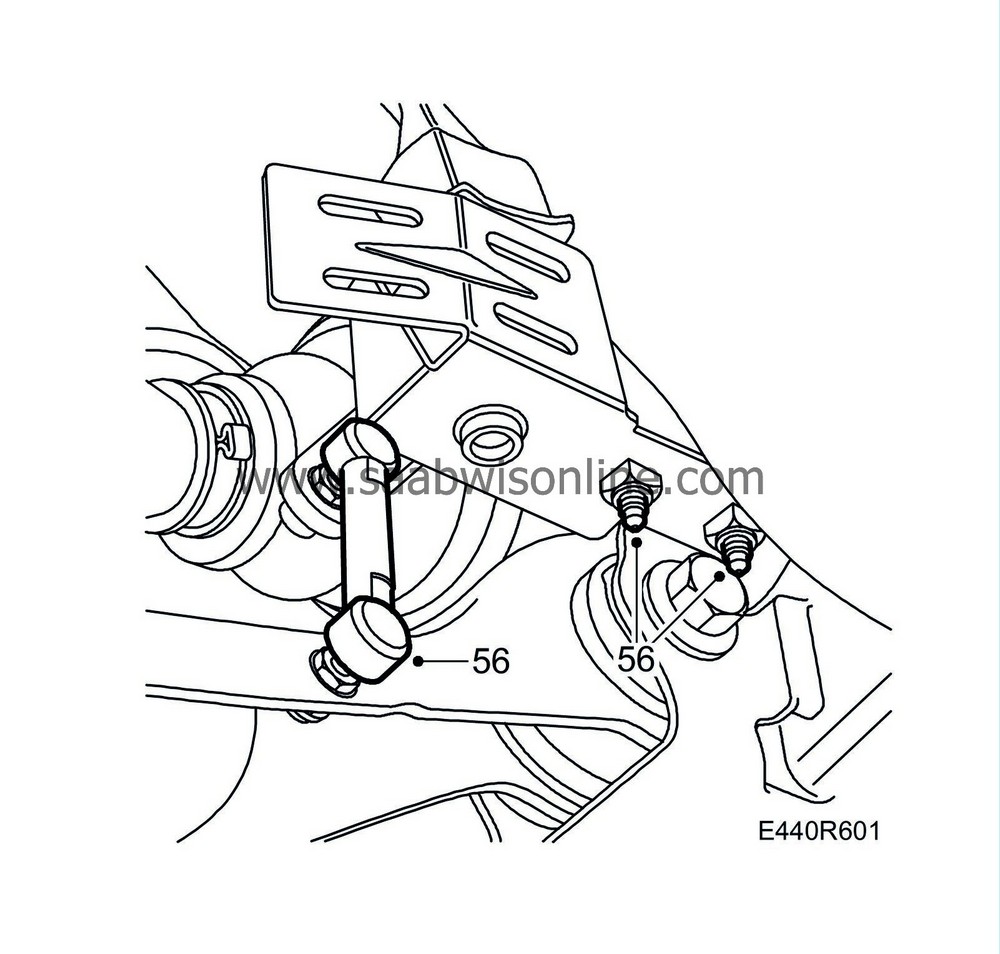
| 56. |
Fit the headlamp position sensor (option).
|
|
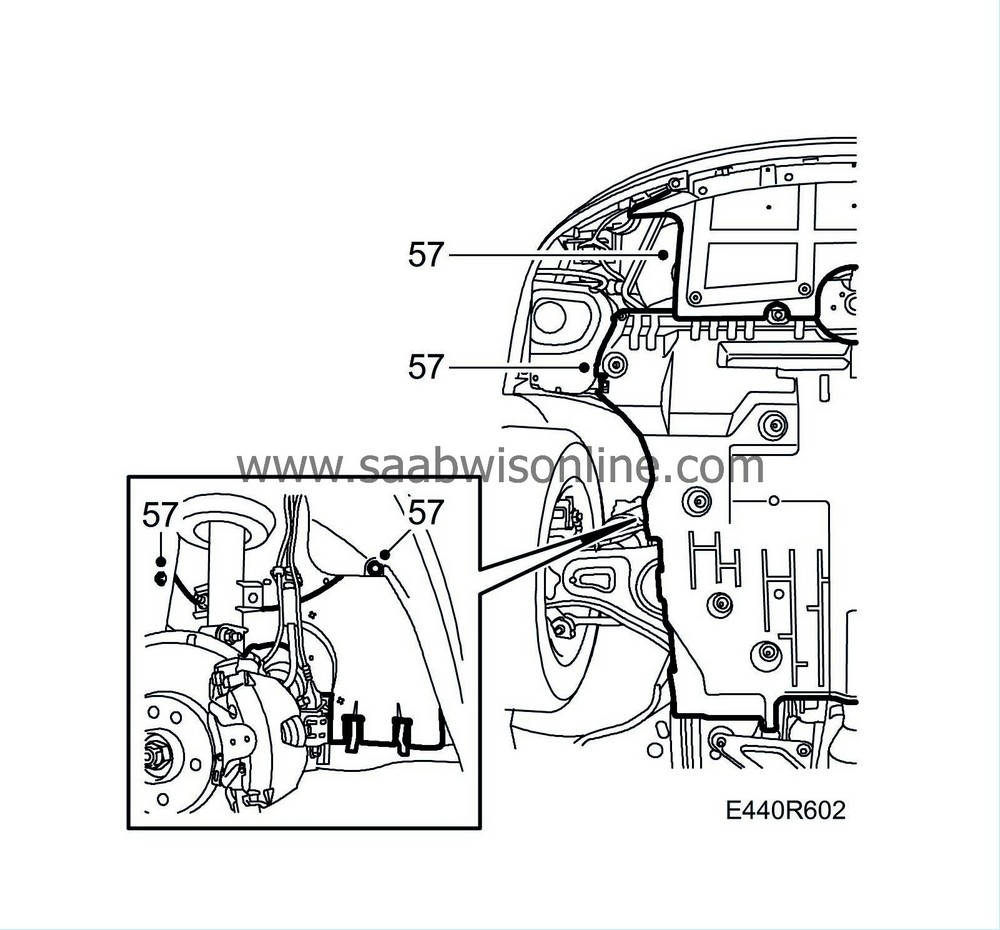
| 57. |
Fit the spoiler shield, the drive belt system cover, the left-hand side cover and the lower engine cover.
|
|
| 58. |
Test drive the car with varying engine loads and rpm and delete any diagnostic trouble codes. Also check the position of the steering wheel when driving straight ahead on a level road. Adjust if needed.
|
|
| 59. |
After gearbox replacement: carry out
Adaptation, resetting
.
|
|
| 60. |
Perform
Procedure after battery disconnection
.
|
|


