Hydraulic Clutch System Bleeding
|
|
Hydraulic Clutch System Bleeding
|
Special Tools
DT-6174-A
Connecting Hose Set
For equivalent regional tools, refer to
Special Tools
.
Refer to
Brake Fluid Irritant Warning
.
 Warning
|
|
Brake fluid must not come in contact with mineral oils and greases. The smallest amount of such could lead to malfunction or breakdown of the clutch.
|
|
|
|
|
|
Refer to
Brake Fluid Effects on Paint and Electrical Components Caution
.
|
Note
|
|
Only use brake fluid DOT 4. The hydraulic clutch actuation must now only be bled from "below", i.e. from the bleeder valve. A brake bleeder must be used for this purpose. Manual bleeding is no longer permissible. Observe manufacturer's instructions before using brake bleeder. The brake bleeder must be set to an operating pressure of approximately 2 bar.
|
|
2.
|
Attach brake bleeder.

|
|
|
2.1.
|
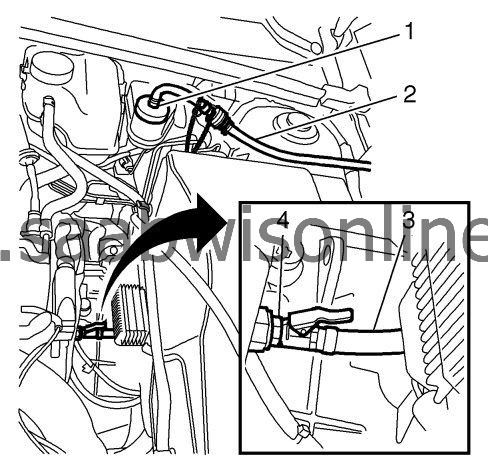
Screw adapter (1) for corresponding brake bleeder onto brake fluid reservoir.
|
|
|
2.2.
|
|
Note
|
|
Insert hose end in suitable brake fluid collecting basin.
|
Connect
set
DT-6174-A (2) to adapter.
|
|
|
2.3.
|
Disconnect valve cap from bleeder valve.
|
|
|
2.4.
|
Connect
DT-6174-A
connecting hose set (3) to bleeder valve (4).
|
|
|
2.5.
|
Connect
DT-6174-A
set to brake bleeder.
|
|
|
3.1.
|
Switch on brake bleeder.
|
|
|
3.2.
|
Open bleeder valve 2-3 turns.
|
|
|
3.3.
|
Bleed until brake fluid escapes without bubbles at
set
DT-6174-A.
|
|
|
3.4.
|
Close bleeder valve hand tight.
|
|
|
4.1.
|
Detach adapter from brake fluid reservoir.
|
|
|
4.2.
|
Push valve cap onto bleeder valve to protect the bleeder valve.
|
|
5.
|
|
Note
|
|
The following operational stages must be undertaken to fill the pressure line between the transmission housing and the central release. When bleeding, ensure that the brake fluid reservoir is always filled up sufficiently and does not run dry.
|
Bleed pressure line between transmission housing and central release.
|
|
6.
|
Bleed pressure line between transmission housing and central release.
|
|
|
6.1.
|
Press and hold clutch pedal.
|
|
|
6.2.
|
Open bleeder valve until air or air/brake fluid mixture emerges.
|
|
|
6.3.
|
Close bleeder valve hand tight.
|
|
|
6.4.
|
|
Note
|
|
Do not close the bleeder valve too fast.
|
Release clutch pedal as far as the stop at normal speed.
|
|
|
6.5.
|
Wait approximately 5 seconds.
|
|
|
6.6.
|
Repeat this bleeding process 4 times.
|
|
|
6.7.
|
Tighten bleeder valve.
|
|
|
6.8.
|
Detach
set
DT-6174-A
|
|
|
6.9.
|
Push valve cap onto bleeder valve to protect the bleeder valve.
|
|
8.
|
Top up brake fluid reservoir.
|
|
|
8.1.
|
Fill brake fluid reservoir up to "MAX" marking.
|
|
|
8.2.
|
Install brake fluid reservoir.
|
|
9.
|
Check actuation pressure of clutch pedal.
|
|
10.
|
Check shifting for ease of movement with vehicle stationary, with engine running and with clutch disengaged.
|
|
11.
|
Road test the vehicle to ensure proper operation.
Undertake road test using varying RPM ranges and frequent gear changes, bring vehicle to operating temperature during this process. Ensure the brake and clutch system is operating correctly.
|


 Warning

