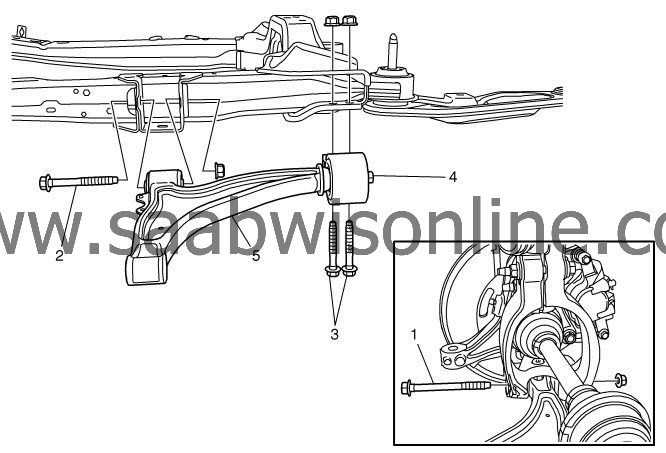
Lower Control Arm Replacement (GNB)
|
|
Lower Control Arm Replacement (GNB)
|

|
Callout
|
Component Name
|
Preliminary Procedure
|
1
|
Outer Lower Control Arm Fastener
Refer to
Fastener Caution
.
Procedures
|
1.
|
Remove lower control arm from the strut yoke.
|
|
2.
|
Remove and discard the fastener and install NEW nut and bolt. Do NOT re-use the fastener.
|
|
3.
|
Install the nut by hand. Before tightening, use a hydraulic jack to raise the link arm into the horizontal position.
|
Tighten
115 Nm (85 lb ft) + 120 degrees + 15 degrees
|
2
|
Front Lower Control Arm Fastener
Procedures
|
1.
|
Remove the lower control arm from the frame.
|
|
2.
|
Install NEW nut and bolt.
|
|
3.
|
Install the nut by hand. Before tightening, use a hydraulic jack to raise the link arm into the horizontal position.
|
Tighten
100 Nm (74 lb ft) + 75 degrees + 15 degrees
|
3
|
Front Lower Control Arm Fastener (Qty: 2)
Procedures
|
1.
|
Remove lower control arm bushing from the frame.
|
|
2.
|
Install NEW bolts and nuts.
|
|
3.
|
Install the nut by hand. Before tightening, use a hydraulic jack to raise the link arm into the horizontal position.
|
Tighten
100 Nm (74 lb ft) + 75 degrees + 15 degrees
|
4
|
Front Lower Control Arm Bushing Fastener
Procedures
|
2.
|
Install the nut by hand. Before tightening, use a hydraulic jack to raise the link arm into the horizontal position.
|
|
3.
|
Tighten the screw using the
torque wrench
(GE-6600-2).
|
Tighten
55 Nm (41 lb ft) + 90 degrees + 15 degrees
Special Tools
GE-6600-2
Torque Wrench
For equivalent regional tools. Refer to
Special Tools
.
|
5
|
Lower Control Arm
|


