Evaporative Emission Canister Replacement
| Evaporative Emission Canister Replacement |
| Removal Procedure |
| 1. |
Relieve the fuel system pressure. Refer to
Fuel Pressure Relief
.
|
|
| 2. |
Drain the fuel tank. Refer to
Fuel Tank Draining
.
|
|
| 3. |
Raise and support the vehicle. Refer to
Lifting and Jacking the Vehicle
.
|
|
| 4. |
Remove the right rear wheel. Refer to
Tire and Wheel Removal and Installation
.
|
|
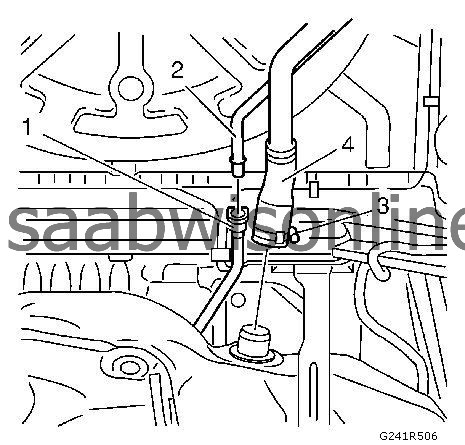
| 6. |
Disconnect the fuel tank filler pipe quick connect fitting (1) from the chassis fuel feed pipe (2). Refer to
Plastic Collar Quick Connect Fitting Service
.
|
|
| 7. |
Disconnect the fuel tank filler pipe retainer (3) from the chassis fuel pipe (4).
|
|
| 8. |
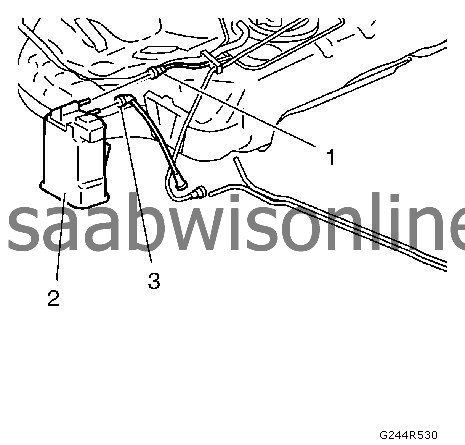
Disconnect the evaporative emission canister purge pipe (1). Refer to
Plastic Collar Quick Connect Fitting Service
.
|
|
| 9. |
Disconnect the fuel feed pipe (2). Refer to
Plastic Collar Quick Connect Fitting Service
.
|
|
| 10. |
Have assistants support either side of the fuel tank.
|
|
| 11. |
Place a suitable adjustable jack under the fuel tank.
|
|
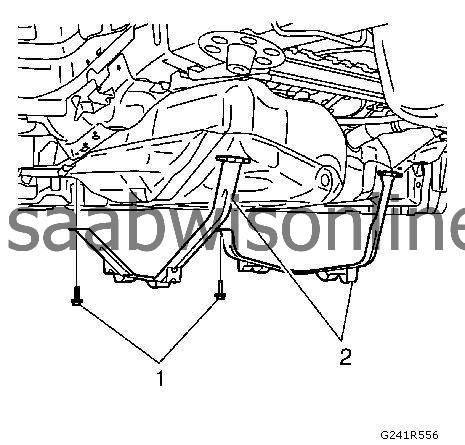
| 12. |
Remove fuel tank strap fastener (1) and straps (2).
|
|
| 13. |
Have the assistants rest the fuel tank on the adjustable jack.
|
|
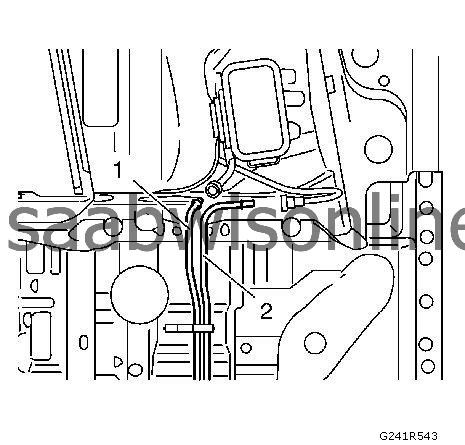
| 14. |
Disconnect the fuel tank fuel pump module wiring harness electrical connector (1) from the fuel tank fuel pump module.
|
|
| 15. |
Once the tank is clear of the frame, lower the fuel tank down and remove forward toward the right side of the vehicle.
|
|
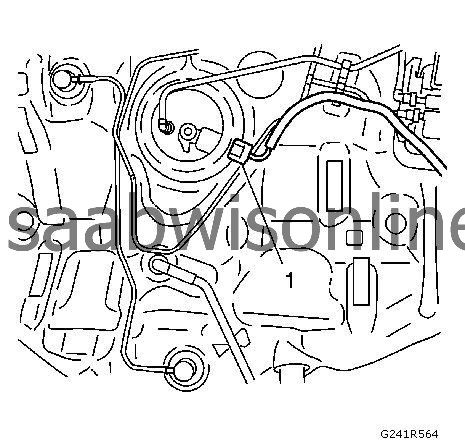
| 16. |
Disconnect the fuel tank vent pipe (1) from the evaporative emission canister.
|
|
| 17. |
Remove the evaporative emission canister (2).
|
|
| 18. |
Remove the evaporative emission canister purge pipe (3). |
|||||||
| Installation Procedure |
| 1. |
Install the evaporative emission canister (2).
|
|
| 2. |
Connect the fuel tank vent pipe (1) at the evaporative emission canister.
|
|
| 3. |
connect the evaporative emission canister purge pipe (3) at the evaporative emission canister.
|
|
| 4. |
Have assistants support either side of the fuel tank.
|
|
| 5. |
Place a suitable adjustable jack under the fuel tank.
|
|
| 6. |
Have the assistants rest the fuel tank on the adjustable jack.
|
|
| 7. |
Once the tank is clear of the frame, upper the fuel tank high.
|
|
| 8. |
Disconnect the fuel tank fuel pump module wiring harness electrical connector (1) from the fuel tank fuel pump module.
|
|
| 9. |
Install the fuel tank straps fastener (2) and fastener (1).
|
|
| 10. |
Connect the evaporative emission canister purge pipe (1). Refer to
Plastic Collar Quick Connect Fitting Service
.
|
|
| 11. |
Connect the fuel feed pipe (2).
|
|
| 12. |
Connect the fuel tank feed pipe (2) and lock quick connect fitting (1). Refer to
Plastic Collar Quick Connect Fitting Service
.
|
|
| 13. |
Refer to
Fastener Caution
.
Connect the fuel tank filler pipe (4) from the filler pipe retainer (3) and tighten to 4 Nm (35 lb in) . |
|
| 14. |
Install the exhaust system. Refer to
Exhaust System Replacement (LAU/A28NER)
Exhaust System Replacement (LLU/A16LET)
Exhaust System Replacement (LHU/A20NFT)
Exhaust System Replacement (LHU/A20NFT - AWD, LAU/A28NER - AWD)
.
|
|
| 15. |
Lower the vehicle by half high.
|
|
| 16. |
Install the right rear wheel. Refer to
Tire and Wheel Removal and Installation
.
|
|
| 17. |
Refill the fuel tank.
|
|
This project is supported by memberships and donations. If you use this site, please consider Joining SCNA and/or making a donation.
Our Friends
