Engine block
| Engine block |
| 1. |
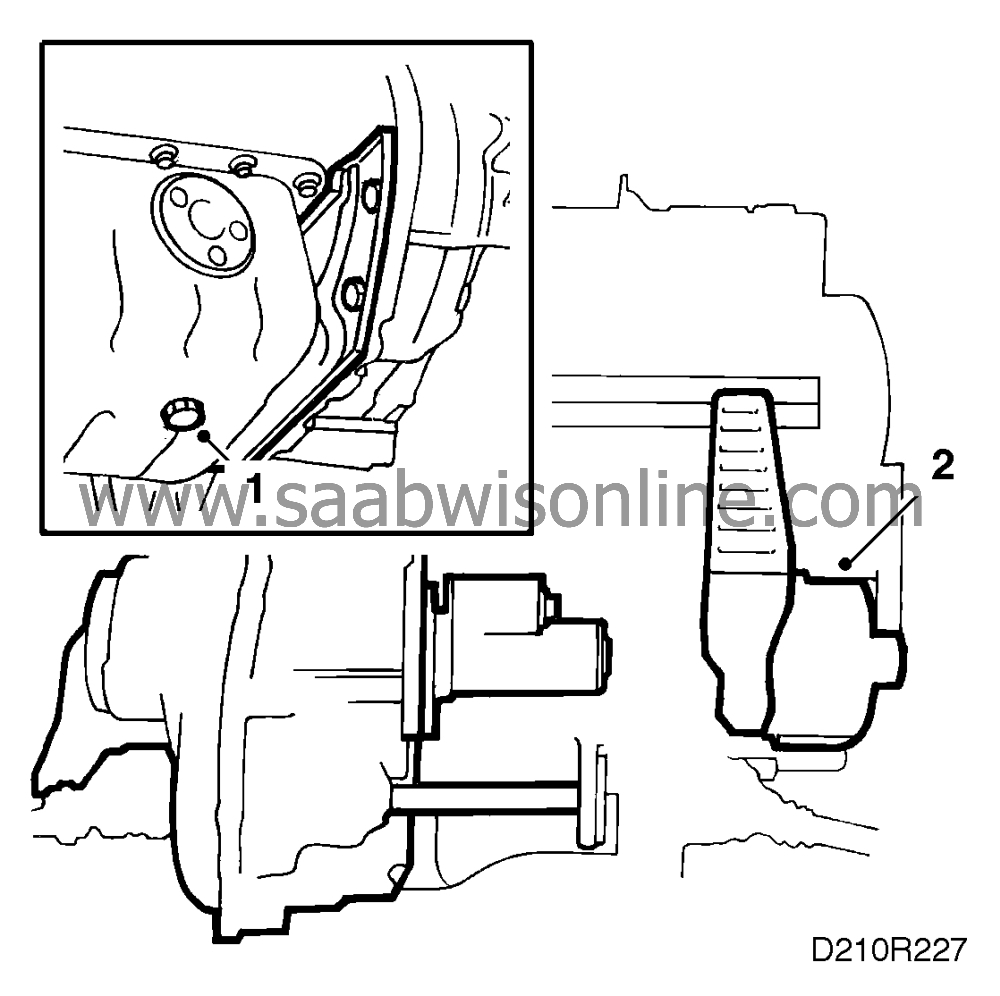
Drain the engine oil and refit the oil plug.
|
|
| 2. |
Remove the alternator and the support bearing bracket complete with tube and internal drive node.
|
|
| 3. |
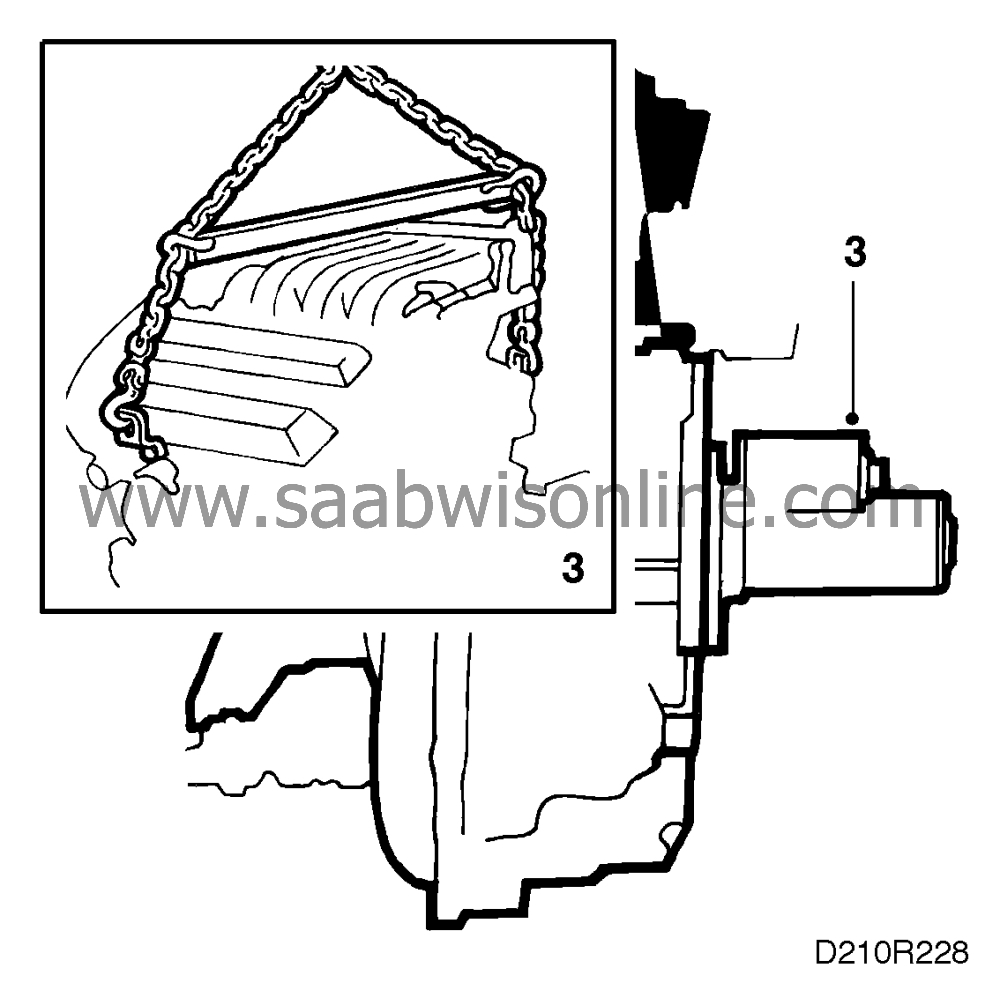
Remove the starter motor and hook on lifting sling 83 92 409. Lift out the power train.
|
|
| 5. |
Prevent the torque converter from moving out of position by means of tool 87 92 285 (aut.).
|
|
| 6. |
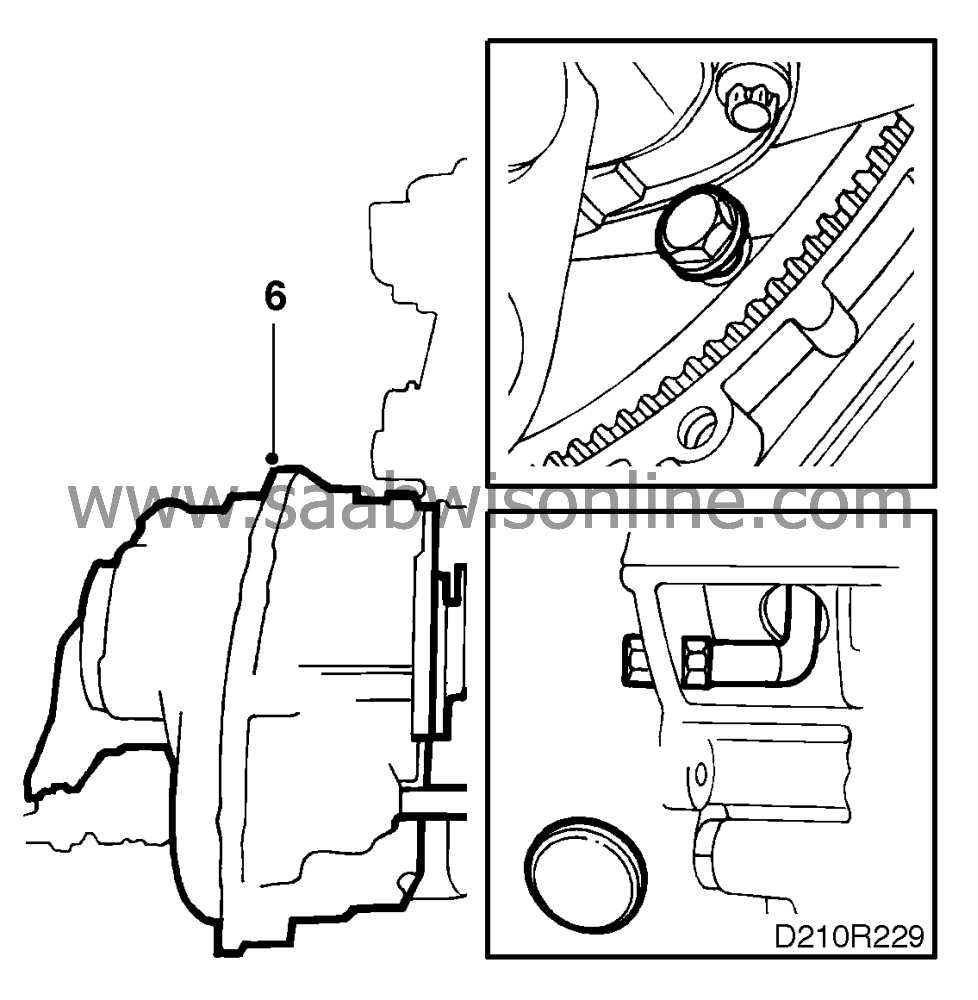
Remove the transmission.
|
|
| 7. |
Remove the coolant intake, the thermal shield above the front exhaust manifold and the secondary air injection pipe.

|
|
| 8. |
Remove the bracket for the positive cable to the starter motor and alternator.

|
|
| 9. |
Remove the oil filter and disconnect the oil lines from the cylinder block.
|
|
| 10. |
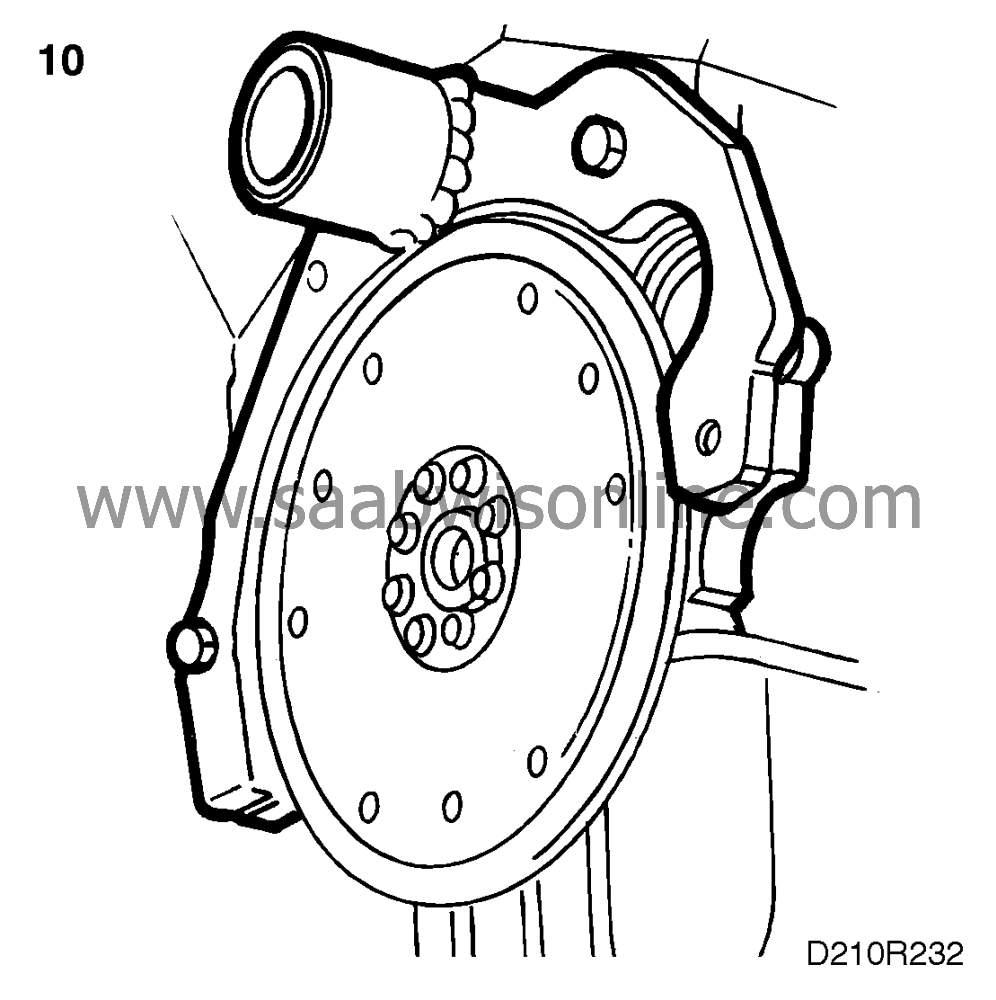
Fit holder 83 94 751 to the engine and lift the engine over to work stand 78 74 878.
|
|
| 11. |
Remove the A/C compressor's bracket complete with engine mounting.
|
|
| 12. |
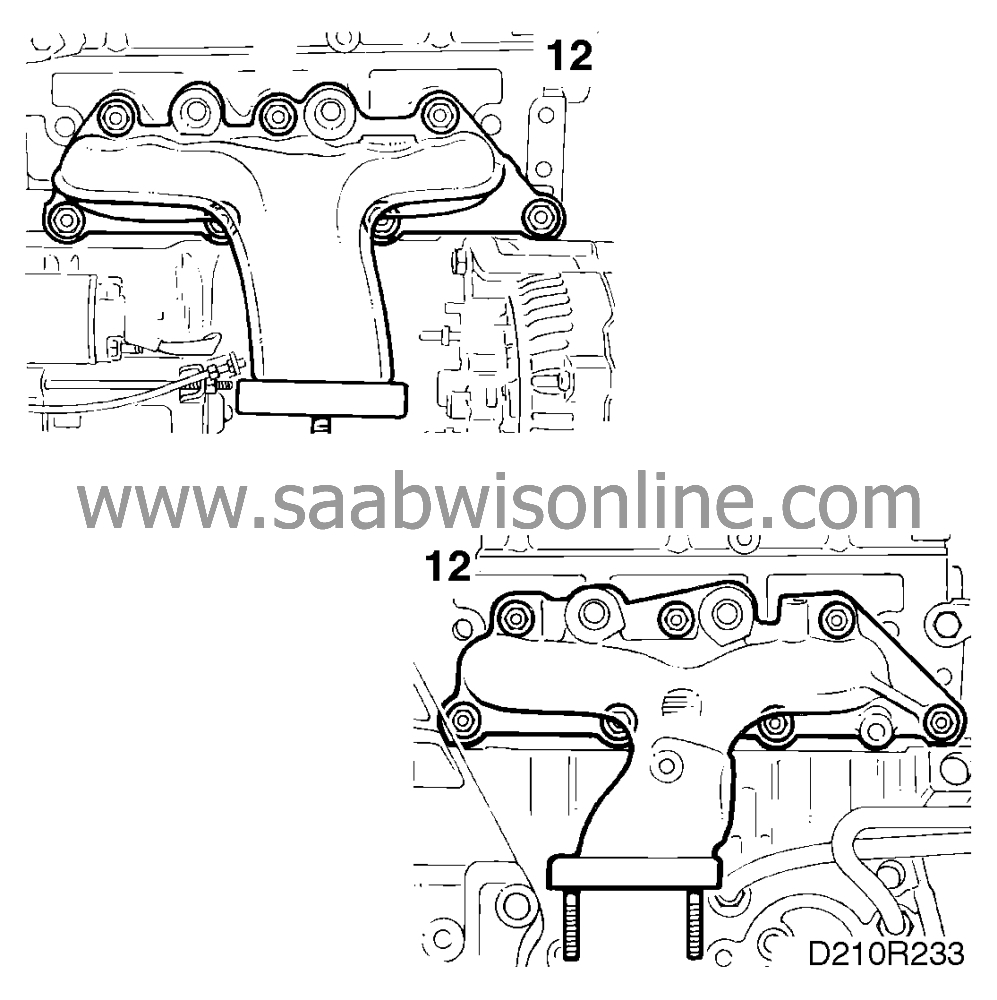
Detach the exhaust manifolds and remove the gaskets. Detach the secondary air injection pipes (where fitted)
|
|
| 13. |
Unplug power connector and remove crankshaft position sensor.

|
|
| 14. |
Remove belt tensioner.
|
|
| 15. |
Remove the knock sensors.
|
|
| 16. |
Disconnect intake manifold and lift it up. Then remove:

|
|
| • |
hose to fuel pressure regulator.
|
| • |
the secondary air injection vacuum hose (where fitted).
|
| • |
connector for the idle air control valve (IAC-valve).
|
| • |
connector for TCS throttle body.
|
| • |
throttle connector.
|
| • |
coolant hoses to throttle body.
|
| • |
hose to evaporative emission canister air purging valve.
Lift away the intake manifold. Take care of the gasket. |
| 17. |
Remove the ignition coil complete with ignition cables.

|
|
| 18. |
Unplug and remove the electrical wiring from the engine.
|
|
| 19. |
Remove the fuel supply pipe complete with fuel injection valves.

|
|
| 20. |
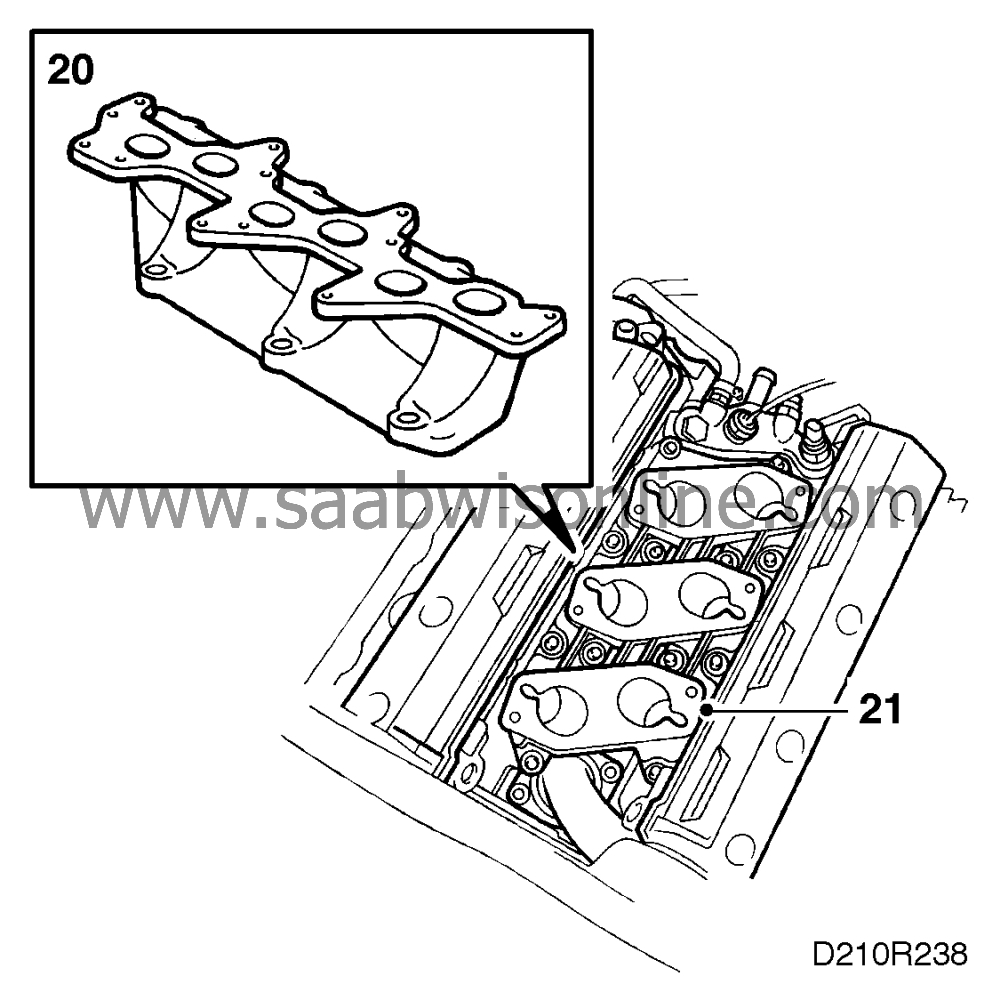
Remove the centre intake manifold.
|
||||||||||
| 21. |
Remove the lower intake manifold.
|
|
| 22. |
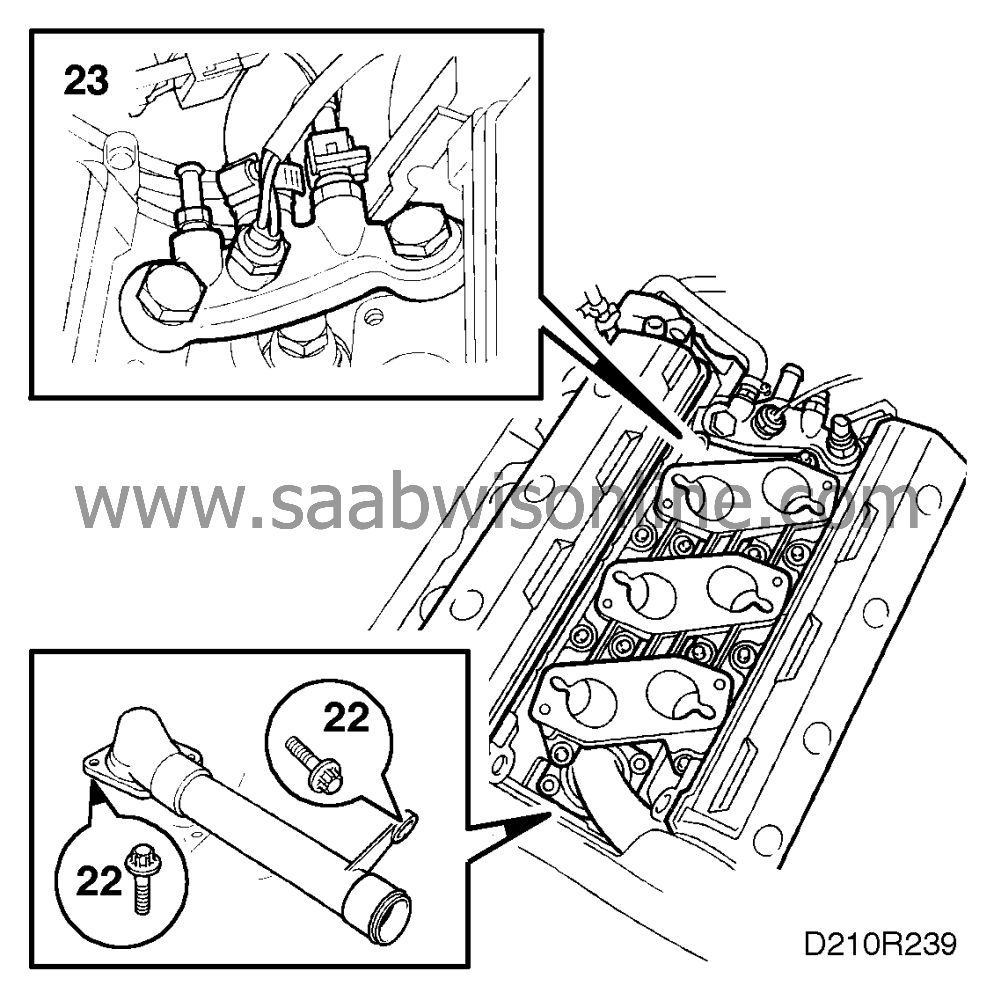
Disconnect the coolant pipe and remove the thermostat housing complete with thermostat.
|
|
| 23. |
Remove the coolant bridge. Be careful with the copper gasket.
|
|
| 24. |
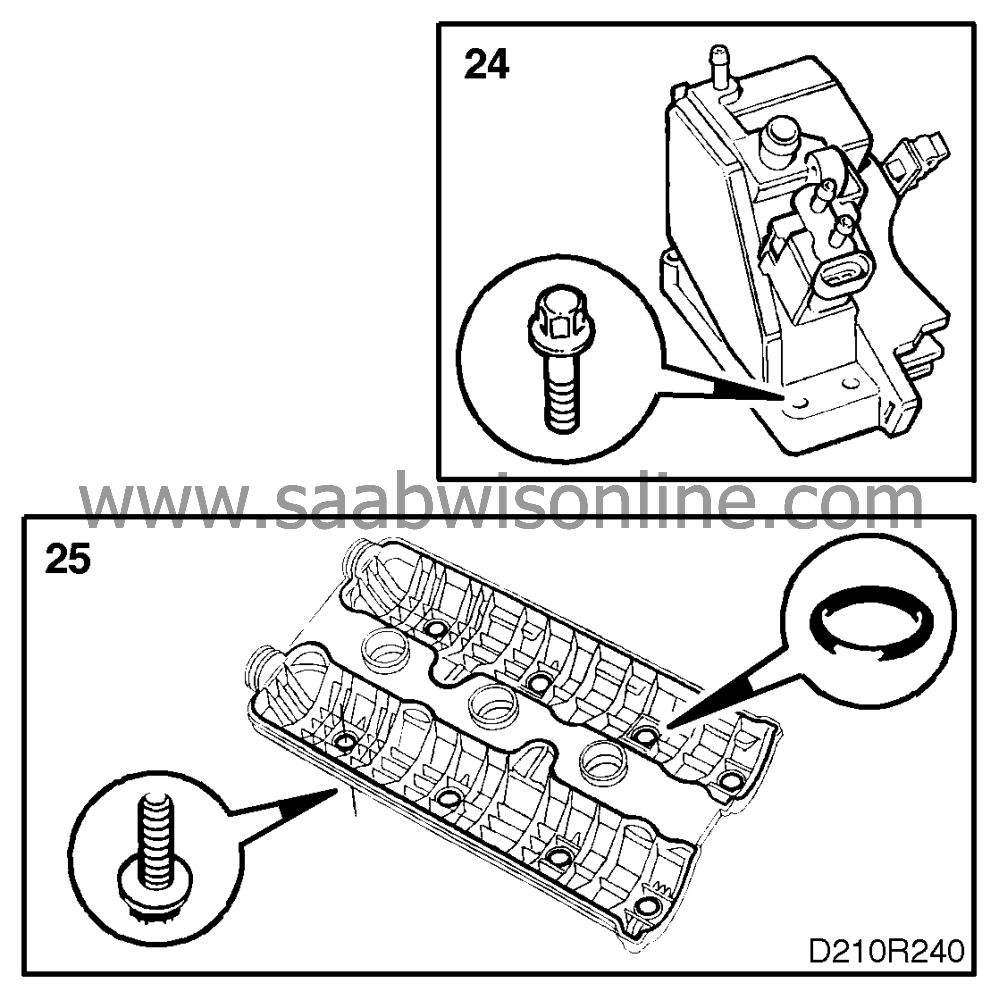
Remove the crankcase breather housing.
|
|
| 25. |
Remove spark plugs and the valve caps complete with gaskets.
|
|
| 26. |
Remove coolant pump pulley and the crankshaft pulley and lift off the timing cover.

|
|
| 27. |
Zero the engine, mark the direction of rotation of the toothed belt, release the belt tension and remove the belt. Turn the crankshaft back to 60° BTDC.
|
|||||||||
| 29. |
Remove the holder with the tensioning pulley and the upper adjusting pulley. Remove the lower adjusting pulley.

|
|
| 30. |
Remove the coolant pump, be careful with the O-ring.
|
||||||||||
| 31. |
Remove the rear timing cover and the camshaft position sensor.
|
|
| 32. |
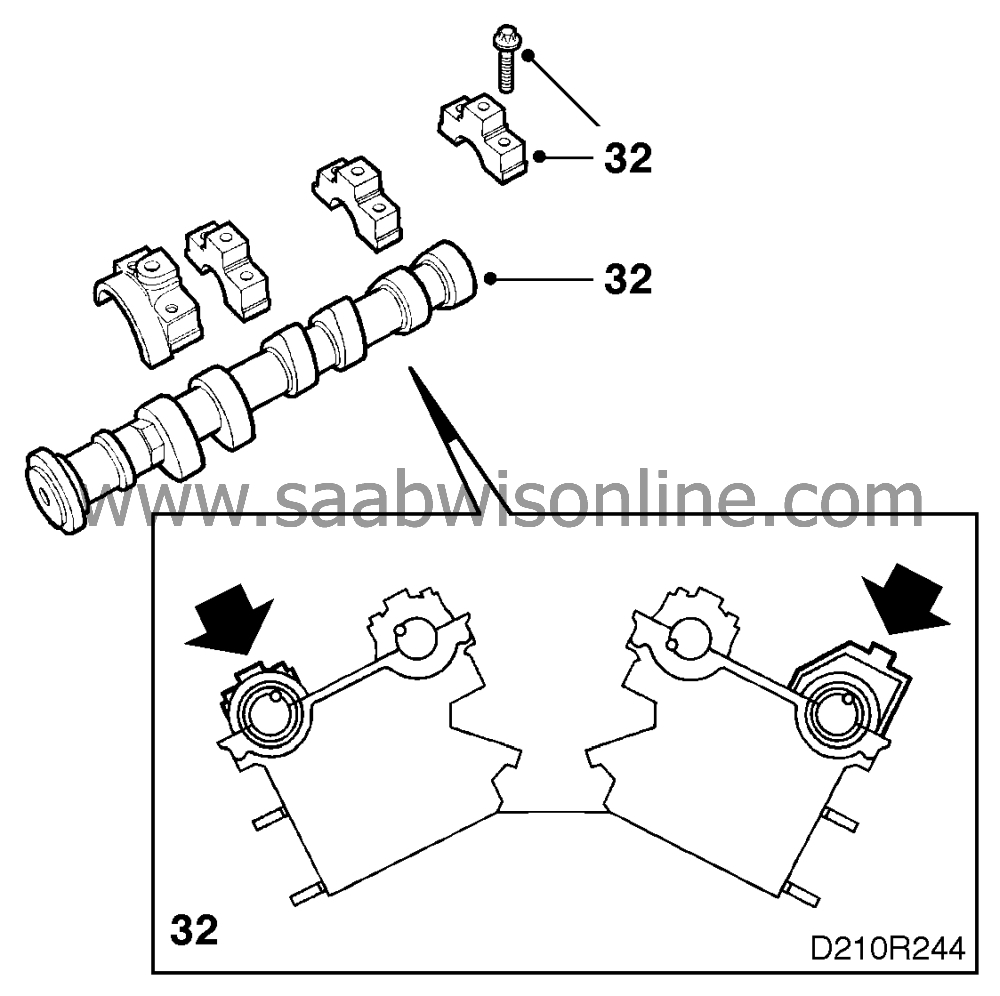
Remove the exhaust camshafts' bearing caps by gradually undoing the bolts 1/2 to 1 turn at a time. It is important to stop removal of the bearing cap where the tappets are under load, and lift out the camshafts. Note the markings on the camshaft bearing caps.
|
||||||||||||||||
| 33. |
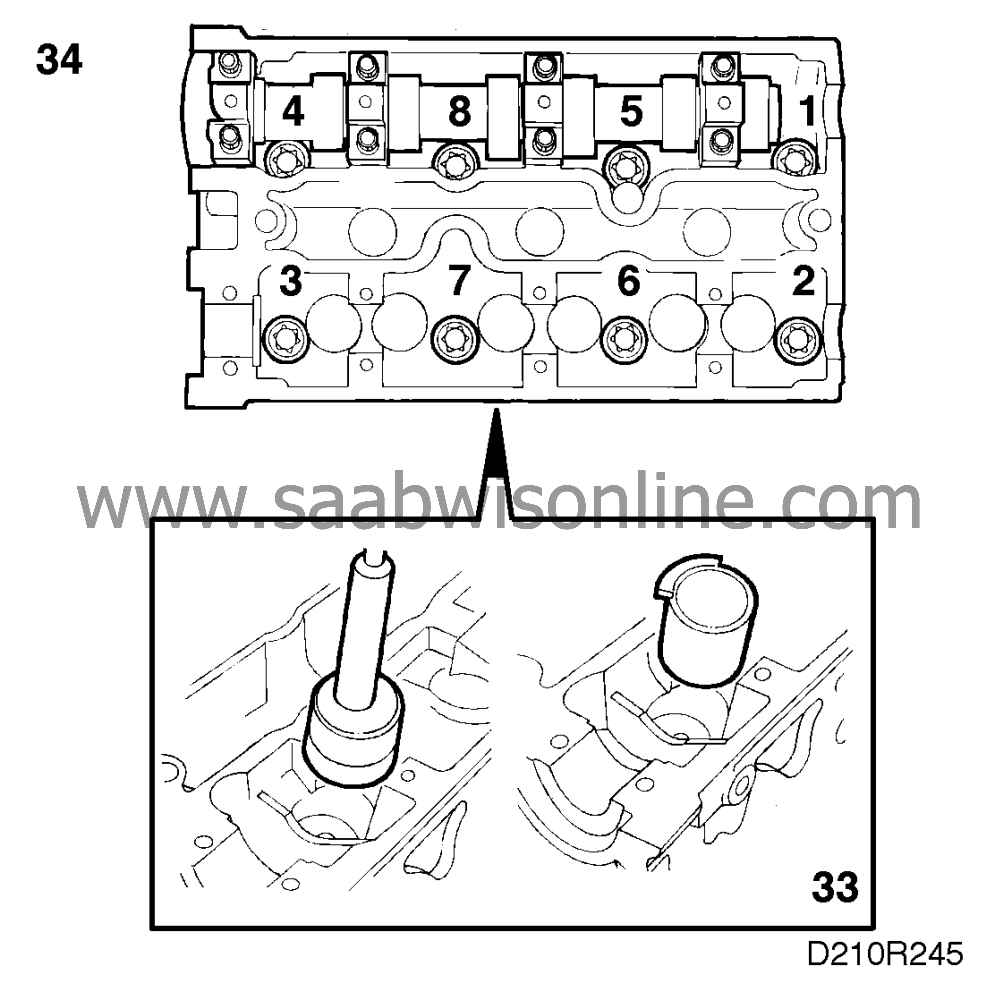
Remove the valve tappets and place them in valve stand 83 93 787 so that they do not become mixed up. Insert protective sleeves 83 95 022.
|
|
| 34. |
Undo the cylinder head bolts, see drawing, in steps of 1/4 to 1/2 a turn. Remove the cylinder heads. Be careful when putting them down as the intake camshafts remain in place and the valve stems could be bent accidentally.
|
|
| 35. |
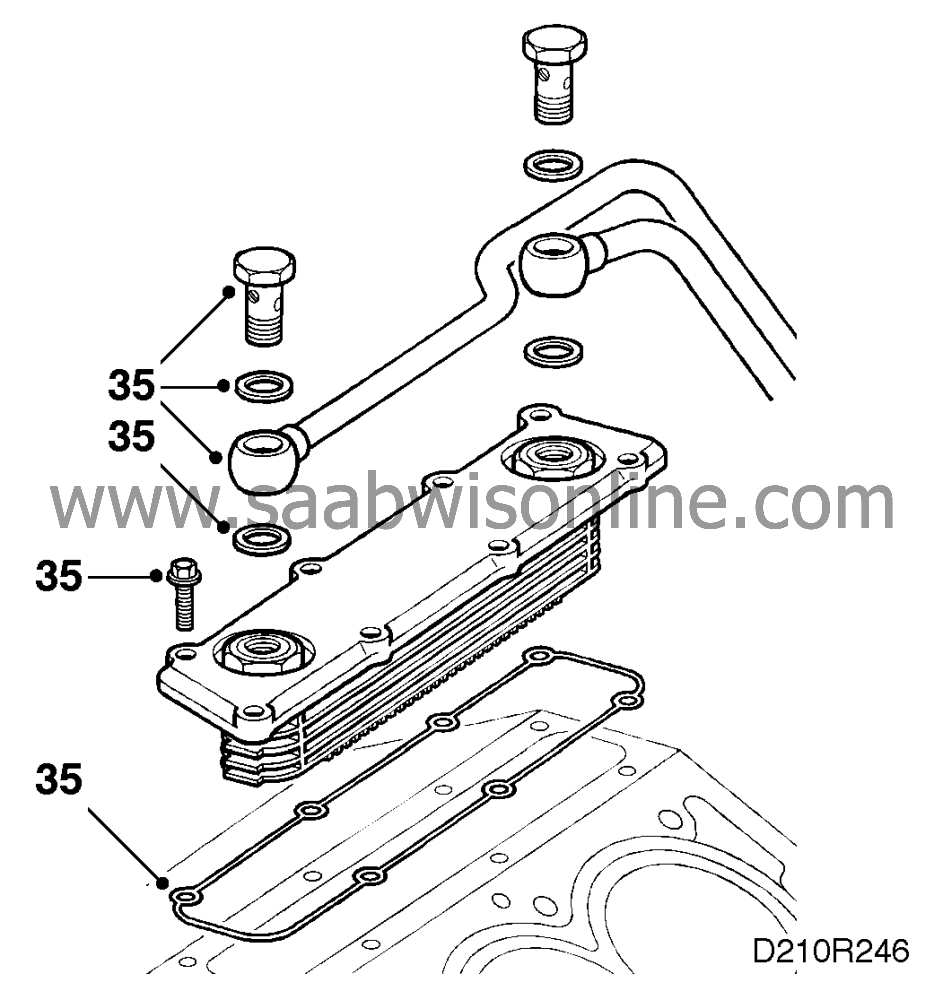
Disconnect the lines from the heat exchanger, being careful with the copper gaskets, and remove the heat exchanger cover complete with the heat exchanger. Remove the gasket.
|
||||||||||
| 36. |
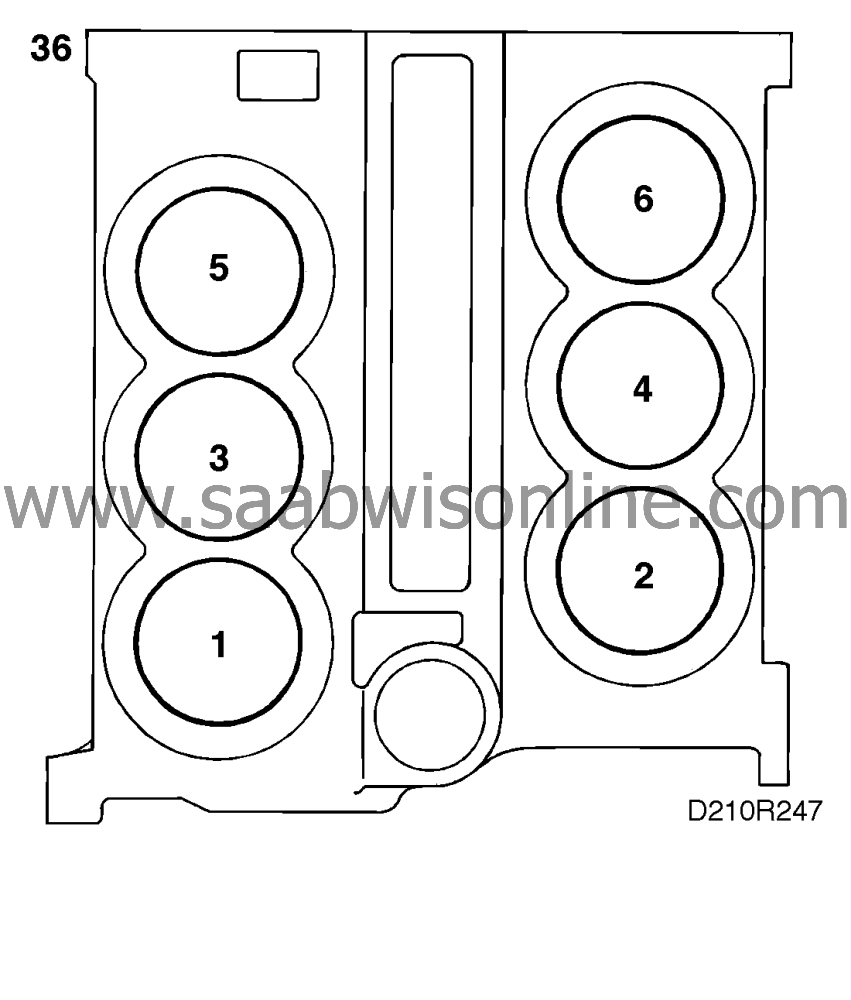
Mark the pistons with cylinder number.
|
|
| 37. |
Turn the engine over and remove the oil sump, the oil vacuum pipe and the antislosh baffles.

|
|
| 38. |
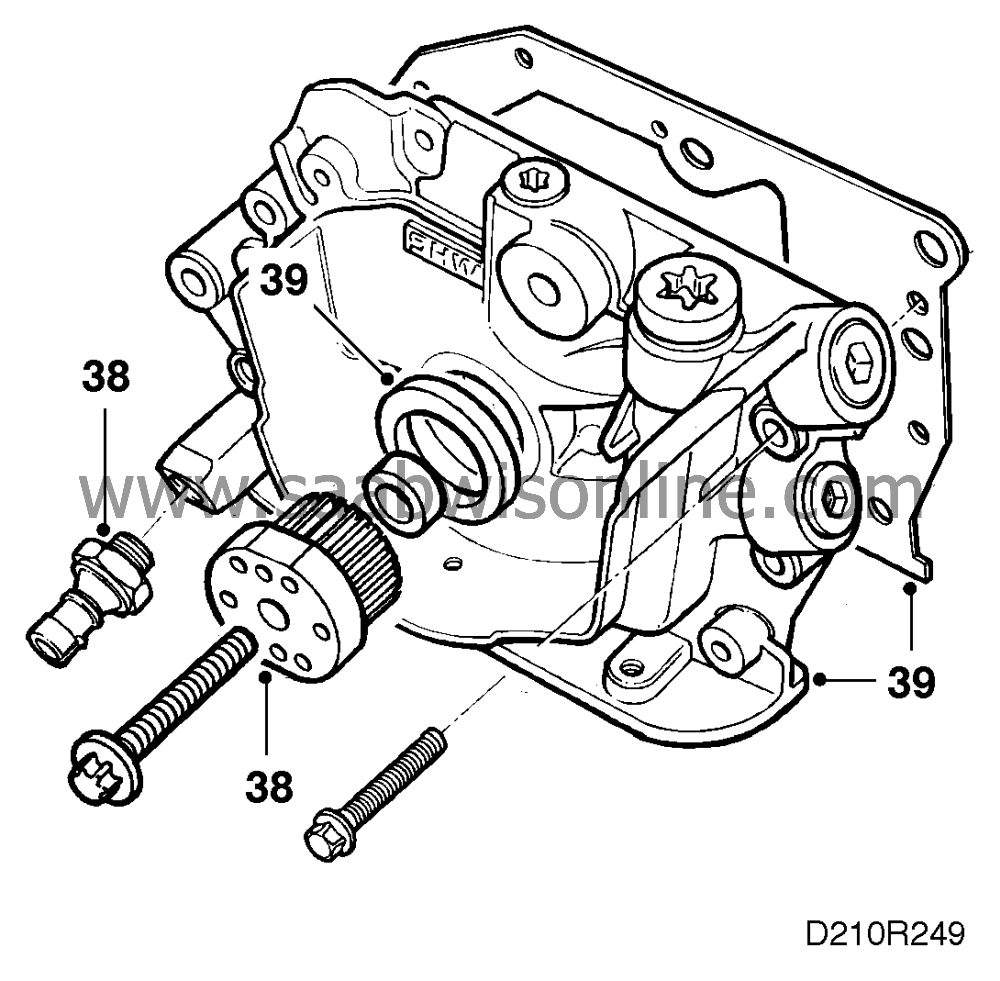
Attach support 83 95 063, remove the toothed belt sprocket from the crankshaft and remove the oil pressure sensor.
|
|
| 39. |
Remove the oil pump and the gasket. take out the crankshaft seal.
|
|
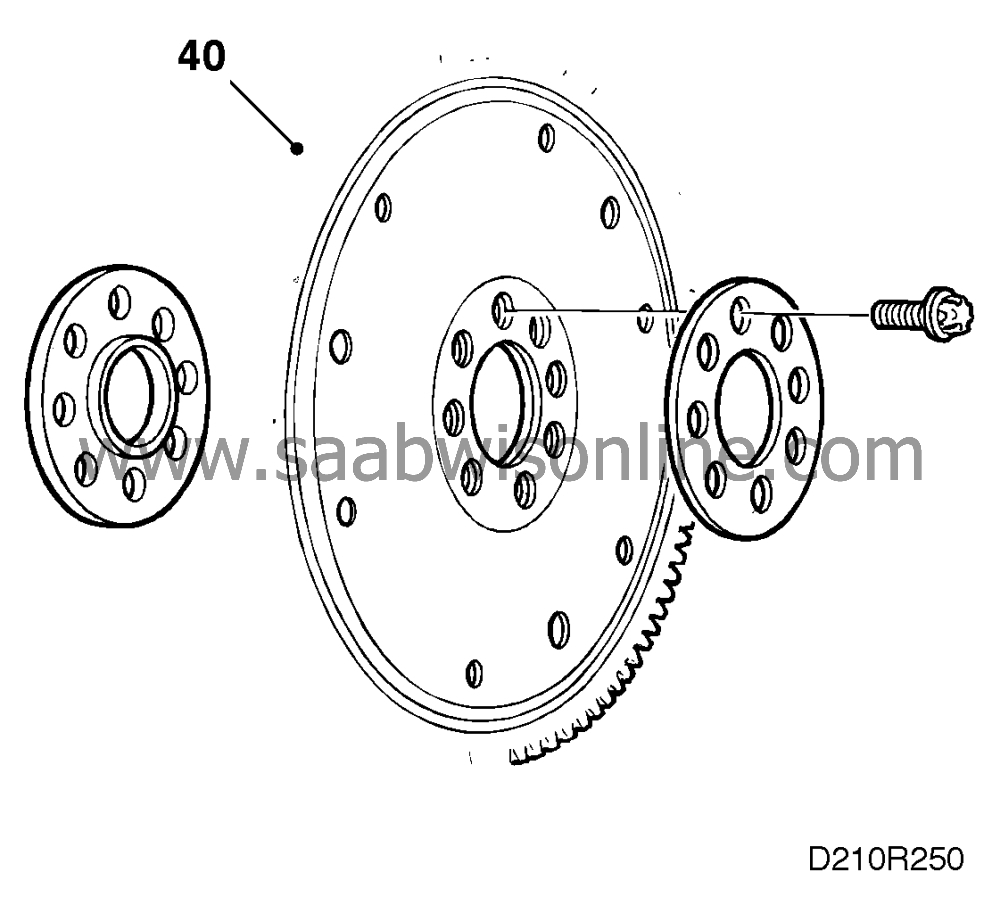
| 40. |
Remove the flywheel or alternatively the drive plate.
|
|
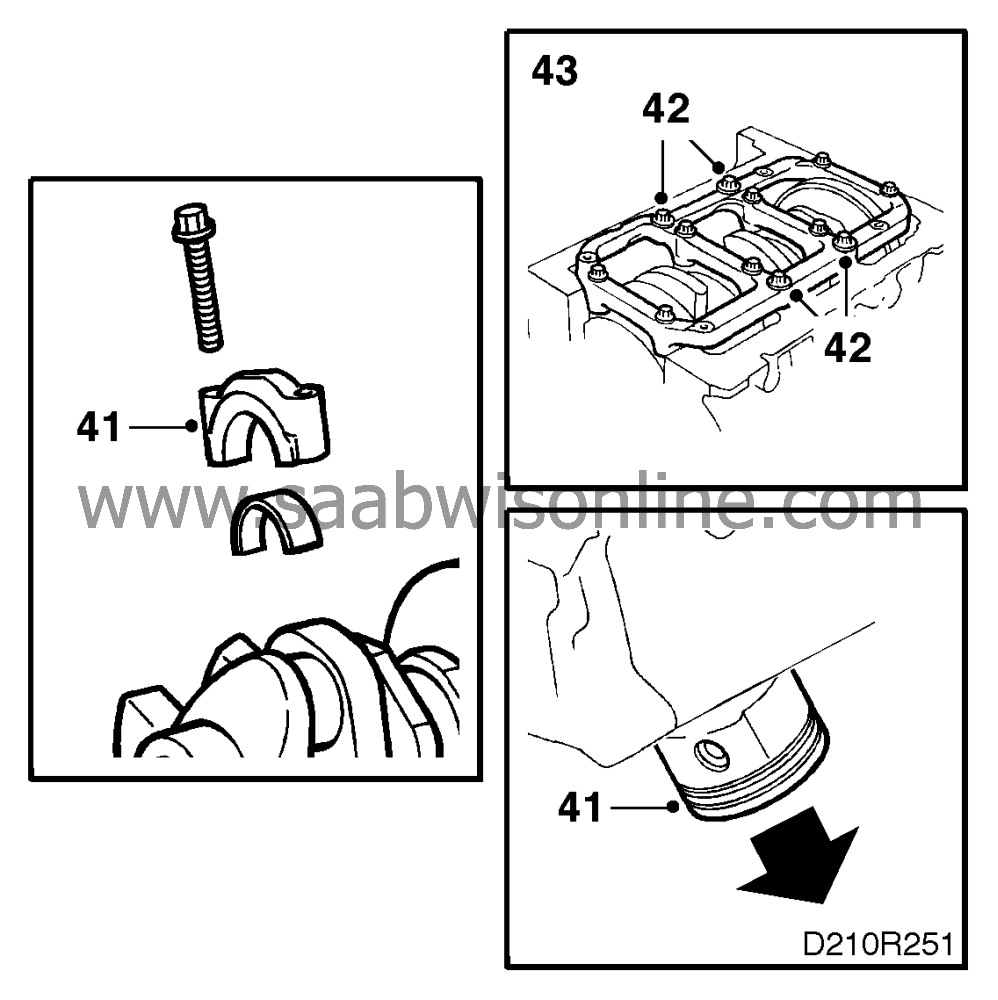
| 41. |
Undo all big-end bearing caps and push or carefully tap the pistons in pairs from the cylinders. Start with 1 and 2.
|
|
| 42. |
Remove the main bearing member by first undoing the 4 middle bolts on the long sides, see drawing, and screwing the adjusting sleeves up about 1/2 turn.
|
|||||||
| 43. |
Remove remaining bolts. Note the assembly position of the main bearing member.
|
|
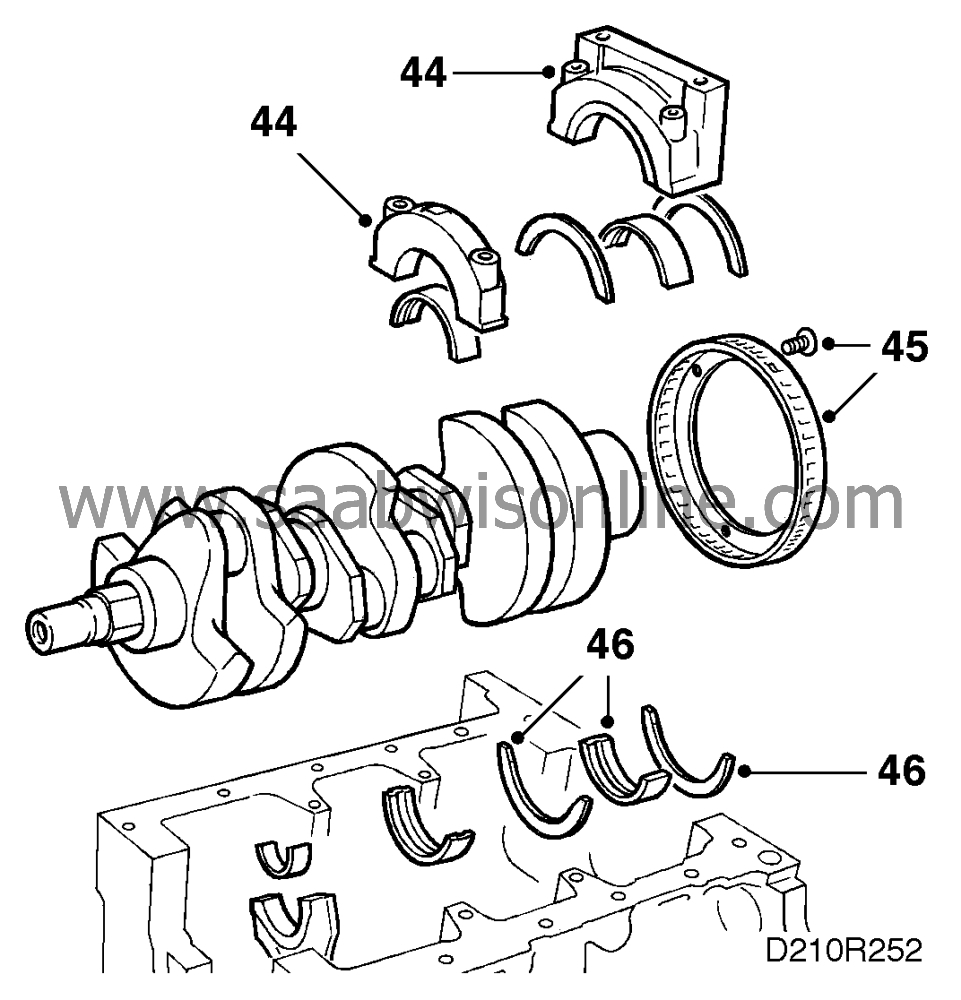
| 44. |
Remove the main bearing caps and lift out the crankshaft.
|
||||||||||
| 45. |
Remove the perforated disc.
|
|
| 46. |
Remove all bearing shells for both the main bearings and the big-end bearings.
|
|
| Assembly |
|
|||||||
Wash all sealing surfaces with benzine, making sure that they are absolutely clean. All components must be thoroughly cleaned. Make sure that water and oil passages and pipes are clean and blown dry.
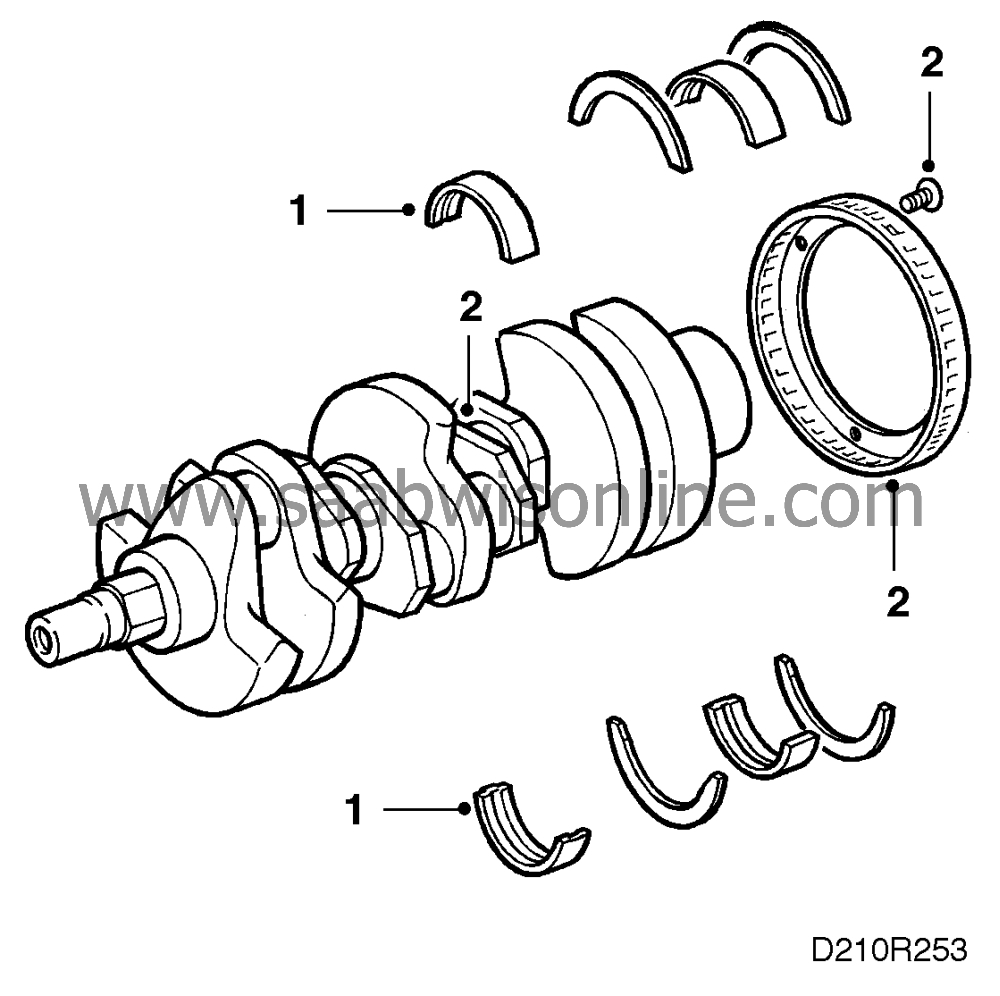
| 1. |
Place all main bearings in their places and oil them in.
|
||||||||||
| 2. |
Fit the perforated ring. Apply thread locking compound 74 96 268 to the bolts. Fit the crankshaft in position.
|
|
| 3. |
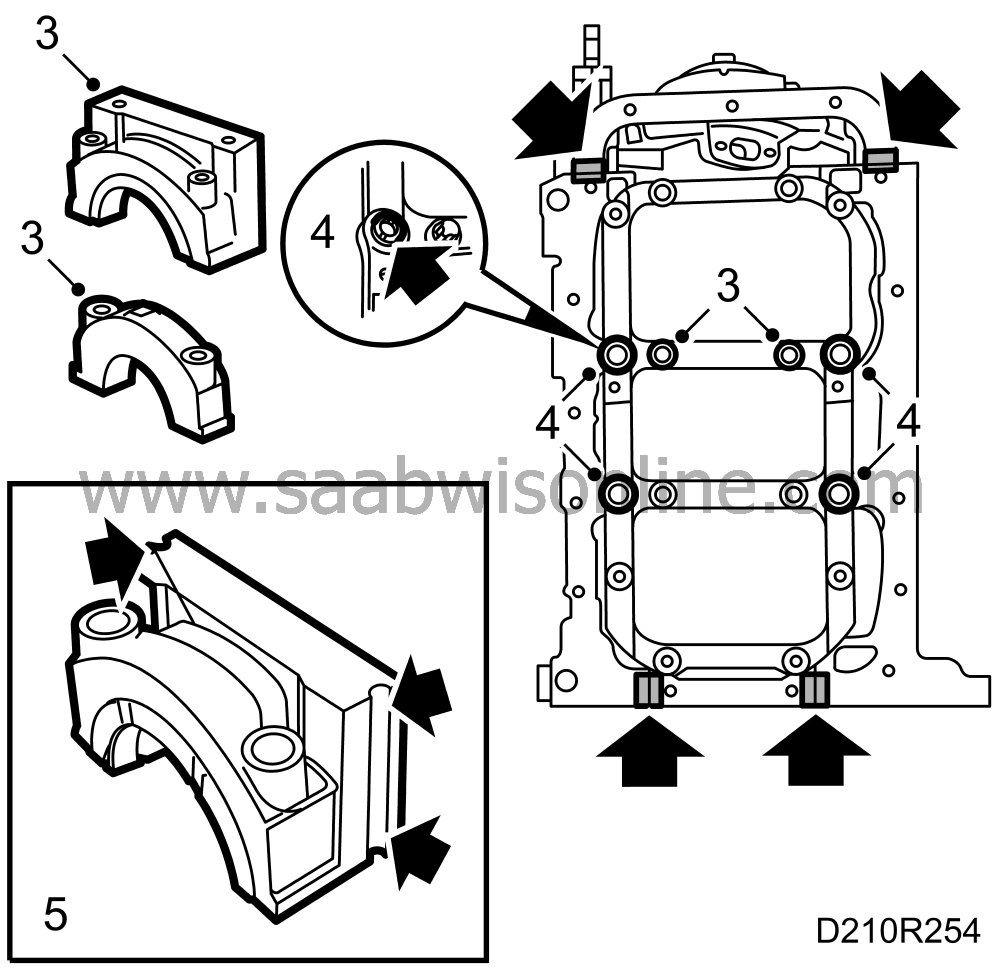
Lubricate and fit all main bearing caps in their original places, making sure they are the right way round. Fit the main bearing member in place and tighten the main bearing cap bolts.
Tightening torques 50 Nm (37 lbf ft) + 60 + 15. |
|
| 4. |
Screw down the adjusting sleeves to contact.
Apply flange sealant, part No. 93 21 795, and tighten the outer bolts of the main bearing member. Tightening torque 20 Nm (15 lbf ft). |
|
| 5. |
Inject flange sealant, part No. 87 81 841, into the mating joints at the rear main bearing. Do not stop until the sealant is forced out at the side.
|
|
| 6. |
Turn the engine and angle it so that cylinders 1,3,5 are vertical, oil the pistons and rings, adjust the position of the compression ring gaps as in the drawing and fit the pistons in their respective cylinders.

I = The front marking on the top of the piston towards the timing end. 1 = Upper compression ring 2 = Lower compression ring 3 = Steel spacer ring (top oil-scraper ring) 4 = Middle ring (oil-scraper ring) 5 = Steel spacer ring (bottom oil-scraper ring) The arrow marked on the piston crown must face the timing end of the engine. Use piston installing tool 83 95 048 and gently tap the pistons down into the cylinders. Do the same for cylinders 2,4,6. |
|
| 7. |
Lubricate and fit all connecting rod bearing caps in their original positions and make sure they are the right way around (the rib should be facing the gearbox side). Blow the contact surfaces clean. If they are damaged, the connecting rod must be changed.
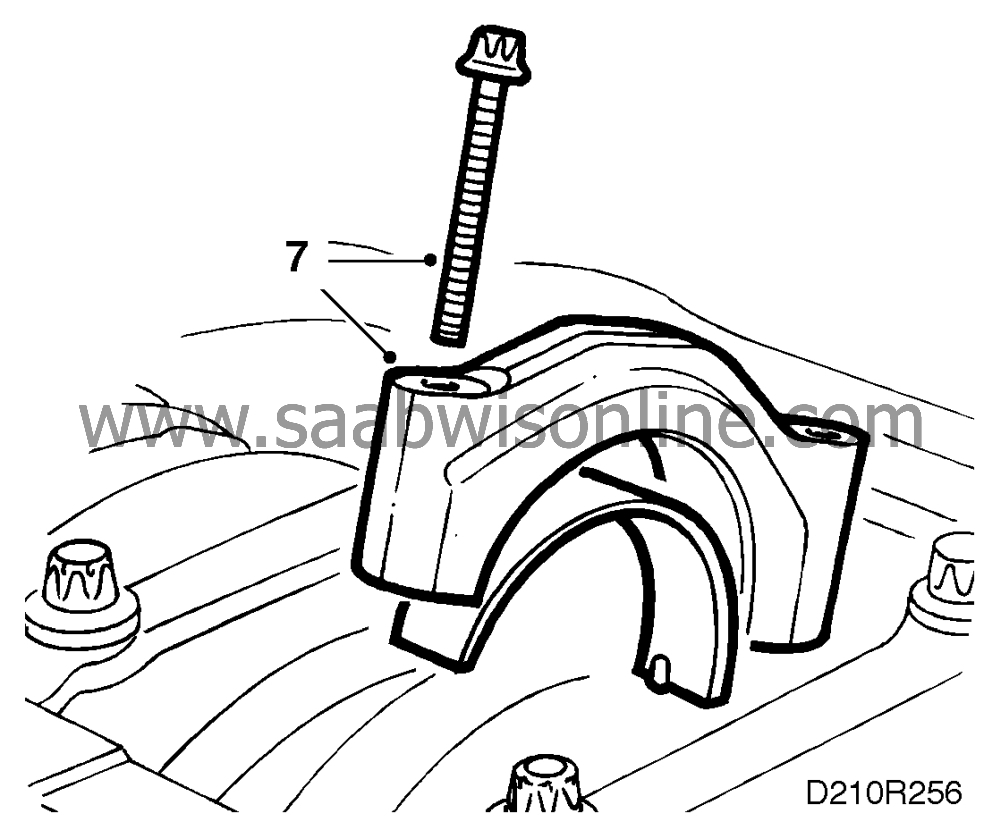
Tightening torques 35 Nm (26 lbf ft) + 45 + 15. |
|
| 8. |
Fit a new crankshaft seal using tools 83 94 967 and 83 94 975 and refit the flywheel or the drive plate. Apply 74 96 292 to the bolts.

Tightening torque 65 Nm (48 lbf ft) + 30. |
|
| 9. |
Fit the oil pump complete with a new gasket. Apply 93 21 795 to the gasket.
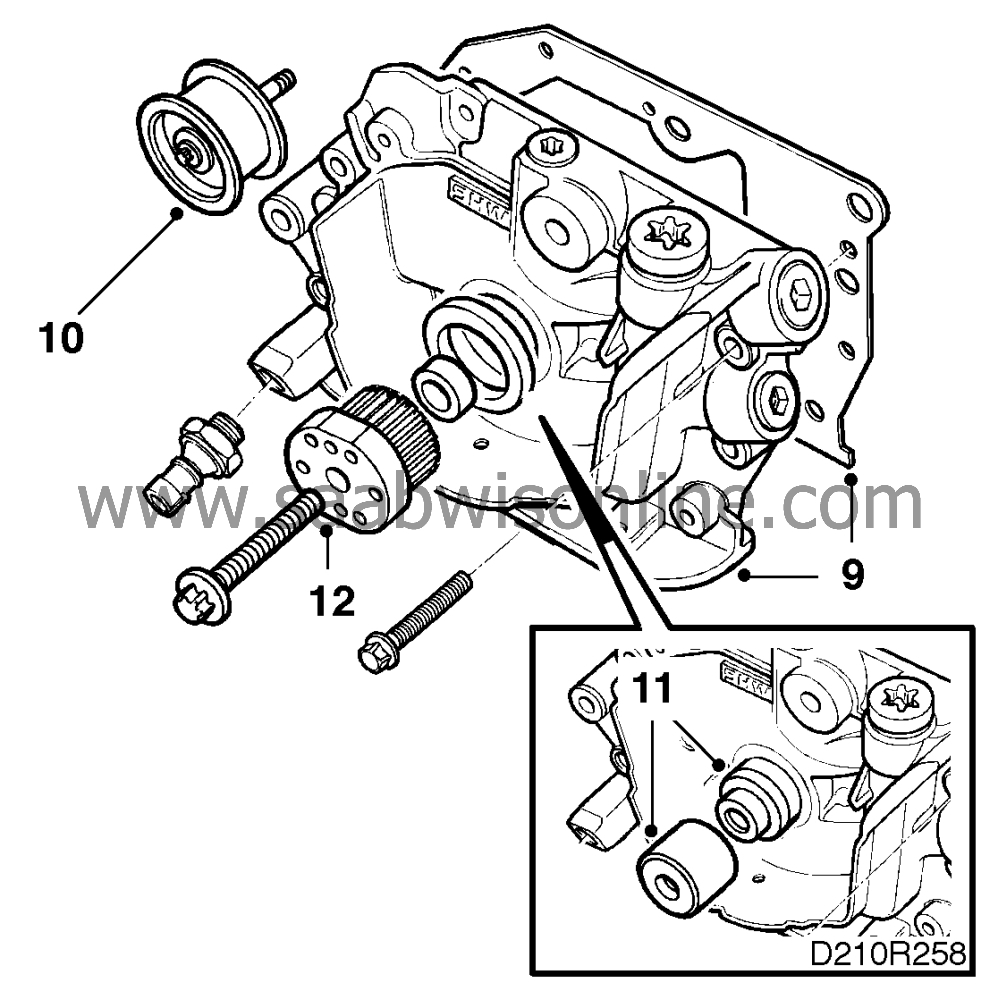
Turning torque 6 Nm (4.5 lbf ft). |
|
| 10. |
Refit the bottom adjusting roller.
Turning torque 40 Nm (30 lbf ft). |
|
| 11. |
Fit a new crankshaft seal using tool 83 94 942.
|
|
| 12. |
Fit holder 83 95 063. Refit the oil pressure sensor. Apply 93 21 795 to the back of the toothed belt sprocket and tighten it.
Tightening torques 250 Nm (184.5 lbf ft) + 45. |
|
| 13. |
Invert the engine and apply flange sealant, part No. 87 81 841, to the mating surfaces, see illustration.

|
|
| 14. |
Fit the oil antislosh baffles. Apply 74 96 268 to the bolts.

Turning torque 8 Nm (6 lbf ft). |
|
| 15. |
Refit the oil suction pipe complete with O-ring. Apply 74 96 268 to the bolts.
Turning torque 8 Nm (6 lbf ft). |
|
| 16. |
Fit the sump complete with a new gasket. See drawing for tightening order. Apply 74 96 268 to the bolts.

Tightening torque: 15 Nm (11 lbf ft). |
|
| 17. |
Invert the engine, clean the heat exchanger cover with benzine and apply 87 81 841 in the groove. Refit the heat exchanger complete with a new gasket.

|
|
| 18. |
Tighten the cover.
Tightening torque 20 Nm (15 lbf ft). |
|
| 19. |
Connect the oil pipe to the heat exchanger complete with new gasket and tighten the connectors.
Turning torque 30 Nm (22 lbf ft). |
|
| 20. |
Fit new cylinder head gaskets. Be careful of the oil ducts (see drawing).
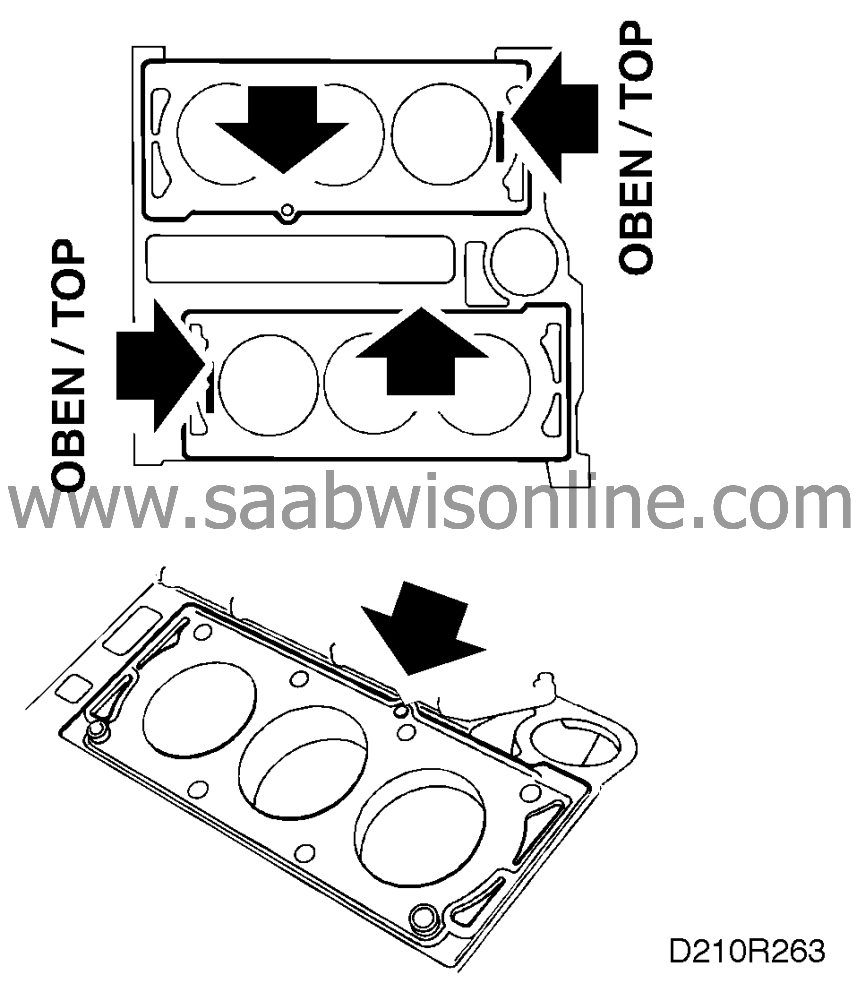
For cylinders 1-3-5 the marking "OBEN/TOP" should face the gearbox end. For cylinders 2-4-6 the marking should face the timing end of the engine. |
|
| 21. |
Turn the crankshaft to about 60° BTDC and fit the cylinder heads using new bolts. See drawing for tightening order.
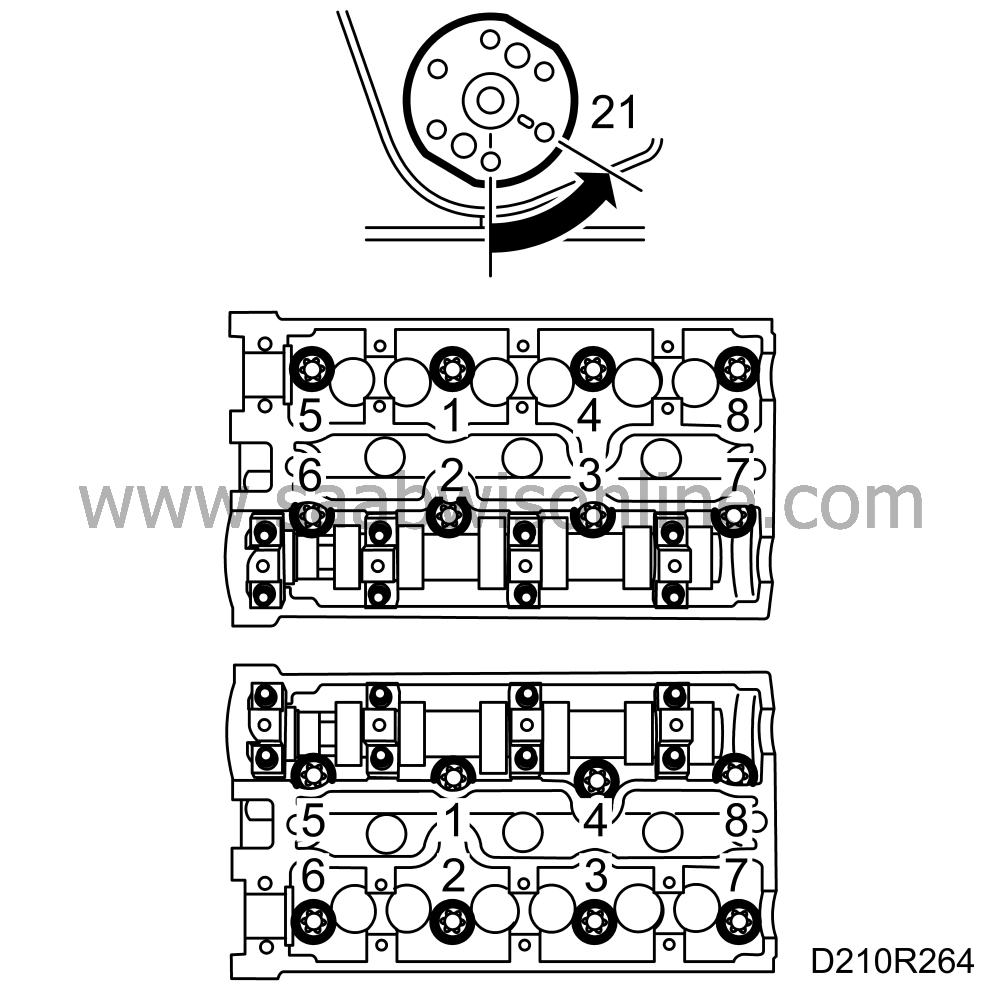
Tightening torques 25 Nm (18.5 lbf ft) + 90 + 90 + 90. |
|
| 22. |
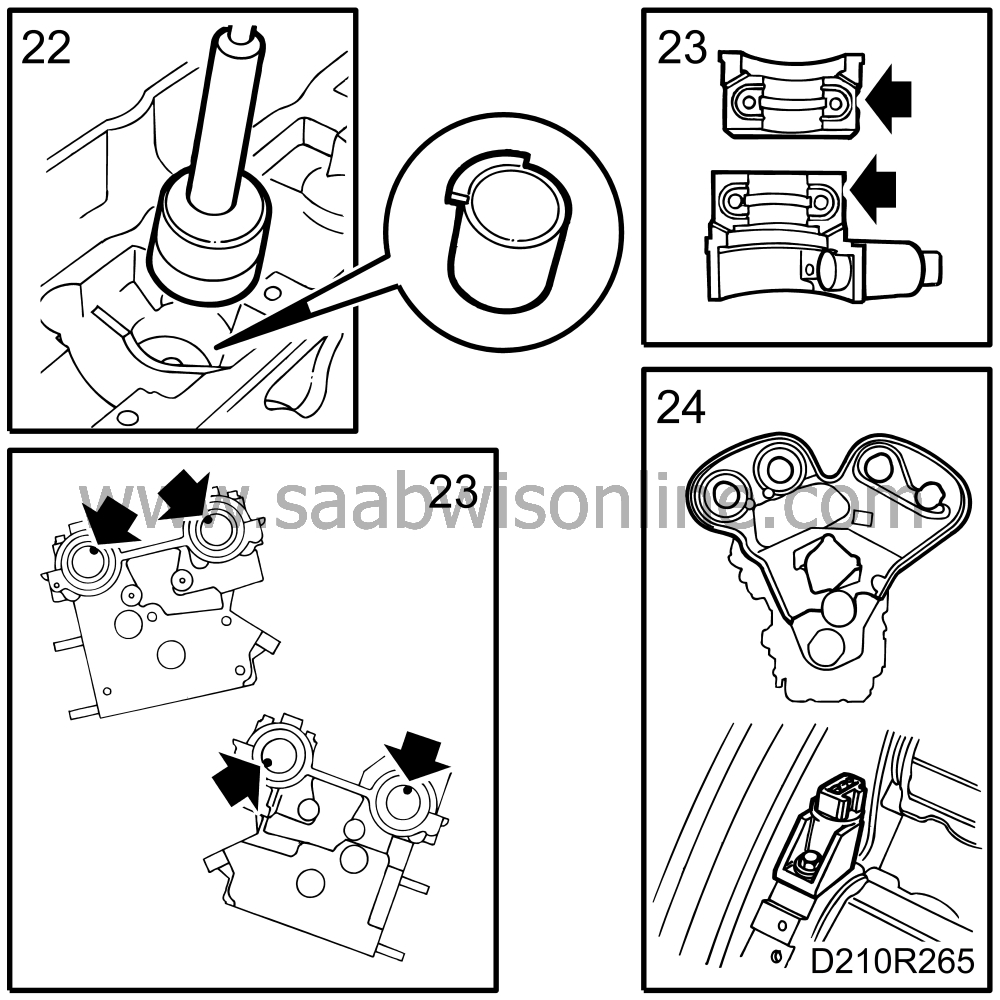
Remove the protective sleeves and refit the valve depressors.
|
|
| 23. |
Position the camshafts and fit the caps. Start where the cams point down and are pressing on the tappets. Coat lightly with 74 96 268 on the contact surfaces between the front bearing caps and the cylinder heads.
Cylinder 1-3-5 The guide pin on the camshaft should point towards the internal bolts for the camshaft bearing caps, see drawing. Cylinders 2-4-6 The locating pin for the intake camshaft should be in line (downwards) with the internal bolt for the camshaft bearing cap, see drawing. The locating pin for the exhaust camshaft should be in line with the edge of the camshaft sensor (upwards), see drawing. Turning torque 8 Nm (6 lbf ft).
|
||||||||||
| 24. |
Refit the camshaft position sensor and the rear timing cover.
|
|
| 25. |
Coat the new O-ring for the coolant pump and the sealing surface on the cylinder block with acid-free vaseline. Fit the coolant pump.
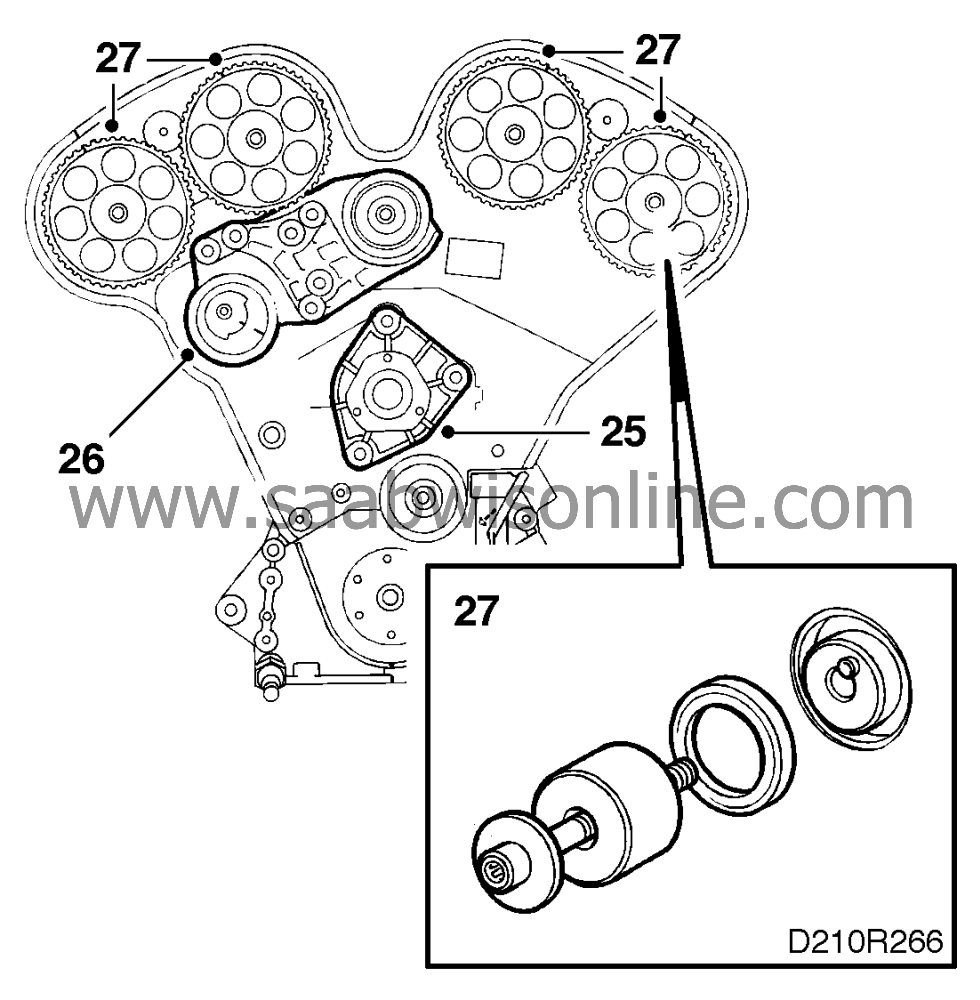
Tightening torque: 25 Nm (18.5 lbf ft). |
|
| 26. |
Refit the bracket with the tensioning pulley and the upper adjusting roller.
Turning torque 40 Nm (30 lbf ft). |
|
| 27. |
Lubricate and fit the new camshaft gasket with tool 83 94 959 and refit the camshaft sprockets.
Tightening torque 50 Nm (37 lbf ft) + 60. |
|||||||||
| 28. |
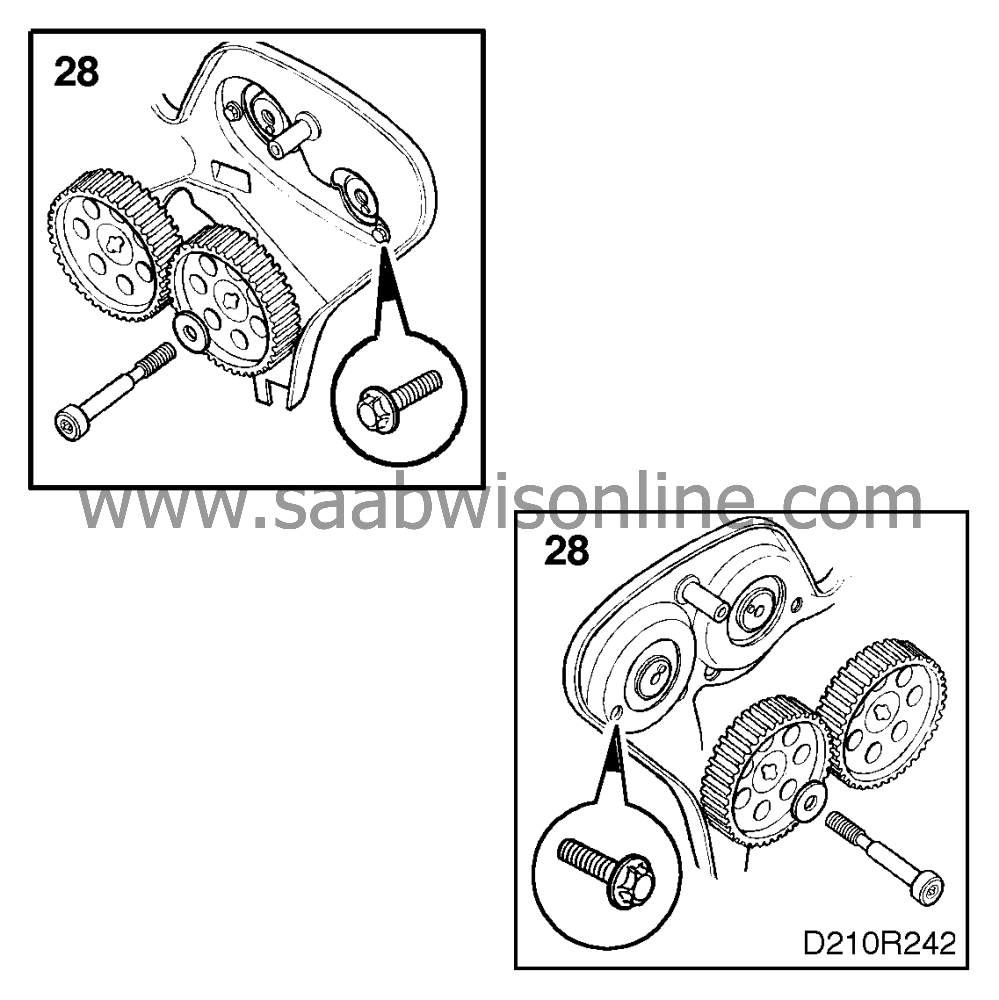
Carefully turn the camshafts so that the markings on the camshaft sprockets match the grooves on the rear timing cover. Use setting tool 83 95 006. Fix the camshafts in place with KM-800-1 (cylinders 1-3-5) and KM-800-2 (cylinders 2-4-6).

|
|
| 29. |
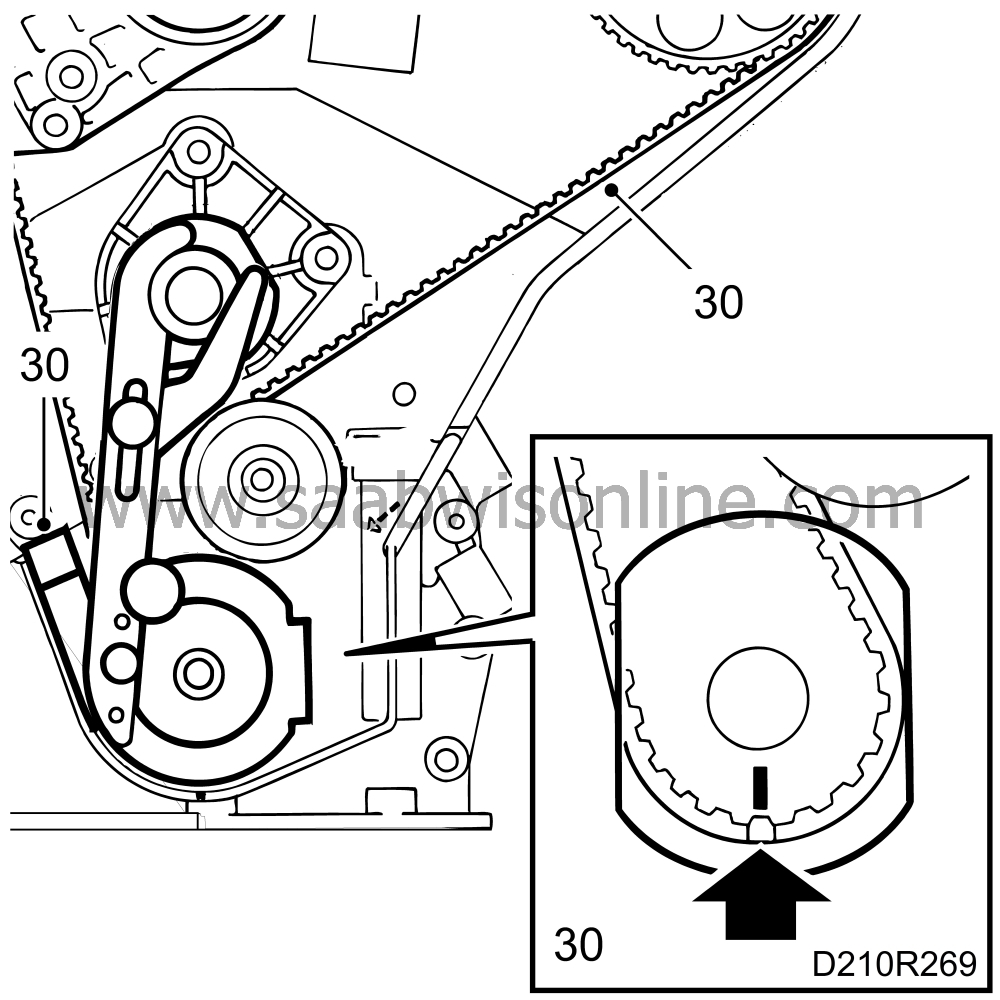
Turn the crankshaft in the engine's direction of rotation until just before top dead centre. Fit setting tool 83 95 006 on the crankshaft and turn the crankshaft to top dead centre. Press the adjustable arm against the flat on the coolant pump's flange and secure same.

|
|
| 30. |
Fit a new toothed belt with the arrows pointing in the engine's direction of rotation. Start with the double line marking at the line marking on the toothed belt sprocket on the crankshaft. Use tool 83 95 006 to hold the belt in place.
|
|
| 31. |
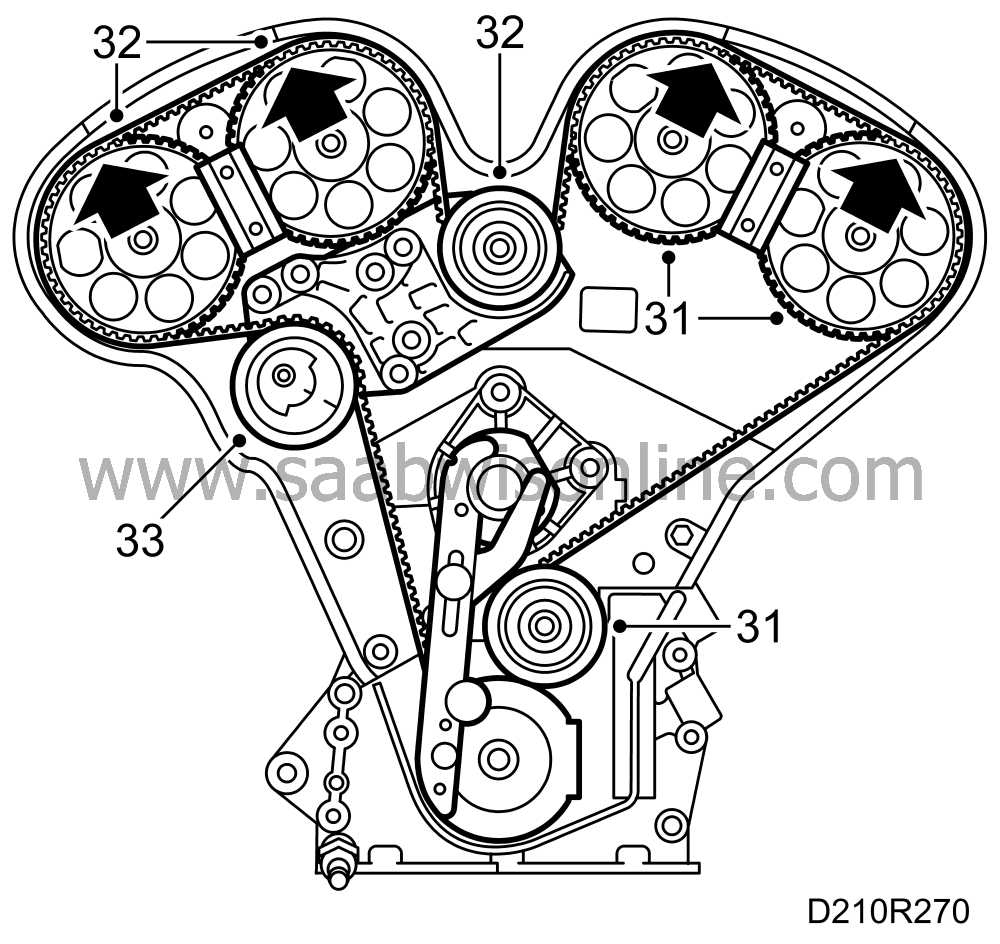
Fit the toothed belt over the bottom adjusting roller and then over camshaft sprockets 3 and 4. The line markings on the belt should match with the grooves on the camshaft sprockets and the rear timing cover. The adjusting roller may have to be loosened before the toothed belt can be fitted.
|
|
| 32. |
Insert the toothed belt under the top adjusting roller, and then place the belt on camshaft sprockets 1 and 2. The line markings on the belt should match the grooves on the camshaft sprockets and the rear timing cover. The adjusting roller may need to be loosened before the toothed belt can be fitted.
|
|
| 33. |
Fit the timing belt over the tension roller. Carry out valve timing.
|
|
| 34. |
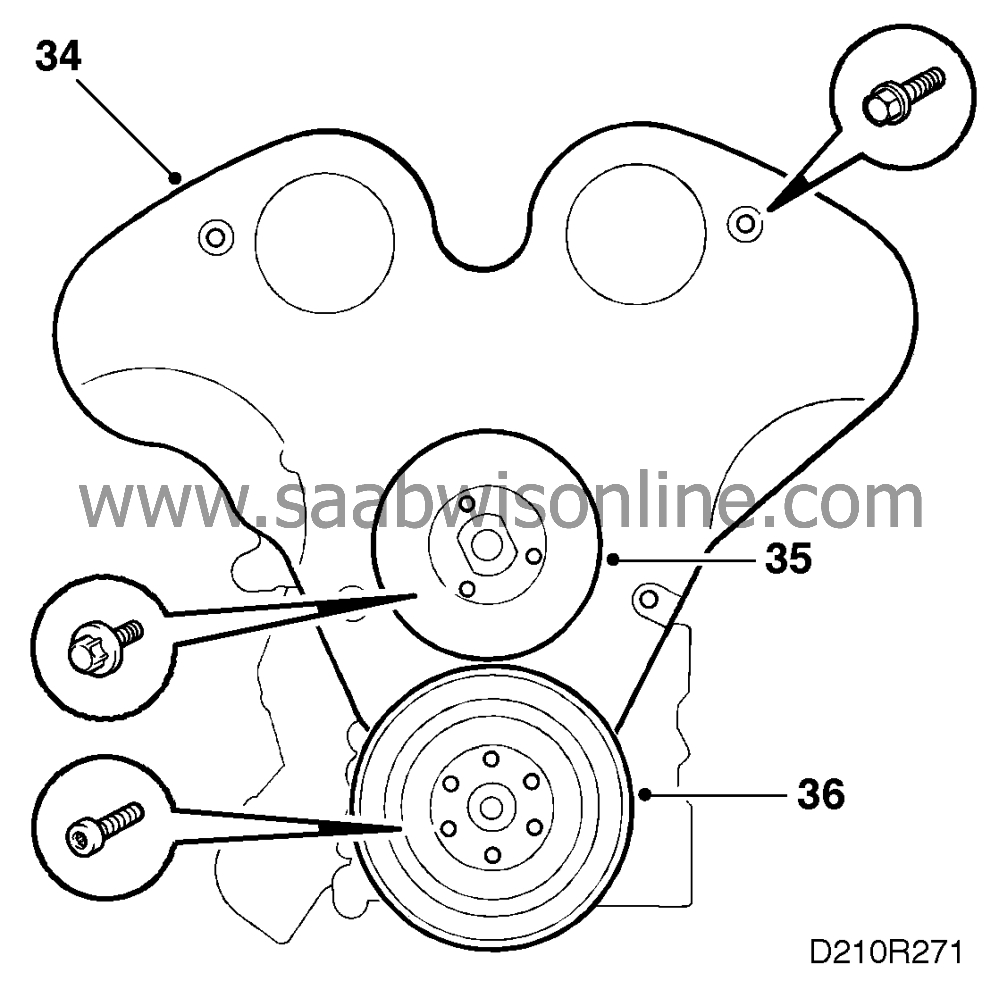
Fit the timing cover.
|
|
| 35. |
Refit the coolant pump pulley.
Turning torque 8 Nm (6 lbf ft). |
|
| 36. |
Tighten the crankshaft pulley.
Tightening torque 20 Nm (15 lbf ft). |
|
| 37. |
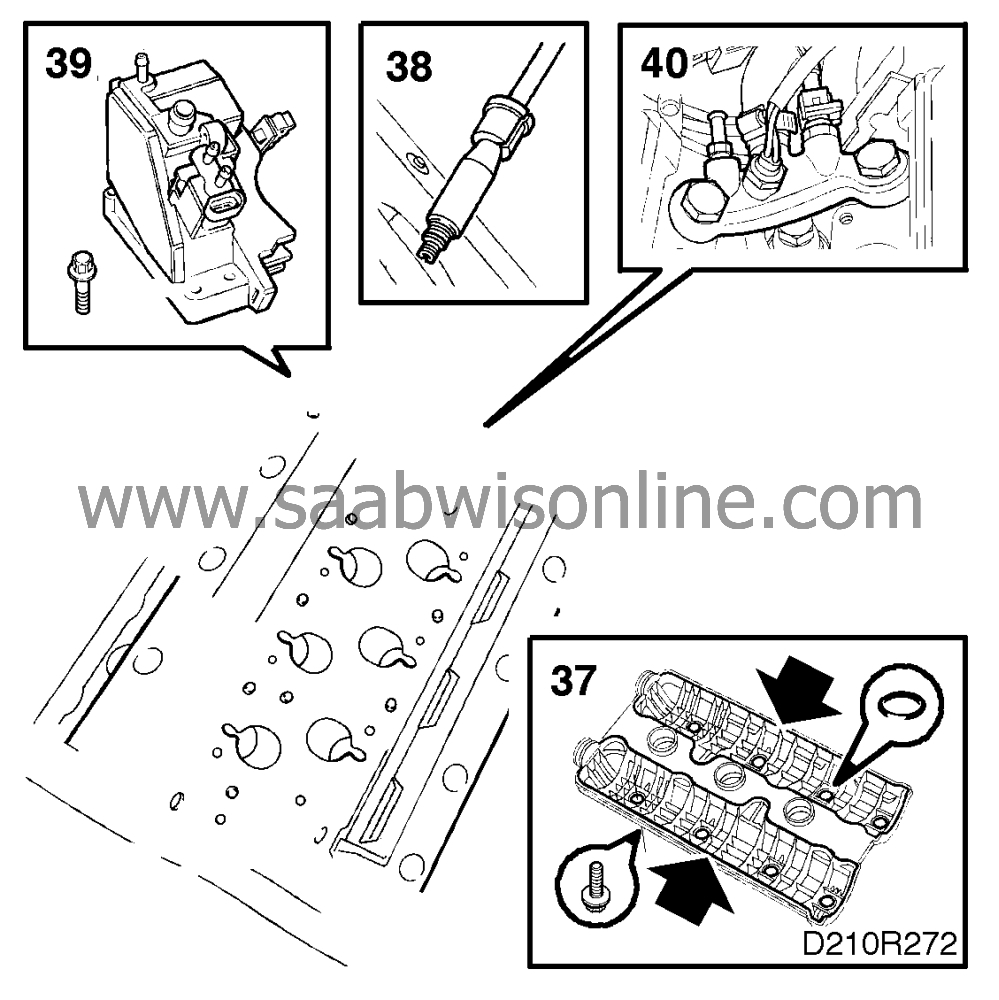
Fit new gaskets to the valve covers and wipe clean. Lubricate with soapy water and apply 87 81 841 in the corners by the camshaft bearing caps. Fit the valve covers.
|
|
| 38. |
Fit the spark plugs.
Tightening torque: 25 Nm (18.5 lbf ft). |
|
| 39. |
Refit the crankcase ventilation housing using two of the bolts.
|
|
| 40. |
Refit the coolant bridge complete with new copper gaskets. Apply 74 96 284 to the bolts.
Turning torque 30 Nm (22 lbf ft). |
|
| 41. |
Fit the thermostat with a new O-ring. Dampen the O-ring with coolant.

Tightening torque 20 Nm (15 lbf ft). |
|
| 42. |
Refit the coolant pipe complete with new O-rings. Fitting is easier if the O-rings have been dampened with coolant.
Tightening torque 20 Nm (15 lbf ft). |
|
| 43. |
Fit the bottom intake pipe complete with new gaskets. Remove the protective tape, tighten the bolts and lock them with 74 96 268.
Tightening torque 20 Nm (15 lbf ft). |
|
| 44. |
Place a new gasket on the locating pins and fit the middle intake manifold for cylinders 1-3-5 using the long studs. Lock the studs using 74 96 268.
Tightening torque 20 Nm (15 lbf ft). |
|
| 45. |
Fit the fuel supply pipe to the injection valves.
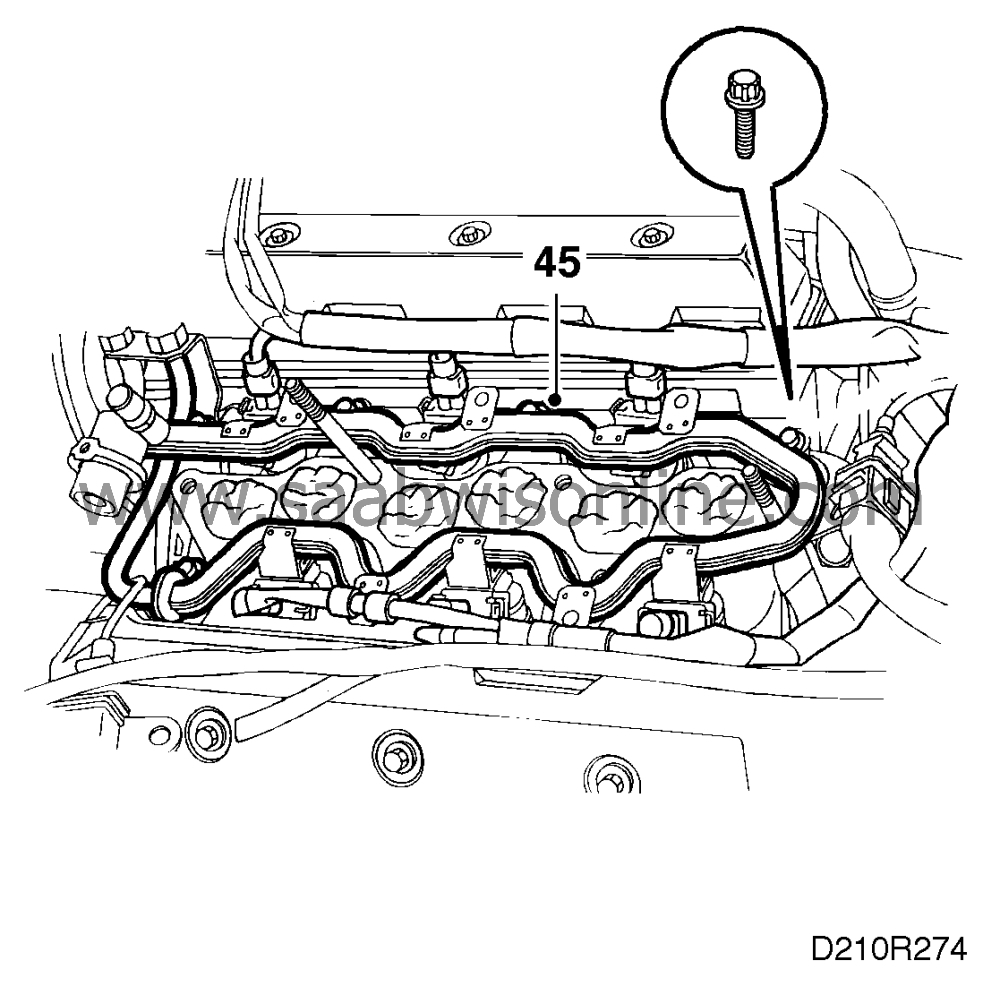
Turning torque 8 Nm (6 lbf ft). |
|
| 46. |
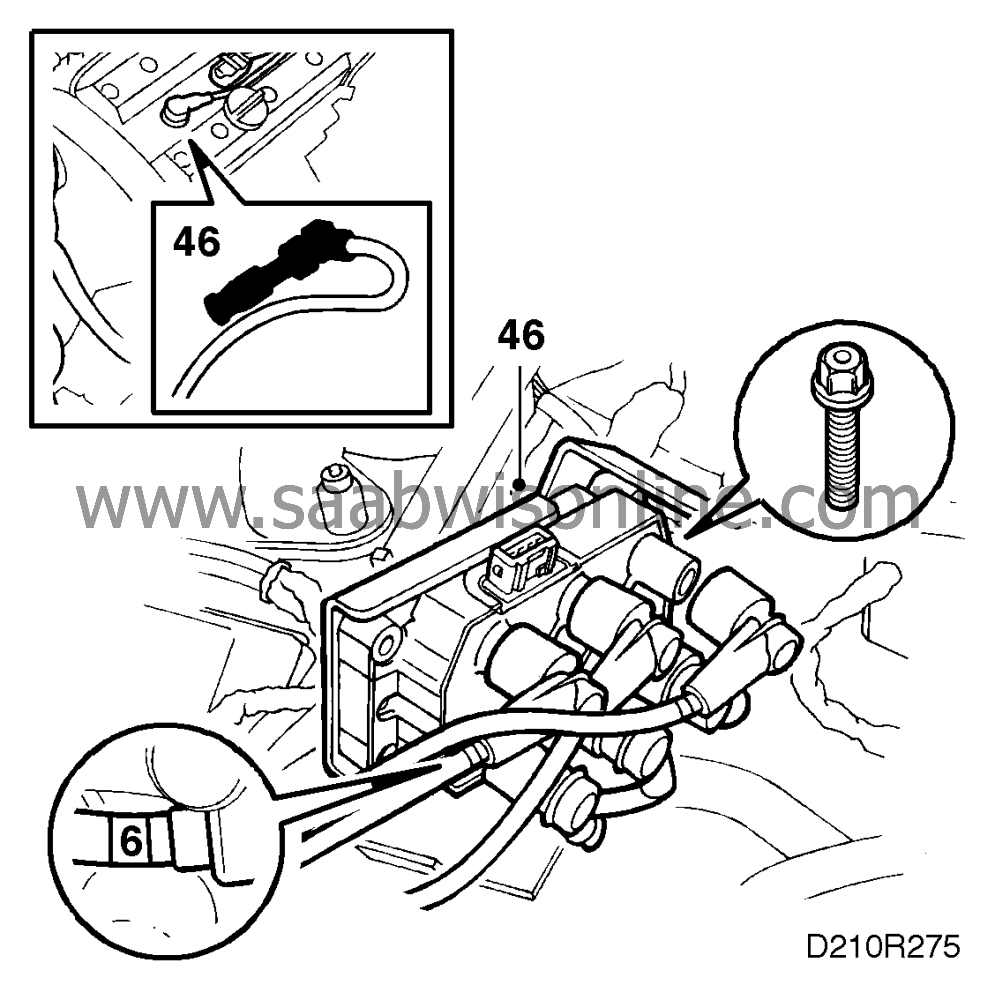
Attach and connect the engine electrical supply and refit the ignition coil and ignition cables.
|
|
| 47. |
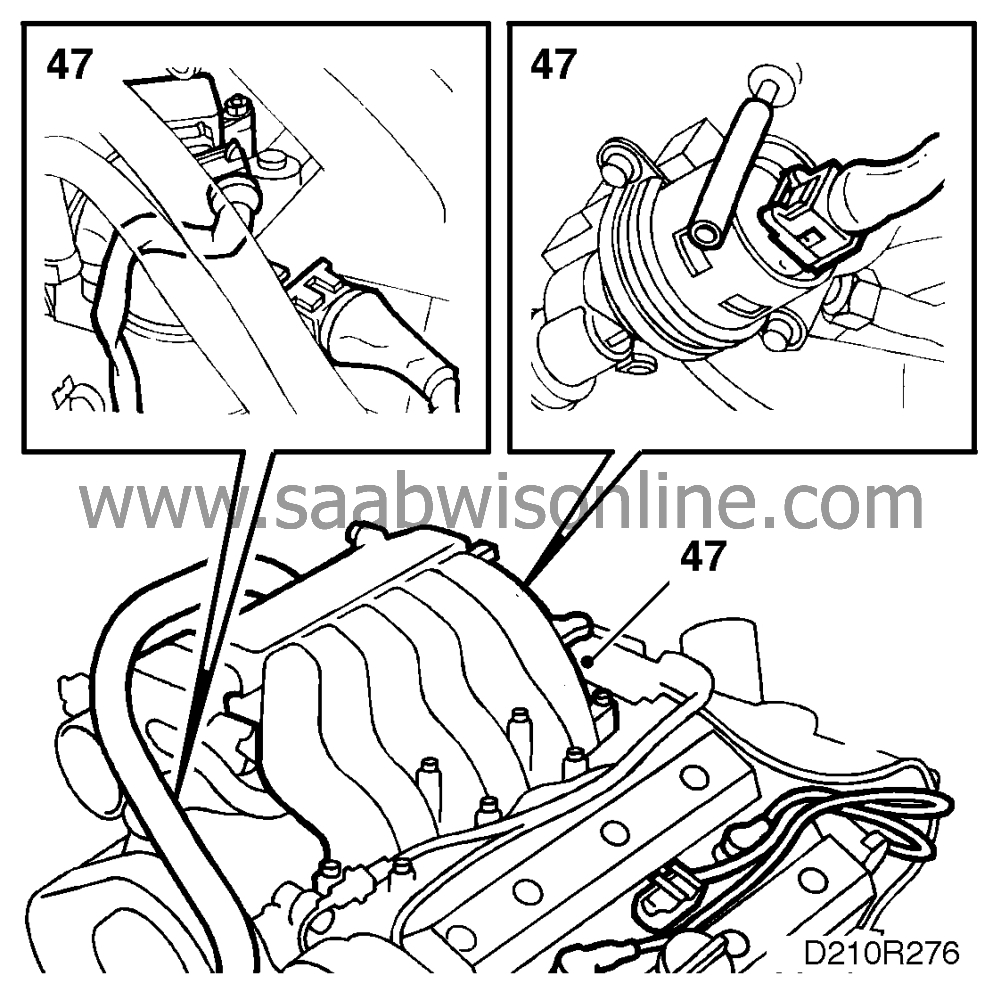
Fit the intake manifold using a new gasket. Use new nuts. Start with:
|
|
| • |
hose to evaporative emission canister air purging valve.
|
| • |
coolant hoses to throttle body.
|
| • |
throttle connector.
|
| • |
connector for TCS throttle body.
|
| • |
connector for the idle air control valve (IAC-valve).
|
| • |
vacuum hose to the boost pressure control valve (where fitted).
|
| • |
hose to fuel pressure regulator.
Tighten all bolts at the mating surface. Begin with the bolts in the middle and continue alternately towards the ends. Tightening torque 20 Nm (15 lbf ft).
|
||||||||||
| 48. |
Connect the crankcase ventilation hose to the throttle body.
|
|
| 49. |
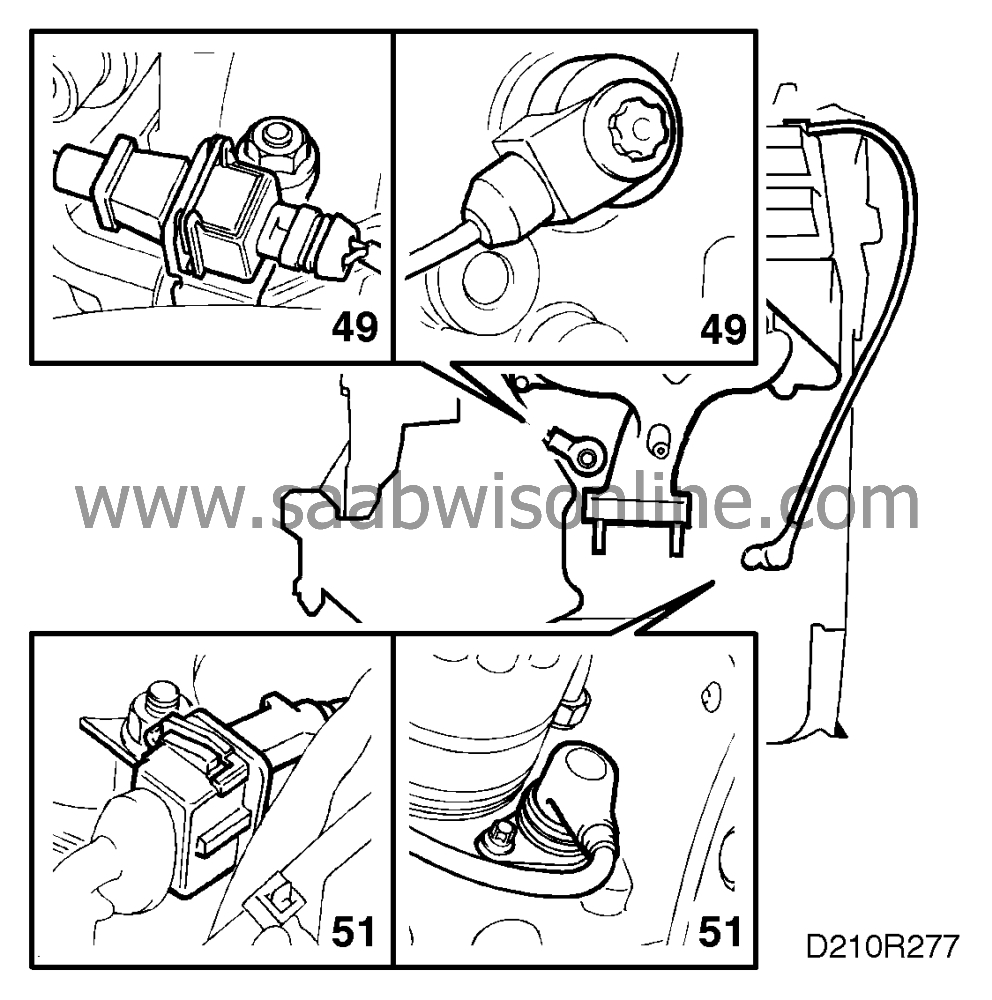
Clean the surface under the knock sensors and fit the knock sensors.
Tightening torque: 22 Nm (16 lbf ft). |
|
| 50. |
Fit the belt tensioner.
Turning torque 40 Nm (30 lbf ft). |
|
| 51. |
Connect the crankshaft position indicator and refit it complete with a new O-ring.
Turning torque 8 Nm (6 lbf ft). |
|
| 52. |
Fit new gaskets, refit the exhaust manifolds and, where fitted, the secondary air injection pipes. Use new nuts.

Tightening torque 20 Nm (15 lbf ft). |
|
| 53. |
Fit the thermal shield.
|
|
| 54. |
Refit the A/C compressor's bracket complete with engine mounting.
|
|
| 55. |
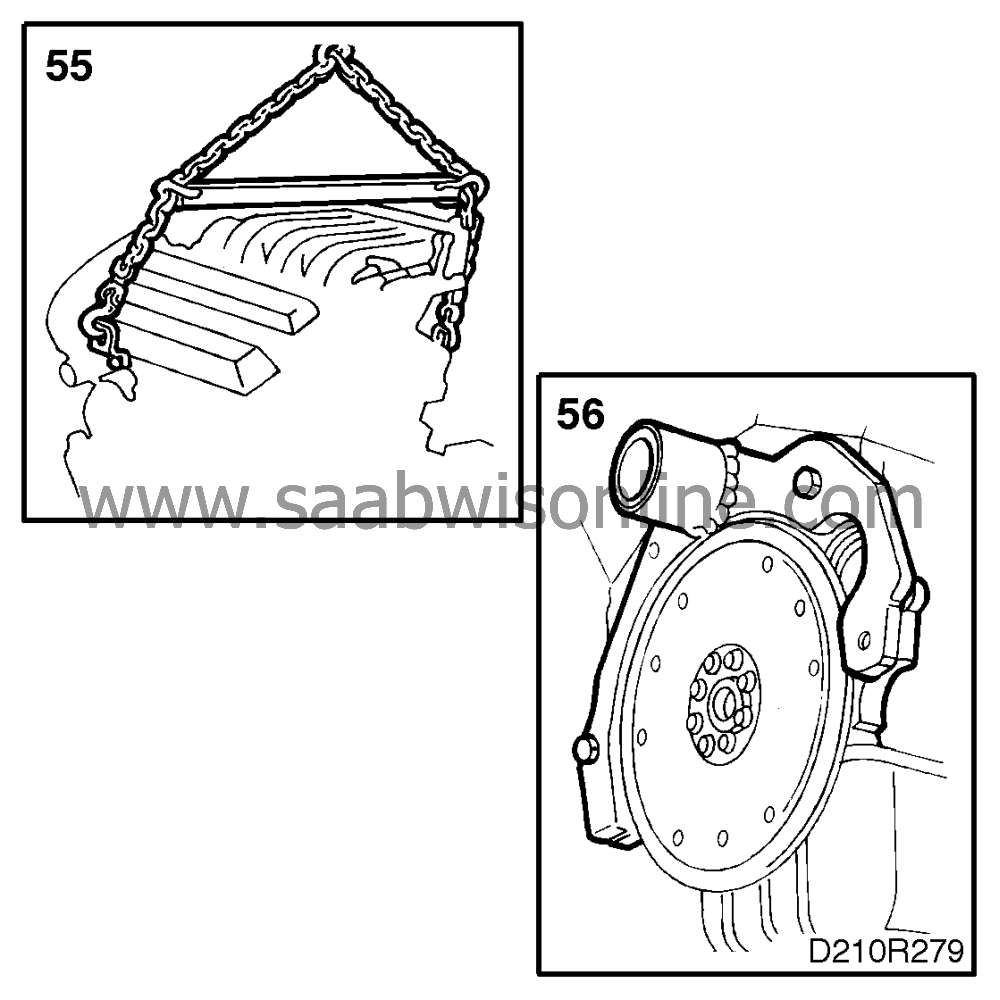
Fit a lifting sling to the engine and lift it off the stand. Remove the fixture and lower the engine onto a trolley.
|
|
| 56. |
Remove the holder.
|
|
| 57. |
Fit the oil filter.
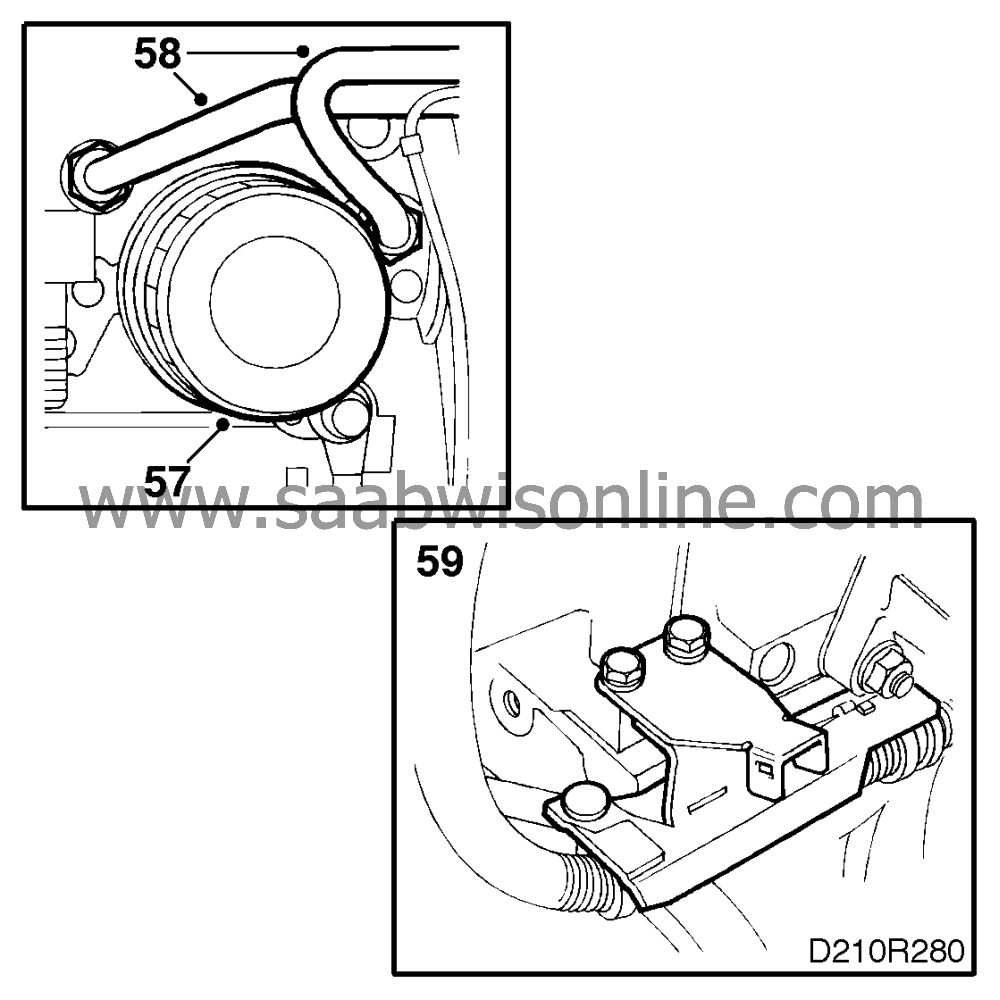
Turning torque 10 Nm (7.4 lbf ft). |
|
| 58. |
Connect the oil lines to the cylinder block.
Turning torque 30 Nm (22 lbf ft). |
|
| 59. |
Refit the bracket for the positive cable to the starter motor and alternator using the two remaining crankcase ventilation housing bolts.
|
|
| 60. |
Refit the coolant intake and the secondary air injection lines. Fix the connector between the oil lines.
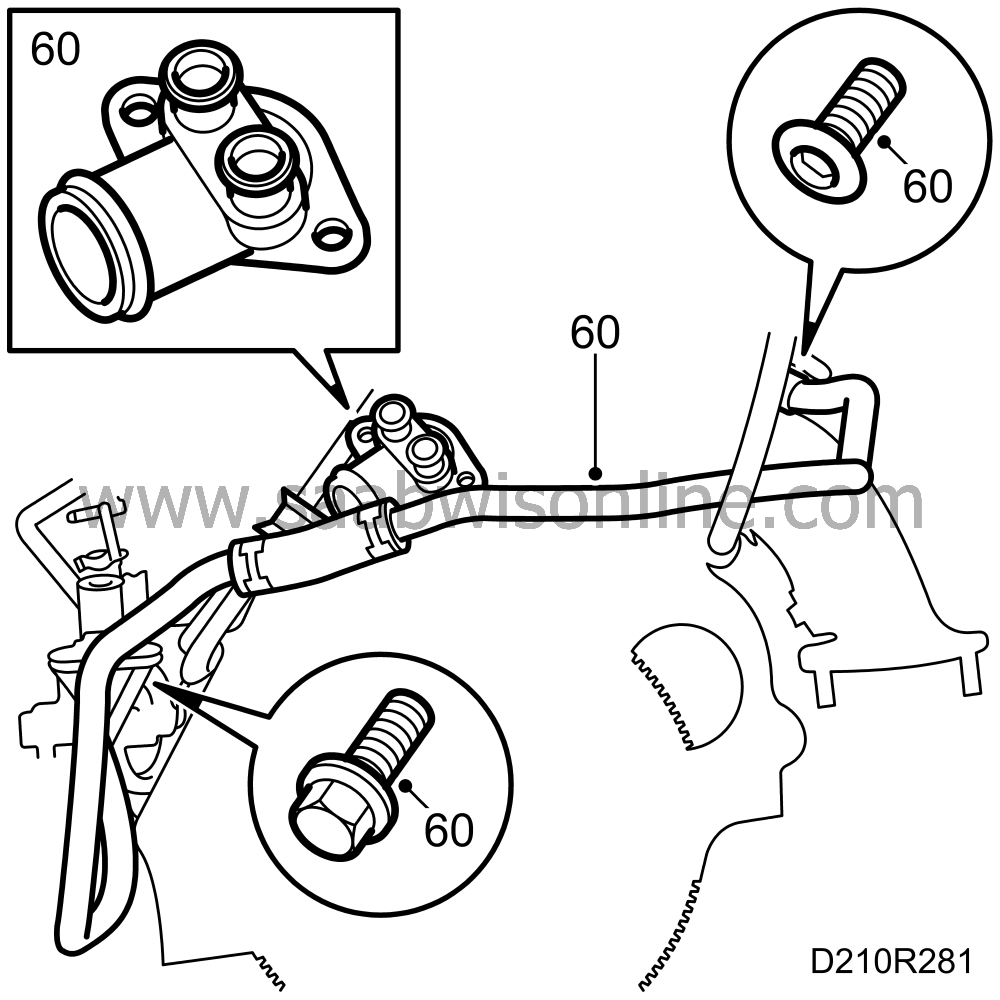
|
|
| 61. |
Position and tighten the gearbox.
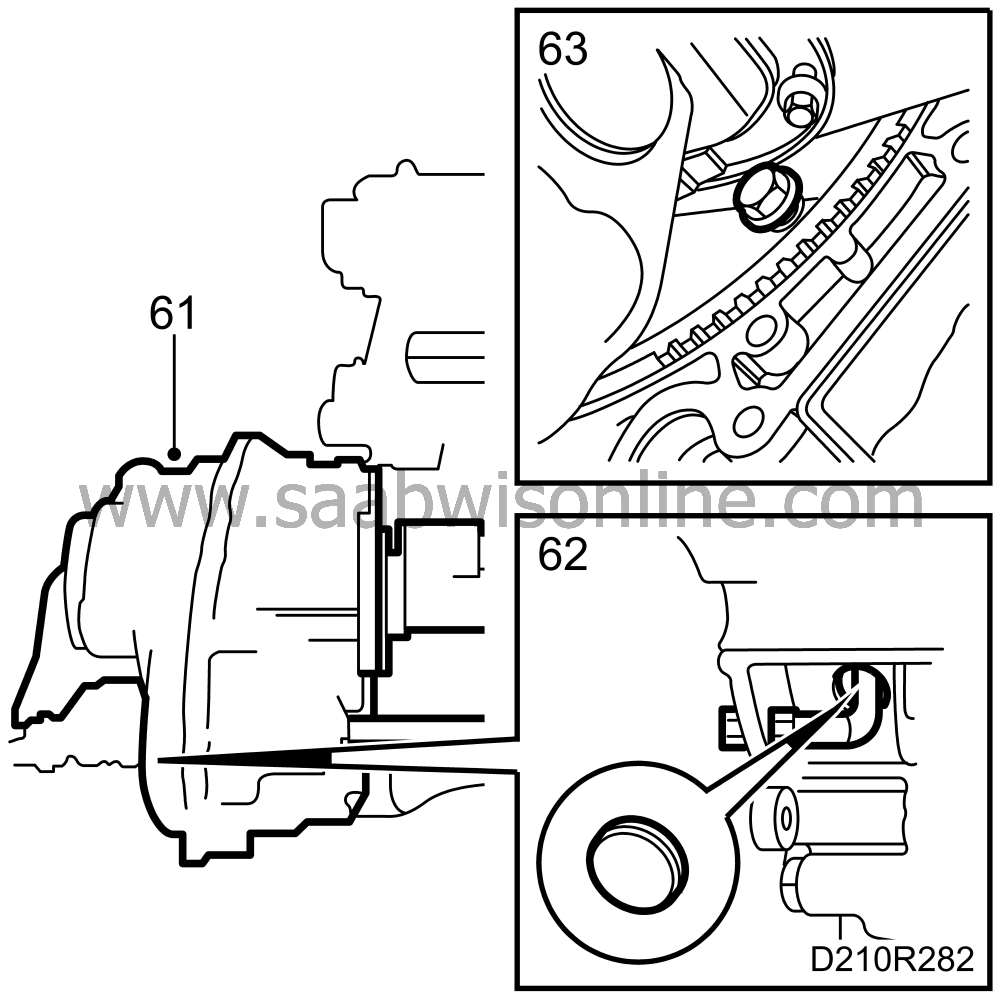
Turning torque 75 Nm (55 lbf ft). |
|
| 62. |
Remove the torque converter immobilizing tool (aut.).
|
|
| 63. |
Connect the drive plate and the torque converter by slowly rotating the crankshaft so that all bolts can be tightened (aut.).
Turning torque 30 Nm (22 lbf ft). |
|
| 64. |
Refit the cover plate.
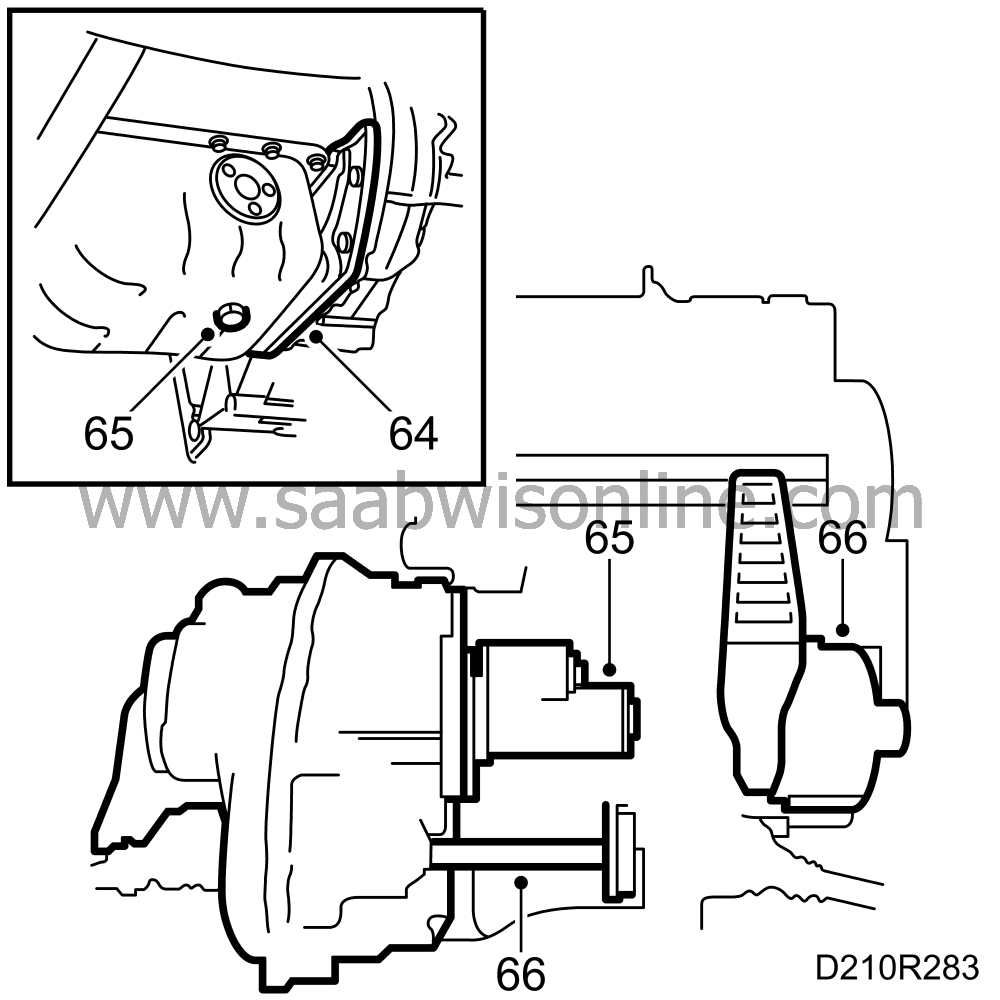
Turning torque 7 Nm (5 lbf ft). |
|
| 65. |
Fit the starter motor and connect the cables. Check that the oil drain plug is tight. Use a new seal.
|
|
| 66. |
Fit the support bearing bracket complete with pipe and internal drive node. Refit and reconnect the alternator.
|
|
| 67. |
Fit the drive belt.
The power train is now ready to be fitted into the car. |
|

 Warning
