Fault diagnosis, indicator and warning lamps(MIU 2)
|
|
Fault diagnosis, indicator and warning lamps
(MIU 2)
|
Includes:
|
•
|
SHIFT UP indicator lamp (pin 39)
|
|
•
|
TCS indicator lamp (pin 41)
|
|
•
|
TCS OFF warning lamp (pin 20)
|
|
•
|
SPORT indicator lamp (pin 23)
|
|
•
|
WINTER indicator lamp (pin 42)
|
|
•
|
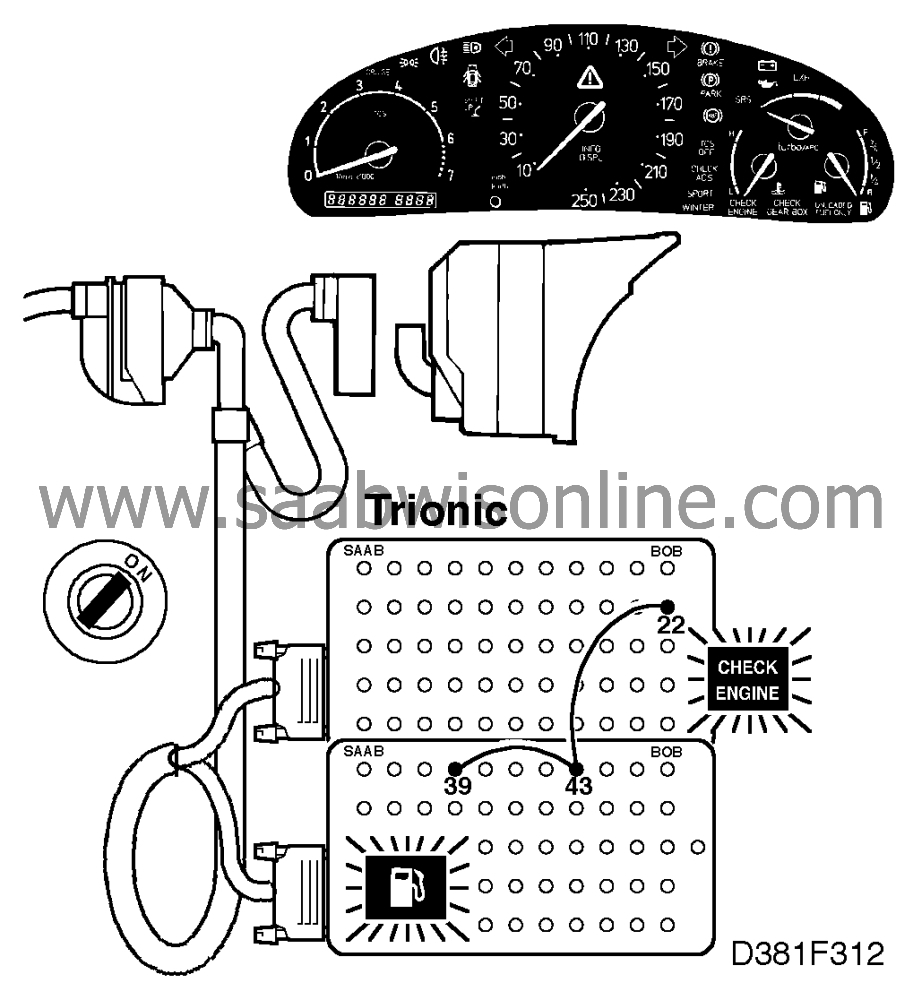
CHECK ENGINE lamp (MIL) (pin 22)
|
|
•
|
CHECK GEARBOX warning lamp (pin 28)
|
|
•
|
"Door open" warning lamp (pin 38)
|
|
•
|
CHECK ACS warning lamp (pin 27)
|
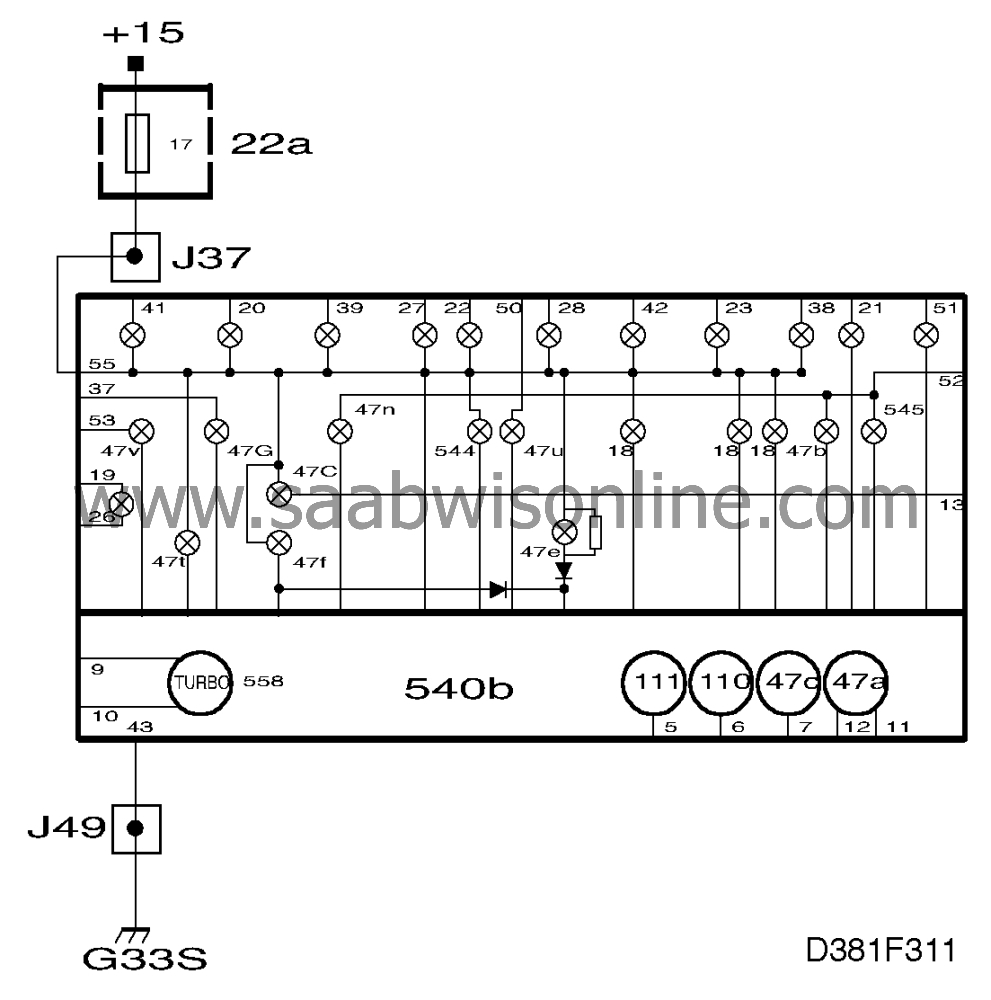
The above indicator and warning lamps are supplied with battery voltage from
the main instrument display panel (+15 circuit) and grounded in their respective systems
outside the main instrument display panel.
Fault symptoms
If none of the above indicator lamps work, fuse 17 has probably blown.
Indicator lamp does not light up when activated.
Diagnostic procedure
|
1.
|
If the lamp does not light up as it should,
the bulb is probably faulty and must be changed. If the lamp still fails to light up when
activated, check that the new bulb is OK by fitting it in place of another bulb in the main
instrument display panel that does light up.
|
|
2.
|
If the bulb is intact, check the main instrument display panel and the wiring
between it and the bulb's sensor by connecting a BOB to the 56-pin connector behind
the main instrument display panel (which should be connected).
|
|
3.
|
Switch on the ignition. Ground the pin on the BOB corresponding to the
bulb connection.

If the bulb lights up, there is an open circuit in the wiring between the main instrument
display panel and the bulb's sensor or in the sensor. Investigate the cause and take
appropriate action.
If the bulb does not light up, the fault is in the main instrument display panel. Continue
with point 4.
|
|
4.
|
Remove the main instrument display panel's rear section complete with
processor card and check that all leads between the processor card and the intermediate part
are securely located. If any lead has worked loose or is broken, continue on
 .
.
If the connections are OK, the fault is probably in the intermediate part with bulbs and
indicating instruments. Continue on
 .
.
|
Includes:
|
•
|
Indicator lamp, main beam (pin 37)

|
|
•
|
Indicator lamp, lights on (pin 53)
|
|
•
|
Indicator lamp, rear fog light (pin 52)
|
|
•
|
Indicator lamp, LH direction indicators (pin 51)
|
|
•
|
Indicator lamp, RH direction indicators (pin 21)
|
|
•
|
Indicator lamp, Cruise Control (pin 50)
|
|
•
|
Indicator lamp, EXH (pin 13)
|
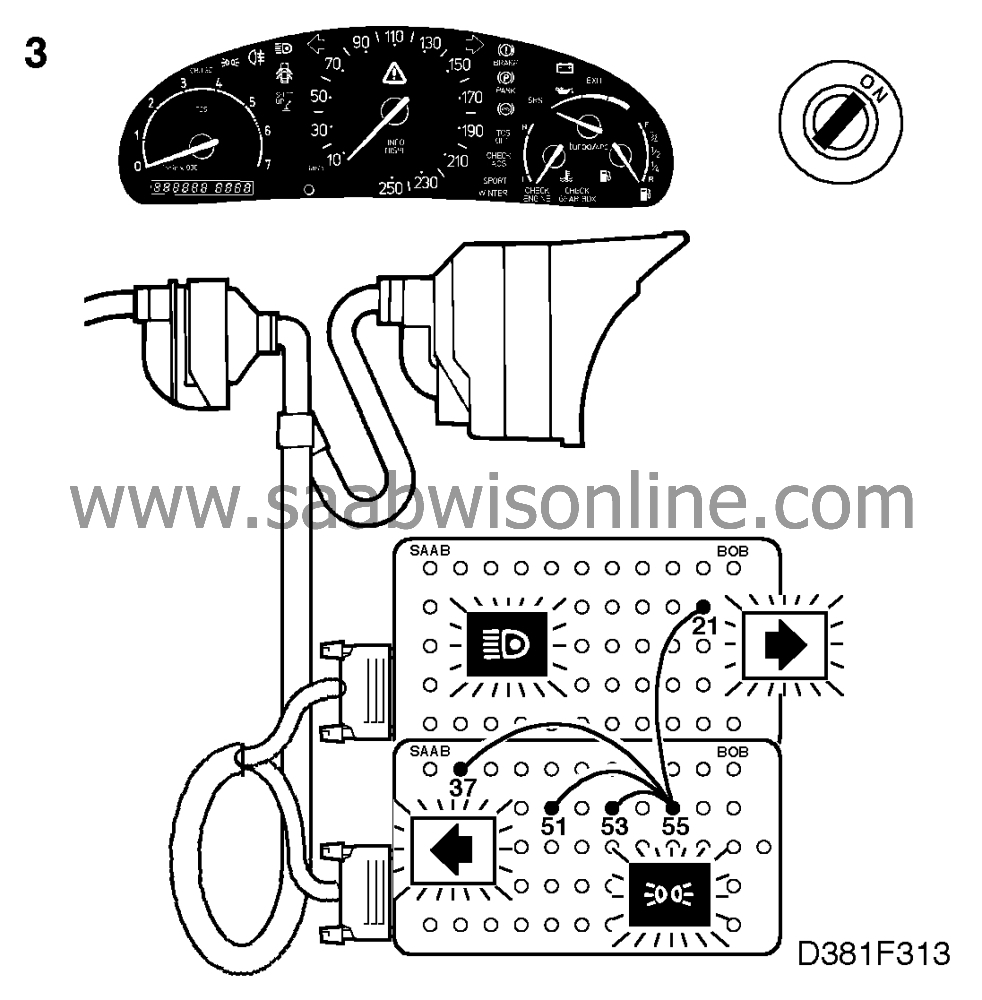
The above indicator and warning lamps are grounded in the main instrument
display panel and supplied with battery voltage from systems outside the main instrument
display panel.
Fault symptoms
None of the above indicator lamps (except the EXH lamp) light up when
activated.
Diagnostic procedure
|
1.
|
The fault could be because the
bulbs' driver stage on the processor card is faulty. Continue on
 .
.
|
Fault symptoms
The indicator/warning lamp does not light up when activated.
Diagnostic procedure

|
1.
|
If the lamp does not light up as it should, the bulb
is probably faulty and must be changed.
If the lamp still fails to light up when activated, check that the new bulb is OK by fitting it
in place of another bulb in the main instrument display panel that does light up.
|
|
2.
|
If the bulb is intact, check the main instrument display panel and the wiring
between it and the bulb's sensor by connecting a BOB to the 56-pin connector behind
the main instrument display panel (which should be connected).
|
|
3.
|
Switch on the ignition.
Supply the bulb with current, using the BOB, by connecting pin 15 to the corresponding
pin to which the bulb is connected.
If the bulb lights up, there is an open circuit in the wiring between the main instrument
display panel and the bulb's sensor or in the sensor. Investigate the cause and take
appropriate action.
If the bulb does not light up, the fault is in the main instrument display panel. Continue
with point 4.
|
|
4.
|
Remove the main instrument display panel's rear section complete with
processor card and check that all leads between the processor card and the intermediate part
are securely located. If any lead has worked loose or is broken, continue on
 .
.
If the connections are OK, the fault is probably in the intermediate part with bulbs and
indicating instruments. Continue on
 .
.
|

 .
.


