Windscreen
| Windscreen |
The windscreen of the Saab 900 is a load-bearing part of the car body structure. It accounts for a large proportion of the body's torsional rigidity. Its design and mounting have been thoroughly tested to ensure conformity with legal collision safety requirements. The airbags in the airbag system are supported by the windscreen when they inflate. For the proper performance of the car and the safety of the occupants, it is therefore of vital importance to ensure that the windscreen is correctly mounted. The only windscreen adhesive that has been collision-tested and approved for aftermarket use is Betamate E 2400. So that Saab Automobile can accept responsibility and guarantee that the car will have the same high standard of collision safety after replacement of the windscreen as it had before, the windscreen must be bonded with Betamate E 2400 as described below.
| To remove |
| 1. |
Lower the door windows so that the windscreen will not be pressed out by the sudden pressure build-up in the cabin if one of the doors is closed while work is in progress.
|
|
| 2. |
Remove the windscreen wipers.
|
|
| 3. |
Remove the cover over the bulkhead partition space and the water guard.
|
|
| 4. |
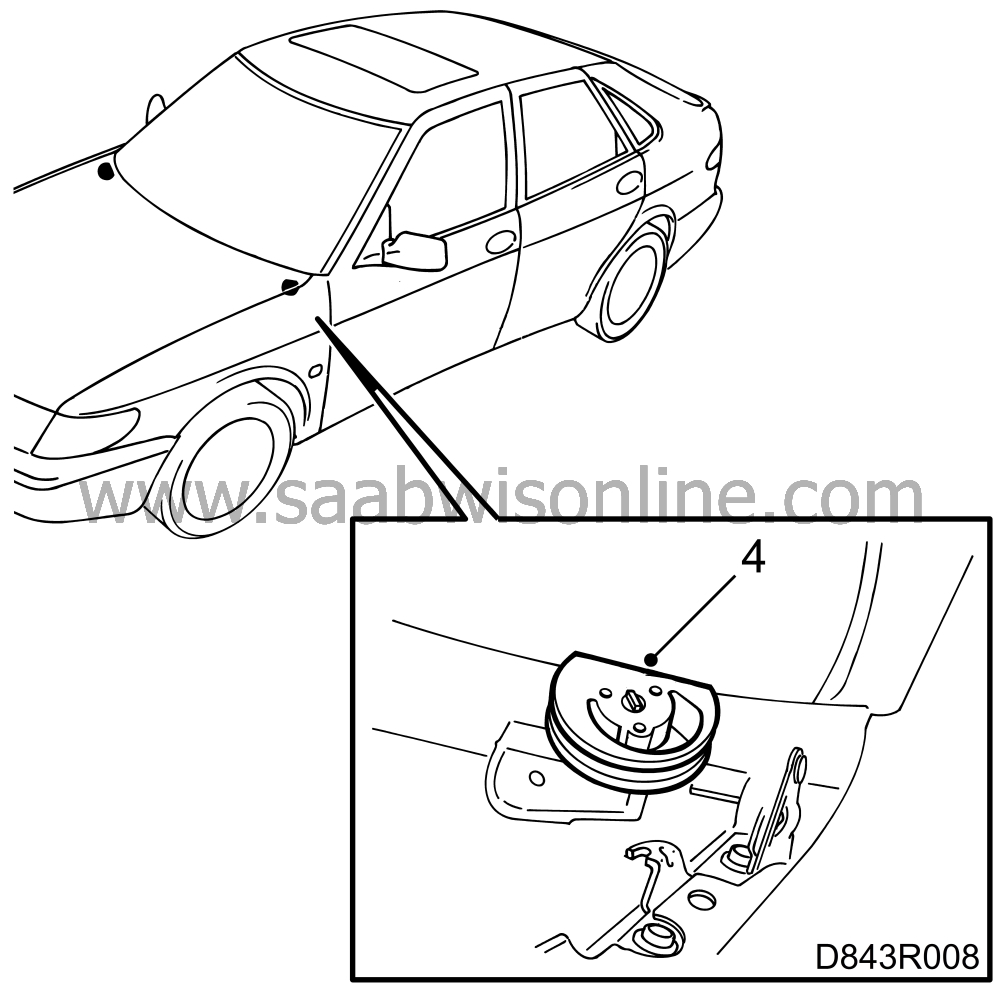
Turn the eccentric stops to the open position.
|
|
| 5. |
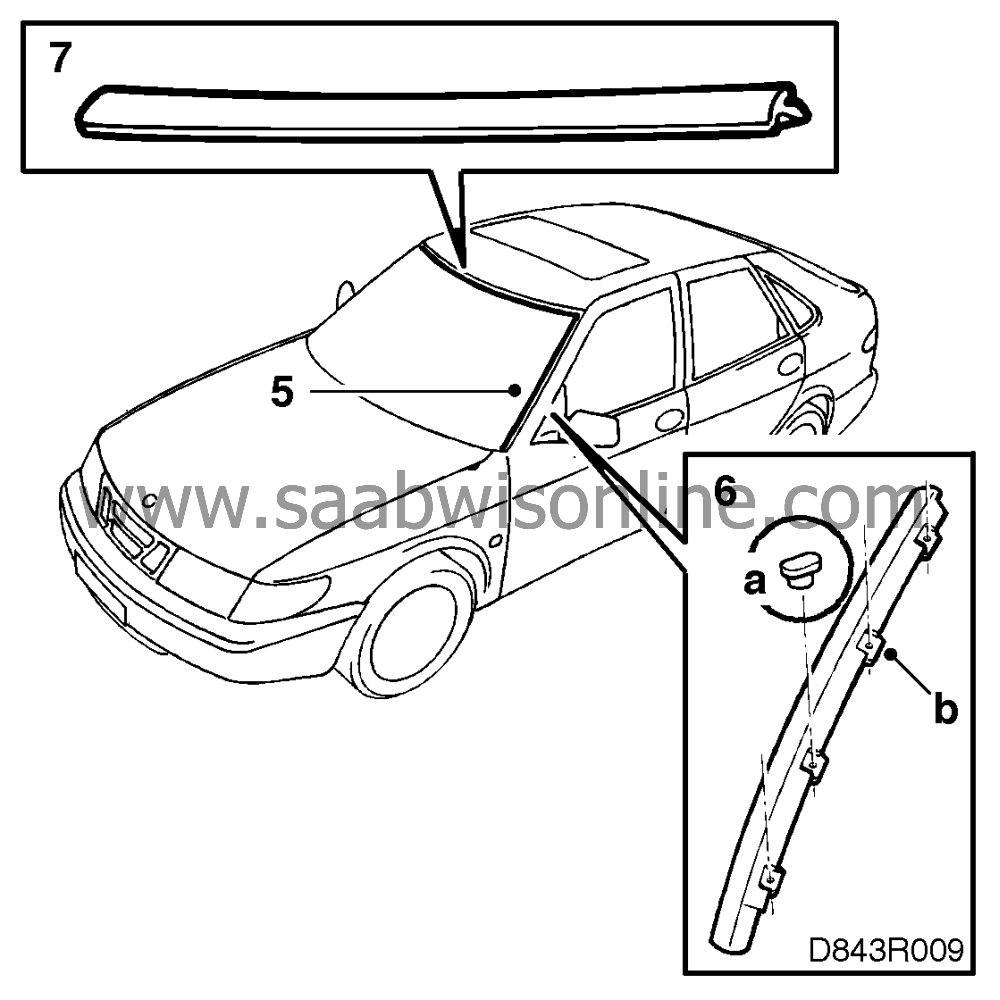
Remove the roof sealing from the A pillars on both sides.
|
|
| 6. |
Remove the decor strips on the outside of the A pillars by:
|
|
| 6.a. |
Pull out the plastic pins.
|
| 6.b. |
Gently prise loose the plastic clips, using a small screwdriver. Exercise care to avoid damaging the paintwork on the A pillar.
|
| 7. |
Remove the upper decor strip and pull off the retaining strip with a pair of pliers.
|
|
| 8. |
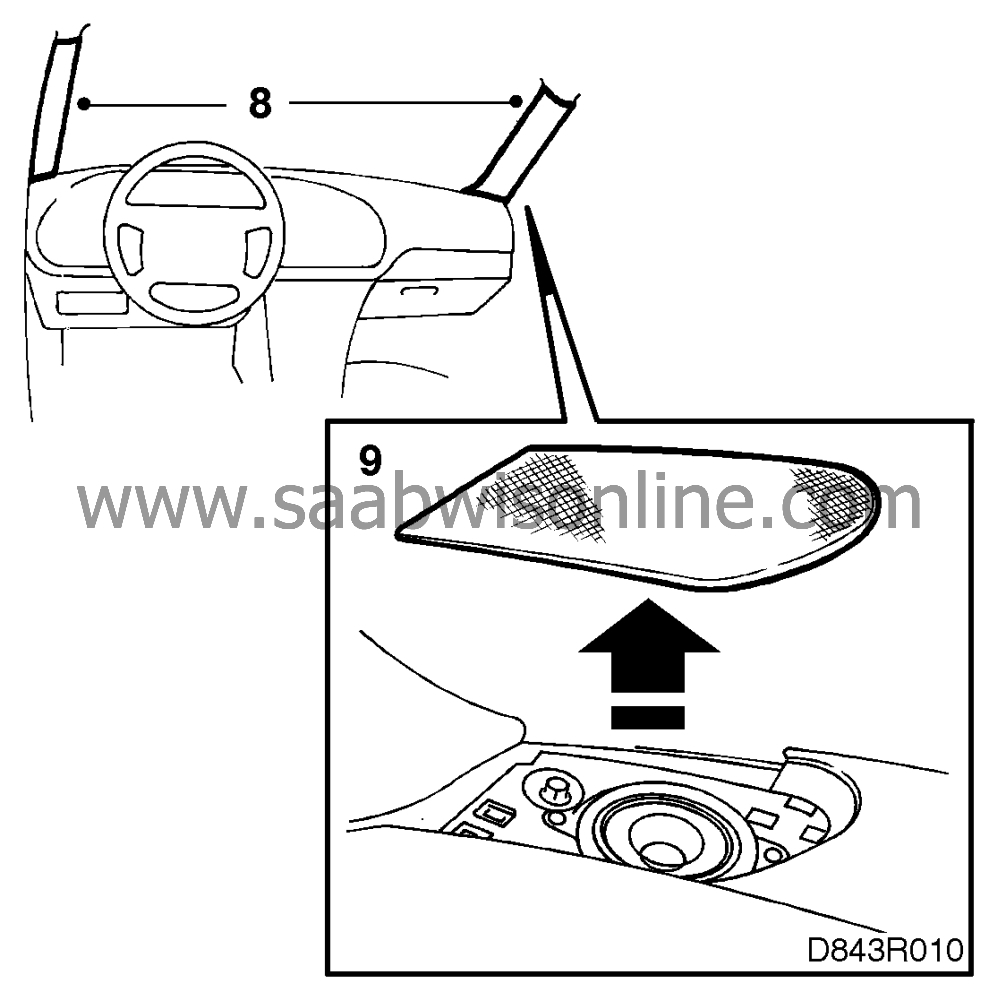
Remove the A-pillar trim.
|
|
| 9. |
Remove the loudspeaker grille. Remove the sun visors with supports. Remove the rear-view mirror cover. Bend down the headlining a short way and place some padding (a cloth or similar) between the headlining and the outer roof.
|
|
| 10. |
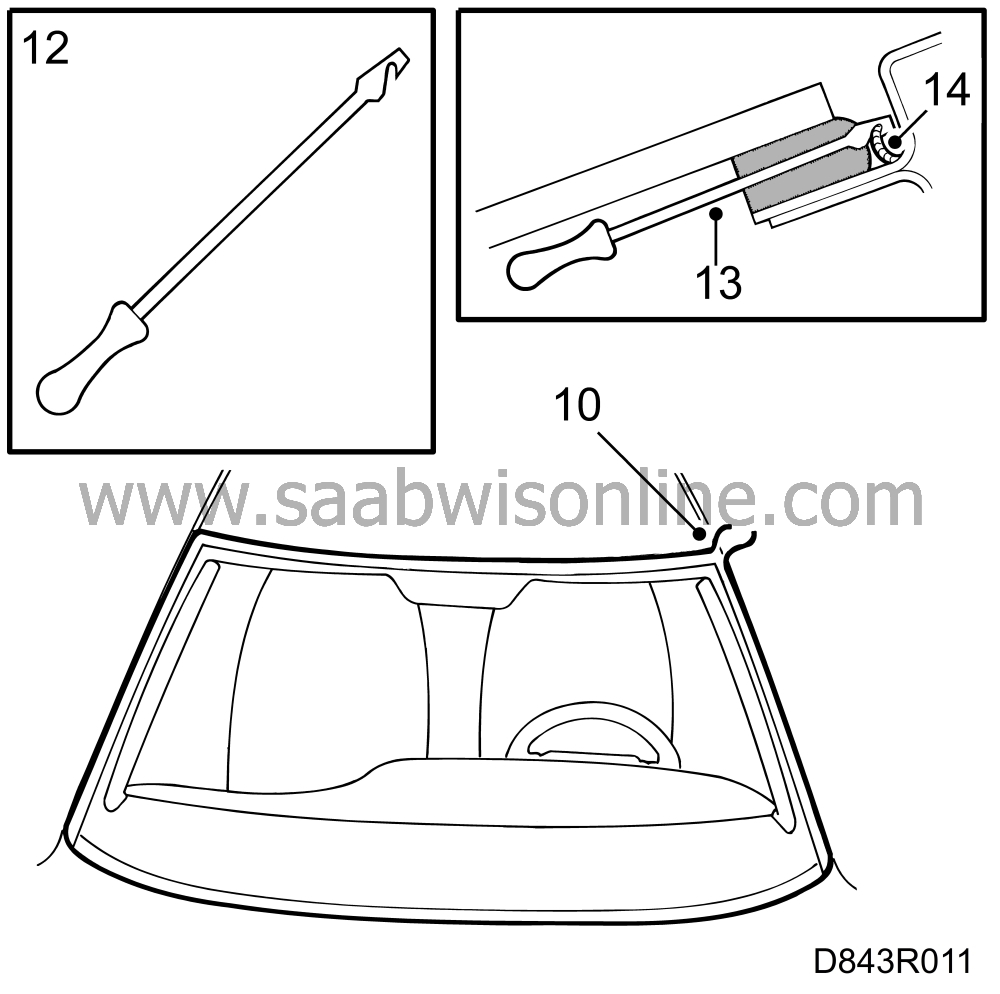
Lay cutting wire, part no. (16) 82 92 831 or (16) 82 93 219, round the windscreen so that the ends meet at one of the top corners.
|
|
| 11. |
Press the cutting wire down all round the windscreen, using a plastic wedge, wooden spatula or other suitable tool.
|
|
| 12. |
Fabricate a special tool by cutting a slot in a long, narrow screwdriver as shown. This will enable you to pull the cutting wire through the adhesive quickly and easily. Alternatively, music wire could be used instead.
|
|
| 13. |
Press the screwdriver through the adhesive from the inside at the top corner of the windscreen where the ends of the cutting wire meet.
|
|
| 14. |
Hook one end of the cutting wire in the screwdriver and pull the wire through the adhesive and into the cabin.
|
|
| 15. |
Pull the other end of the wire through the adhesive in the same way. Avoid crossing the wires.
|
|
| 16. |
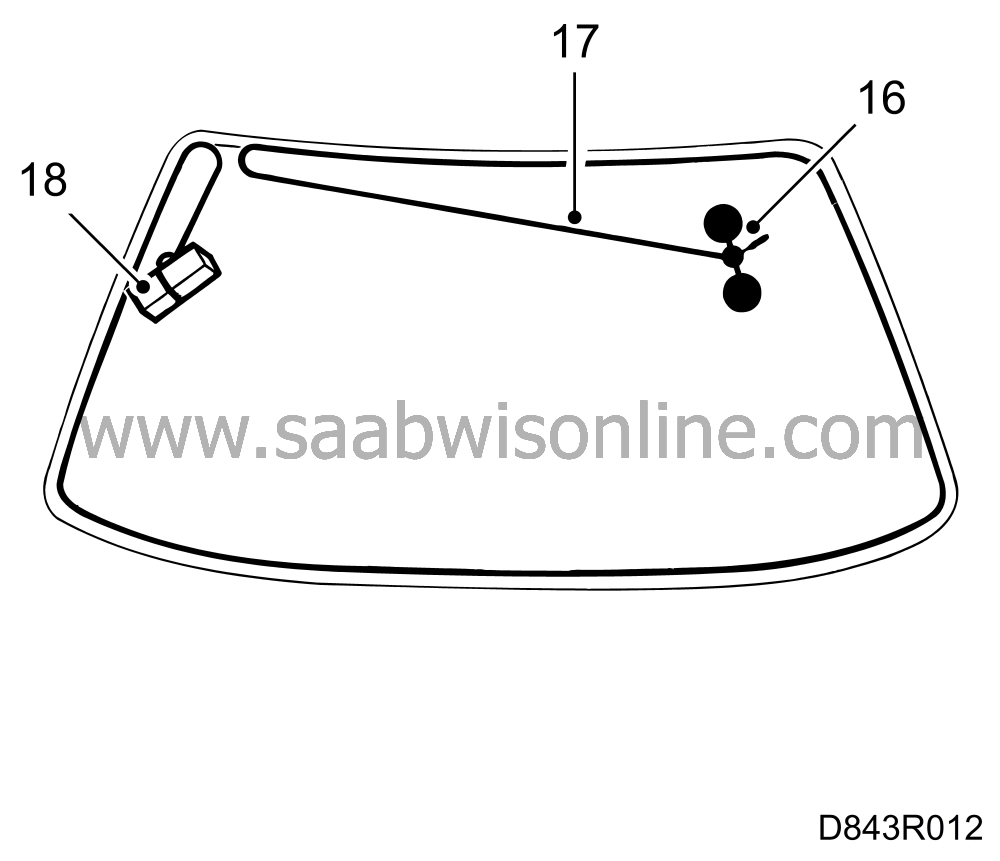
Fit the wire coiler, part no. (16) 82 92 823, at the other top corner inside the windscreen.
|
|
| 17. |
Pull out the end of the cutting wire nearest the wire coiler and fasten it to the coiler reel.
|
|
| 18. |
Tie the other end of the cutting wire to a piece of wood.
|
|
| 19. |
Use a ratchet handle to crank the coiler so that the wire cuts through the adhesive. Reposition the wire coiler as the windscreen comes loose. The wire must cut through the adhesive all the time and not just be pulled through. Keep the wire close to the windscreen so that the insulation at the bottom is not damaged. Resistance will be greatest at the corners. If there is a danger of the wire breaking, wait for 10-15 seconds to give the wire time to work into the adhesive.
|
|
| 20. |
Lift out the windscreen.
|
|
| To fit |
| Important | ||
|
Betamate E 2400 hardens in 4 hours at + 23 ° C and 50%% relative humidity. To prevent the windscreen from loosening or becoming dislodged, be careful to avoid jolting the car or banging on it during this period. Do not slam the doors, boot lid or bonnet. The car must not be rocked or rolled. Neither should any clamping of the windscreen take place during the time the adhesive is hardening. |
||
The car should be standing evenly with all four wheels on a level surface when the windscreen is fitted in place. To ensure the best possible results, it is extremely important for all surfaces that have been cleaned or primed to be kept free from dust and dirt while work is in progress. The same goes for the adhesive when it has been applied. Once work has been started it should therefore be continued without interruption until the windscreen has been fitted and the adhesive hardened. The adhesive begins to harden as soon as the contents of both tubes are mixed. The windscreen should therefore be fitted into place within five minutes from the time that application of the bead of adhesive was first begun. Note that points 6 10 must without exception be carried out in the given order to ensure satisfactory results with maximum adhesion.
| 1. |
Trim the bead of adhesive on the frame to a maximum thickness (height) of 2 mm. If the old windscreen is to be fitted back in place, the bead of adhesive on it must also be trimmed to a thickness of 2 mm. Old, firmly-adhering adhesive makes a good key for the fresh bead of adhesive. Remove all loose adhesive from the paintwork and glass.
|
|
| 2. |
Use a vacuum cleaner to remove all loose particles and dirt from the sheet metal flange.
|
|
| 3. |
Make good any damage to the paintwork.
|
|
| • |
Scrape off any loose flakes of paint, using a knife.
|
| • |
Wash thoroughly with Teroson FL cleaning agent.
|
| • |
Apply primer. Use Standox 1K Füllprimer.
|
| • |
Apply the finish coat.
|
||||||||||
| 4. |
Apply body primer, part No. (45) 301 87 02, to any painted areas that have been touched up. Body primer must
not
be used on old, firmly adhering adhesive.
|
|
| 5. |
Attach the glass suckers to the outside of the windscreen and place the glass on trestles with the inside facing upwards.
|
|
| 6. |
Wash the edge of the glass thoroughly, using the cleaning solution supplied with the adhesive kit. Carefully wet the edge with a cloth and then use the lint-free cloth supplied with the adhesive kit to wipe it dry. Avoid touching the cleaned surface.
Important
|
||||||||||
| 7. |
Apply glass primer to the cleaned surface. Apply it in a bead 20 mm wide at the lower edge of the windscreen directly above the dotted line. Leave the primer to dry for ten minutes. Use the glass primer supplied with the adhesive kit.
|
|
| 8. |
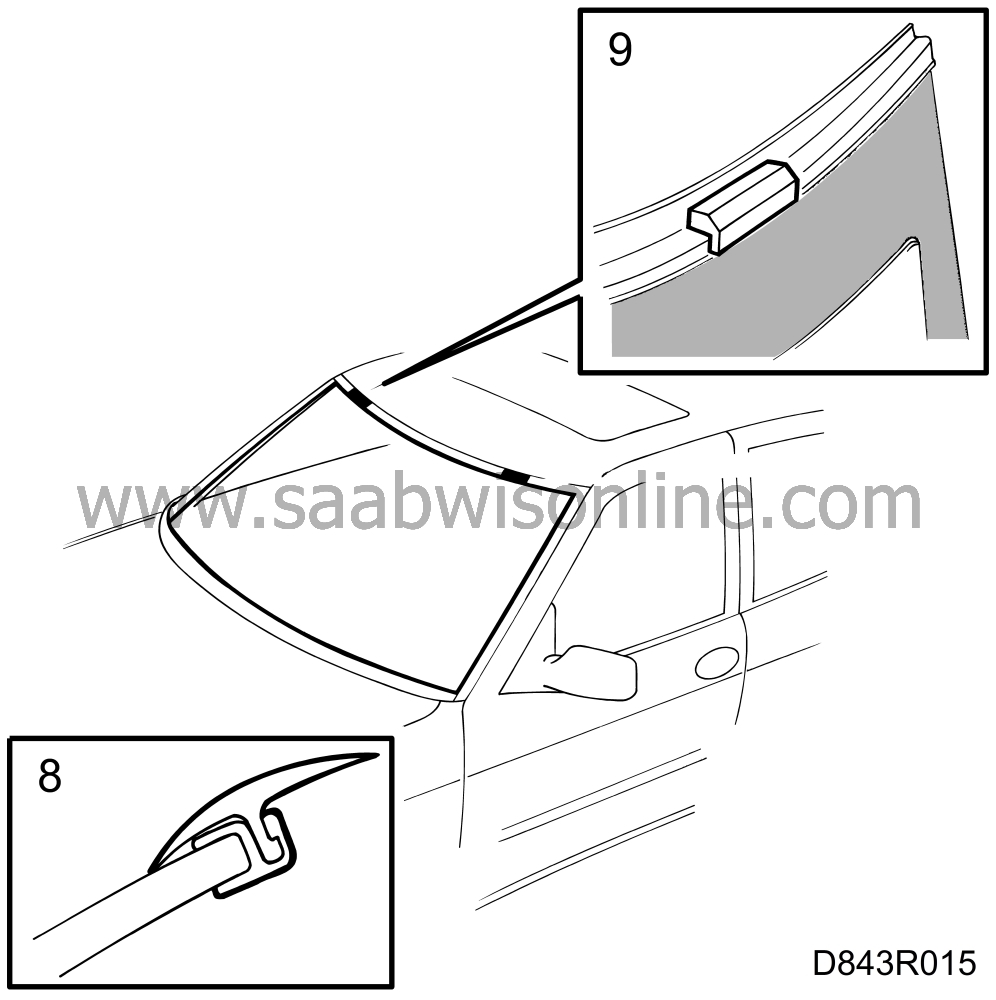
Press the retaining strip with the decor strip onto the top of the windscreen. The decor strip should protrude by an equal amount on both sides. Avoid touching the primed surface.
|
|
| 9. |
Place the spacers on the windscreen.
|
|
| 10. |
Apply the adhesive as follows:

|
|
| • |
Cut 5 mm off the tip of the adhesive applicator nozzle. Heat the nozzle in hot water and adjust the opening to the shape and dimensions shown.
|
| • |
Adjust the pressure of the adhesive gun to obtain a bead of adhesive measuring 7 x 11 mm.
|
| • |
Hold the gun perpendicular to the surface and apply a bead of adhesive to the primed surface along the edge of the retaining strip. Begin at the bottom of the windscreen. Check that there are no cavities or voids in the adhesive.
|
| 11. |
Fit the windscreen in place.

|
|
| 11.a. |
Adjust the position of the windscreen against the roof. Ensure the distance to the right and left-hand A-pillars are equal.
|
| 11.b. |
Hold the windscreen in this position and turn the eccentric stops until they rest against it.
|
||||||||||
| 12. |
Slightly raise the top edge of the decor strip midway along the top of the windscreen and pour water over it. Check for leaks inside the car.
|
|
| 13. |
Fit the trim mouldings back in place on the outsides of the A pillars and check the fit of the windscreen.

|
|
| 14. |
Leave the adhesive to harden before continuing the fitting process. Betamate E 2400 hardens in 4 hours at + 23
°
C and 50%% relative humidity.
|
|
| 15. |
Refit the loudspeaker. Remove the padding from between the headlining and outer roof. Fit the sun visors with supports and the rear-view mirror cover.
|
|
| 16. |
Refit the A-pillar trim.
|
|
| 17. |
Fit the roof seal in place.
|
|
| 18. |
Refit the cover over the space between the bulkhead partitions.
|
|
| 19. |
Refit the windscreen wipers and check their operation and parking position.
|
|
| 20. |
Clean the windscreen both inside and out.
|
|


