ASSEMBLY
| ASSEMBLY |
| Saab 9-2X 2.5i Linear |
RACK HOUSING ASSEMBLY
| Important | ||
|
Use only genuine grease for the gearbox. |
||
Specified grease for gearbox:
VALIANT GREASE M2 (Part No. 32005010)
Apply power steering fluid to a new oil seal.
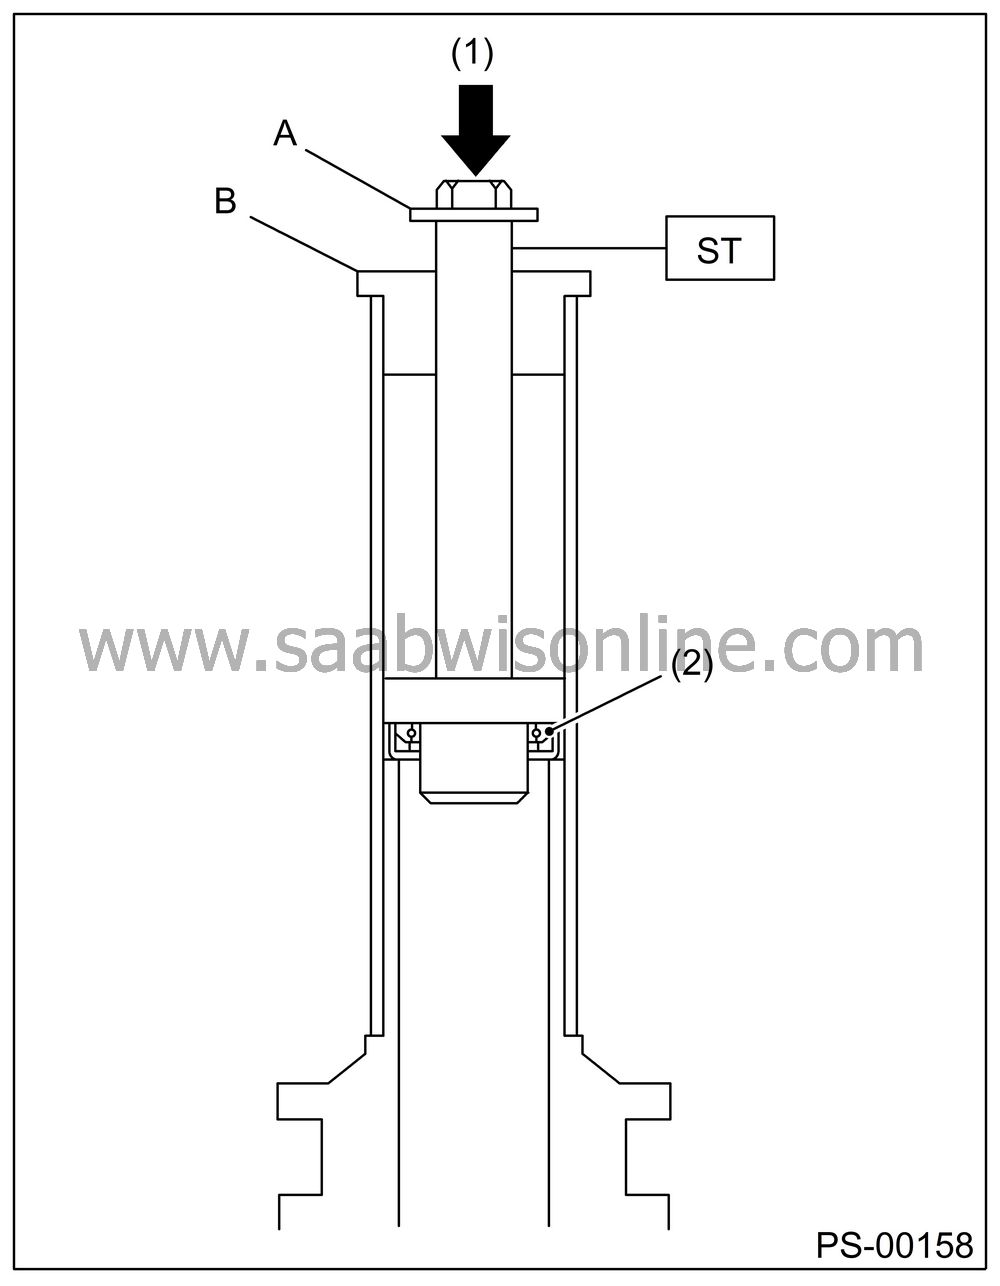
Install the oil seal in correct position as shown in the figure. Push the oil seal using a press until portion A of ST contacts face of B.
ST 32005046 INSTALLER
| Important | ||
|
Be careful not to damage or scratch the cylinder inner wall. |
||
|
(1)
|
Press
|
|
(2)
|
Oil seal
|
Fix the rack housing in vise using ST.
ST 32005190 STAND
| Note | ||
| • |
When fixing the rack housing in vise, be sure to use
this special tool. Do not fix rack housing in vise using pad such
as aluminum plates, etc.
|
|
| • |
When using the old rack housing, be sure to clean and
remove rust before assembling. Check pinion housing bushing carefully.
|
|
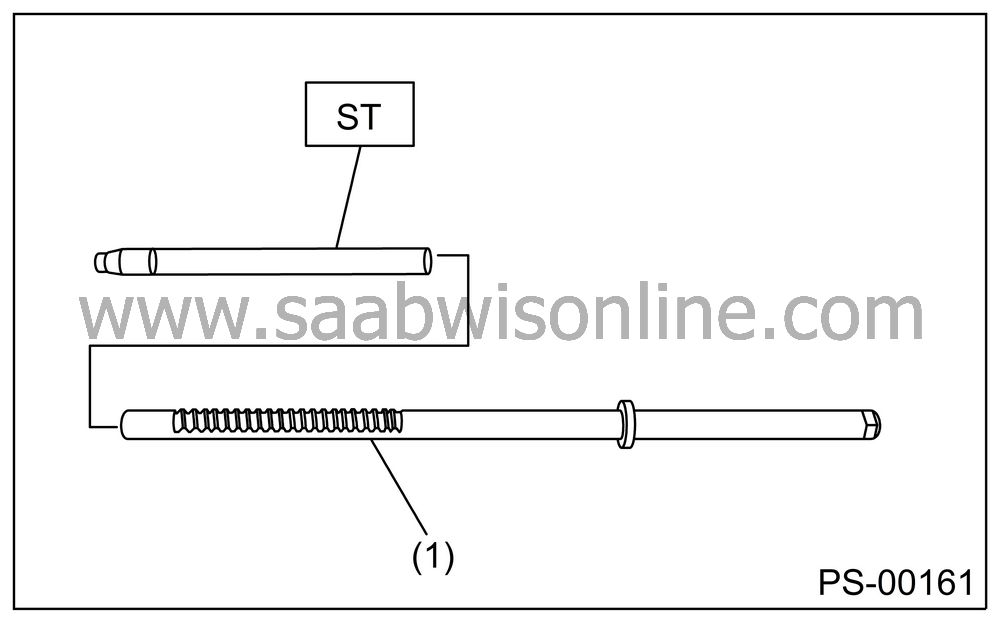
Fit the ST over toothed portion of rack assembly, and check for binding or irregular insertion. If any deformation is noted on flats at the end of rack, shape by using file, and wash with cleaning fluid.
ST 32005194 COVER & REMOVER
|
(1)
|
Rack assembly
|
Apply genuine grease to the teeth of thoroughly washed rack assembly, and then fit the ST over the toothed portion.
| Important | ||
| • |
Be careful not to block the
air passage with grease. Remove excessive grease.
|
|
| • |
After fitting cover, check the air passage hole for
clogging. If clogged, open by removing grease from the hole.
|
|
Before inserting the rack assembly, apply a coat of specified power steering fluid to the surfaces of ST and rack piston.
Insert the rack assembly into rack housing from cylinder side, and then remove the ST after it has passed completely through oil seal.
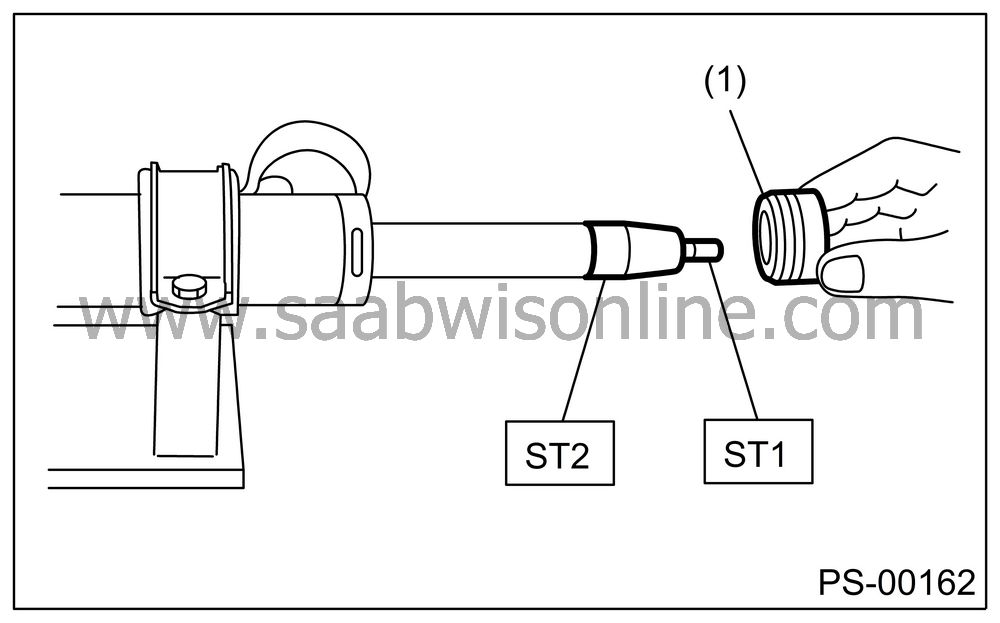
Fit the ST1 and ST2 over the end of rack, and then install a new rack bushing.
ST1 32005195 GUIDE
ST2 32005216 GUIDE
| Important | ||
| • |
If burrs or nicks are found
on this guide and rack shaft portion, remove by filing.
|
|
| • |
Dip the rack bushing in specified power steering fluid
before installing, and pay attention not to damage O-ring and oil
seal.
|
|
|
(1)
|
Rack bushing
assembly
|
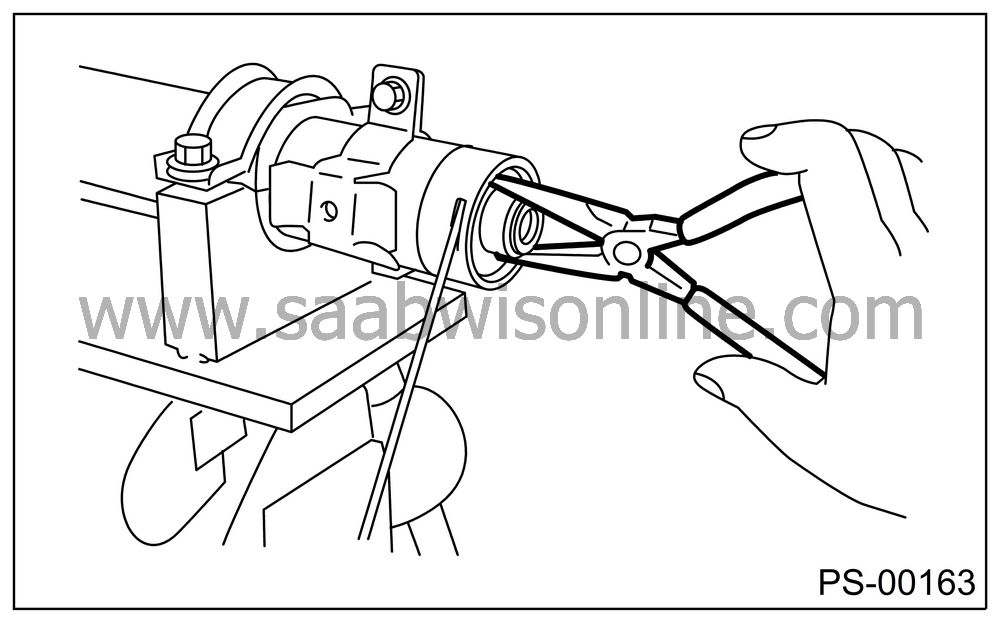
Insert the rack stopper into the cylinder tube until internal groove (on cylinder side) is aligned with external groove (on rack stopper). Turn the rack stopper with ST so that the rack stopper hole is seen through cylinder slits.
Insert the rack stopper into the rack housing, and then wrap a new circlip using a sharp pointed pliers to secure the rack stopper in position.
| Important | ||
|
Be careful not to scratch the rack while winding circlip. |
||
| Note | ||
|
Rotate the wrench another 90 to 180° after end of circlip has been wrapped in. |
Apply genuine grease to dust cover, and then install the dust cover to valve assembly.
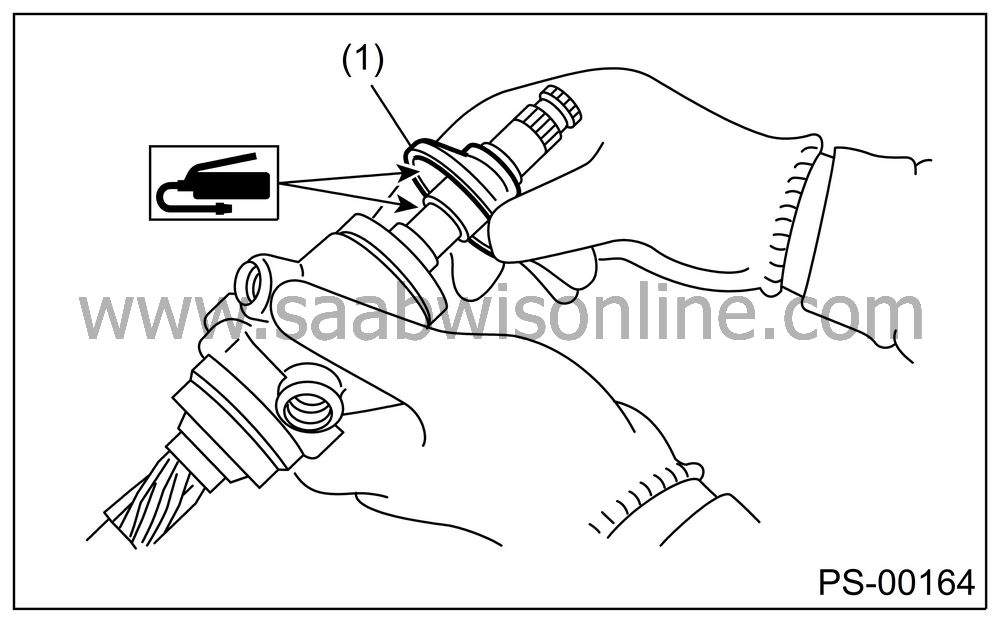
|
(1)
|
Dust cover
|
Apply genuine grease to the pinion gear and bearing of valve assembly.
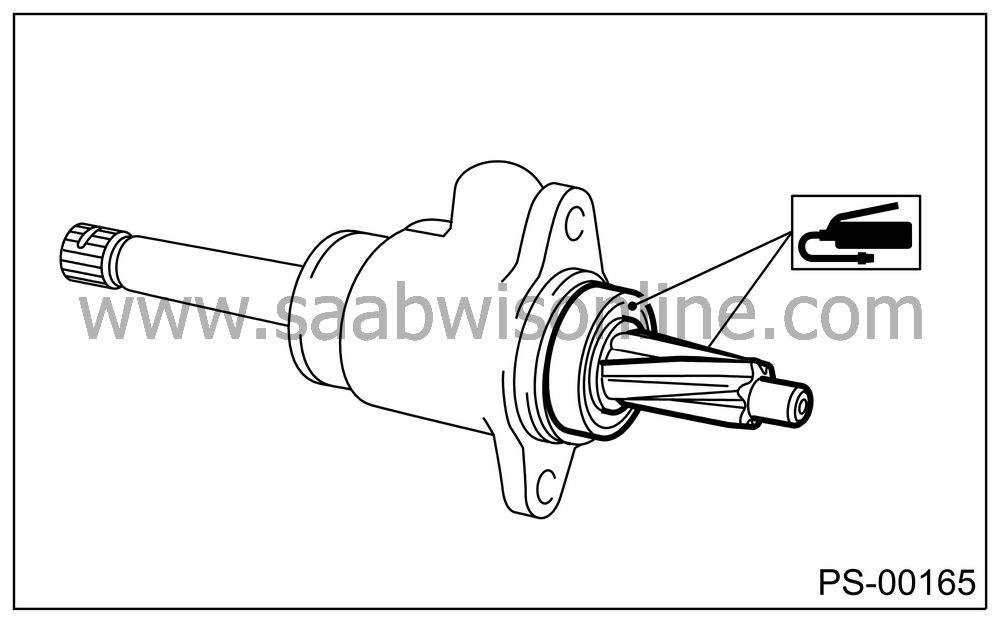
Install a new gasket on valve assembly. Insert the valve assembly into place while facing rack teeth toward pinion.
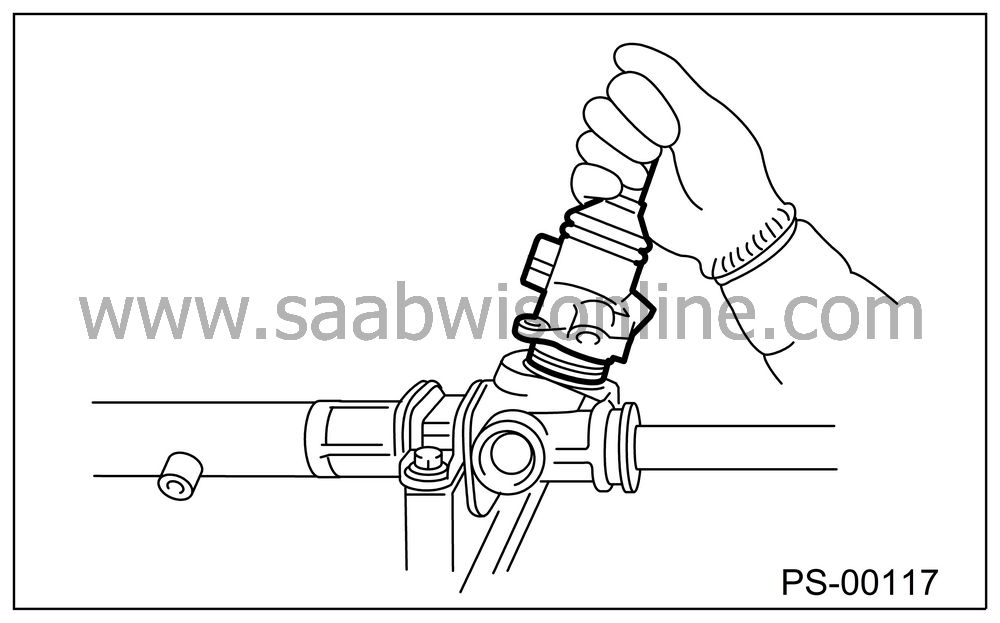
Tighten the bolts alternately to secure valve assembly.
Tightening torque:
25 Nm (2.5 kgf-m, 18.1 ft-lb)
| Important | ||
|
Be sure to alternately tighten the bolts. |
||
Temporarily install the rack, and then operate it from lock to lock two or three times to make it fit in. Remove the grease blocking air vent hole.
| Important | ||
|
If operating the rack from lock to lock without installing tie-rod, it may damage the oil seal. Always install the tie-rods LH and RH. |
||
Apply a coat of grease to the sliding surface of sleeve and seating surface of spring, and then insert sleeve into steering body.
Charge the adjusting screw with grease, and then insert the spring into adjusting screw and install on steering body.
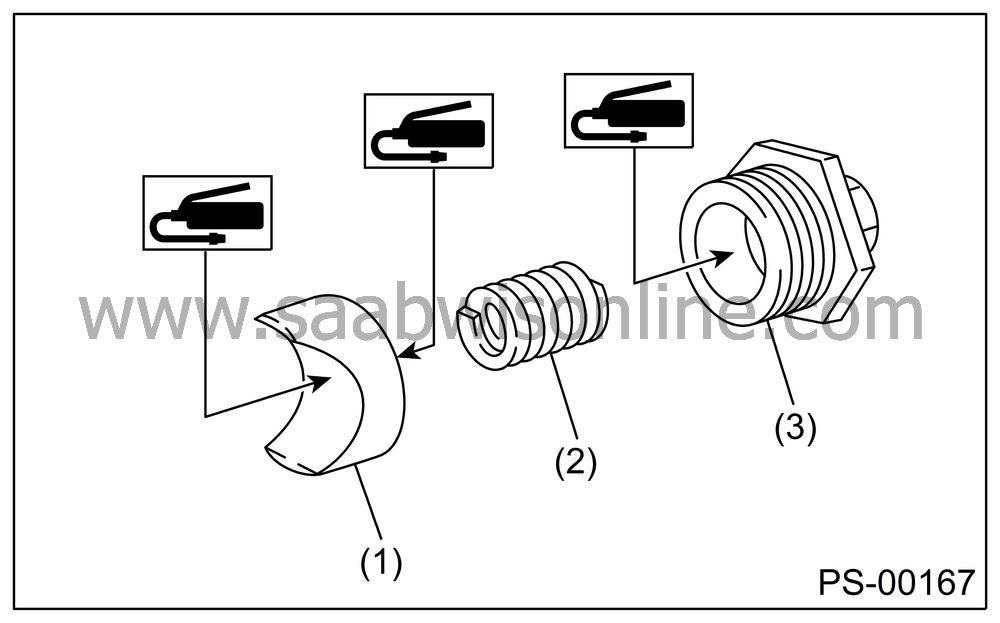
|
(1)
|
Sleeve
|
|
(2)
|
Spring
|
|
(3)
|
Adjusting
screw
|
Tighten the adjusting screw to specified torque.
Tightening torque:
7.4 Nm (0.75 kgf-m, 5.4 ft-lb)
After tightening to the specified tightening torque, loosen it by 25°.
Remove the tie-rod.
Verify that play is within specified value.

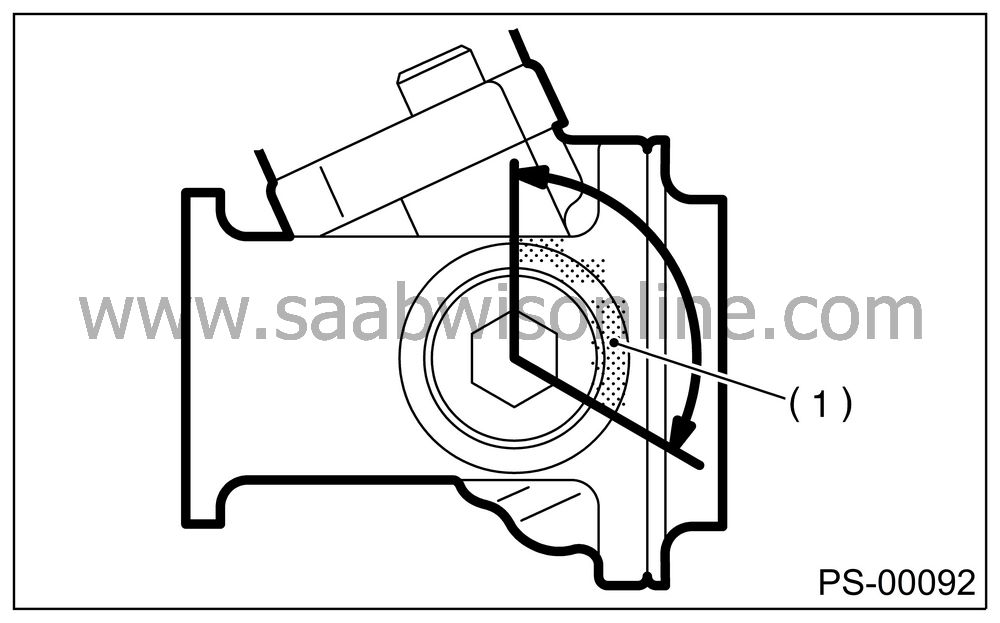
Loosen the adjusting screw, and then apply liquid gasket to at least 1/3 of the entire perimeter of adjusting screw thread.
Liquid gasket:
THREE BOND 1141
|
(1)
|
Apply liquid
gasket to at least 1/3 of entire perimeter.
|
Tighten the adjusting screw to specified torque.
Tightening torque:
7.4 Nm (0.75 kgf-m, 5.4 ft-lb)
After tightening to the specified tightening torque, loosen it by 25°.
Install the lock nut. While holding the adjusting screw with a wrench, tighten lock nut using ST.
ST 32005191 SPANNER
Tightening torque (Lock nut):39 Nm (4.0 kgf-m, 28.9 ft-lb)
| Note | ||
|
Hold the adjusting screw with a wrench to prevent it from turning while tightening lock nut. |
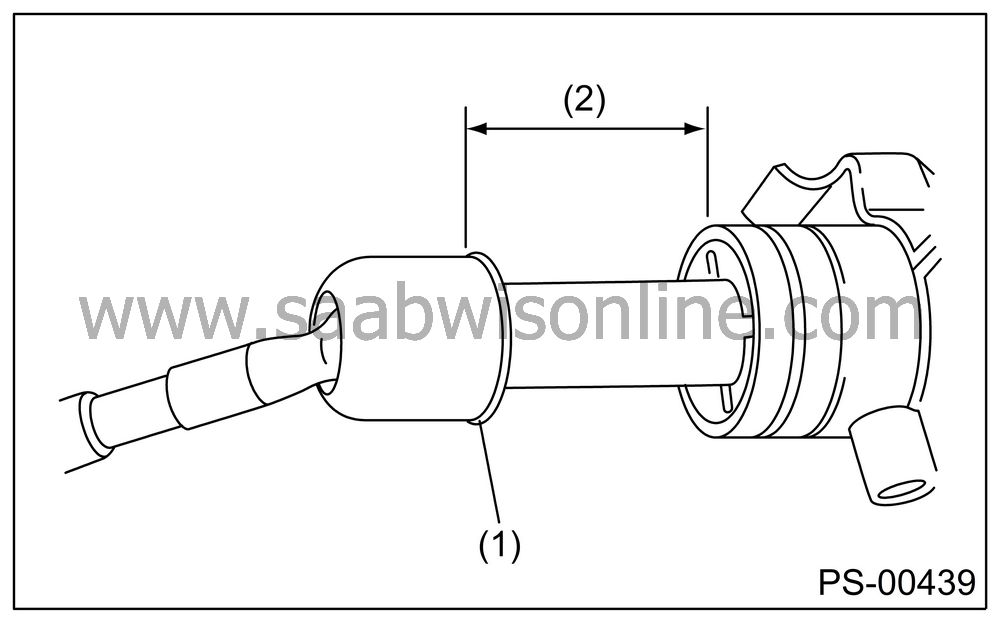
Extend the rack approx. 40 mm (1.57 in) beyond side of steering body.
Install the tie-rod and a new lock washer into rack.
Tightening torque:
78 Nm (8.0 kgf-m, 57.9 ft-lb)
|
(1)
|
Lock washer
|
|
(2)
|
Approx.
40 mm (1.57 in)
|
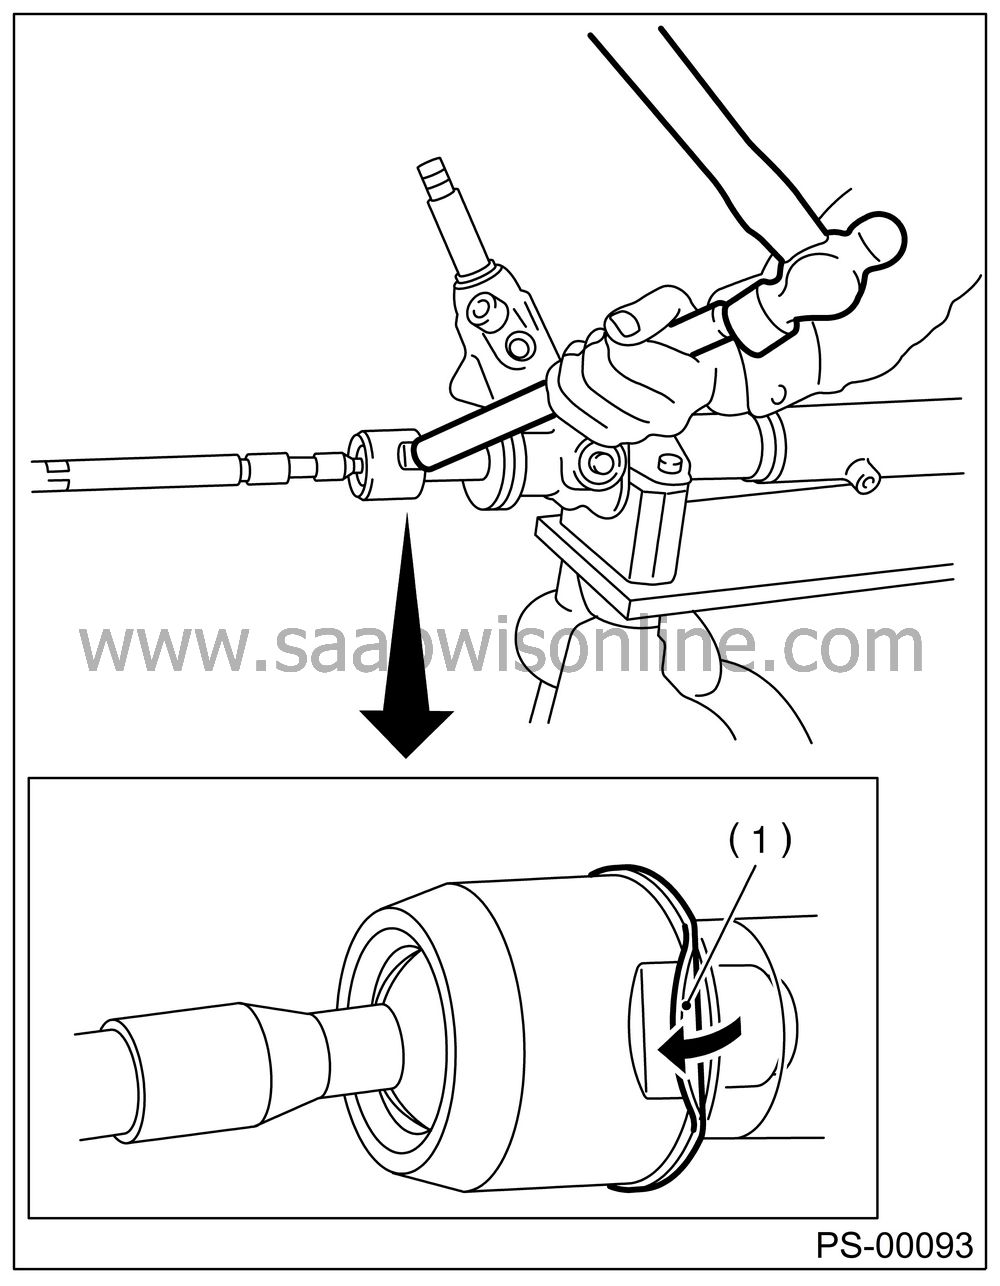
Bend the lock washer.
| Important | ||
|
Be careful not to scratch the rack when bending lock washer. |
||
|
(1)
|
Lock washer
|
Apply a coat of grease to the tie-rod groove, and then install the boot to housing.
| Note | ||
|
Make sure that the boot is installed without unusual inflation or deflation. |
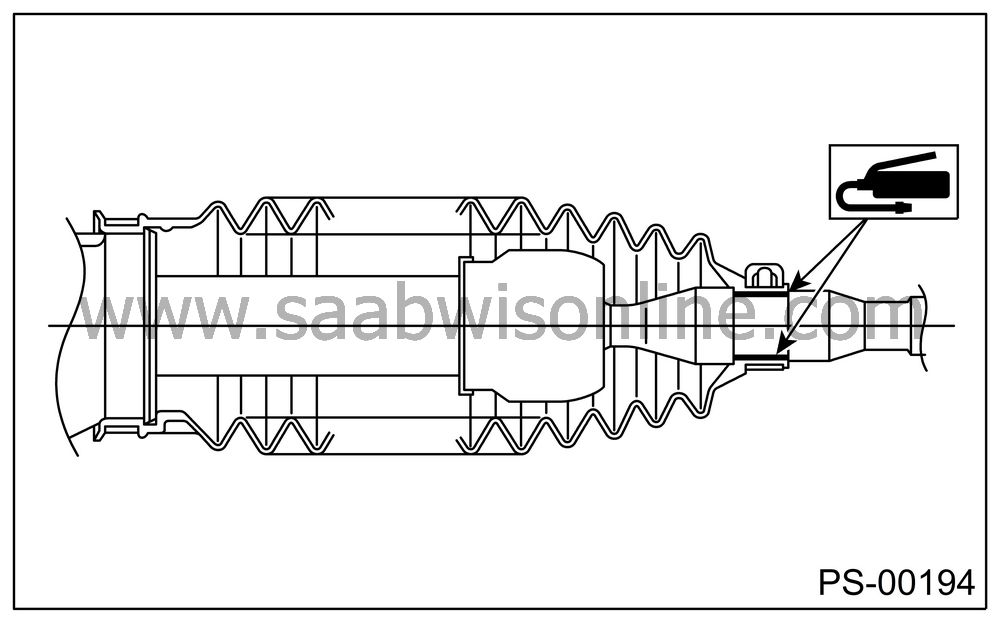
Install a new boot band. Using band clamp pliers, caulk the boot band until caulking part clearance is 2 mm (0.079 in) or less.
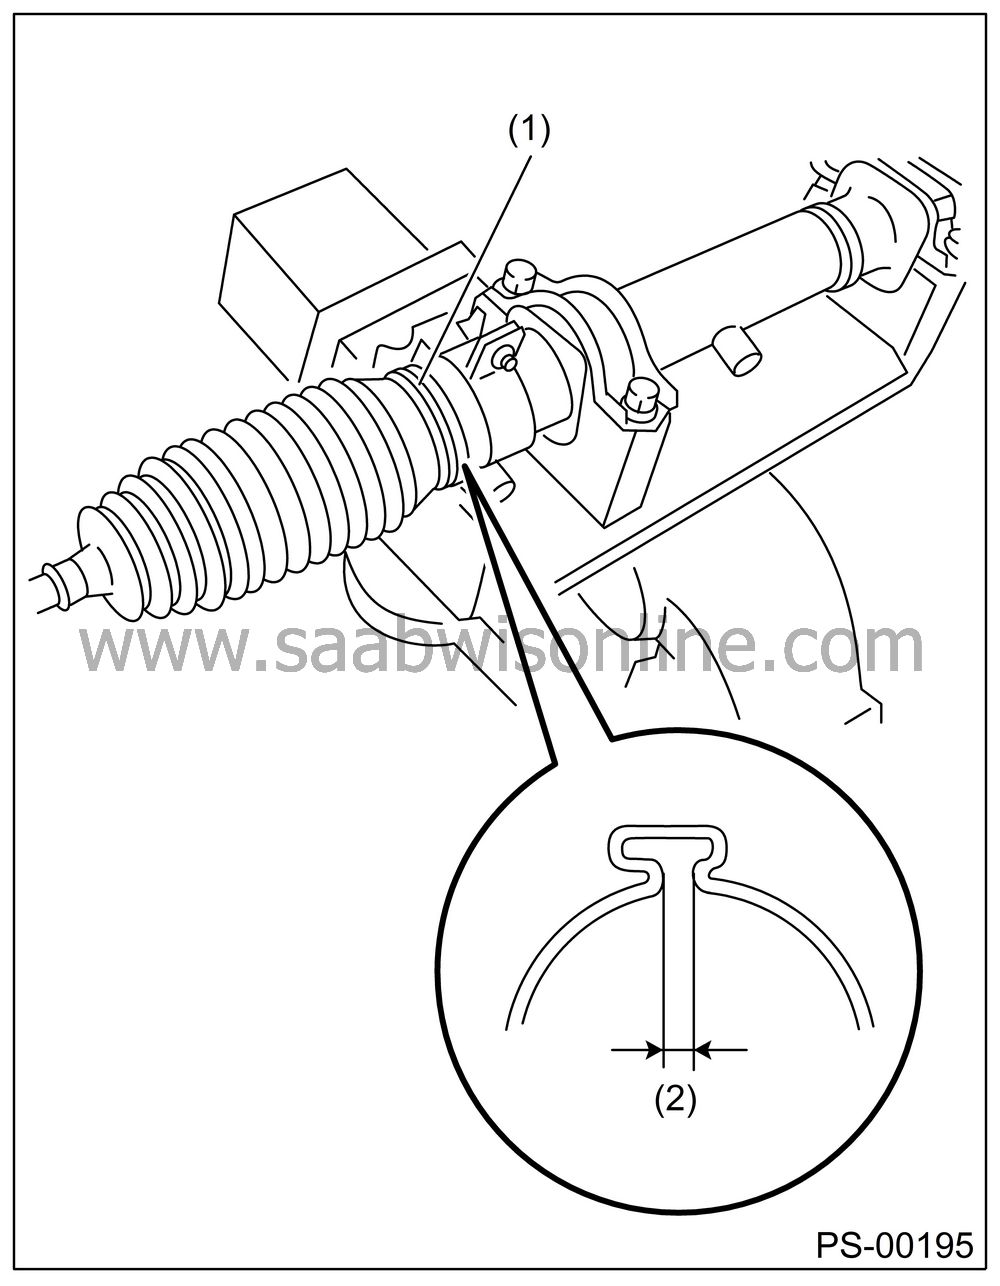
|
(1)
|
Boot band
|
|
(2)
|
2 mm (0.079
in) or less
|
Fix the boot end with clip (small).
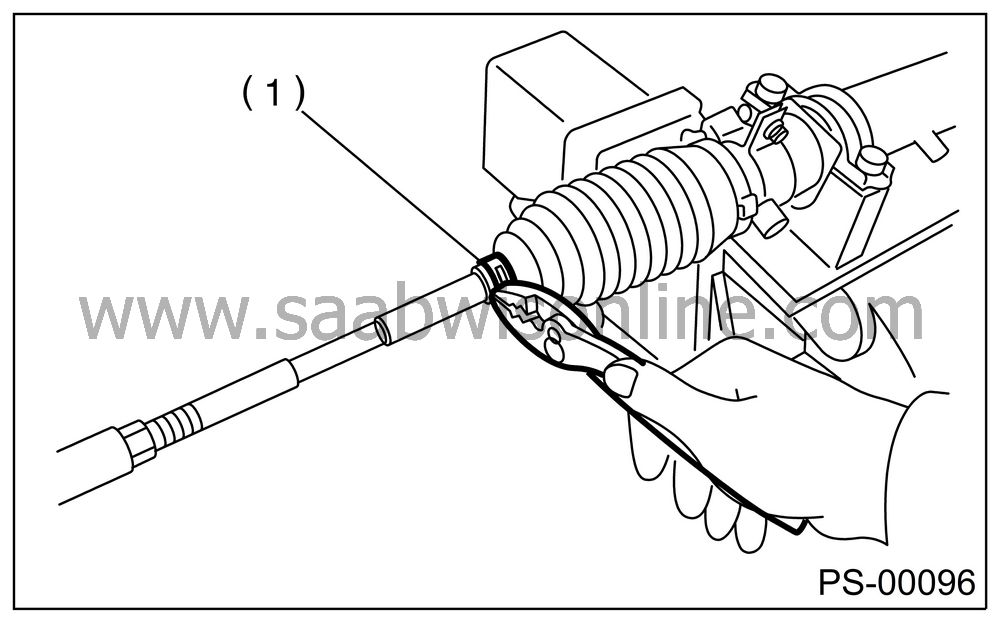
|
(1)
|
Clip
|
After installing, check the boot end is positioned into groove on tie-rod.
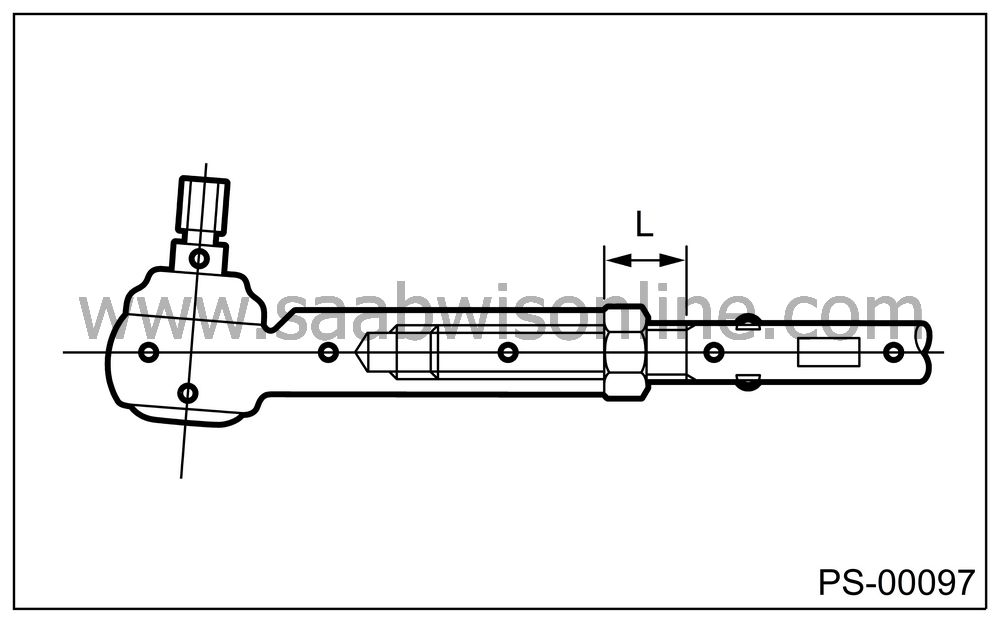
If the tie-rod end was removed, screw in the lock nut and tie-rod end to screwed portion of tie-rod, and then tighten the lock nut temporarily in a position as shown in the figure.
Installed tie-rod length L:
15 mm (0.59 in)
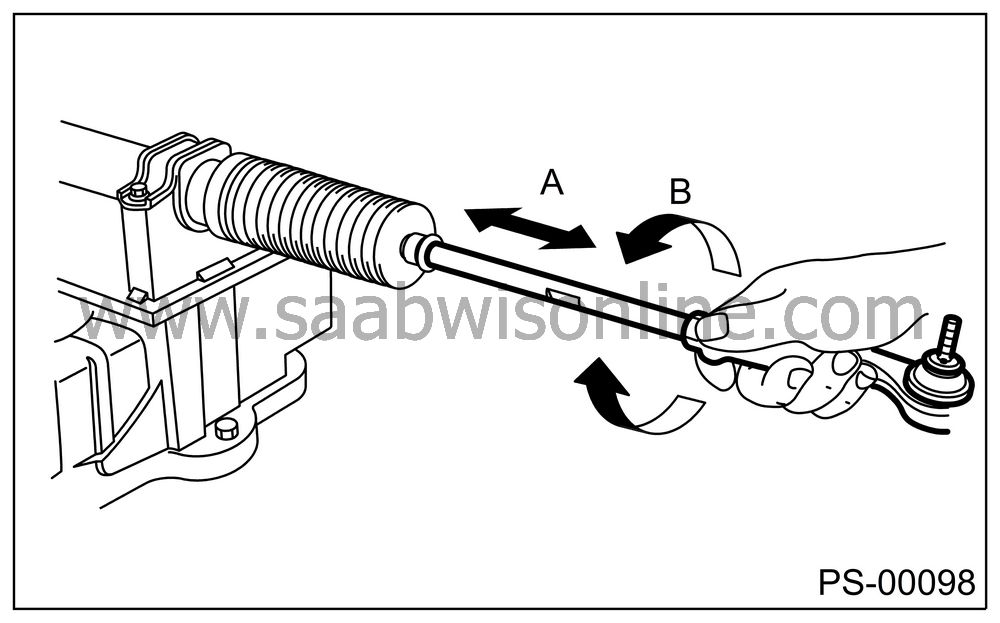
Inspect the gearbox as follows:
“A” Holding the tie-rod end, repeat lock to lock two or three times as quickly as possible.
“B” Holding the tie-rod end, turn it slowly at a radius one or two times as large as possible.
After all, make sure that the boot is installed in specified position without deflation.
Remove the gearbox from ST.
ST 32005190 STAND
Install the four pipes on gearbox.Connect the pipe A and B to four pipe joints of gearbox.
Tightening torque:
13 Nm (1.3 kgf-m, 9.4 ft-lb)
Connect the pipe E and F to gearbox.
Tightening torque:
Pipe E: 15 Nm (1.5 kgf-m, 10.8 ft-lb)
Pipe F: 25 Nm (2.5 kgf-m, 18.1 ft-lb)
CONTROL VALVE ASSEMBLY
Specified steering grease:VALIANT GREASE M2 (Part No. 32005010)
Clean all parts and tools before reassembling.
Apply a coat of specified power steering fluid to the inner wall of valve housing.
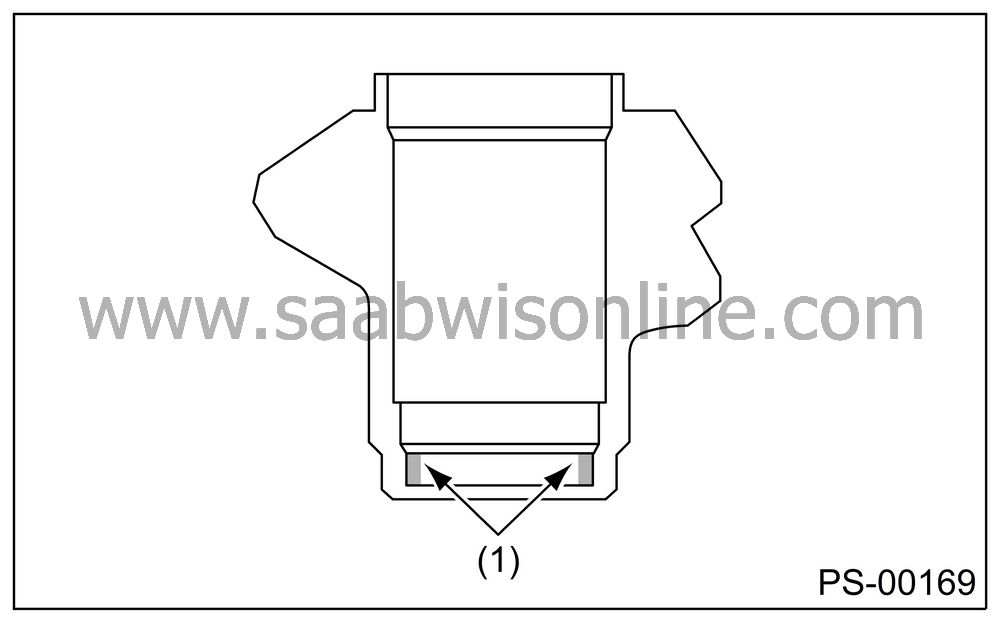
|
(1)
|
Apply fluid.
|
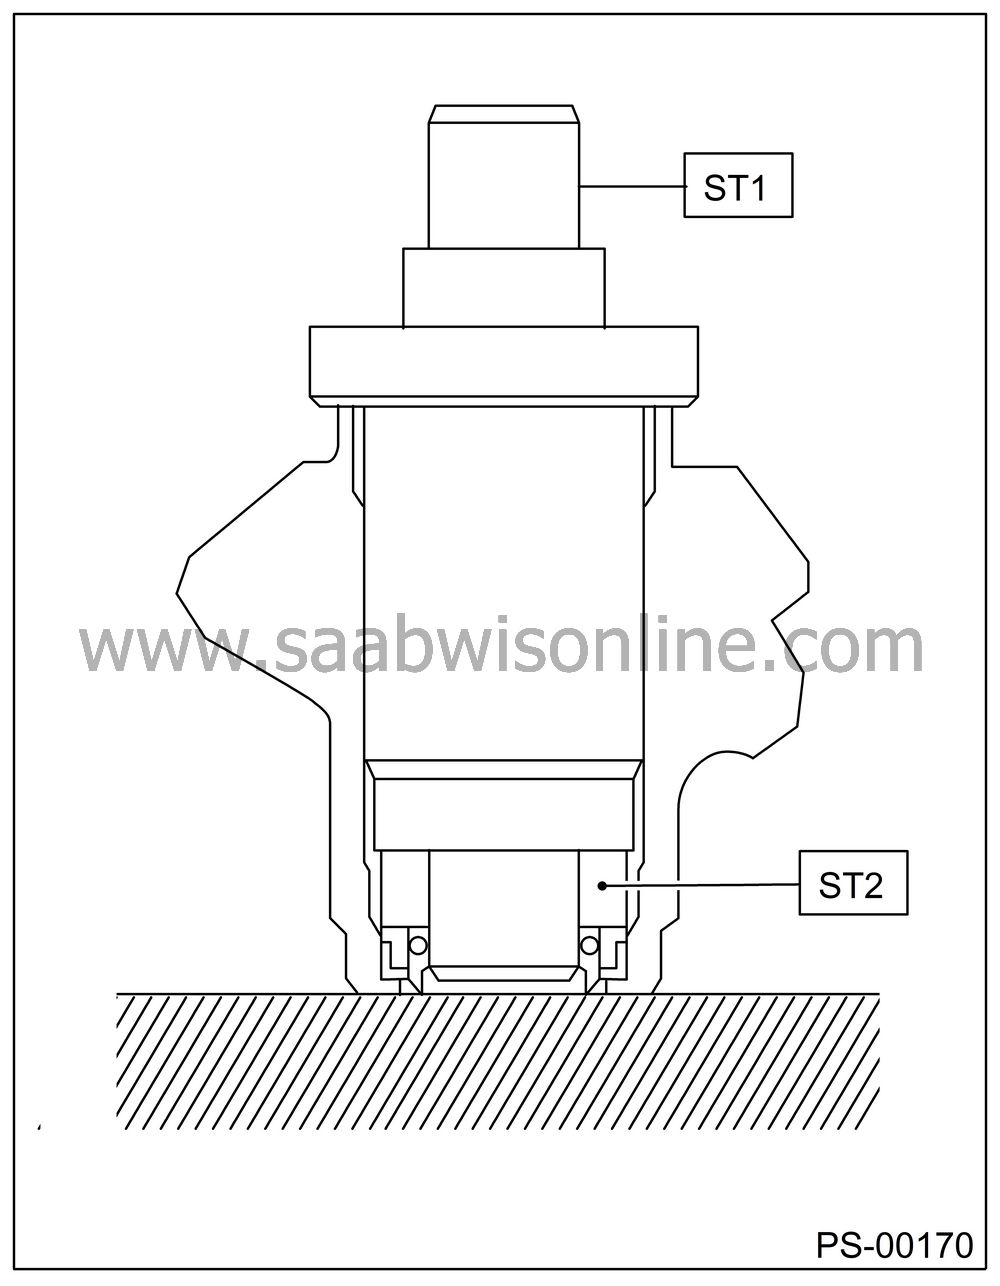
Attach the ST2 to ST1.
ST1 32005047 INSTALLER & REMOVER SEAL
ST2 32005048 INSTALLER SEAL
To avoid scratching the oil seal, apply a coat of grease to the contact surface of installer and oil seal.Verify the oil seal direction.
Attach the oil seal to installer and position in valve housing before pressing into place.
Press the oil seal into place using a press.
Attach the bearing to ST, and then position in value housing. Using the ST and press, install the special bearing in valve housing.
ST 32005047 INSTALLER & REMOVER SEAL
|
(1)
|
Special
bearing
|
|
(2)
|
Oil seal
|
Put vinyl tape around the pinion shaft splines to protect oil seal from damage.
Fit the pinion and valve assembly into valve housing.
Secure the valve assembly to ST1 and ST2.
ST1 32005193 SUPPORTER
ST2 32005045 STAND BASE
Apply specified power steering fluid to oil seal and ST3.Install the ST3 to pinion, and then insert the oil seal. Press the oil seal using a press until ST4 contacts face end of valve housing.
ST3 32005192 INSTALLER A
ST4 32005213 INSTALLER B
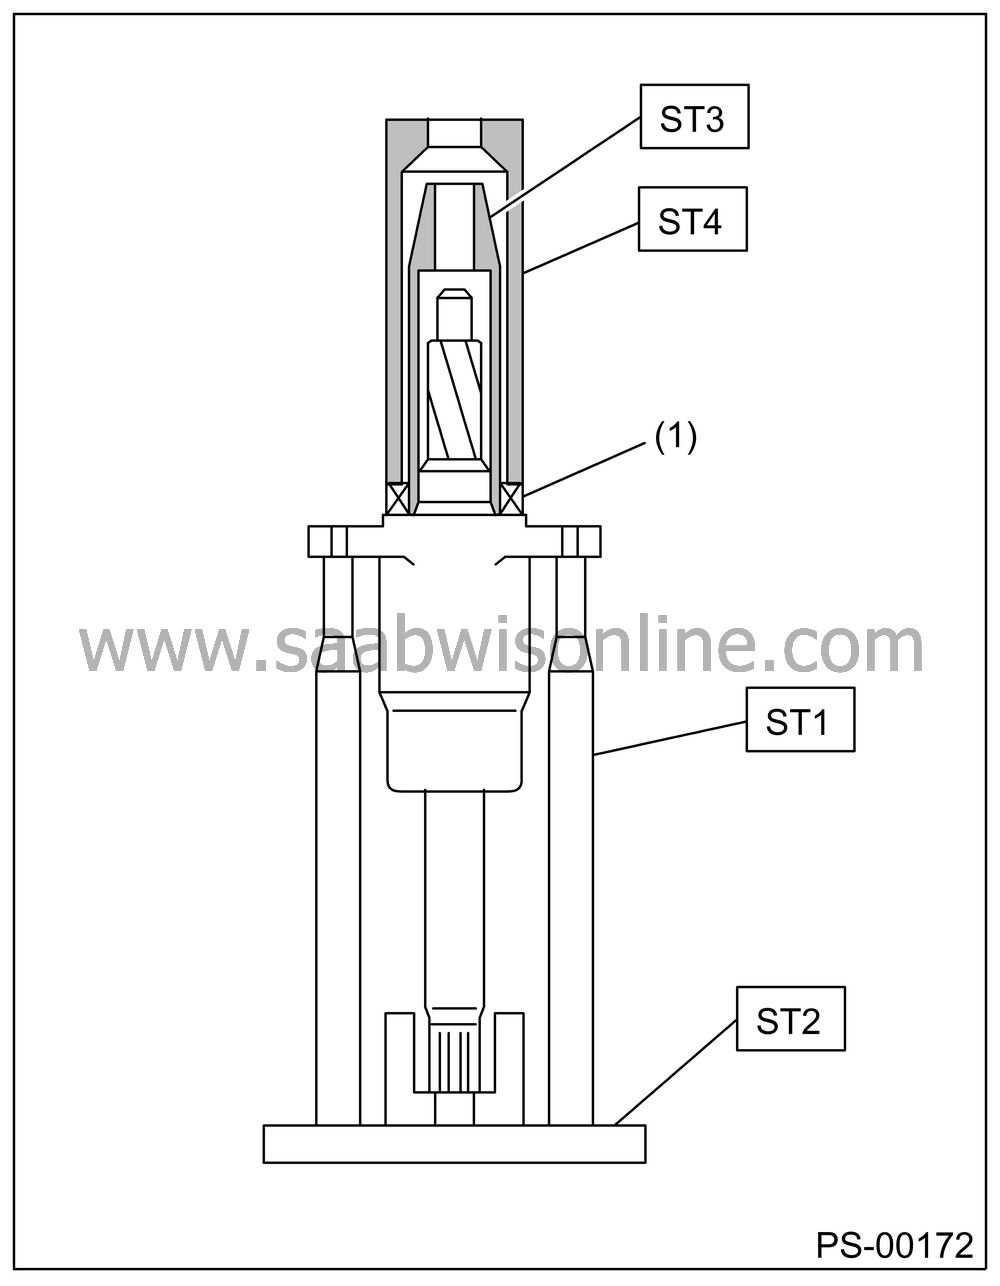
|
(1)
|
Oil seal
|
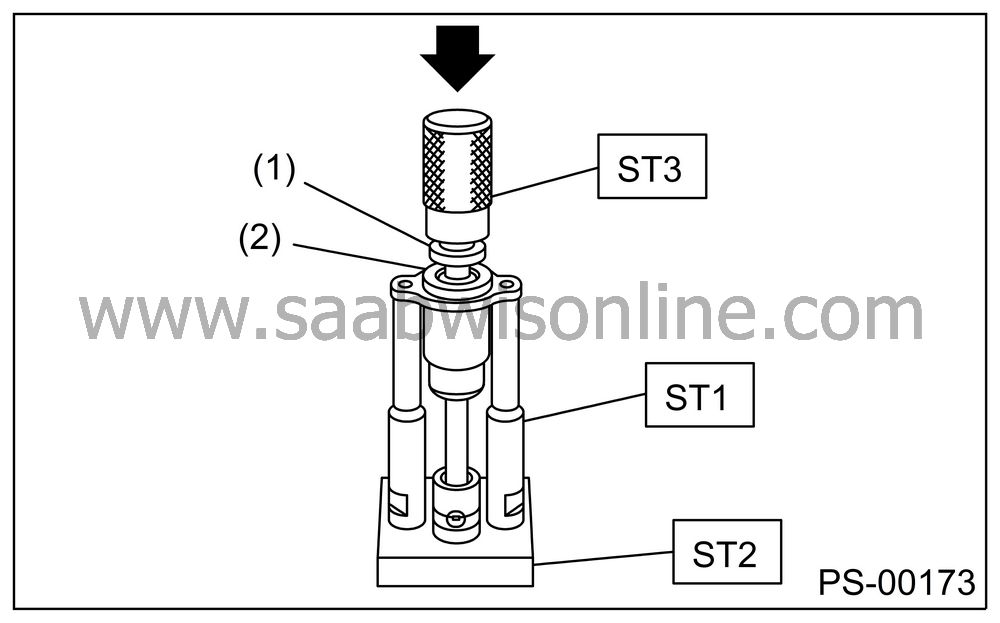
Remove the ST3, and then fit the back-up washer.
Force-fit the ball bearing using ST3.
ST1 32005193 SUPPORTER
ST2 32005045 STAND BASE
ST3 32005214 INSTALLER B
|
(1)
|
Ball bearing
|
|
(2)
|
Back-up
washer
|
| Note | ||
|
Be careful not to tilt the ball bearing during installation. |
Install the snap ring using snap ring pliers.
| Note | ||
|
Rotate the snap ring to check for proper installation. |
Apply the specified grease to dust cover.
Install the dust cover on valve assembly.

|
(1)
|
Dust cover
|
Apply genuine grease to the pinion gear and bearing of valve assembly.

Install a new gasket on valve assembly. Insert the valve assembly into place while facing rack teeth toward pinion.
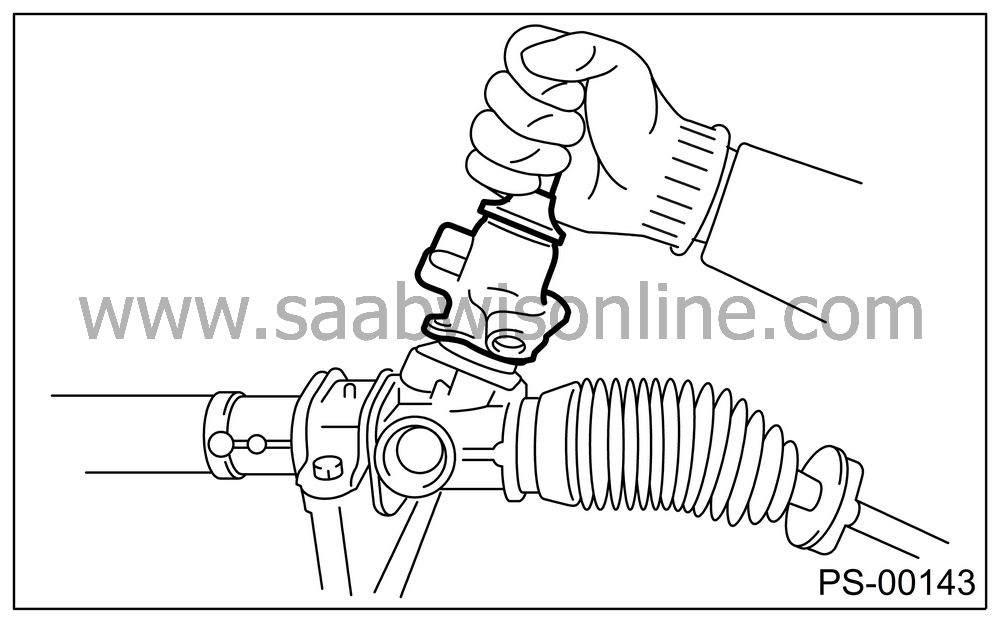
Tighten the bolts alternately to secure valve assembly.
Tightening torque:
25 Nm (2.5 kgf-m, 18.1 ft-lb)
| Important | ||
|
Be sure to alternately tighten the bolts. |
||
Apply a coat of grease to the sliding surface of sleeve and seating surface of spring, and then insert sleeve into steering body.
Charge the adjusting screw with grease, and then insert the spring into adjusting screw and install on steering body.

|
(1)
|
Sleeve
|
|
(2)
|
Spring
|
|
(3)
|
Adjusting
screw
|
Tighten the adjusting screw to specified torque.
Tightening torque:
7.4 Nm (0.75 kgf-m, 5.4 ft-lb)
After tightening to the specified tightening torque, loosen it by 25°.
Verify that play is within specified value.

Loosen the adjusting screw, and then apply liquid gasket to at least 1/3 of the entire perimeter of adjusting screw thread.
Liquid gasket:
THREE BOND 1141

|
(1)
|
Apply liquid
gasket to at least 1/3 of entire perimeter.
|
Tighten the adjusting screw to specified torque.
Tightening torque:
7.4 Nm (0.75 kgf-m, 5.4 ft-lb)
After tightening to the specified tightening torque, loosen it by 25°.
Install the lock nut. While holding the adjusting screw with a wrench, tighten lock nut using ST.
ST 32005191 SPANNER
Tightening torque (Lock nut):39 Nm (4.0 kgf-m, 28.9 ft-lb)
| Note | ||
|
Hold the adjusting screw with a wrench to prevent it from turning while tightening lock nut. |
Remove the gearbox from ST.
Install the four pipes on gearbox.
Connect the pipe A and B to the gearbox.
Tightening torque:
13 Nm (1.3 kgf-m, 9.4 ft-lb)
Connect the pipe E and F to gearbox.
Tightening torque:
Pipe E: 15 Nm (1.5 kgf-m, 10.8 ft-lb)
Pipe F: 25 Nm (2.5 kgf-m, 18.1 ft-lb)
| Saab 9-2X 2.0T Aero |
Apply a coat of grease to inside and outside of new oil seal.
Specified steering grease:
VALIANT GREASE M2 (Part No. 32005010)
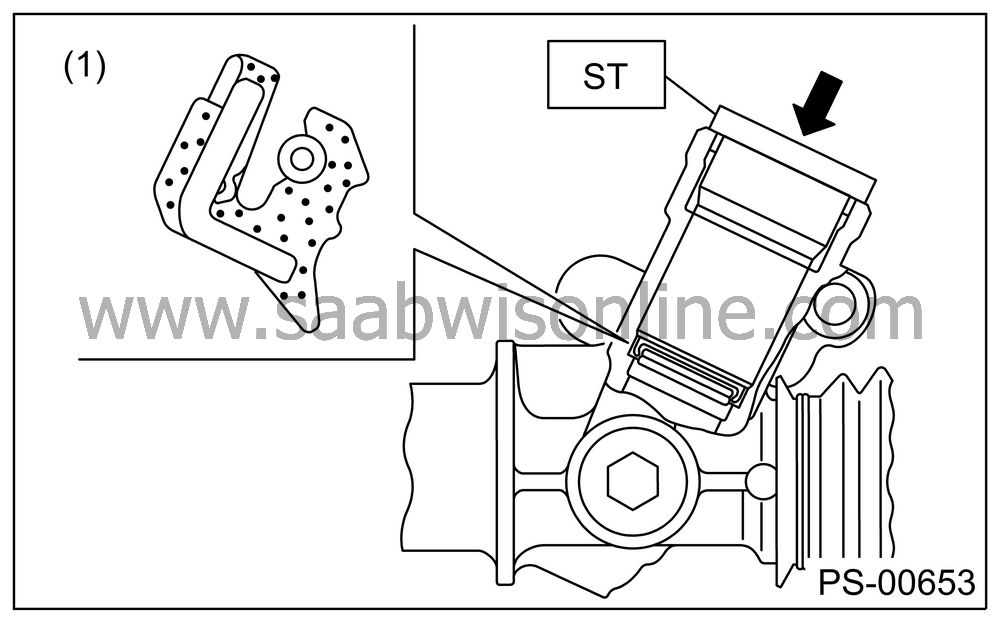
Verify the oil seal direction and installation position. Using the ST and press, press fit the oil seal to gear box.
ST 32009460 GEARBOX OIL SEAL INSTALLER
|
(1)
|
Oil seal
|
Attach the steering body to ST as shown in the figure. Apply a coat of grease to needle bearing.
ST 32005190 STAND
| Important | ||
|
Ensure the needle bearing is free from defects. If it is faulty, replace the steering body with a new one. |
||

|
(1)
|
Steering
body
|
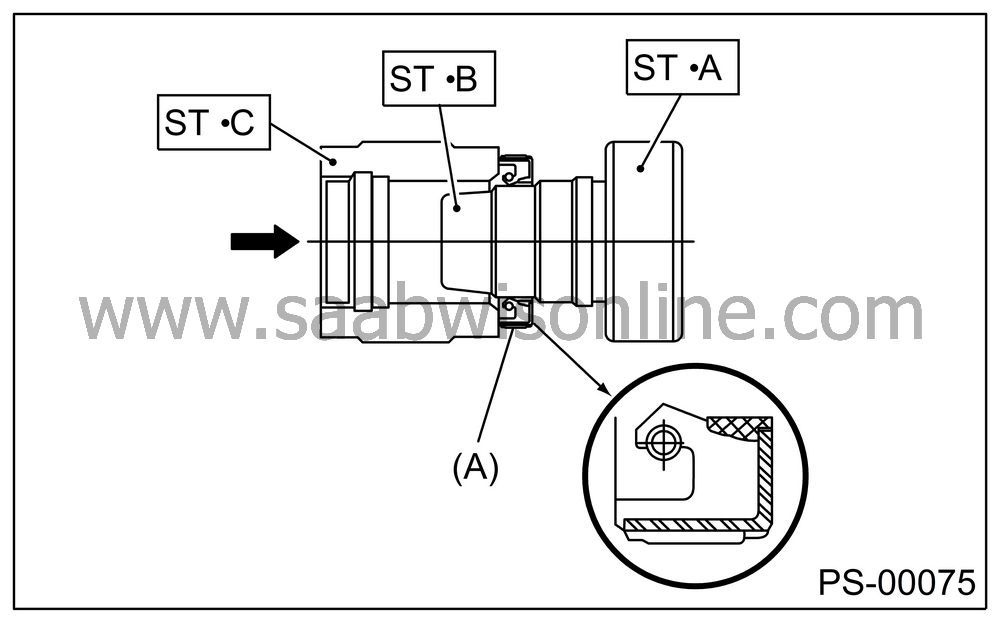
Using the ST·B and ST·C, attach the oil seal to ST·A.
ST 32009463 INSTALLER A, B, C
| Note | ||
|
Face the oil seal in direction shown in the figure. |
|
(A)
|
Oil seal
|
Insert the ST·A with oil seal assembled, through gear side of rack. Remove the oil seal from ST·A near piston, and then remove the ST·A from rack.
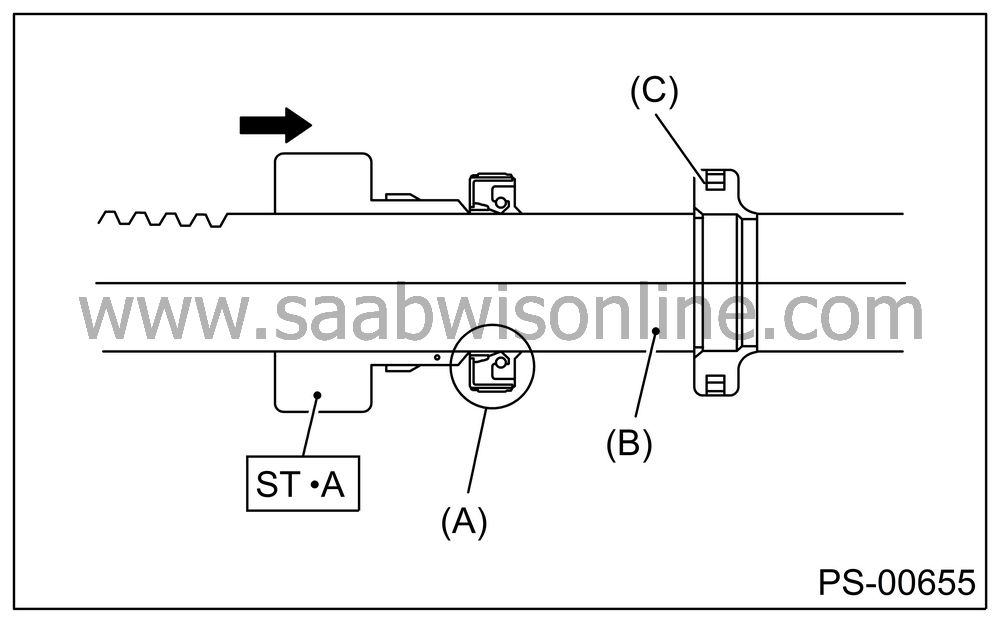
|
(A)
|
Oil
seal
|
|
(B)
|
Rack
|
|
(C)
|
Piston
|
Install the back-up washer from gear side of rack.
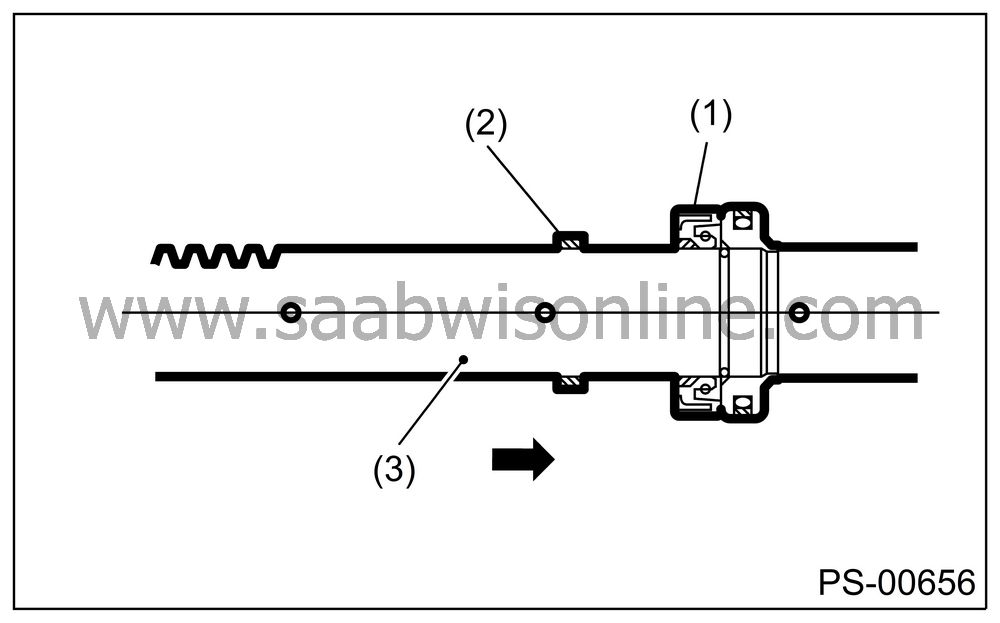
|
(1)
|
Oil
seal
|
|
(2)
|
Back-up
washer
|
|
(3)
|
Rack
|
Equally apply a thin coat of grease to the rack, then install the oil seal.
| Important | ||
|
Be careful not to scratch the oil seal lips with piston’s inner ring section. |
||
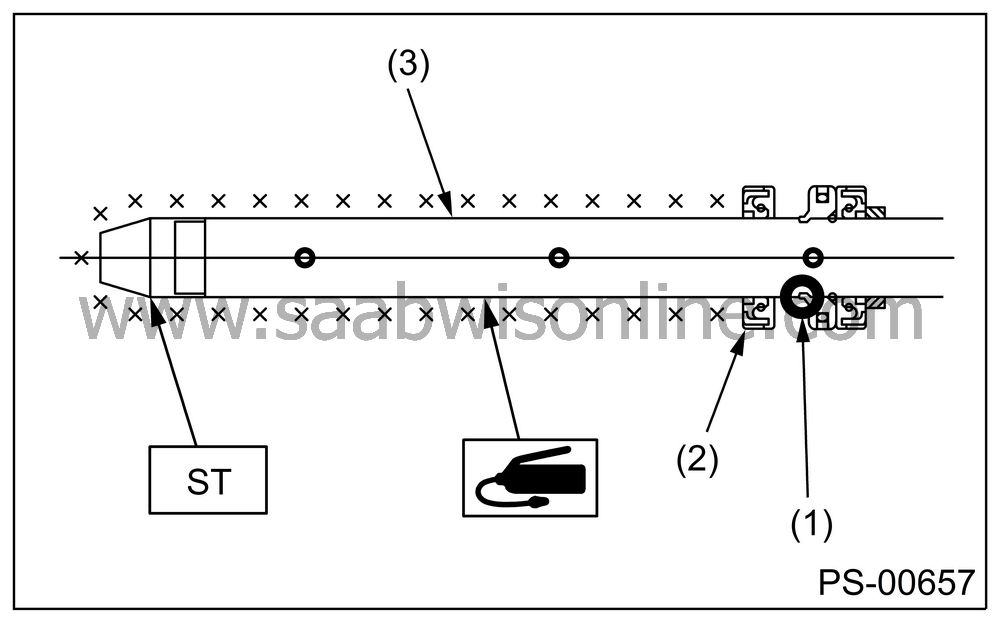
|
(1)
|
Rack
piston inner ring
|
|
(2)
|
Outer
side oil seal
|
|
(3)
|
Rack
|
Apply a coat of grease to the grooves in rack, sliding surface of sleeve and sealing surface of piston. Install the ST on end of steering body cylinder. Then insert the rack into steering body from cylinder side.
ST 32009464 GUIDE
| Important | ||
|
Do not allow grease to block the air vent hole on rack. |
||
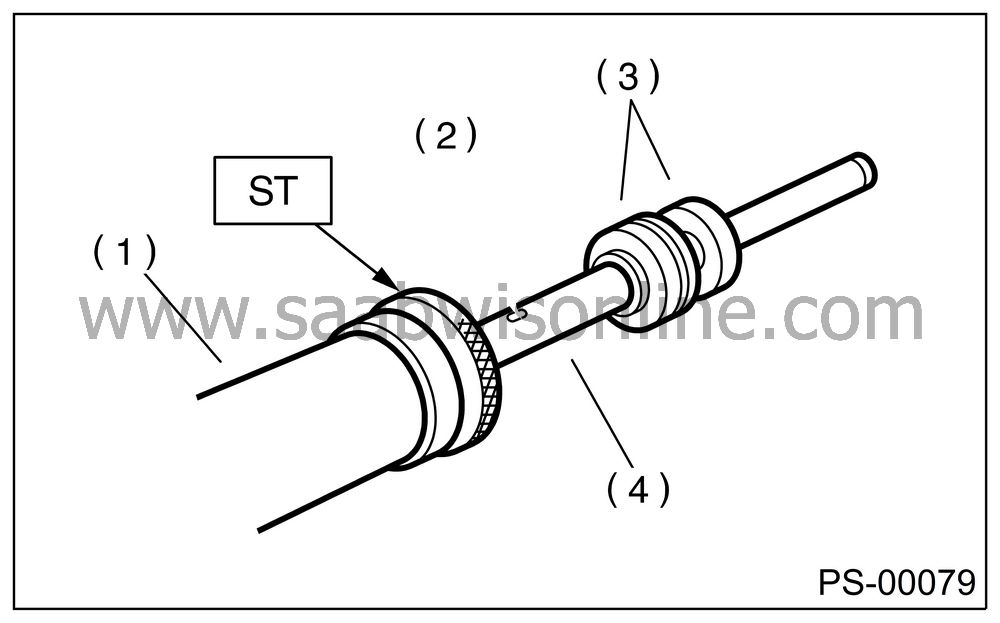
|
(1)
|
Cylinder
side of steering body
|
|
(2)
|
Air
vent hole
|
|
(3)
|
Oil
seal
|
|
(4)
|
Rack
|
Make the ST2 pass through rack, and then push in the rack and ST2 using a press until ST1 comes in contact with ST2 and the end of rack is aligned with end of ST2.
ST1 32009464 GUIDE
ST2 32009465 INSTALLER
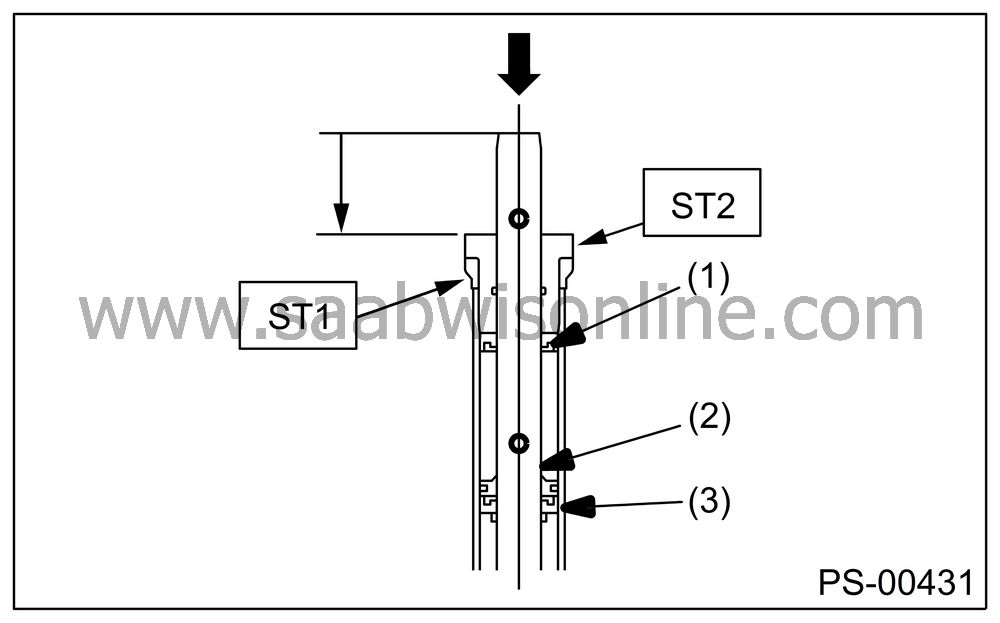
|
(1)
|
Outer
side oil seal
|
|
(2)
|
Rack
piston
|
|
(3)
|
Inner side
oil seal
|
Install a new holder to cylinder side of steering body.
Tightening torque:
90 Nm (9.18 kgf-m, 66.4 ft-lb)
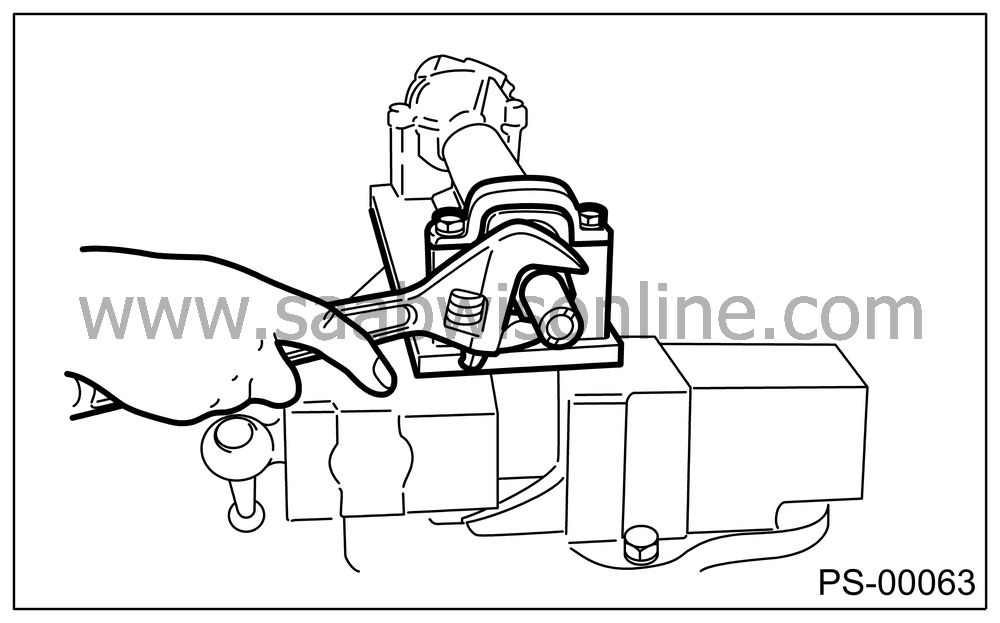
Using the ST, clinch steering body cylinder at a point less than 3 mm (0.12 in) from holder.
| Important | ||
|
Be careful not to deform the holder. |
||
ST 32009454 PUNCH HOLDER
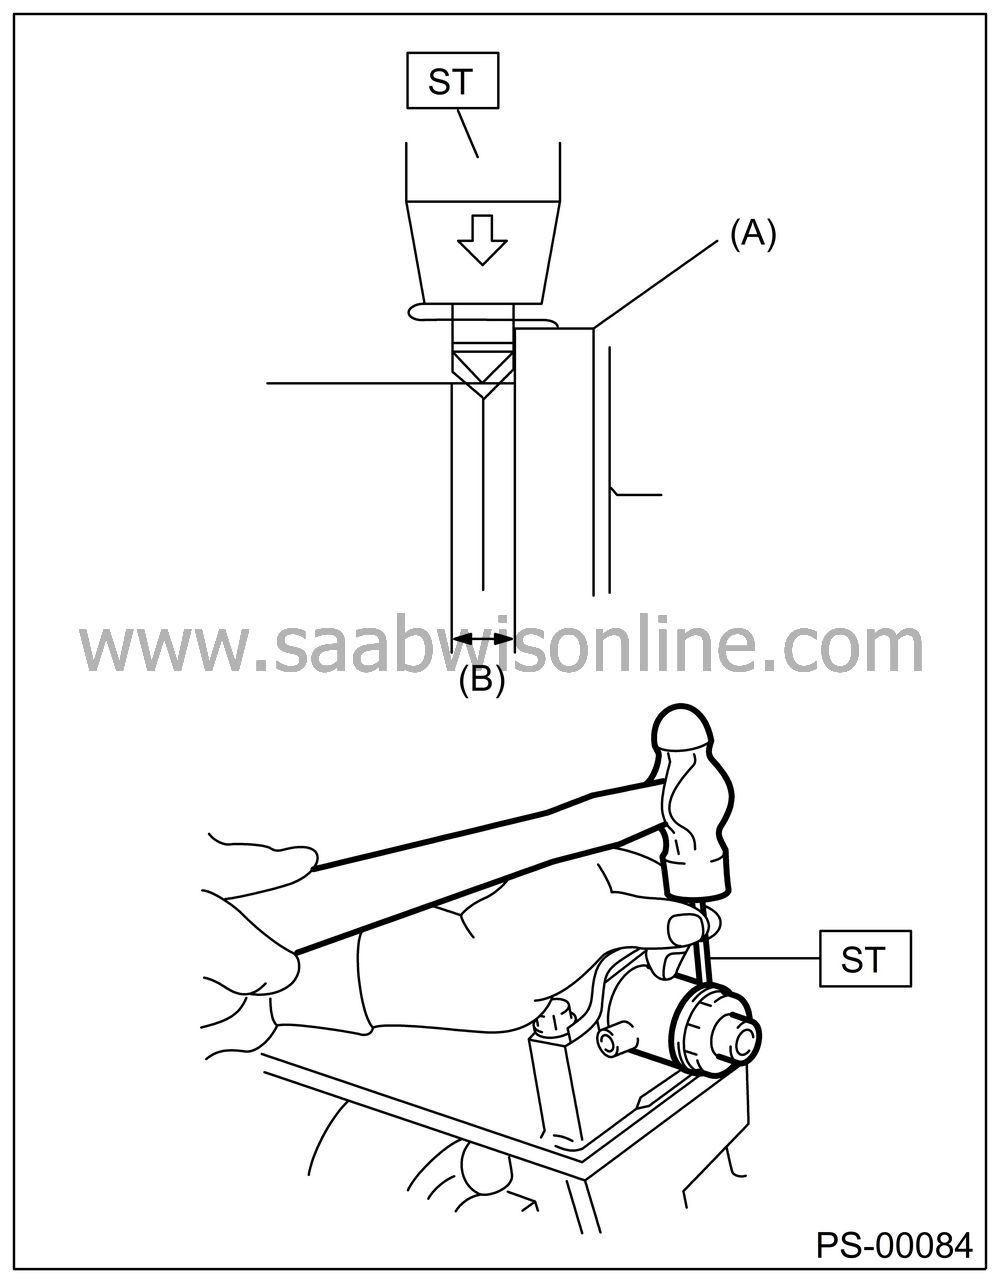
|
(A)
|
Holder
|
|
(B)
|
3 mm (0.1
in)
|
Roll the vinyl tape on serration part of valve assembly, and then apply grease on the tape surface.
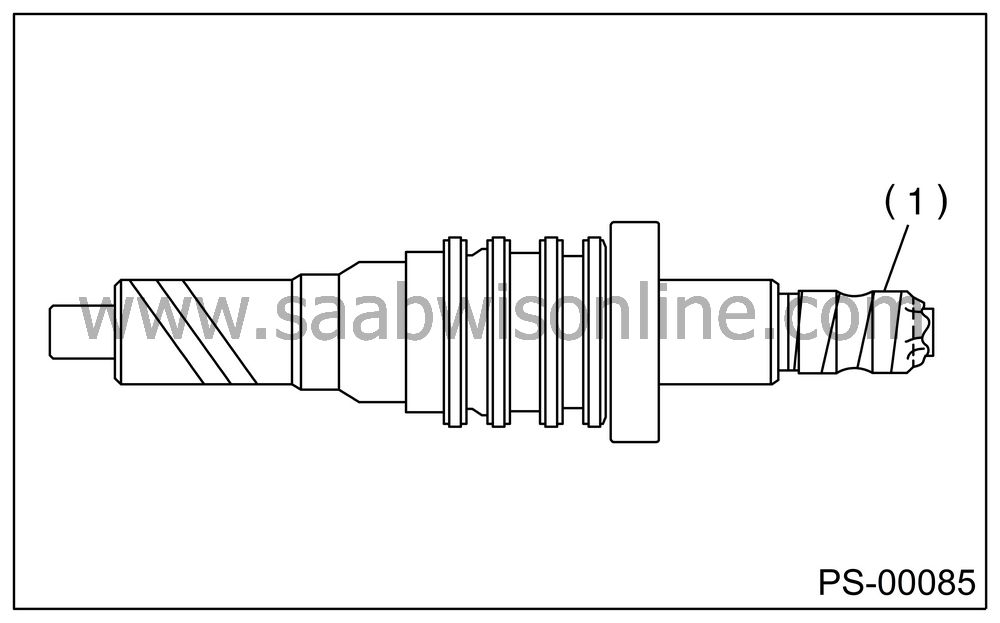
|
(1)
|
Vinyl tape
|
Apply a coat of grease on the gear teeth of valve assembly, and then attach the valve assembly taking care not to scratch oil seal and seal ring.
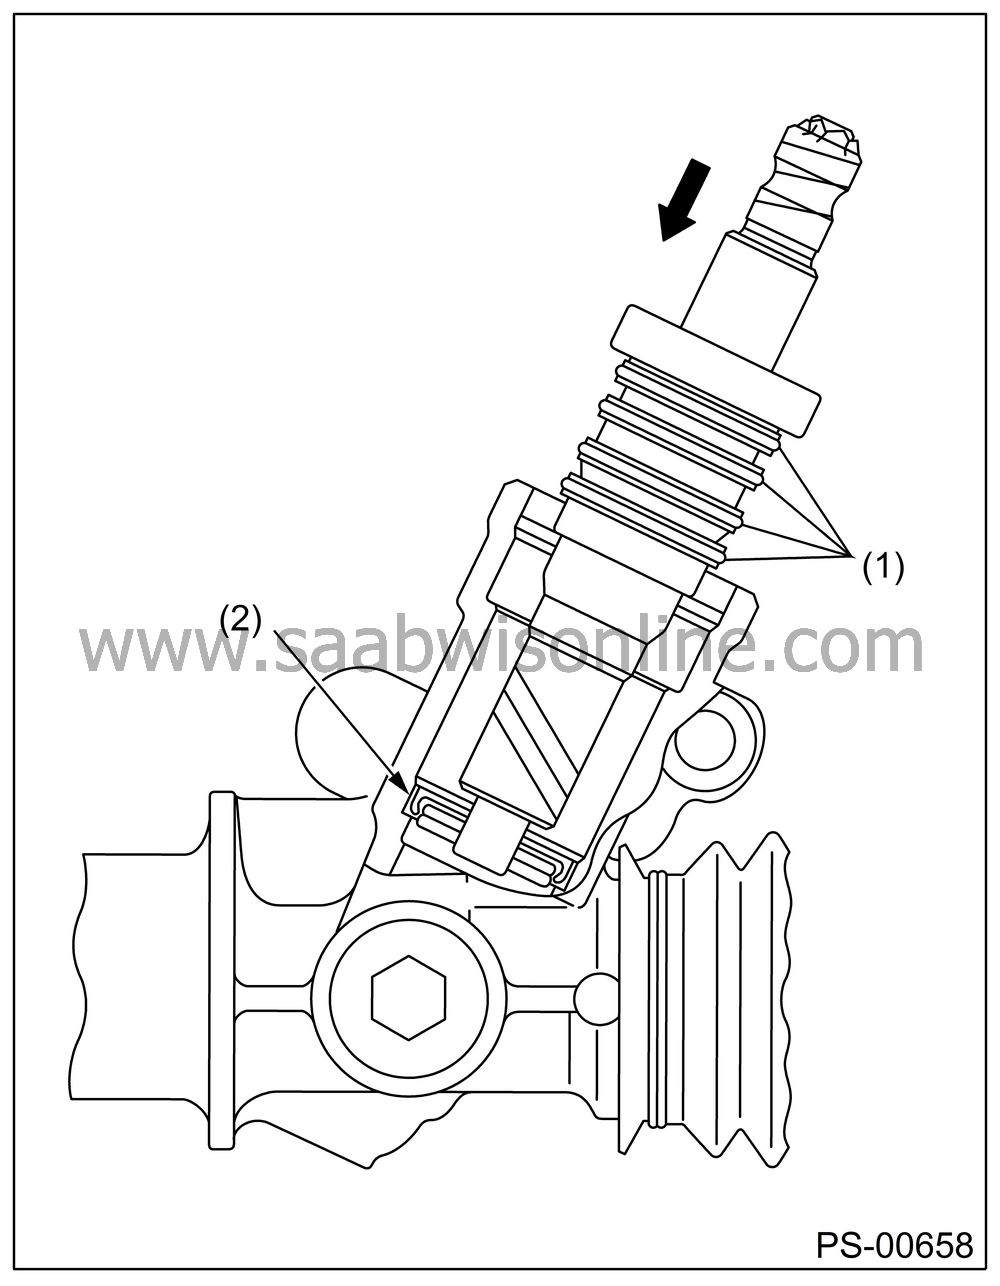
|
(1)
|
Seal
ring
|
|
(2)
|
Oil seal
|
Apply grease on the oil seal circumference, and then press into the plug using ST and a press. Replace the plug circumference O-rings with new ones.
ST 32009458 PLUG OIL SEAL INSTALLER
| Important | ||
|
Pay attention to the oil seal direction, and attaching position. |
||
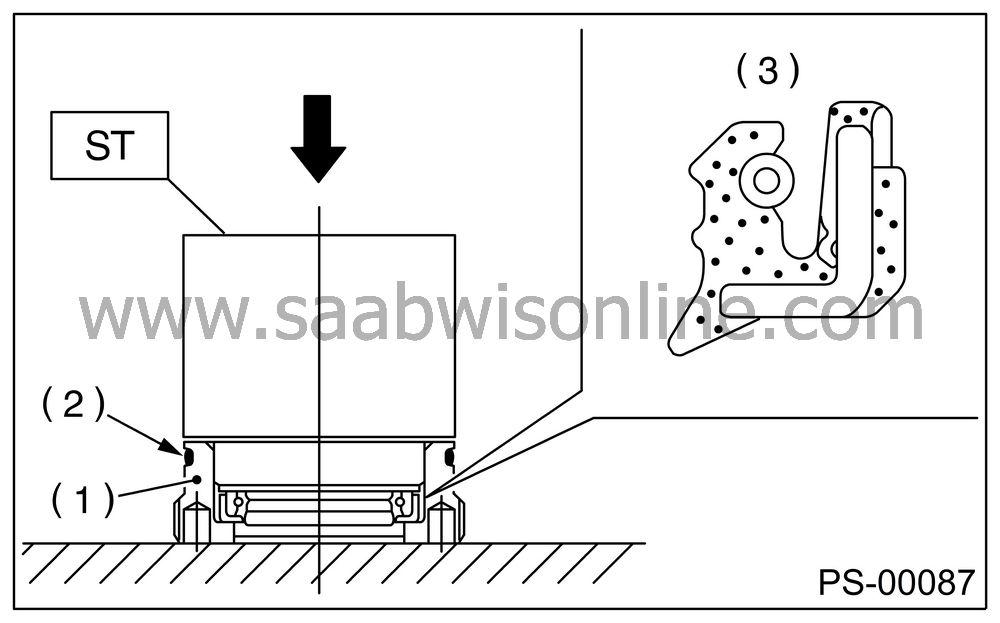
|
(1)
|
Plug
|
|
(2)
|
O-ring
|
|
(3)
|
Oil seal
|
Using the ST, install the plug.
ST 32009456 PLUG WRENCH
Tightening torque:64 Nm (6.5 kgf-m, 47.0 ft-lb)
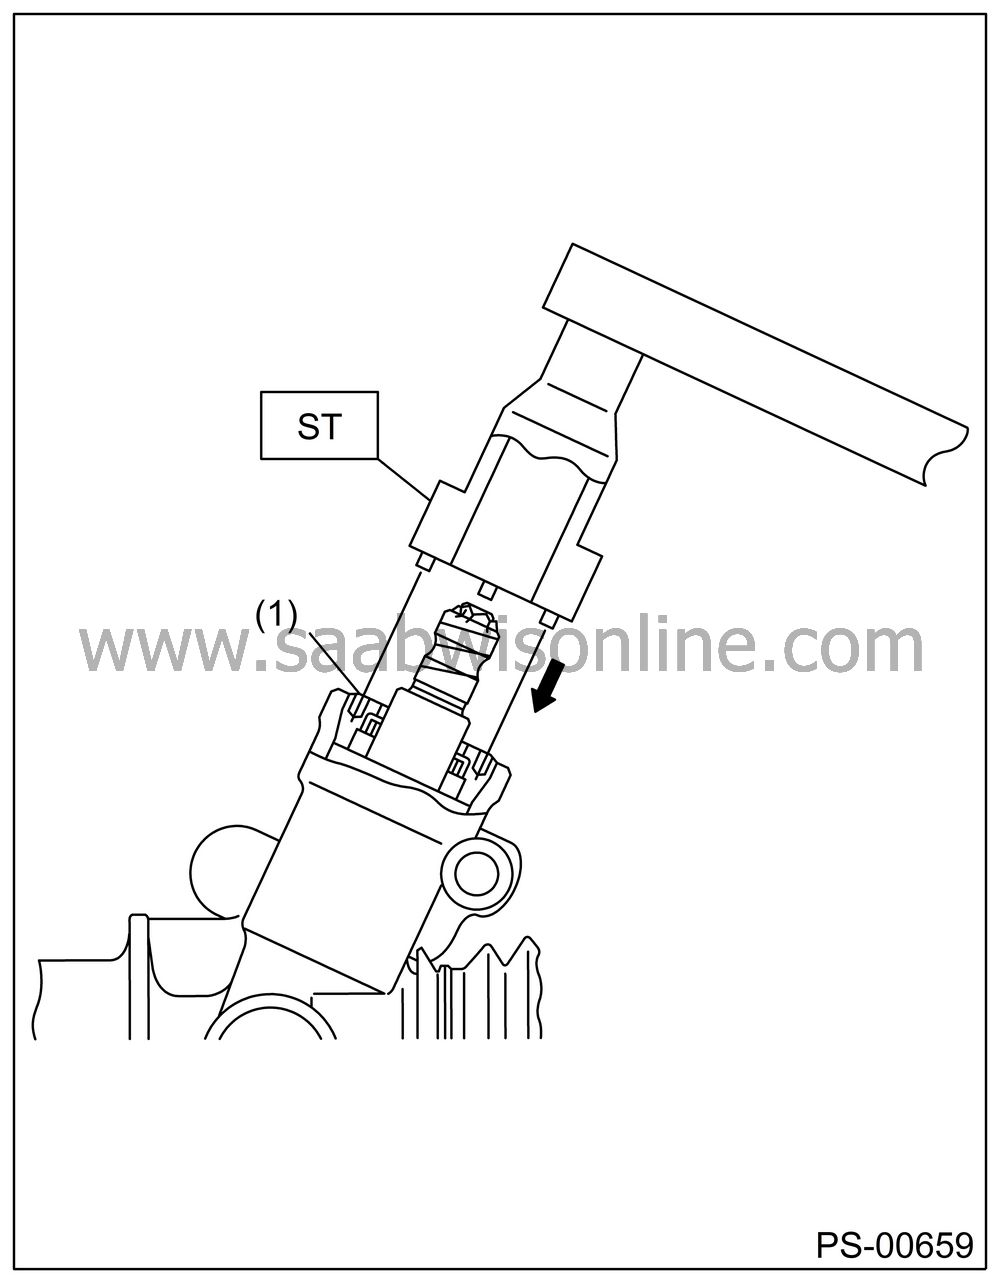
|
(1)
|
Plug
|
Install the dust cover. Remove the vinyl tape.
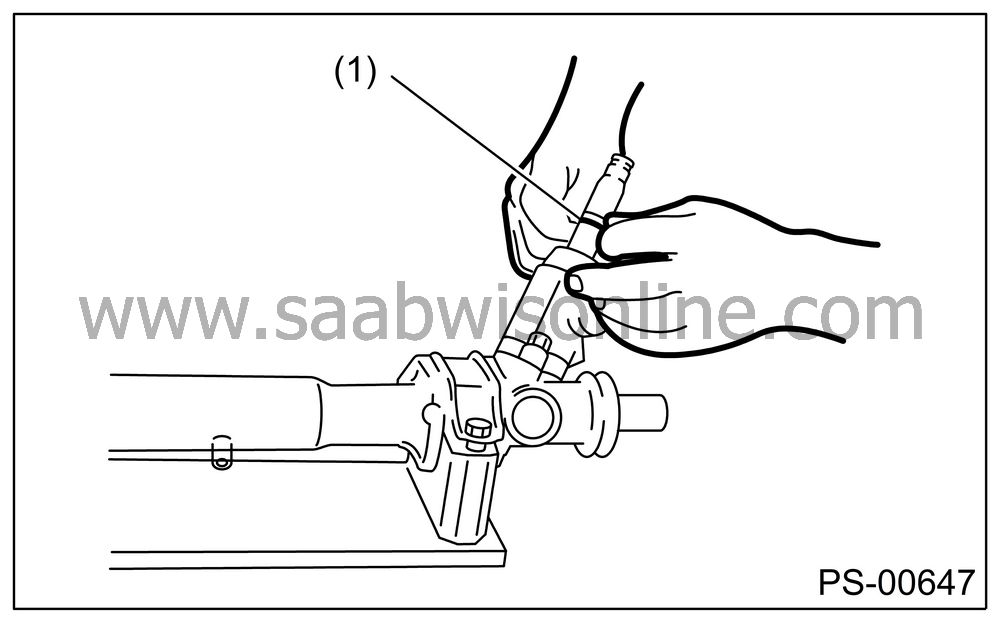
|
(1)
|
Dust cover
|
Temporarily install the rack, and then operate it from lock to lock two or three times to make it fit in. Remove the grease blocking air vent hole.
| Important | ||
|
If operating the rack from lock to lock without installing tie-rod, it may damage the oil seal. Always install the tie-rods LH and RH. |
||
Apply a coat of grease to the sliding surface of seat pad, sleeve and seating surface of spring, and then insert sleeve into steering body.
Charge the adjusting screw with grease, and then insert the spring into adjusting screw and install on steering body.
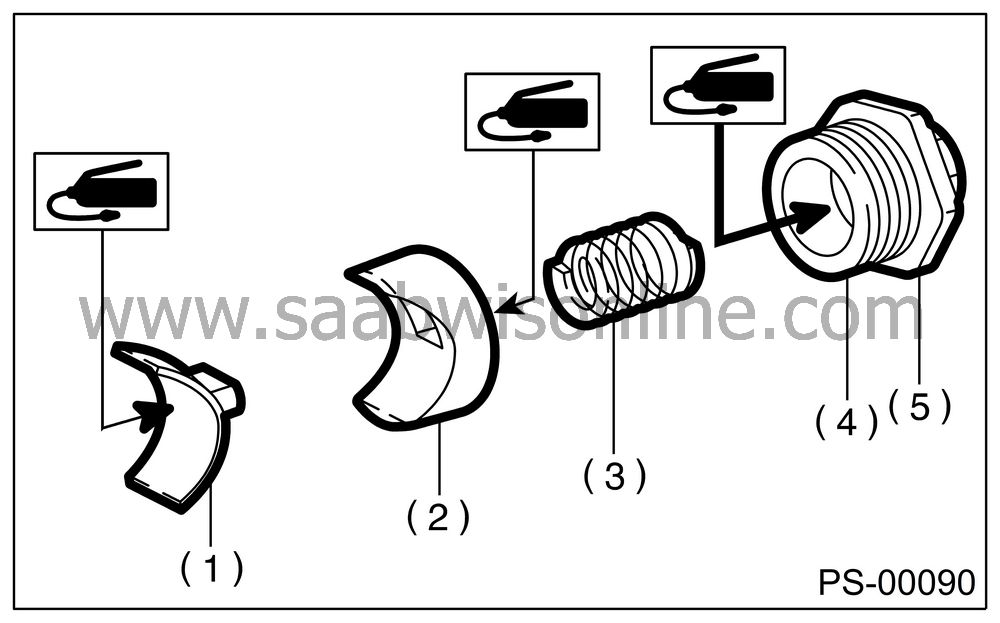
|
(1)
|
Seat
pad
|
|
(2)
|
Sleeve
|
|
(3)
|
Spring
|
|
(4)
|
Adjusting
screw
|
|
(5)
|
Lock nut
|
Tighten the adjusting screw to specified torque.
Tightening torque:
7.4 Nm (0.75 kgf-m, 5.4 ft-lb)
After tightening to the specified tightening torque, loosen it by 37°.
Remove the tie-rod.
Verify that play is within specified value.

Loosen the adjusting screw, and then apply liquid gasket to at least 1/3 of the entire perimeter of adjusting screw thread.
Liquid gasket:
THREE BOND 1141
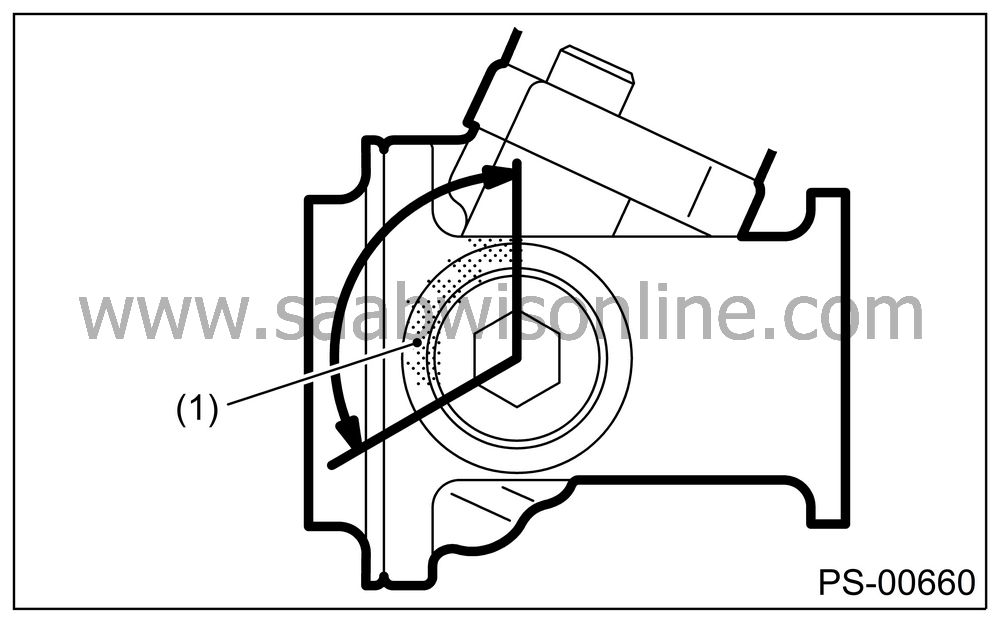
|
(1)
|
Apply liquid
gasket to at least 1/3 of entire perimeter.
|
Tighten the adjusting screw.
Tightening torque:
9.8 Nm (10.0 kgf-m, 7.2 ft-lb)
After tightening to the specified tightening torque, loosen it.
Tighten the adjusting screw.
Tightening torque:
4.8 Nm (0.49 kgf-m, 3.5 ft-lb)
After tightening to the specified tightening torque, loosen it.
Tighten the adjusting screw.
Tightening torque:
4.8 Nm (0.49 kgf-m, 3.5 ft-lb)
After tightening to the specified tightening torque, loosen it by 37°.
Install the lock nut. While holding the adjusting screw with a wrench, tighten lock nut using ST.
ST 32005191 SPANNER
Tightening torque (Lock nut):39 Nm (4.0 kgf-m, 28.9 ft-lb)
| Note | ||
|
Hold the adjusting screw with a wrench to prevent it from turning while tightening lock nut. |
Install the tie-rod into rack.
Tightening torque:
90 Nm (9.0 kgf-m, 65.1 ft-lb)
| Note | ||
|
Check the mating face of rack and tie-rod for foreign material, dirt, dust and etc. |
||
|
If required, clean the mating face. |
Apply a coat of grease to the tie-rod groove, and then install the boot to housing.
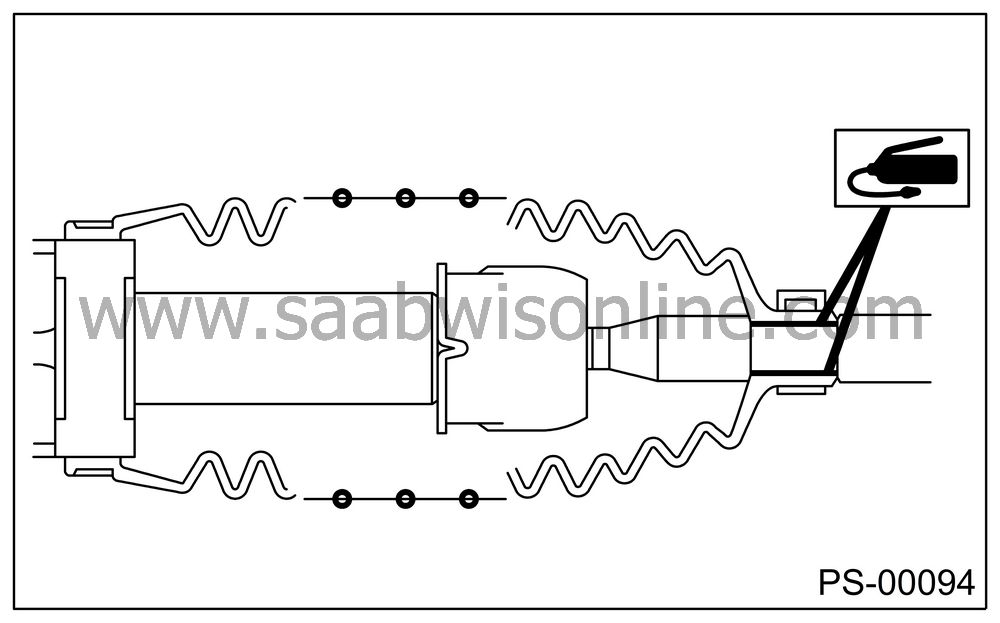
| Note | ||
|
Make sure that the boot is installed without unusual inflation or deflation. |
Caulk the boot so the space inside boot band caulking portion becomes 2 mm (0.08 in) or less.
| Note | ||
|
Use a new boot band. |
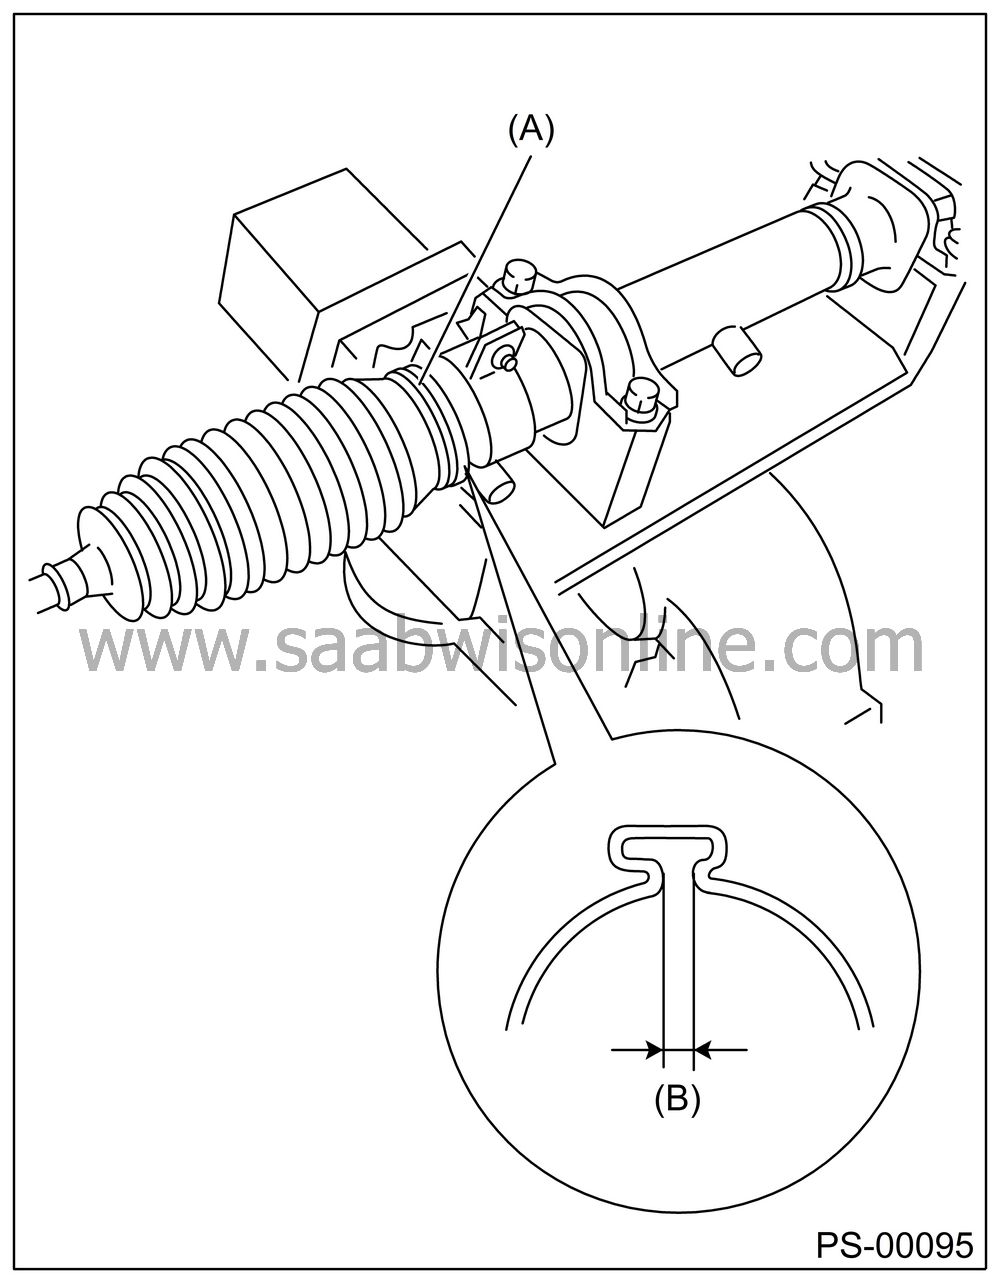
|
(A)
|
Boot
band
|
|
(B)
|
Less than
2mm (0.08 in)
|
Fix the boot end with clip (small).

|
(1)
|
Clip
|
After installing, check the boot end is positioned into groove on tie-rod.
If the tie-rod end was removed, screw in the lock nut and tie-rod end to screwed portion of tie-rod, and then tighten the lock nut temporarily in a position as shown in the figure.
Installed tie-rod length: L
Sedan:
25 mm (0.98 in)Wagon:
15 mm (0.59 in)
Inspect the gearbox as follows:
“A” Holding the tie-rod end, repeat lock to lock two or three times as quickly as possible.
“B” Holding the tie-rod end, turn it slowly at a radius one or two times as large as possible.
After all, make sure that the boot is installed in specified position without deflation.

Remove the gearbox from ST.
ST 32005190 STAND
Install the four pipes on gearbox.Connect the pipe A and B to gearbox.
Tightening torque:
Housing side
20 Nm (2.0 kgf-m, 14.5 ft-lb)Cylinder side
24 Nm (2.4 kgf-m, 17.4 ft-lb)Connect the pipe G and H to gearbox.
Tightening torque:
15 Nm (1.5 kgf-m, 10.8 ft-lb)


