Power unit, fitting, 4WD
| Power unit, fitting, 4WD |
|
|||||||
| To fit |
| 1. |
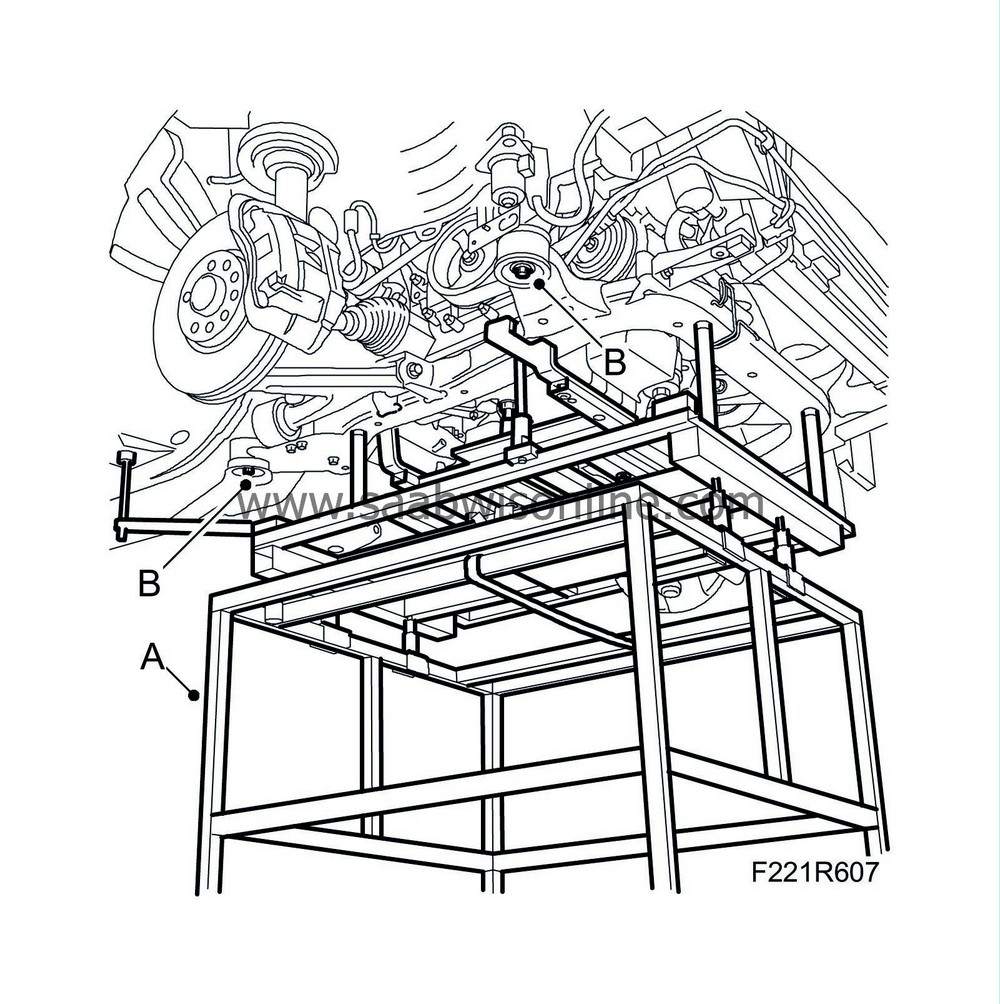
Position the trolley lift with power train and adjust its position in relation to the body. Use
82 93 102 Extension, 500 mm, 3/8 square
through the holes in the subframe to the attachments in the body (A). See Centring tool, engine and subframe.
|
|
| 2. |
Raise the train until the inner drive shaft universal joints are level with the wheel hubs and insert the hub nuts. Make sure that nothing catches or gets damaged.
|
|
| 3. |
Lift a little higher and position the lower swivel joints to the steering swivel members. If necessary, adjust the trolley lift screws to provide even contact with the body. Check that the guide pins are positioned correctly relative the reference holes in the body.
|
|
| 4. |
Move the subframe stays back into position. Position and insert the bolts through the subframe to the body.
|
|
| 5. |
Raise the engine all the way and tighten the subframe bolts (B) and the rear bolts of the stays.
Tightening torque, subframe: 75 Nm + 135° (55 lbf ft +135°) Tightening torque, stay: 90 Nm + 45° (66 lbf ft +45°) |
|
| 6. |
Lower the trolley lift and move it out of the way.
|
|
| 7. |
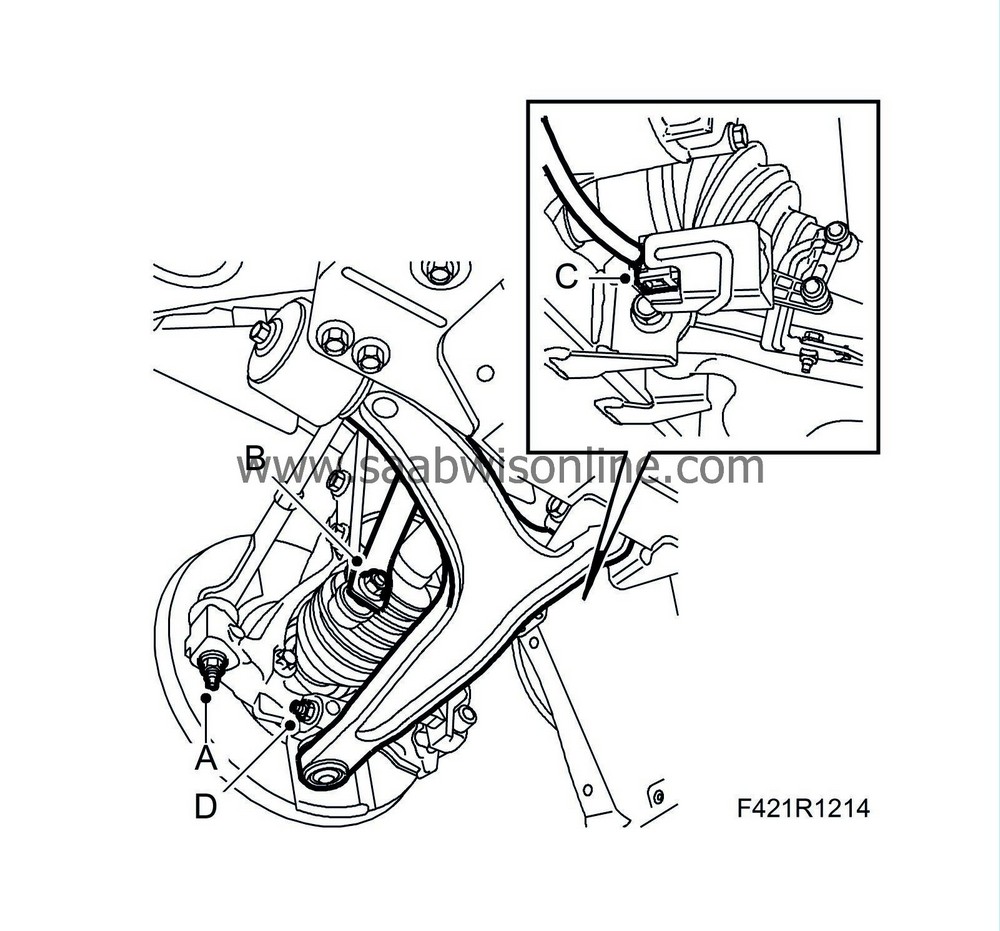
Mount the outer track rods and nuts (A) to steering swivel member.
|
|
| 8. |
Position the lower anti-roll bar links (B) and tighten them while gripping the flats with a thin spanner.
Tightening torque 64 Nm (47 lbf ft) |
|
| 9. |
Certain cars:
Install the connector (C) of the headlamp angle sensor and attach the cable to the subframe.
|
||||||||||
| 10. |
Tighten the bolts (D) on the lower swivel joints.
Tightening torque 50 Nm (37 lbf ft) |
|
| 11. |
Auto:
Fit the left engine mounting (A).
Tightening torque: 70 Nm +45° (52 lbf ft +45°) 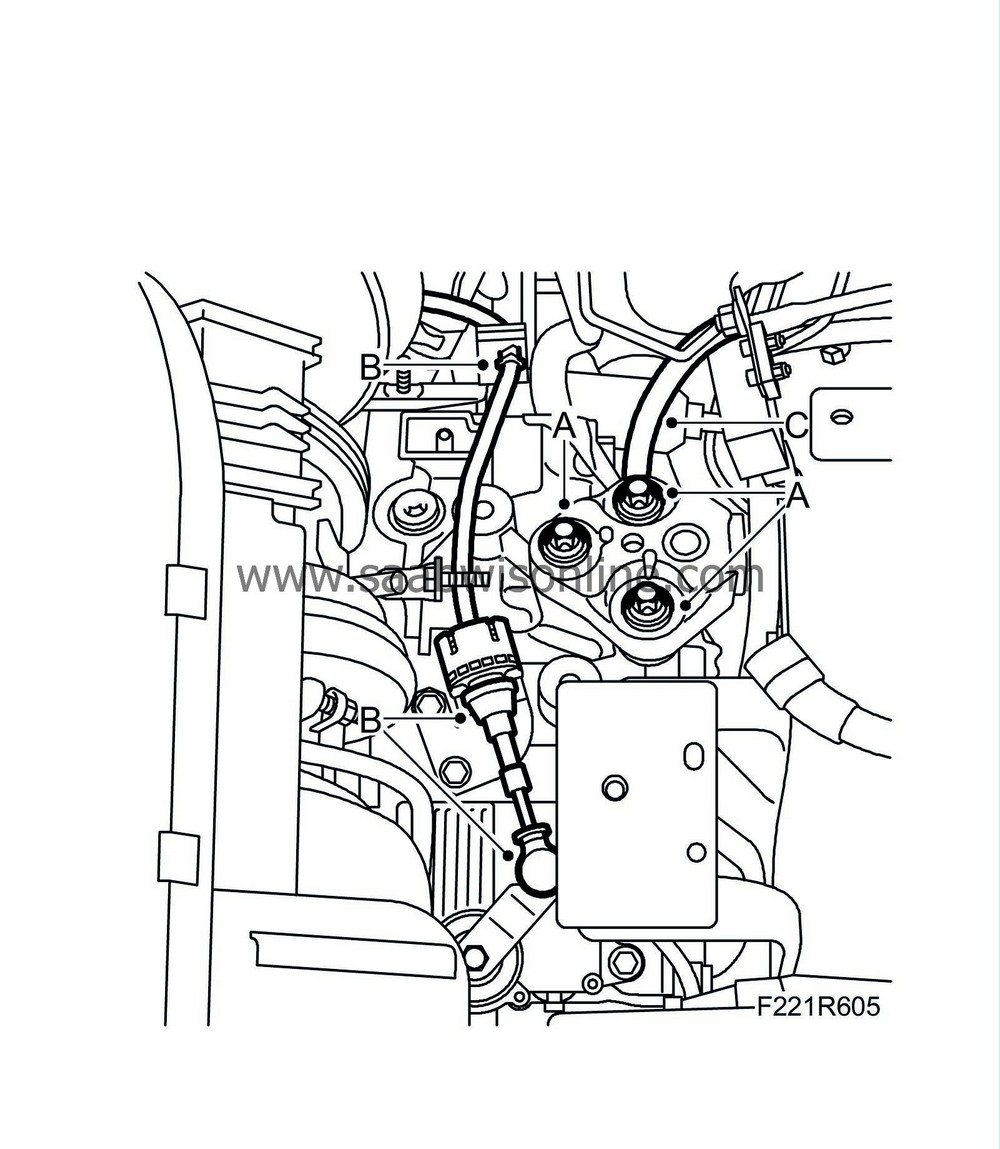
|
|
| 12. |
Auto:
Fit gear cable (B) to gearbox. Mount automatic transmission breather hose (C).
|
|
| 13. |
Man:
Fit the left engine mounting (A).
Tightening torque: 70 Nm +45° (52 lbf ft +45°) 
|
|
| 14. |
Man:
Attach the gear cables (B) to the gearbox.
|
|
| 15. |
Man:
Remove
30 07 739 Hose pinch-off pliers
from clutch hose and fit quick coupling (C) to clutch slave cylinder.
|
|
| 16. |
Fit the right engine mounting (A).
Tightening torque: 70 Nm +60° (52 lbf ft +60°) 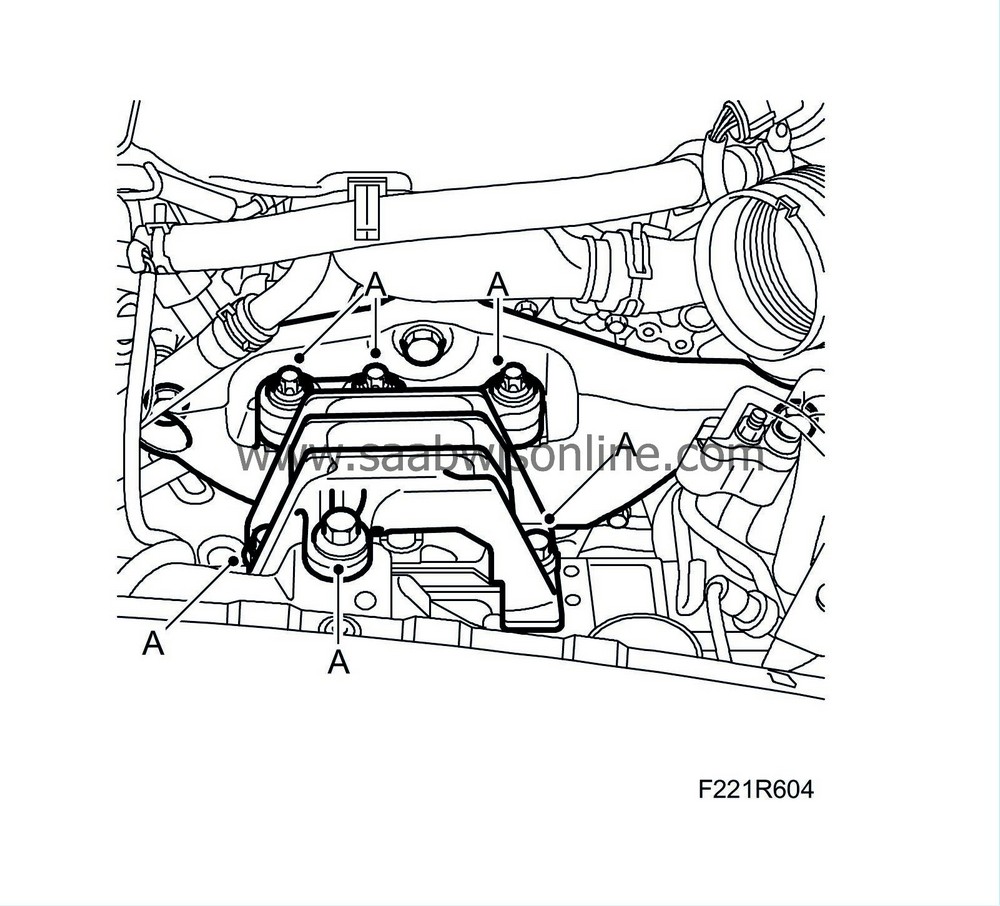
|
|
| 17. |
Fit the quick coupling (D) to the breather line.

|
|
| 18. |
Remove the plugs and connect the fuel line (C) to the fuel rail.
|
|
| 19. |
Connect the brake servo vacuum pipe (A).
|
|
| 20. |
Raise the car.
|
|
| 21. |
Fit the A/C compressor retaining bolts (B) and plug in the A/C compressor connector (A).

|
|
| 22. |
Fit the power steering pipes (A) to the radiator assembly.
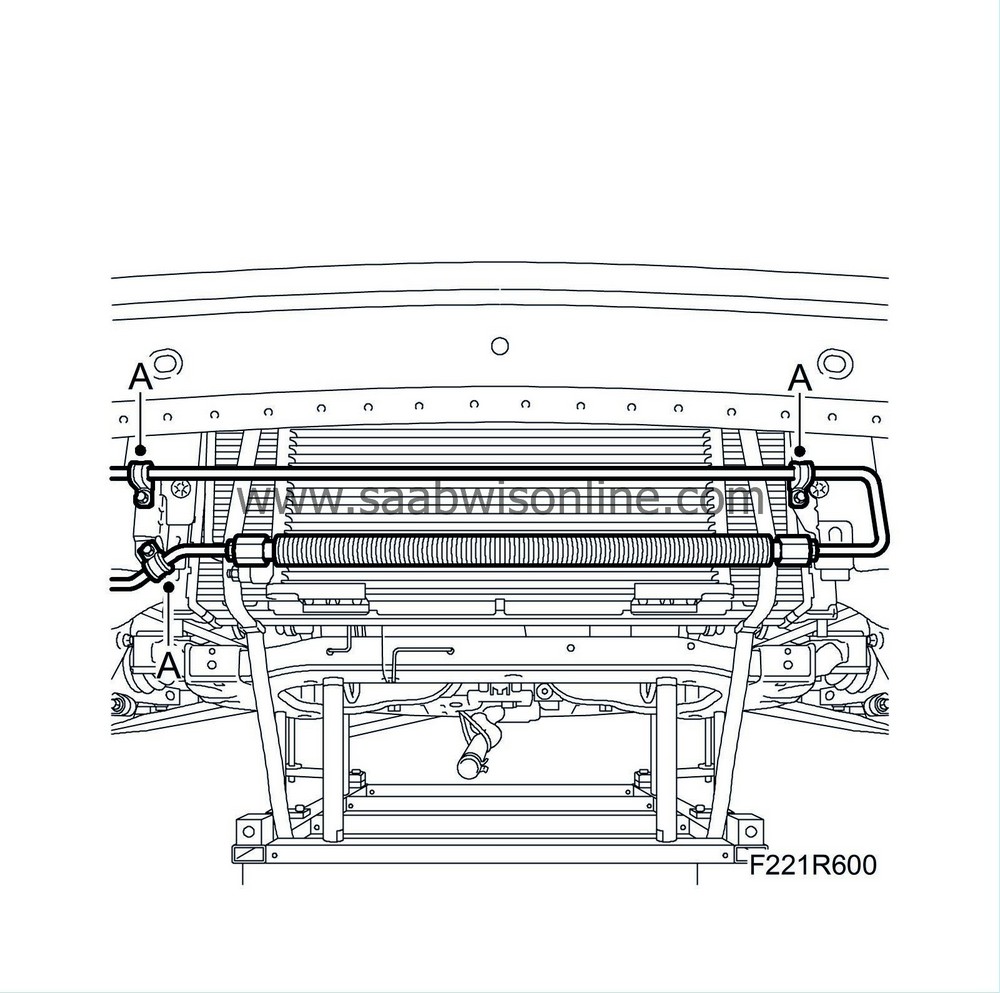
|
|
| 23. |
Connect the steering shaft (A) to the steering gear. Use thread lock.
Tightening torque 30 Nm (22 lbf ft) 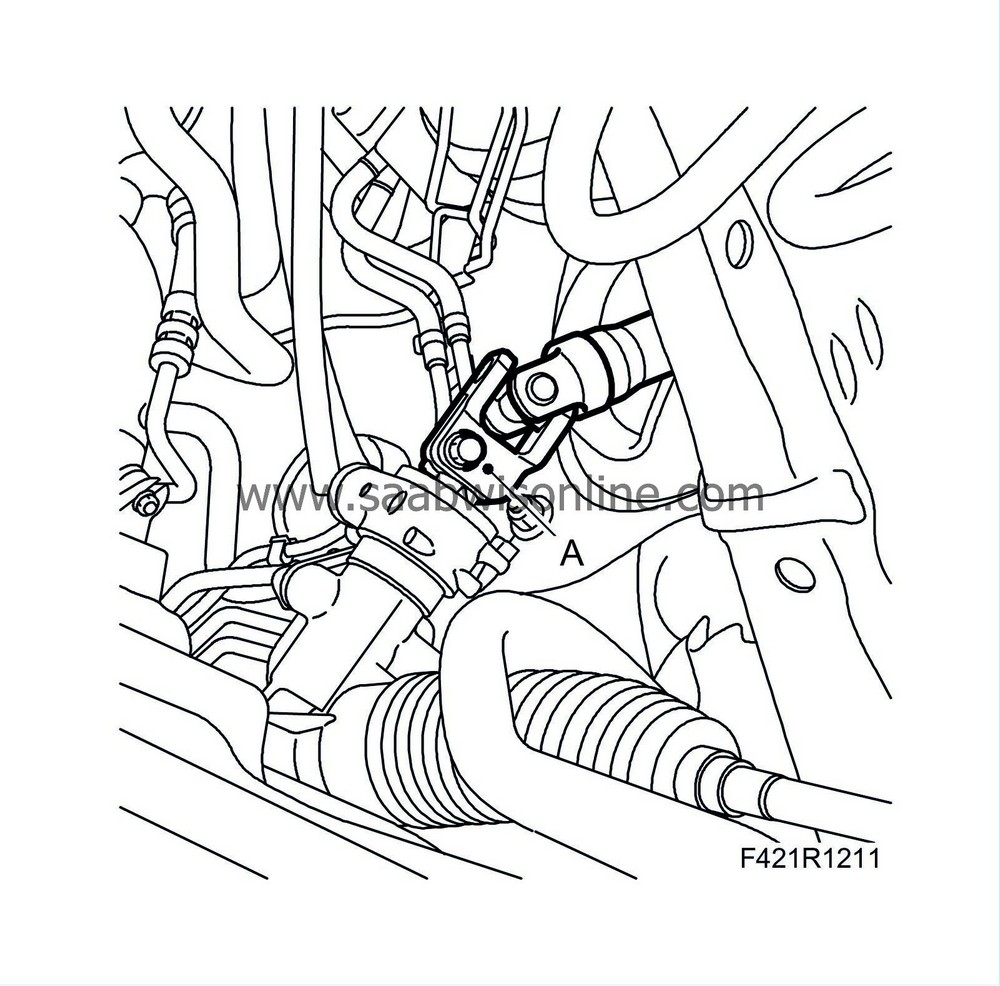
|
|
| 24. |
Lower the car.
|
|
| 25. |
Plug in the two connectors (C) on the structural member.

|
|
| 26. |
Attach the ground cables (B) and the clamp (A) for the engine harness to the body.
|
|
| 27. |
Tighten the retaining screw on the engine harness connector (C) in the main fuse box.

|
|
| 28. |
Attach the positive cable (B) to the positive terminal of the battery.
|
|
| 29. |
Fit the two retaining bolts (A) and the fuse box cover.
|
|
| 30. |
Fit the coolant connections (A) to the heat exchanger.
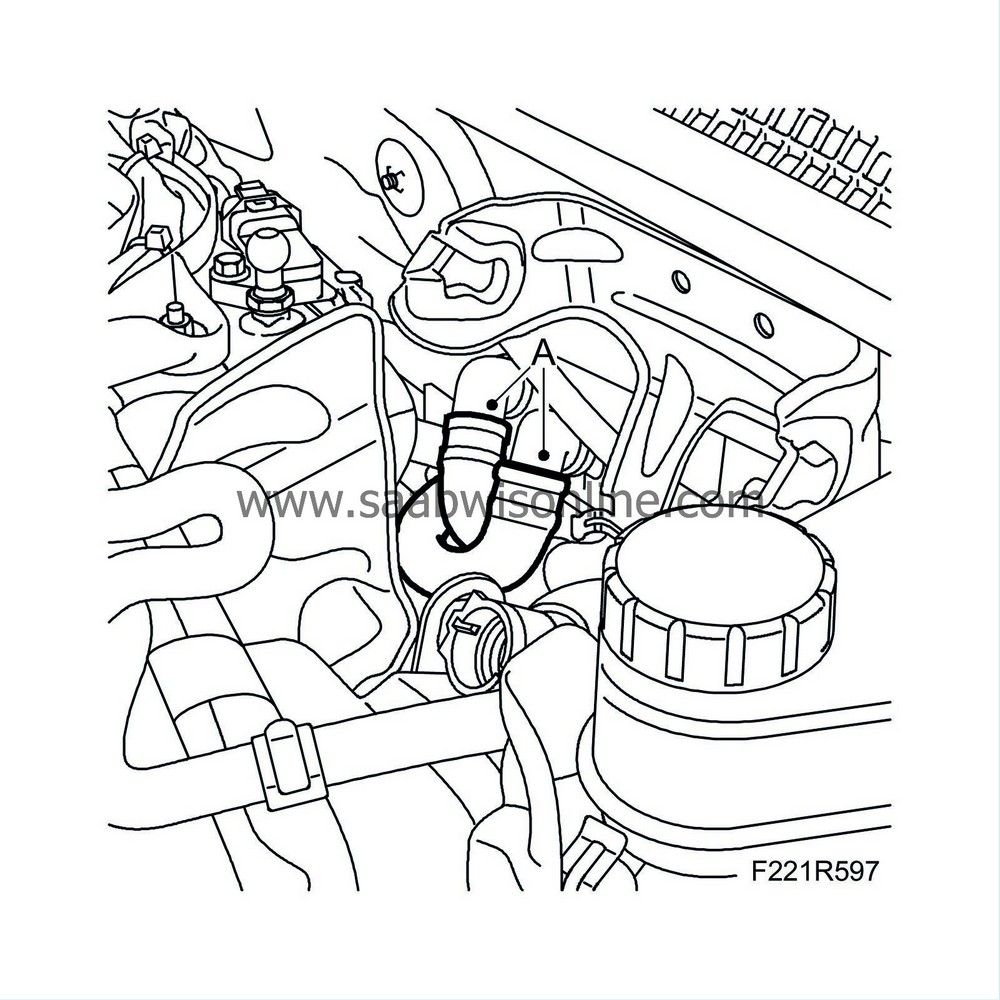
|
|
| 31. |
Fit the level sensor connector (A) and hose (B) quick coupling. Fit coolant reservoir (C).

|
|
| 32. |
Attach the breather hoses (A) from the coolant reservoir.

|
|
| 33. |
Fit the charge air pipe (B) between the throttle body and charge air cooler.

|
|
| 34. |
Plug in the boost pressure sensor connector (688) (A).
|
|
| 35. |
Fit the lower radiator hose (A).
Auto: Remove the plugs and attach the oil pipes to the radiator (B). 
|
|
| 36. |
Attach the upper radiator hose (B) to the engine.
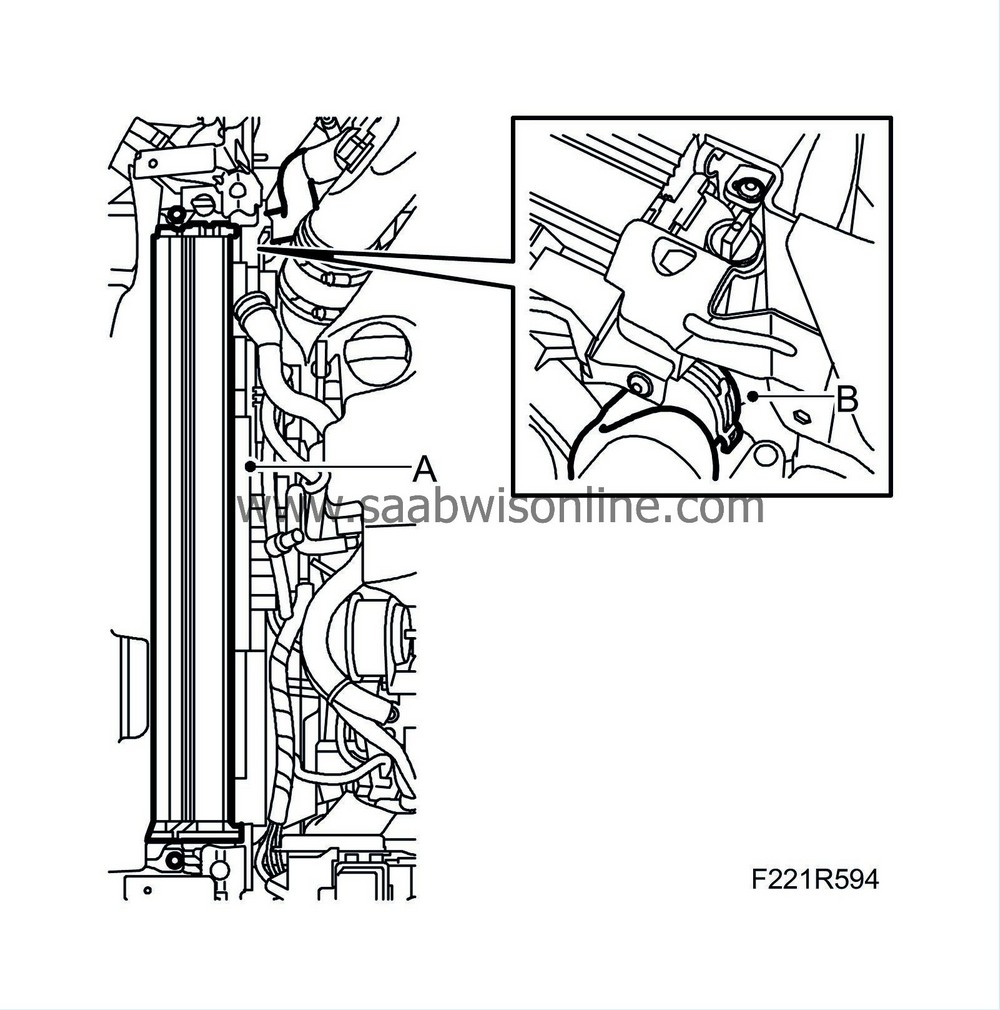
|
|
| 37. |
Fit the cover (A) over the radiator core.
|
|
| 38. |
Fit the air cleaner casing lower section
|
|
| 39. |
Fit the air filter (A).

|
|
| 40. |
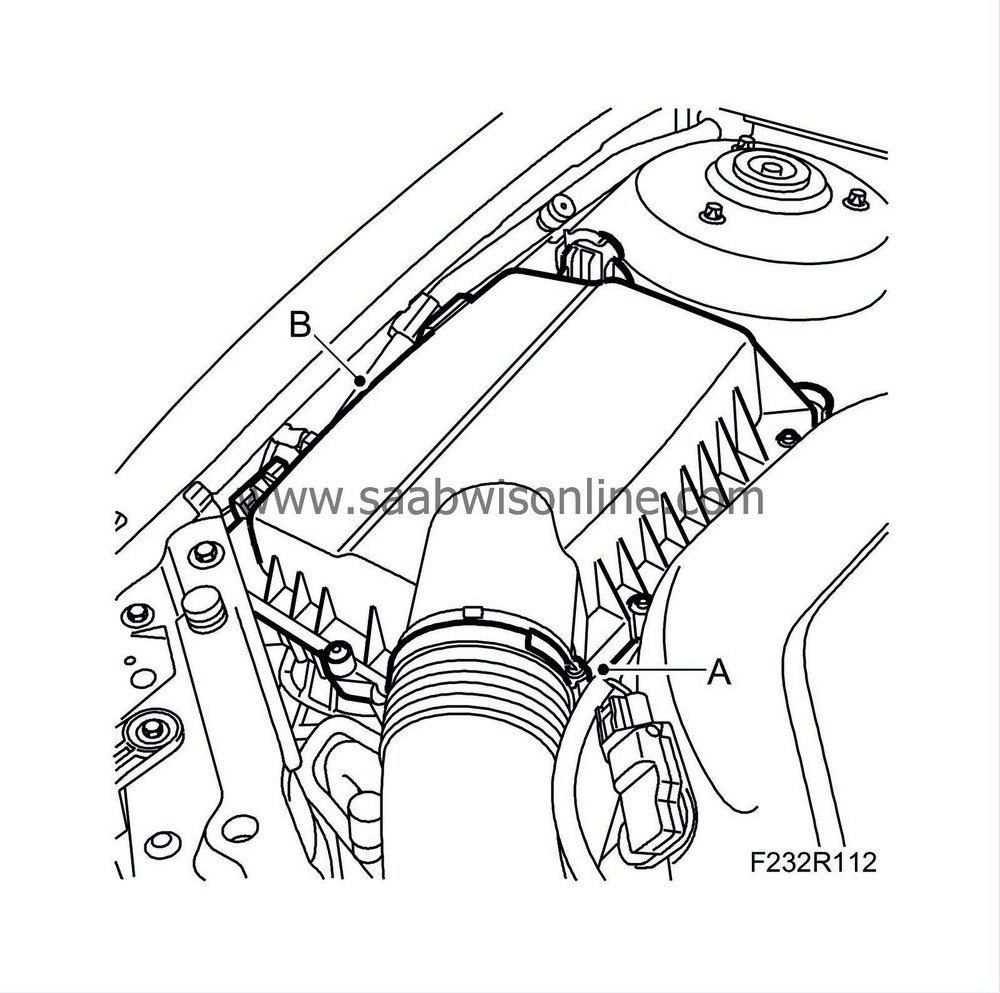
Fit the cap (B) and fit the pipe to the air filter casing cap (A).
|
|
| 41. |
Fit
Fan cowling
.
|
|
| 42. |
Fit the upper engine cover.
|
|
| 43. |
Fit
Propeller shaft
.
|
|
| 44. |
Attach the oil cooler's coolant hose (D) to the radiator.

|
|
| 45. |
Fit the dryer filter bolts (C) on the radiator.
|
|
| 46. |
Attach the hose (B) to the charge air cooler.
|
|
| 47. |
Fit the cover (A) on the right-hand side.
|
|
| 48. |
Mount the charge air pipe lower fixing (C) to the fan cowling and mount the charge air hose (B) between the charge air pipe and the charge air cooler.

|
|
| 49. |
Fit the cover (A) on the left-hand side.
|
|
| 50. |
Fit
Upper radiator member, B284
.
|
|
| 51. |
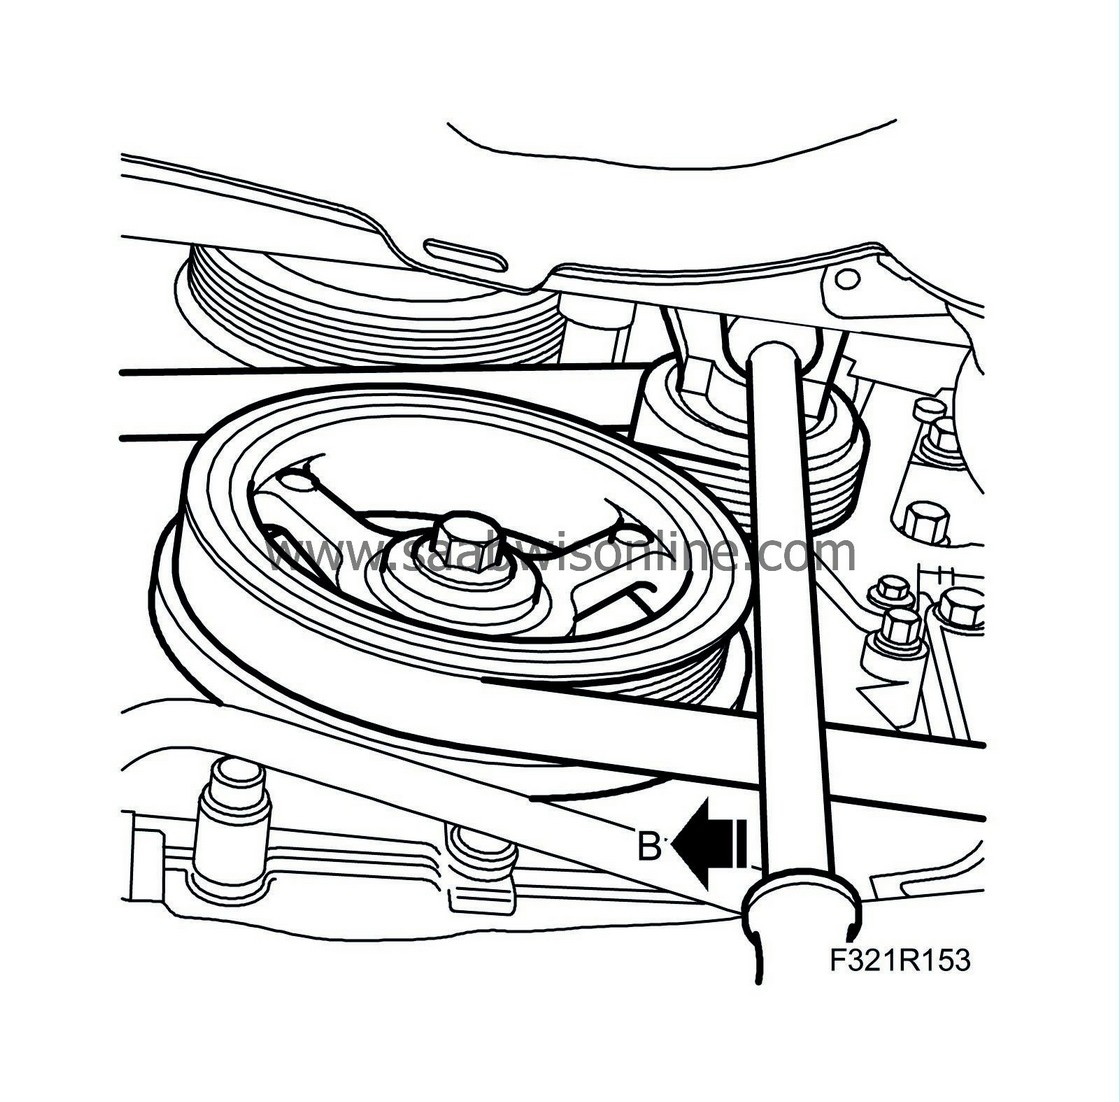
Relieve the load on the belt tensioner. Use a 1/4 " puller handle (B) and fit the driver belt to the A/C compressor pulley.
|
|
| 52. |
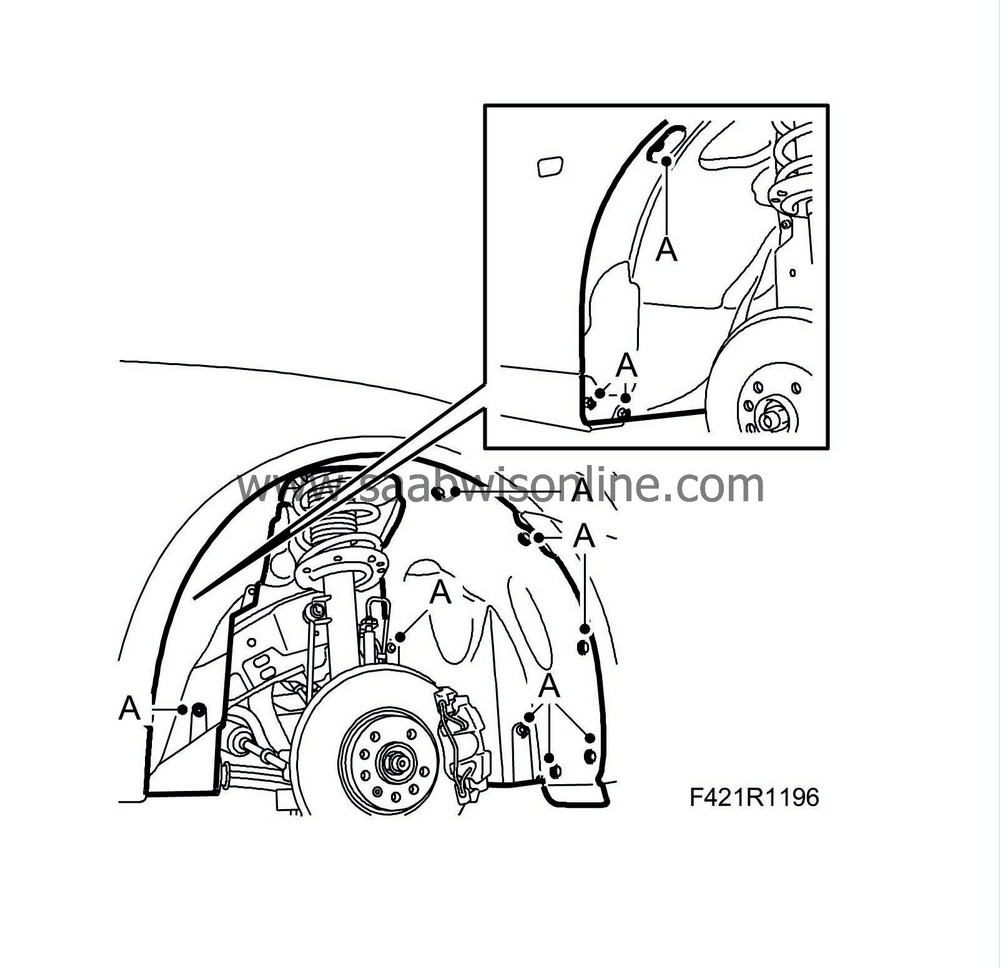
Fit the front part of the left wing liner and fit the right wing liner (A).
|
|
| 53. |
Mount the connector (C) and connect contact piece (B). Mount spoiler shield bolts (A).

|
|
| 54. |
Remove the centre caps of the wheels. Lower the car slightly and mount front wheel, see
Wheel
.
|
|
| 55. |
Lower the car and tighten the hub nuts.
Tightening torque 230 Nm (170 lbf ft). |
|
| 56. |
Fit the wheel centre caps.
|
|
| 57. |
Connect the negative cable and fit the battery cover.
|
|
| 58. |
Remove the wing covers.
|
|
| 59. |
Check oil level and top up as necessary. Fill with coolant to approx. 20 mm above the mark on the expansion tank. If a new engine is fitted, follow the instructions given in
Venting and filling the cooling system
.
|
|
| 60. |
Close the expansion tank cap.
|
|
| 61. |
Aut:
If the gearbox was drained, check the automatic transmission fluid level as described in Checking oil level.
|
|
| 62. |
Remove the wing covers and restore car electrical functions, see
Procedure after reconnecting the battery
.
|
|
| 63. |
Fit the upper engine cover.
|
|

 Warning

