Radiator, A20NFT/LHU
| Radiator, A20NFT/LHU |
| To remove |
|
|||||||||||||
| 1. |
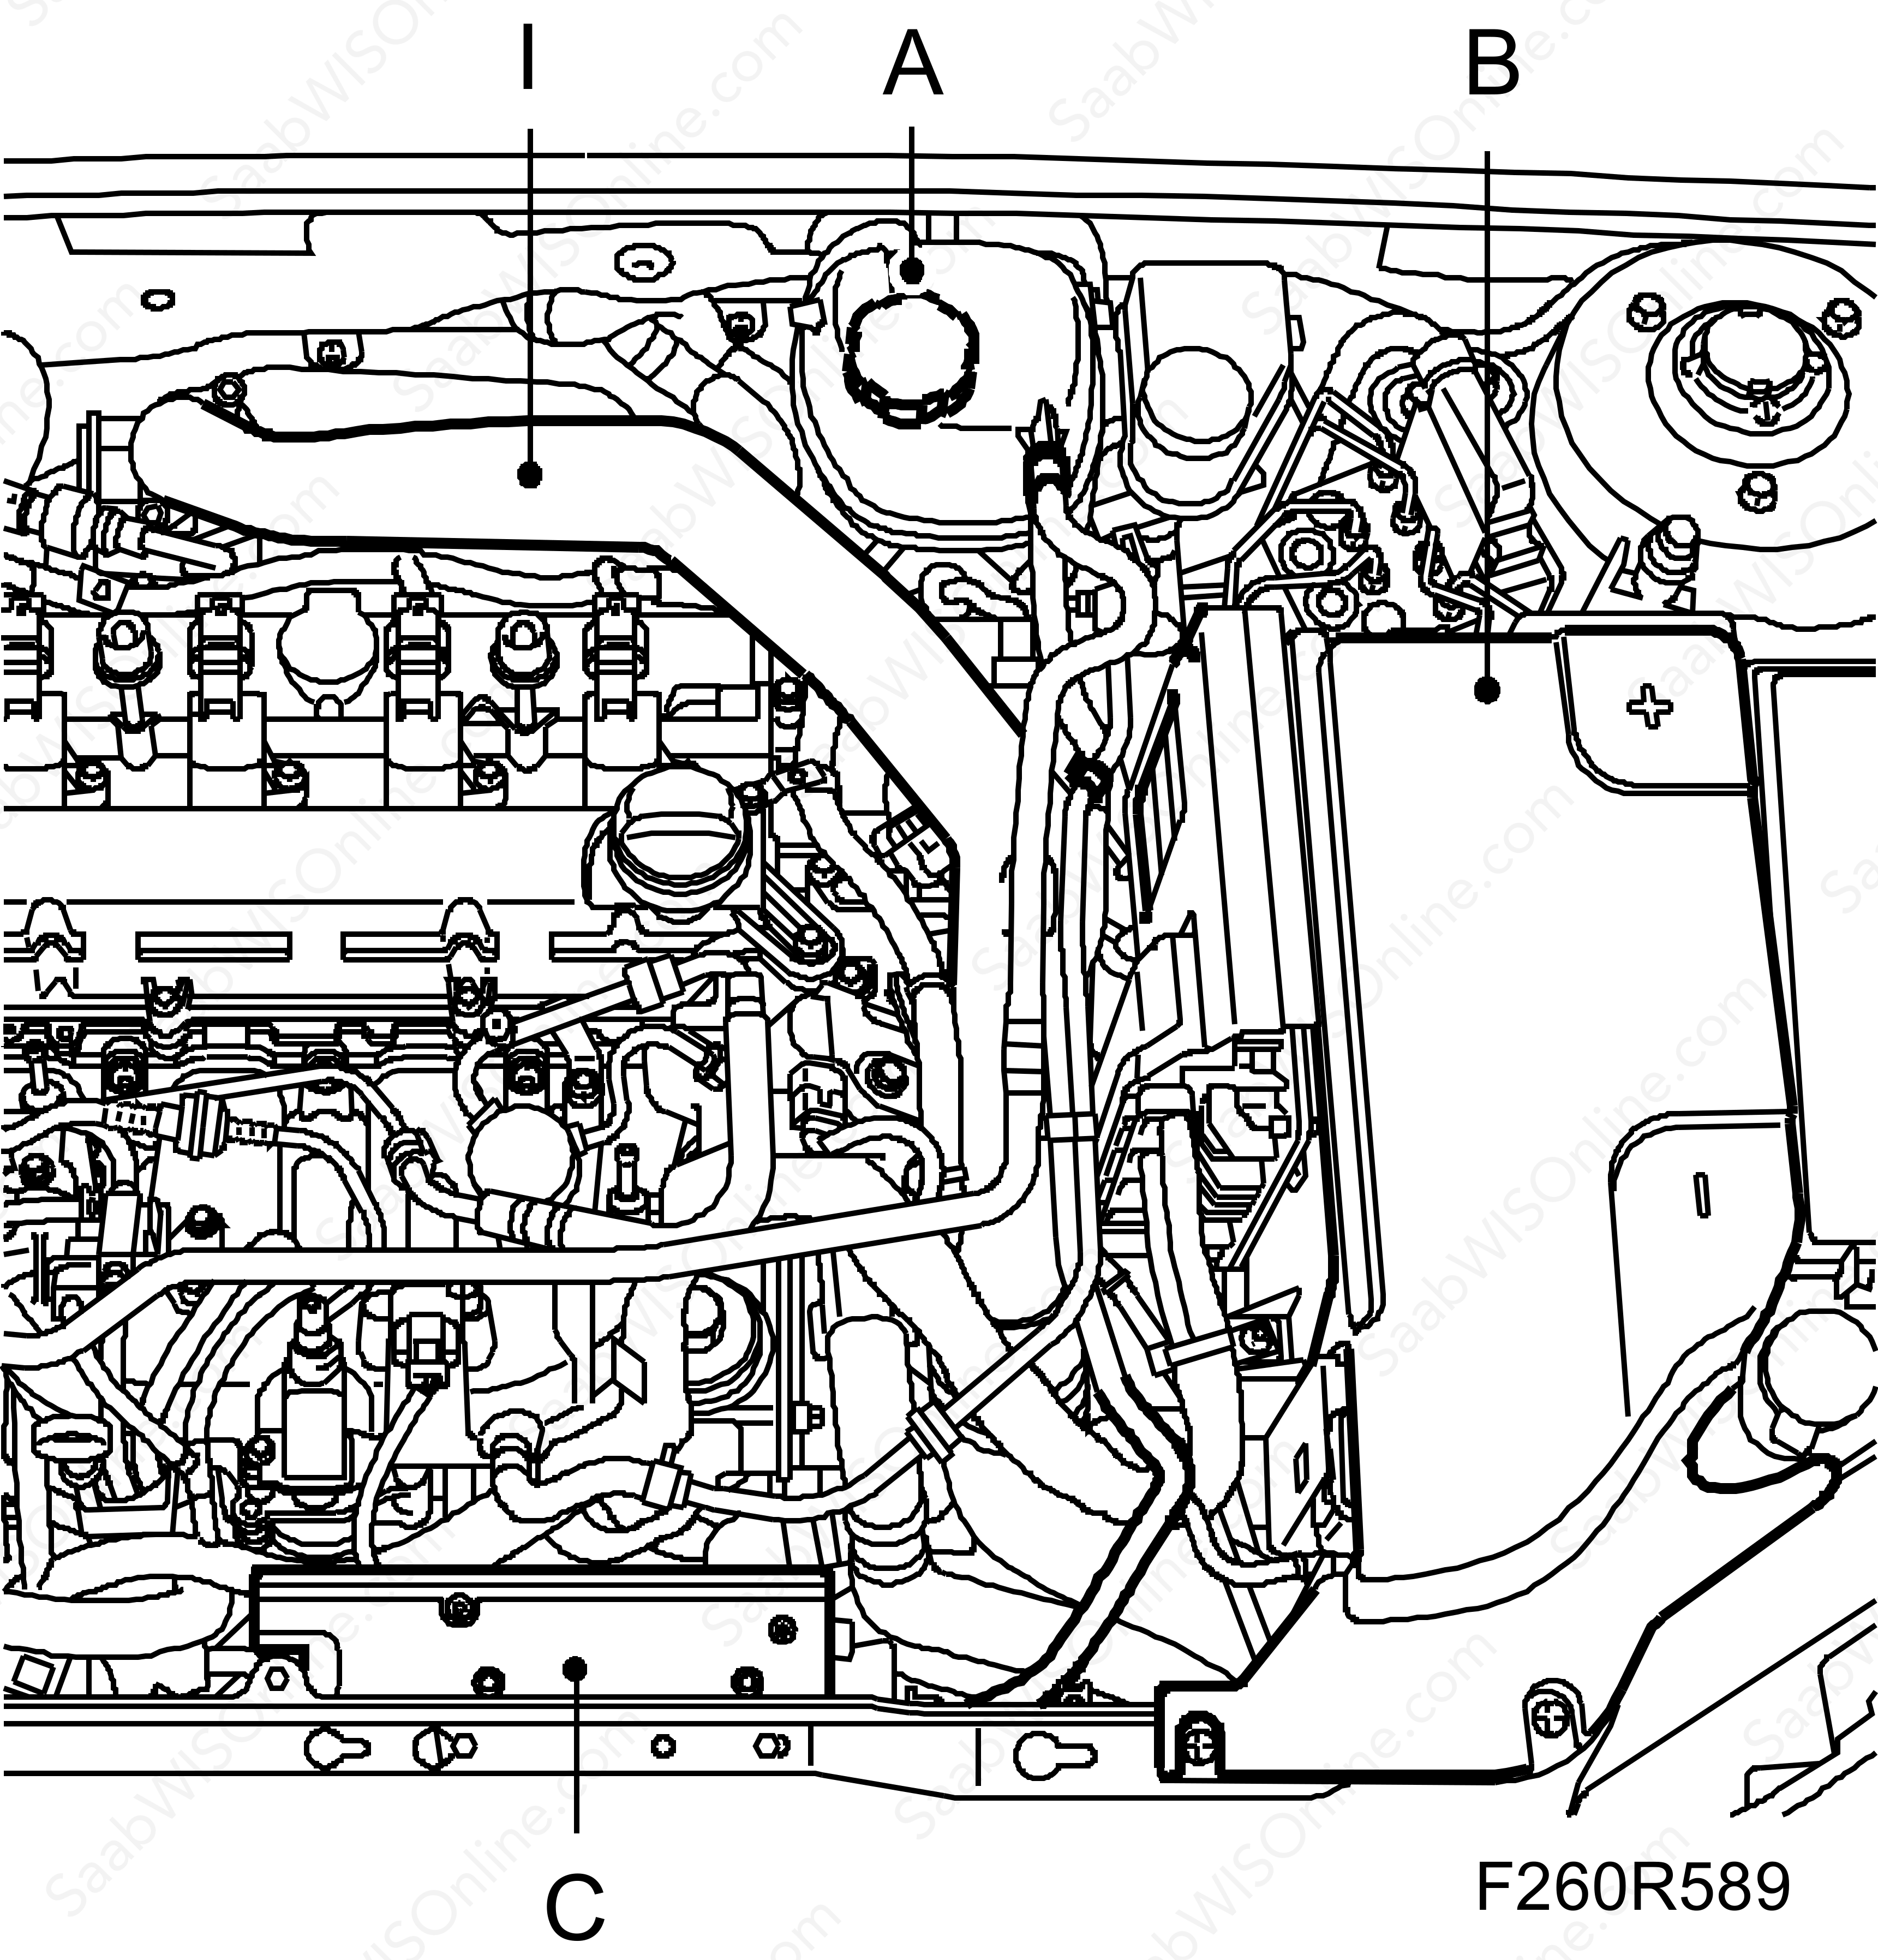
Undo the expansion tank cap (A) and release the pressure.

|
|
| 2. |
Remove the upper engine cover.
|
|
| 3. |
Remove the battery cover (B) and release the cables from the battery.
|
|
| 4. |
Remove the battery cooling pipe and release it from its catch.
|
|
| 5. |
Remove the bracket (C) from the radiator member and move to one side.
|
|
| 6. |
Raise the car.
|
|
| 7. |
Remove the
Spoiler shield, front.
|
|
| 8. |
Place a receptacle under the car, connect a hose and drain the cooling system.
|
|
| 9. |
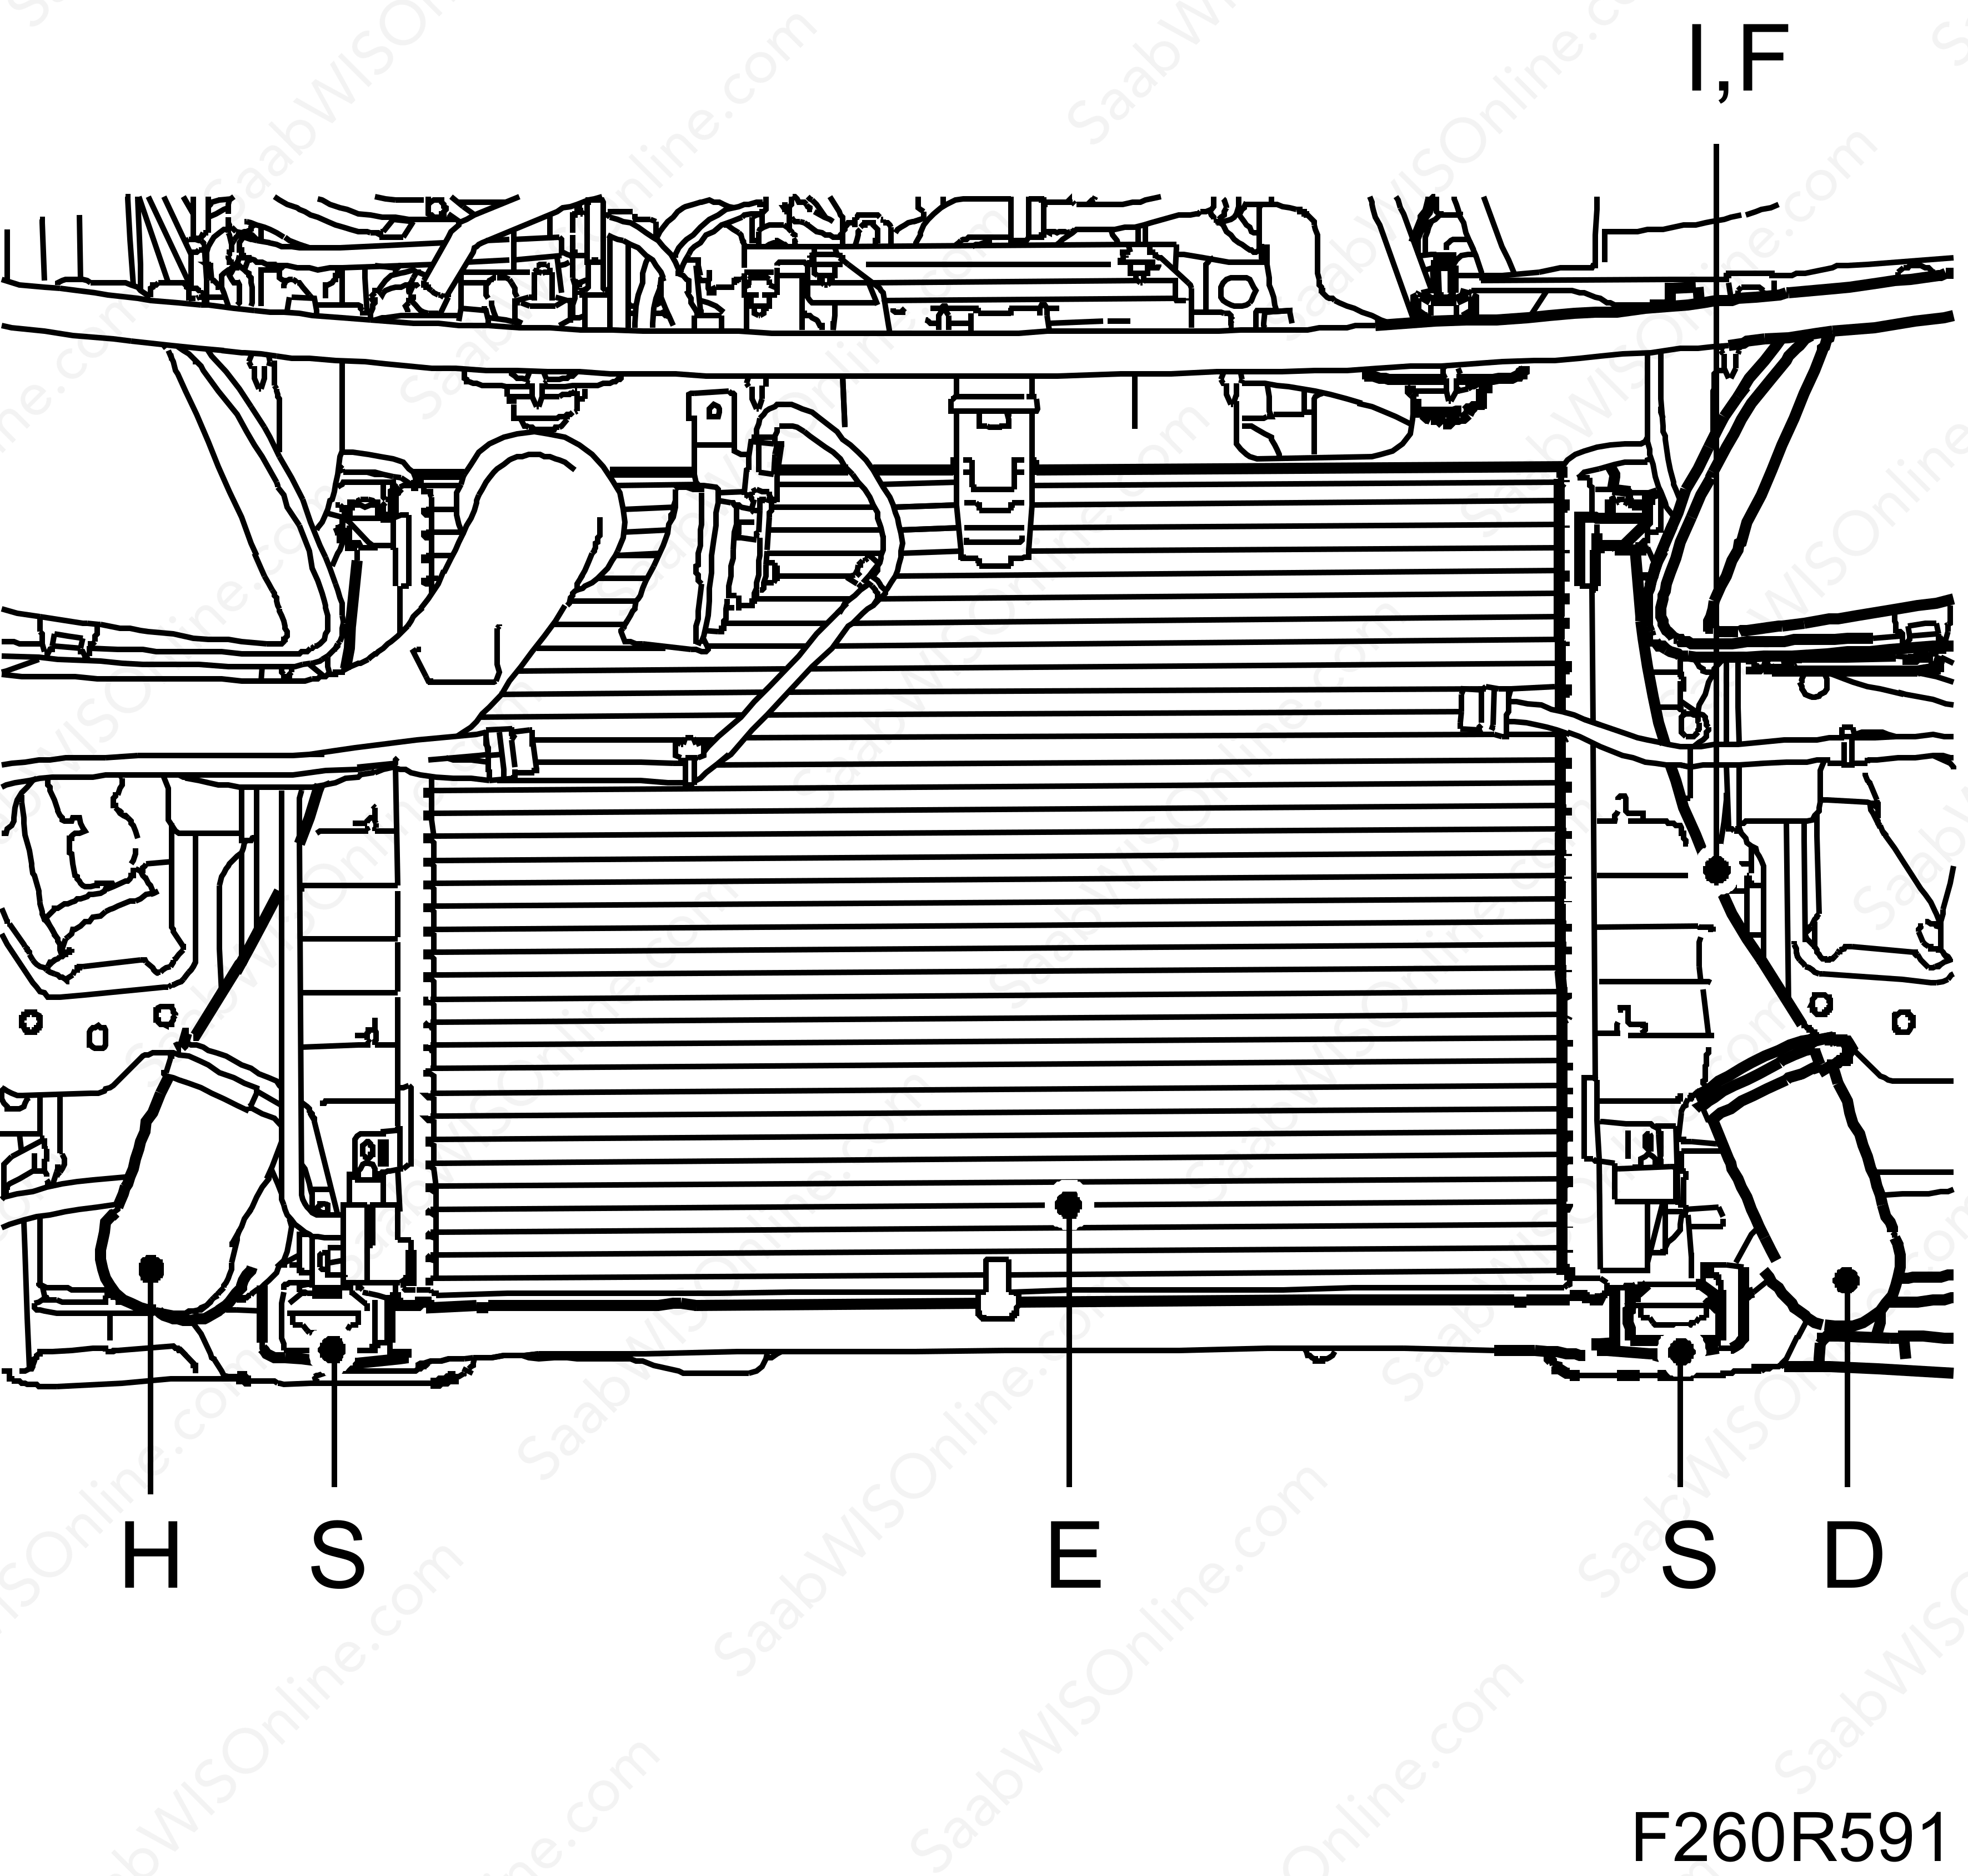
Remove the charge air hose (D) from the charge air cooler (E) on the left side.

|
|
| 10. |
Remove the charge air pipe's (I) lower bracket (F) from the fan cowling (G).
|
|
| 11. |
Remove the charge air hose (H) from the charge air cooler (E) on the right side. Move the hose to one side.
|
|
| 12. |
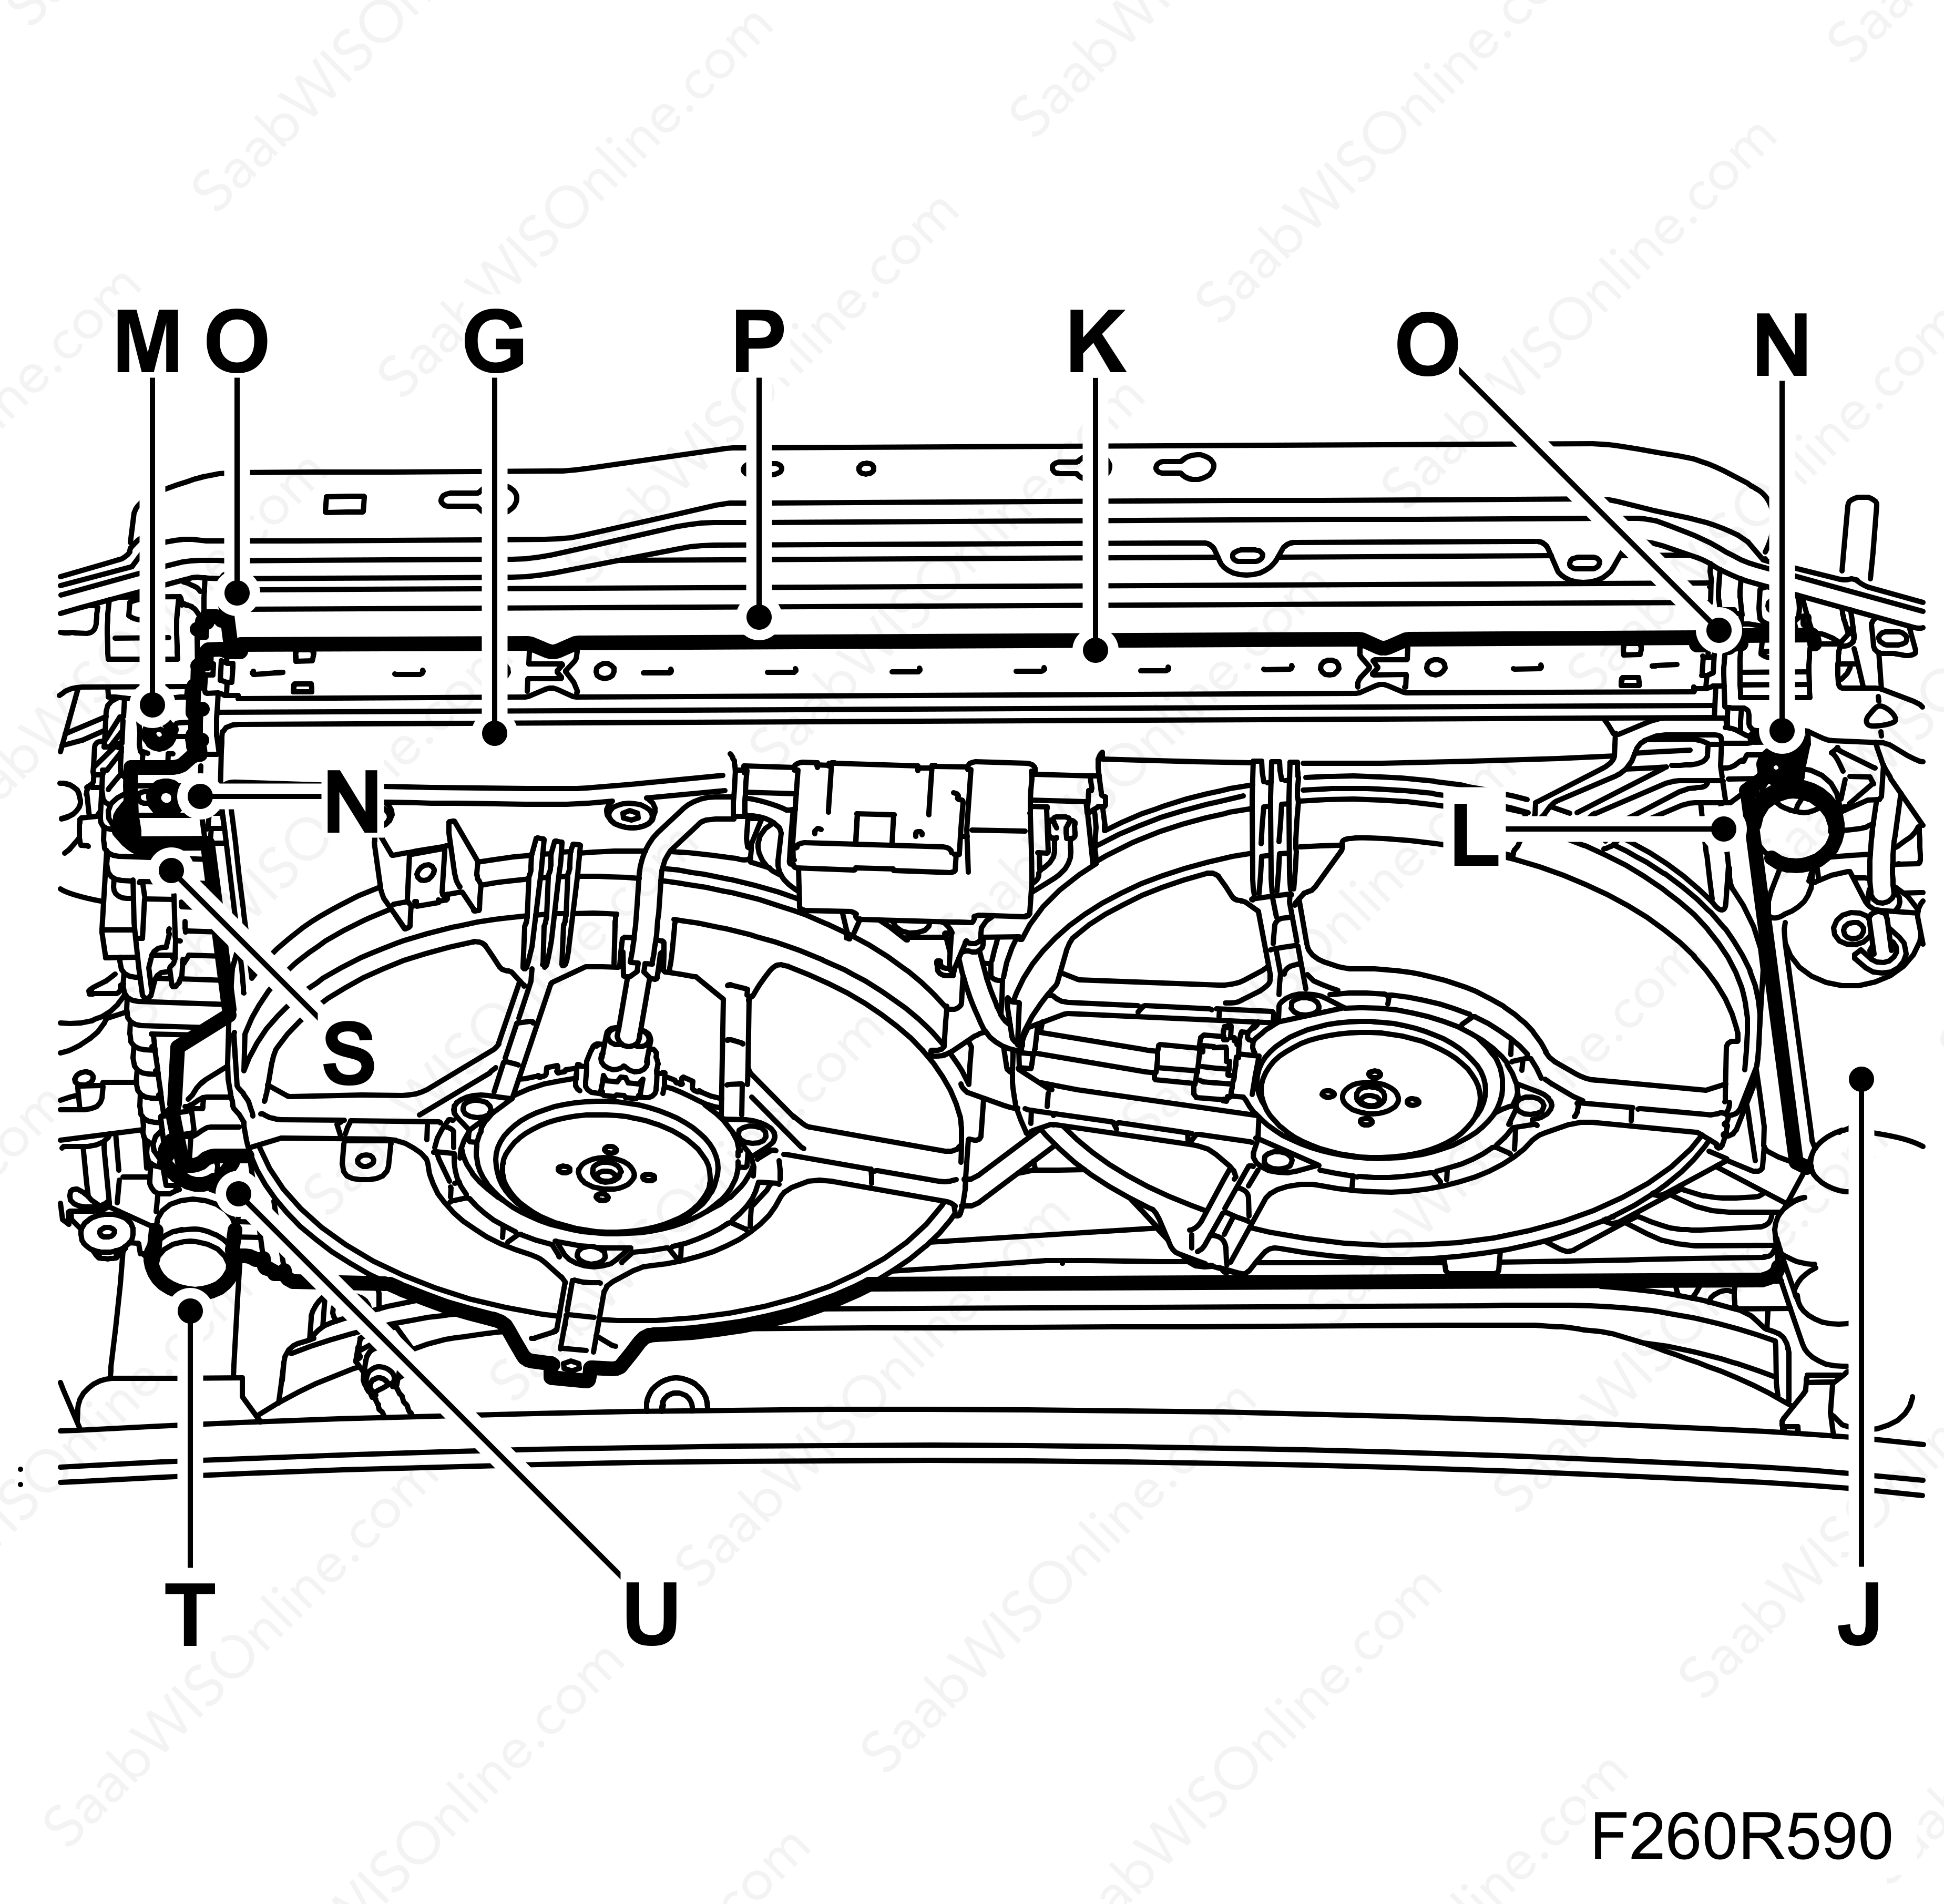
Remove the drier filter's (J) screws from the radiator (K).

|
|
| 13. |
Lower the car.
|
|
| 14. |
Remove the upper radiator hose (L) from the radiator (K).
|
|
| 15. |
Detach the expansion tank hose (M).
|
|
| 16. |
Aut:
Remove the dust guard to the upper pipe (S) by rotating the removal tool
87 92 806 Removal tool, automatic gearbox oil pipe
slightly, remove the connection. At the same time, undo the pipe from the clip.
|
|
| 17. |
Remove the upper fan cowling (G) bolts (N).
|
|
| 18. |
Remove the upper screws (O) to the charge air cooler (P) and the radiator (K).
|
|
| 19. |
Insert two
83 95 212 Straps
to suspend the fan cowling (G) and the charge air cooler (P) together with the condenser (R).
|
|
| 20. |
Raise the car.
|
|
| 21. |
Tighten the
83 95 212 Straps
.
|
|
| 22. |
Remove the lower radiator connection (T).
|
|
| 23. |
Aut:
Remove the dust guard to the lower pipe (U) by rotating the removal tool
87 92 806 Removal tool, automatic gearbox oil pipe
slightly, remove the connection. At the same time, undo the pipe from the clip.
|
|
| 24. |
Unhook the charge air cooler (P) and the condenser (R) from the radiator (K).
|
|
| 25. |
Unhook the fan housing (G) from the radiator (K).
|
|
| 26. |
Remove the radiator's (K) lower bracket (S) from the subframe.
|
|
| 27. |
Carefully move the radiator (K) down.
|
|
| To fit |
Upon radiator replacement: Transfer the upper rubber pads to the new radiator.
| 1. |
Move up the radiator (K). Make sure that the radiator's (K) upper rubber cushions are positioned in their mounts.

|
|
| 2. |
Fit the radiator's (K) lower bracket (S) to the subframe.
Tightening torque 47 Nm (35 lbf ft) |
|
| 3. |
Fit den lower coolant hose (T) between the radiator (K) and the cylinder block.
|
|
| 4. |
Check that the radiator (K) and charge air cooler (P) are connected.
|
||||||||||
| 5. |
Check that the radiator (K) and fan cowling (G) are connected.
|
|
| 6. |
Remove the straps.
|
|
| 7. |
Aut:
Fit the lower oil pipe (U) from the automatic transmission to the radiator (K).
|
|
| 8. |
Fit the screws to the drier filter (J).
|
|
| 9. |
Fit the right charge air hose (H) to the charge air cooler (E).

|
|
| 10. |
Lower the car.
|
|
| 11. |
Aut:
Fit the upper oil pipe (S) from the automatic transmission to the radiator (K).
|
|
| 12. |
Fit the upper screws to the radiator (K) and the charge air cooler (P).
|
|
| 13. |
Fit the fan cowling's (G) upper screws (N).
|
|
| 14. |
Attach the upper coolant hose (L) between the radiator (K) and cylinder block.
|
|
| 15. |
Fit the coolant hose (M) between the radiator (K) and the expansion tank (A).
|
|
| 16. |
Raise the car.
|
|
| 17. |
Fit the charge air pipe's lower bracket (I) to the fan cowling (G).
|
|
| 18. |
Fit the left charge air hose (D) to the charge air cooler (E).
|
|
| 19. |
Fit the
Spoiler shield, front.
|
|
| 20. |
Lower the car.
|
|
| 21. |
Fit the bracket (C) to the radiator member

|
|
| 22. |
Fit the upper engine cover.
|
|
| 23. |
Connect a
30 05 477 Cooling system tester
, pump up a pressure of about 1 bar and check the cooling system to ensure the pressure does not drop.
|
|
| 24. |
Relieve the pressure and remove the cooling system tester.
|
|
| 25. |
Top up coolant. See
Cooling system, draining and filling, LHU/A20NFT
.
|
|
| 26. |
Fit the expansion tank cap (A).
|
|
| 27. |
Fit the battery cooler pipe.
|
|
| 28. |
Attach the battery cables to the batter and fit the battery cover (B).
|
|
| 29. |
Aut:
Check the automatic transmission fluid level.
|
|
| 30. |
If the battery has been disconnected, see
Procedure after reconnecting the battery
.
|
|

 Warning

