Transmission Replacement
| Transmission Replacement |
Special Tools
| • |
CH-49290
Engine fixture
|
|
| • |
CH-49289
Support frame fixture
|
|
| • |
CH-904
Basic tool
|
|
| • |
DT-47648
Transmission fixture
|
|
| • |
EN-47649
Engine Bridge
|
|
| • |
EN-47650
Retainer Frame
|
|
For equivalent regional tools, refer to Special Tools .
| Removal Procedure |
| 1. |
Remove the intake manifold cover. Refer to
Intake Manifold Cover Replacement
.
|
|
| 2. |
Remove the battery tray. Refer to
Battery Tray Replacement
.
|
|
| 3. |
Disconnect the connector (1) from the transmission control module.

|
|
| 4. |
Remove the shift lever cable from the selector on the transmission. Refer to
Range Selector Lever Cable Replacement
.
|
|
| 5. |
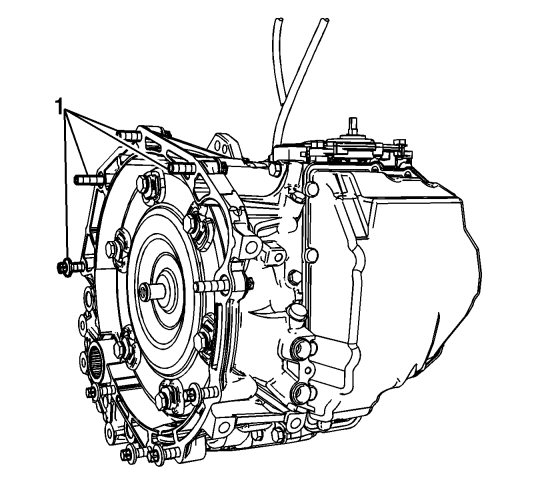
Remove upper transmission fasteners (1).

|
|
| 6. |
Install the engine support fixture. Refer to
Engine Support Fixture (Engine Bridge, Retainer Frame)
Engine Support Fixture (Centering Adapter)
.
|
|
| 7. |
Raise the vehicle.
|
|
| 8. |
Drain the transmission fluid.
|
|
| 9. |
Remove the exhaust front pipe. Refer to
Exhaust Flexible Pipe Replacement (LAU)
Exhaust Flexible Pipe Replacement (LF1- Service)
.
|
|
| 10. |
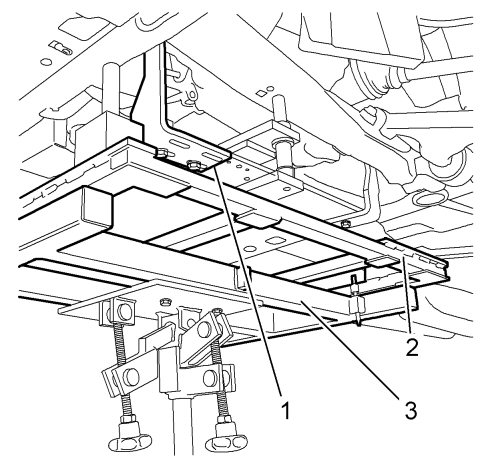
Install
CH-49290
Engine fixture and
CH-49289
Support frame fixture.
|
|
| 11. |
Remove the frame. Refer to
Drivetrain and Front Suspension Frame Replacement
.
|
|
| 12. |
Remove the transmission front mount. Refer to
Transmission Front Mount Replacement
.
|
|
| 13. |
Remove the transmission rear mount bracket. Refer to
Transmission Rear Mount Replacement
.
|
|
| 14. |
Remove the right wheel driveshaft. Refer to
Front Wheel Drive Shaft Replacement
.
|
|
| 15. |
Remove the left wheel drive shaft. Refer to
Front Wheel Drive Shaft Replacement
.
|
|
| 16. |
Remove the transfer case from the transmission. Refer to
Transfer Case Replacement
|
|
| 17. |
Remove the starter. Refer to
Starter Replacement (LAU)
Starter Replacement (LF1)
.
|
|
| 18. |
Remove the six fasteners (1) from the flywheel to the torque converter.

|
|
| 19. |
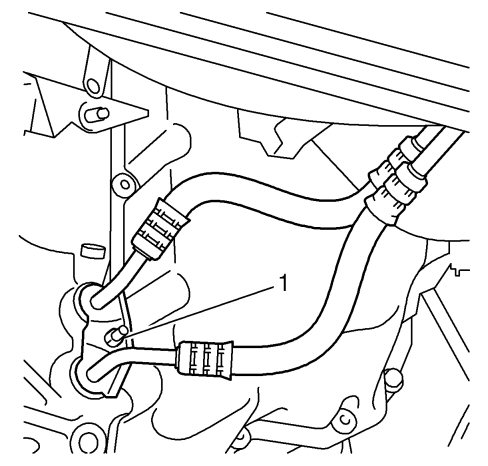
Remove the oil cooler hose connection (1) from the transmission.
|
|
| 20. |
Remove the fasteners to the transmission mount bracket left side. Refer to
Front Axle Shaft Seal Replacement - Left Side
.
|
|
| 21. |
Lower the vehicle.
|
|
| 22. |
Adjust the settings of the
CH-904
Basic tool and lower the engine enough to access the transmission.
|
|
| 23. |
Raise the vehicle.
|
|
| 24. |
Support the transmission with
DT-47648
Transmission fixture and a transmission jack. graphic here
|
|
| 25. |
Remove the lower transmission fasteners.
|
|
| 26. |
Separate the transmission from the engine.
|
|
| 27. |
Secure the torque converter in the transmission to prevent it from falling.
|
|
| 28. |
Lower the transmission.
|
|
| Installation Procedure |
| 1. |
Lubricate the centering pin on the converter and the two guiding sleeves.
|
|
| 2. |
Check torque converter for correct transmission positioning.
|
|
| 3. |
Position the transmission to the engine.
|
|
| 4. |
Refer to
Fastener Caution
.
Install the one lower transmission fastener (1) and tighten to 60 Nm (44 lb ft) . 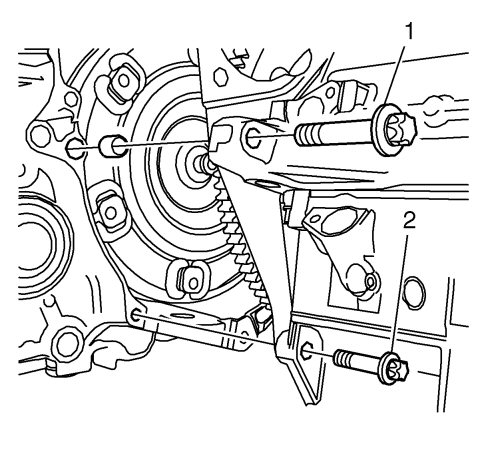
|
|
| 5. |
Install the four lower transmission fasteners (2) and tighten to
40 Nm (30 lb ft)
.
|
|
| 6. |
Install the transfer case to the transmission. Refer to
Transfer Case Replacement
|
|
| 7. |
Remove the
DT-47648
Transmission fixture and the transmission jack.
|
|
| 8. |
Lower the vehicle.
|
|
| 9. |
Raise the engine to the correct level with the engine support fixture.
|
|
| 10. |
Install the fasteners to the transmission mount bracket left side. Refer to
Transmission Mount Replacement - Left Side
|
|
| 11. |
Install the upper transmission fasteners (1) and tighten to
60 Nm (44 lb ft)
.
|
|
| 12. |
Connect the shift lever cable to the selector lever on the transmission. Refer to
Range Selector Lever Cable Replacement
.
|
|
| 13. |
Connect the electrical connector to the transmission control module.
|
|
| 14. |
Raise the vehicle.
|
|
| 15. |
Install the fasteners to the converter.
Apply locking agent on the bolts and tighten to 60 Nm (44 lb ft) . 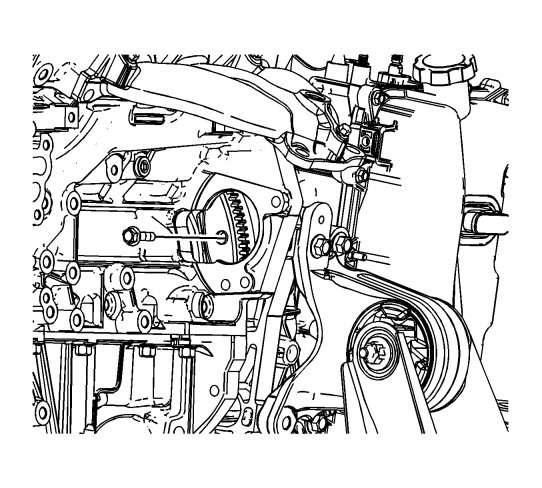
|
|
| 16. |
Install the starter. Refer to
Starter Replacement (LAU)
Starter Replacement (LF1)
.
|
|
| 17. |
Install the oil cooler hose connection (1) to the transmission and tighten to
10 Nm (89 lb in)
.

|
|
| 18. |
Install the transmission rear mount bracket. Refer to
Transmission Rear Mount Replacement
.
|
|
| 19. |
Install the transmission front mount. Refer to
Transmission Front Mount Replacement
.
|
|
| 20. |
Install the right driveshaft. Refer to
Front Wheel Drive Shaft Replacement
.
|
|
| 21. |
Install the left driveshaft to the transmission. Refer to
Front Wheel Drive Shaft Replacement
.
|
|
| 22. |
Install the
CH-49290
Engine fixture with the engine guiding pins.
|
|
| 23. |
Install the frame. Refer to
Drivetrain and Front Suspension Frame Replacement
.
|
|
| 24. |
Remove the
CH-49290
Engine fixture and the
CH-49289
Support frame fixture
|
|
| 25. |
Install the exhaust front pipe. Refer to
Exhaust Flexible Pipe Replacement (LAU)
Exhaust Flexible Pipe Replacement (LF1- Service)
.
|
|
| 26. |
Lower the vehicle.
|
|
| 27. |
Remove the engine support fixture.
|
|
| 28. |
Install the battery tray and battery. Refer to
Battery Tray Replacement
.
|
|
| 29. |
Check the transmission fluid. Refer to
Transmission Fluid Level and Condition Check
.
|
|
| 30. |
Install the intake manifold cover. Refer to
Intake Manifold Cover Replacement
.
|
|


