Wiring harness, rear 4D
| Wiring harness, rear 4D |
| To remove |
| 1. |
Remove all
Side sill scuff plates
.
|
|
| 2. |
Remove both
Front seats
.
|
|
| 3. |
Remove the
Centre console
.
|
|
| 4. |
Remove the
Glove box
.
|
|
| 5. |
Remove the data link connector. (A)

|
|
| 6. |
Remove the lower section of the dashboard with air duct on the driver's side.
|
|
| 7. |
Detach the floor lighting in the lower panel.
|
|
| 8. |
Remove the
Seat cushion, rear seat
|
|
| 9. |
Remove the
Backrest, rear seat, 4D
.
|
|
| 10. |
Remove the nut (A) for the lower rear seat-belt anchorage point on both sides.

|
|
| 11. |
Remove the
C-pillar trim, 4D
on both sides.
|
|
| 12. |
Remove the
Parcel shelf trim, 4D
.
|
|
| 13. |
Remove the
Scuff plate, luggage compartment, 4D
.
|
|
| 14. |
Remove the
Luggage compartment trim, floor panel, 4D
.
|
|
| 15. |
Remove the
Luggage compartment trim, side trim, 4D
on both sides.
|
|
| 16. |
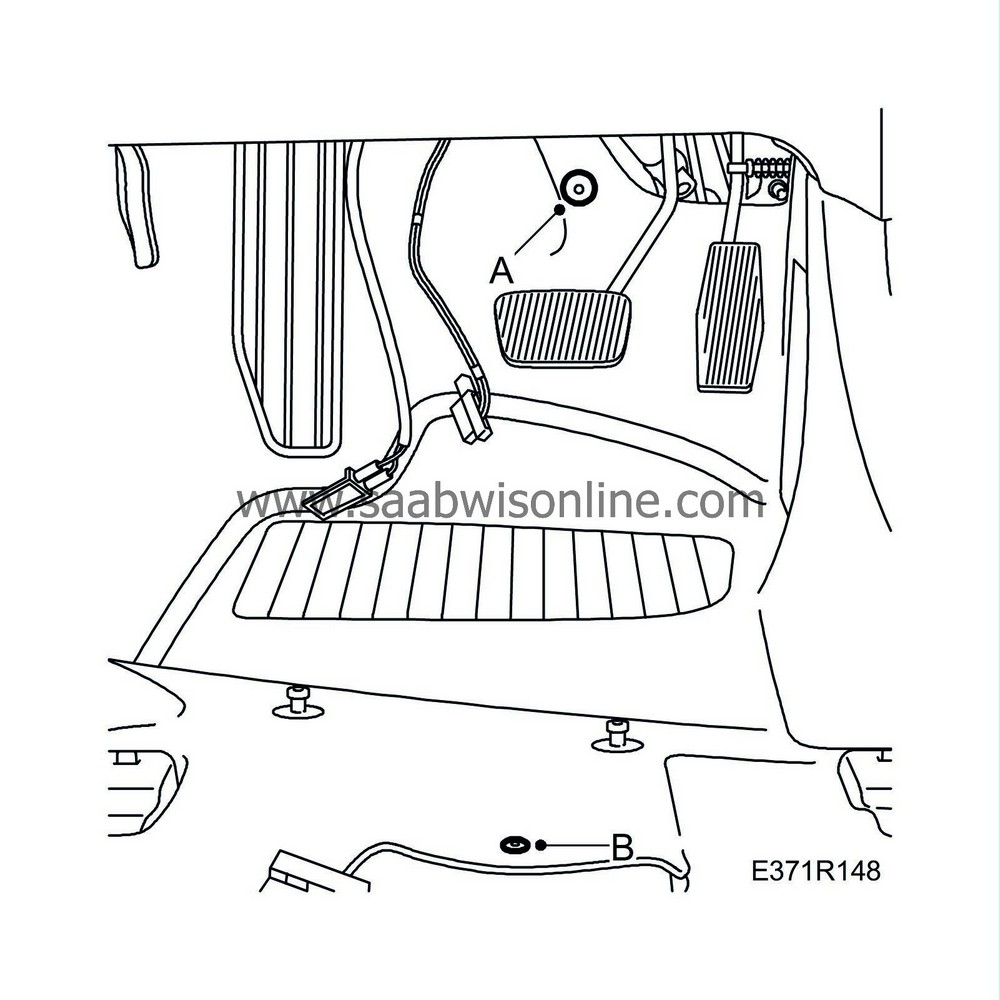
Remove the mat's weld screw nut (A) on the driver's side.
|
|
| 17. |
Remove the mat's two-stage rivets (B) on the driver's side.
|
|
| 18. |
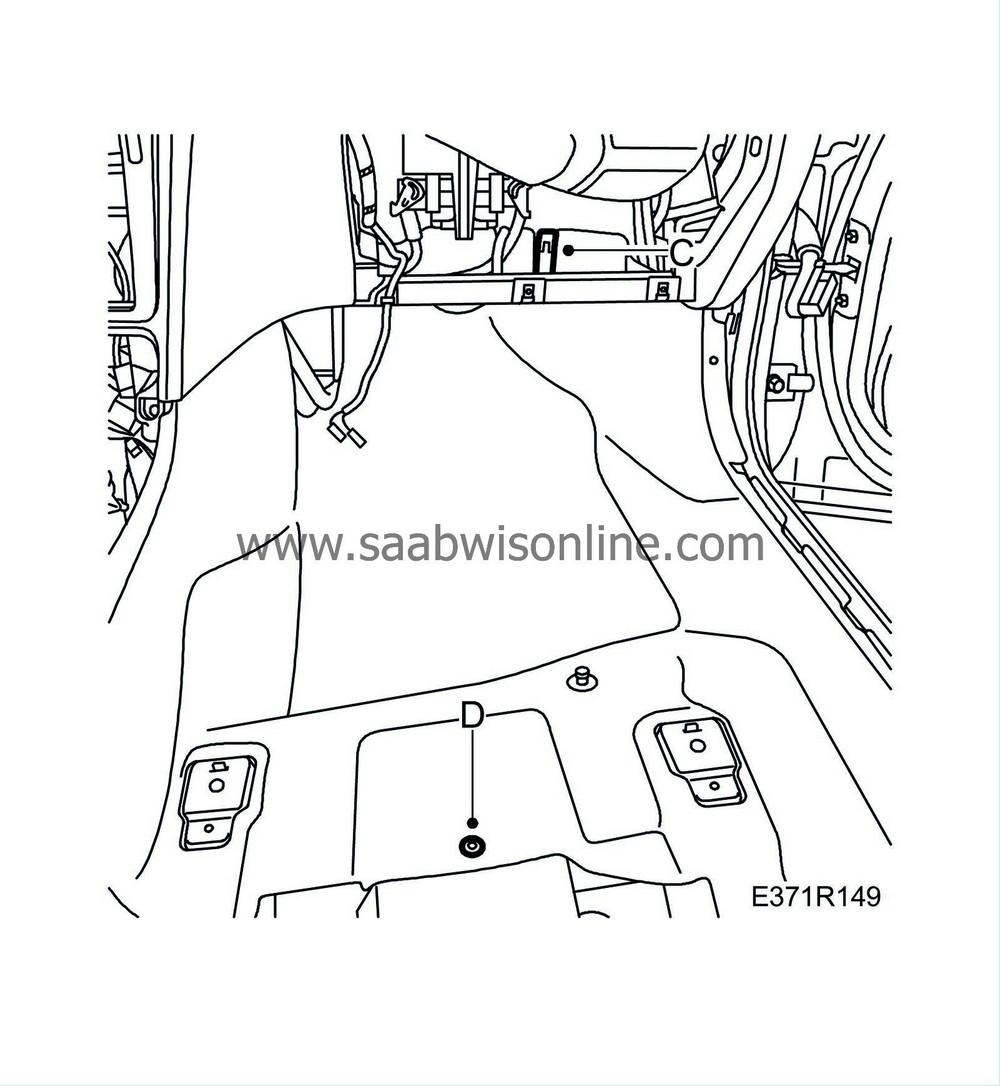
Remove the mat's weld screw nut (C) on the passenger side.
|
|
| 19. |
Remove the mat's two-stage rivets (D) on the passenger side.
|
|
| 20. |
Remove the front floor mats.
|
|
| 21. |
Undo the nuts for the air duct on both sides.
|
|
| 22. |
Remove the air duct on both sides.
|
|
| 23. |
Remove the rear floor mat.
|
|
| 24. |
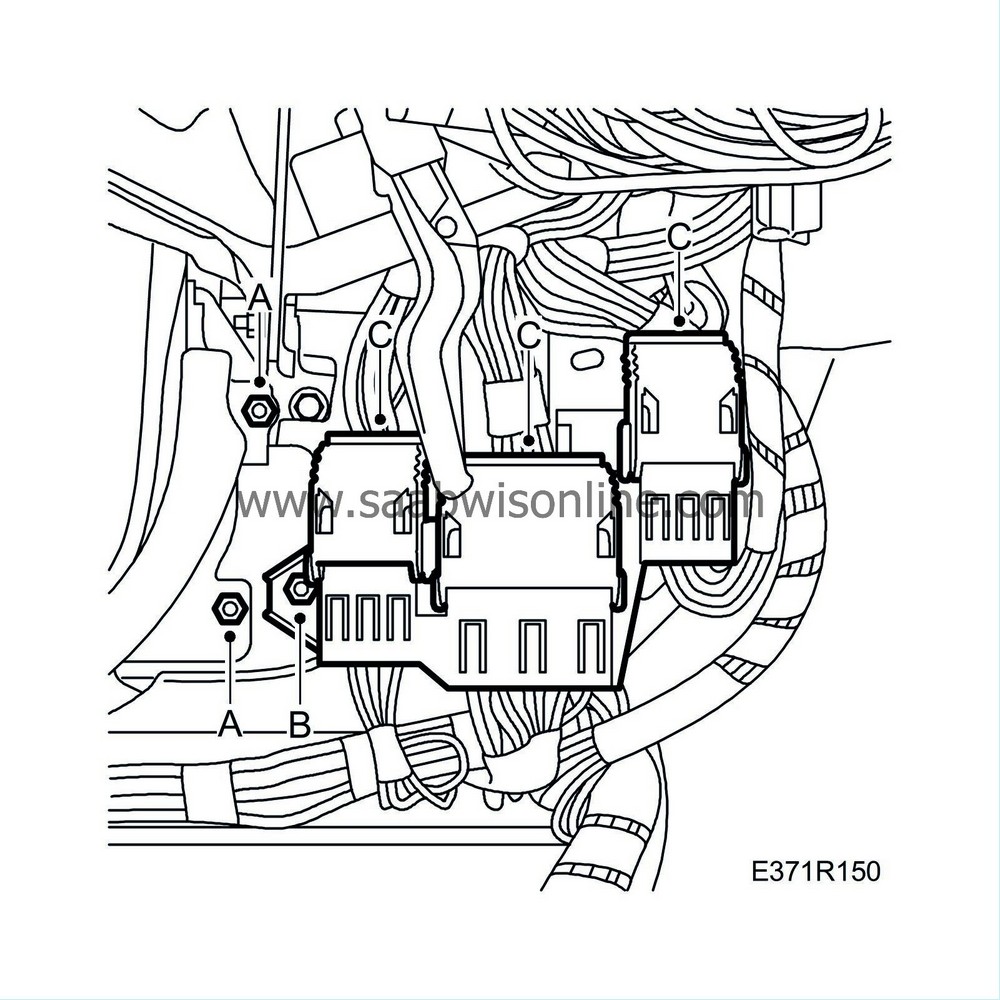
Remove the mounting plate for the left-hand sill scuff plate (A).
|
|
| 25. |
Remove the bracket for connector housings H-80, H43-1 and H43-2 (B).
|
|
| 26. |
Detach the connector housings H-80, H43-1 and H43-2 (C).
|
|
| 27. |
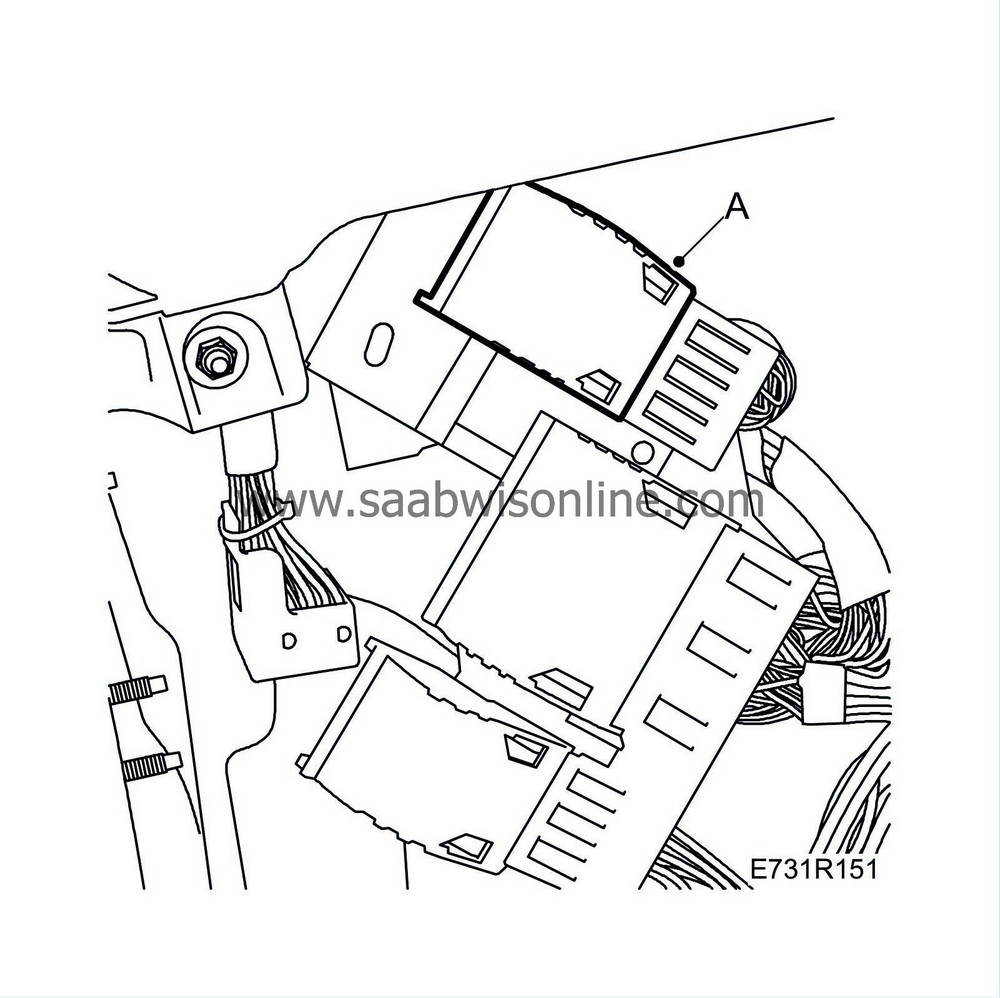
Detach the white connector housing (A) to the front harness from the bracket.
|
|
| 28. |
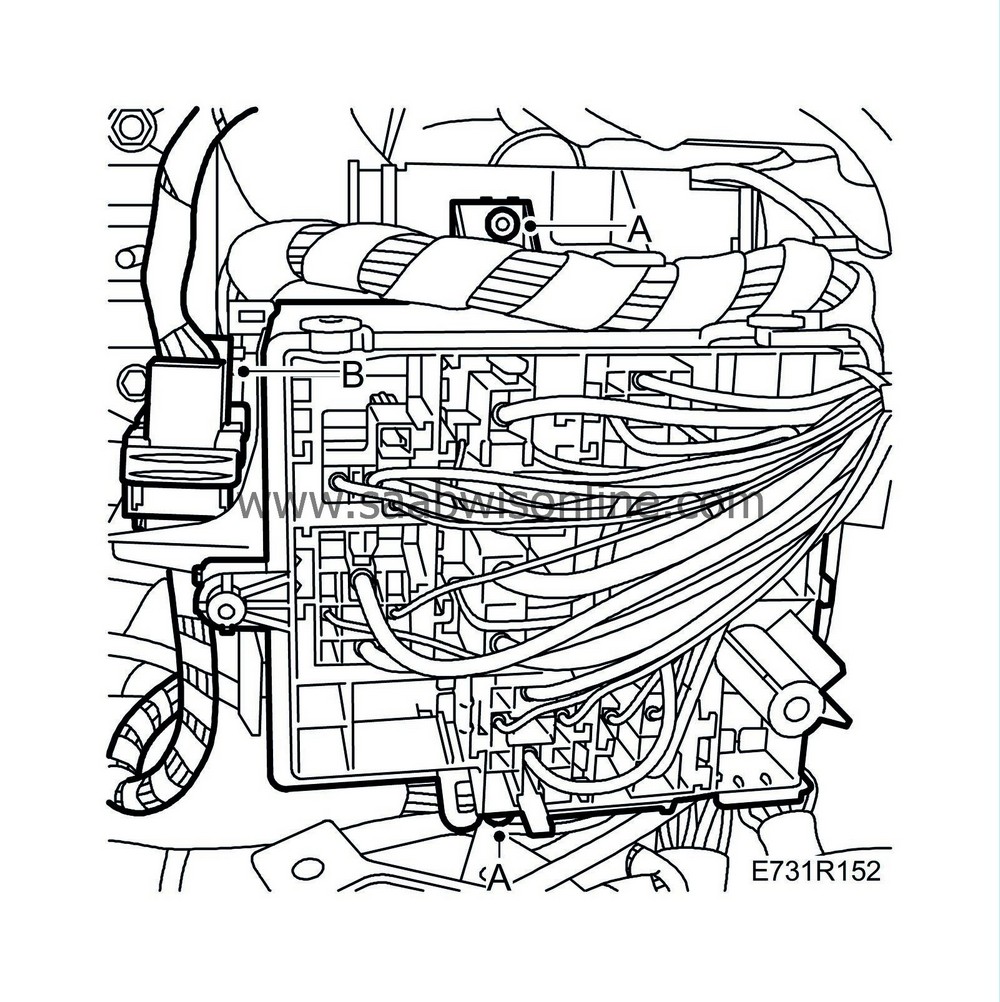
Remove the DICE control module (A) and detach the connector housing for DICE.
|
|
| 29. |
Detach connector housing H-33 (B) and remove the DICE control module's bracket.
|
|
| 30. |
LHD:
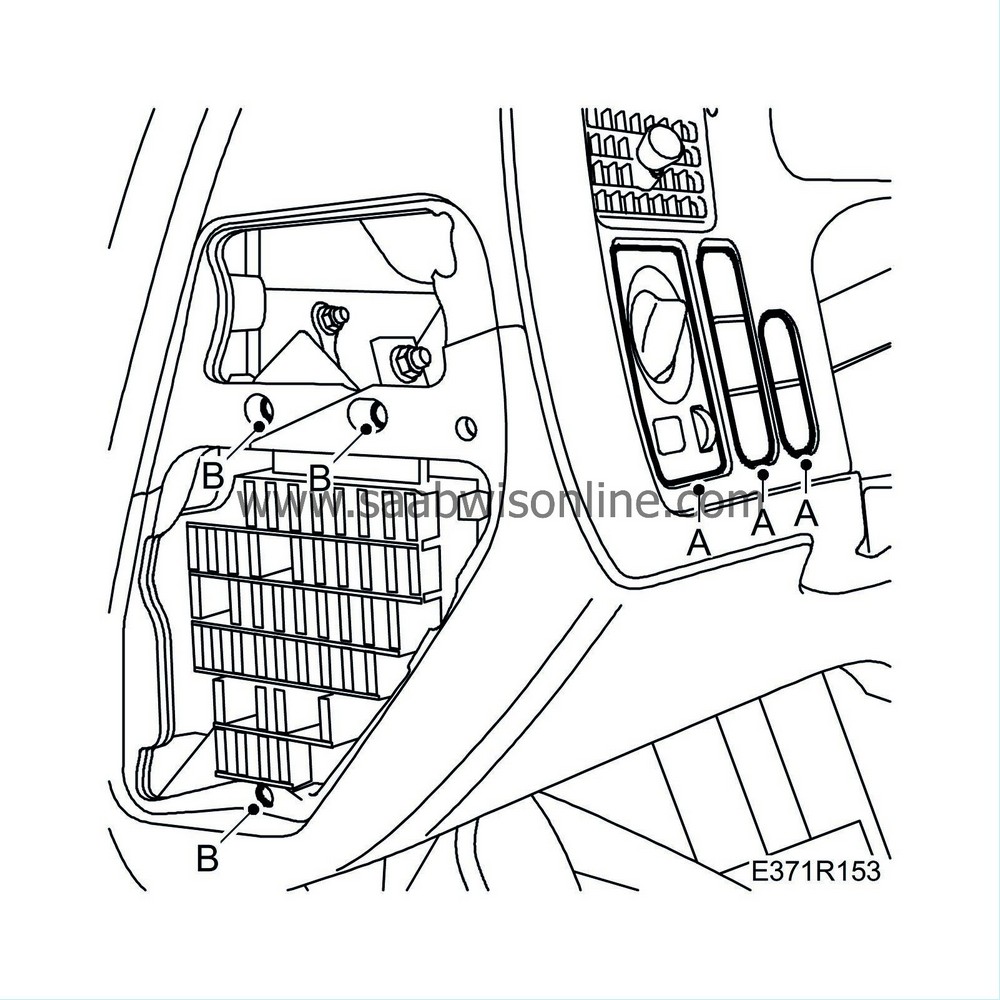
Remove the switches (A).
|
|
| 31. |
LHD:
Remove the fuse holder (B).
|
|
| 32. |
LHD:
Fold down the fuse holder and the wiring harness for the switches.
|
|
| 33. |
Disconnect the ground cable (A) from grounding point G33.

|
|
| 34. |
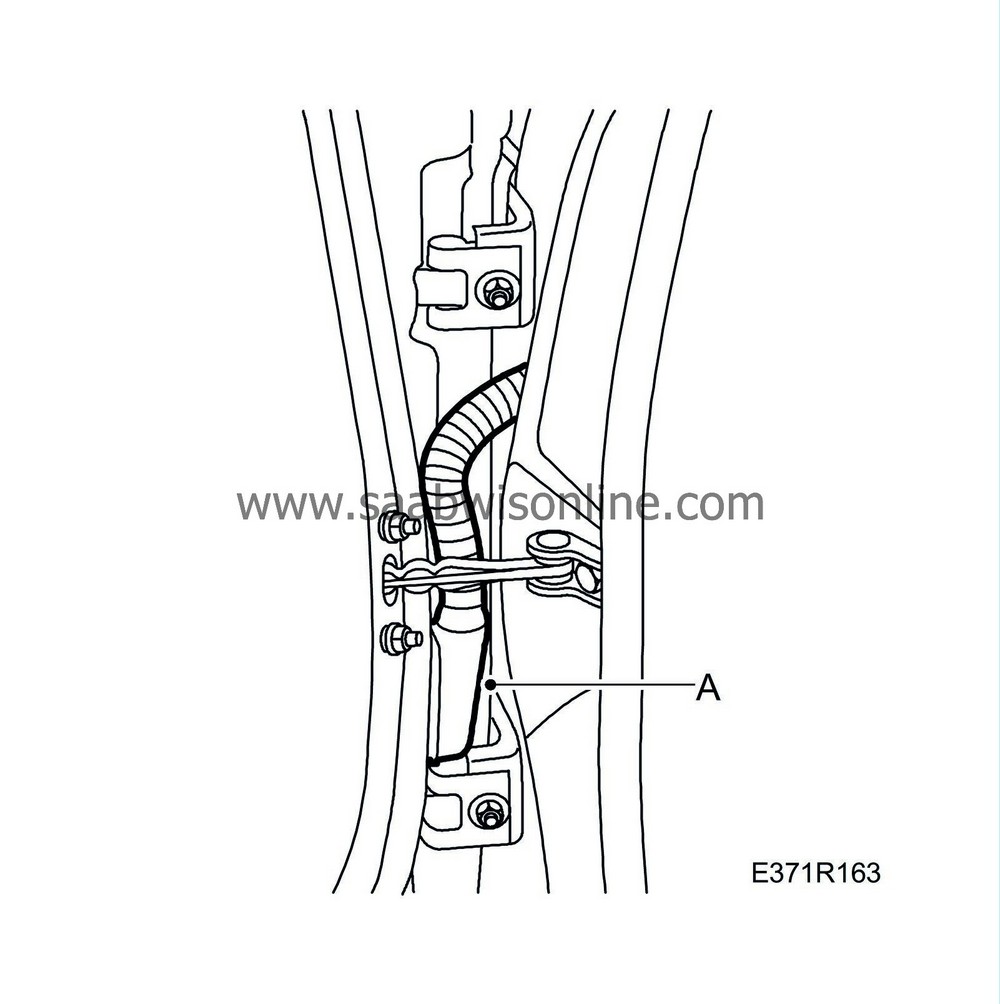
Unplug and separate the connector for the left-hand front door.
|
|
| 35. |
Remove the left-hand side direction indicators.
|
|
| 36. |
Remove the rubber grommet for the left-hand front door's wiring harness and route the wiring harness into the passenger compartment (A).

|
|
| 37. |
Detach the rubber grommet and thread through the side direction indicator (B) wiring harness.
|
|
| 38. |
Remove the front left-hand speaker grille.
|
|
| 39. |
Remove the
Headlining, 4D
.
|
|
| 40. |
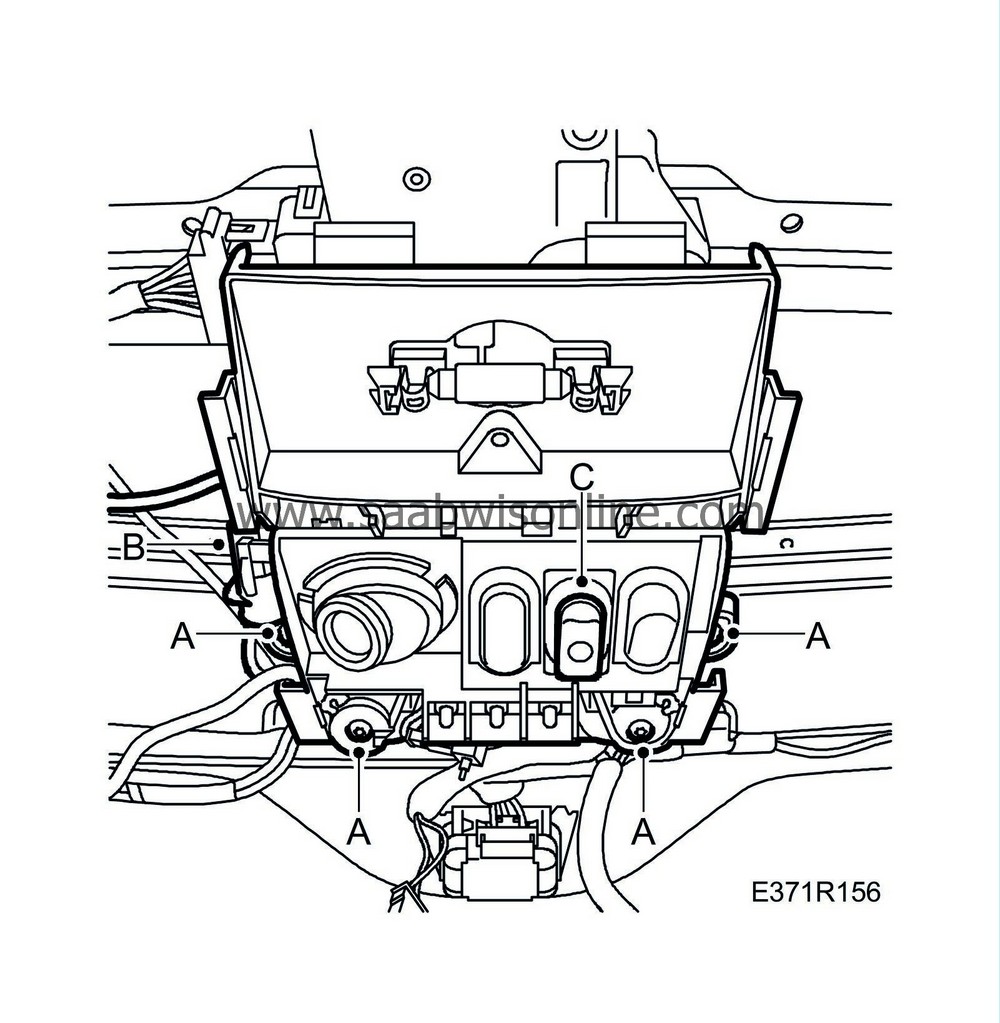
Remove the roof console (A) and unplug the connector (B) and remove any sunroof switch.
|
|
| 41. |
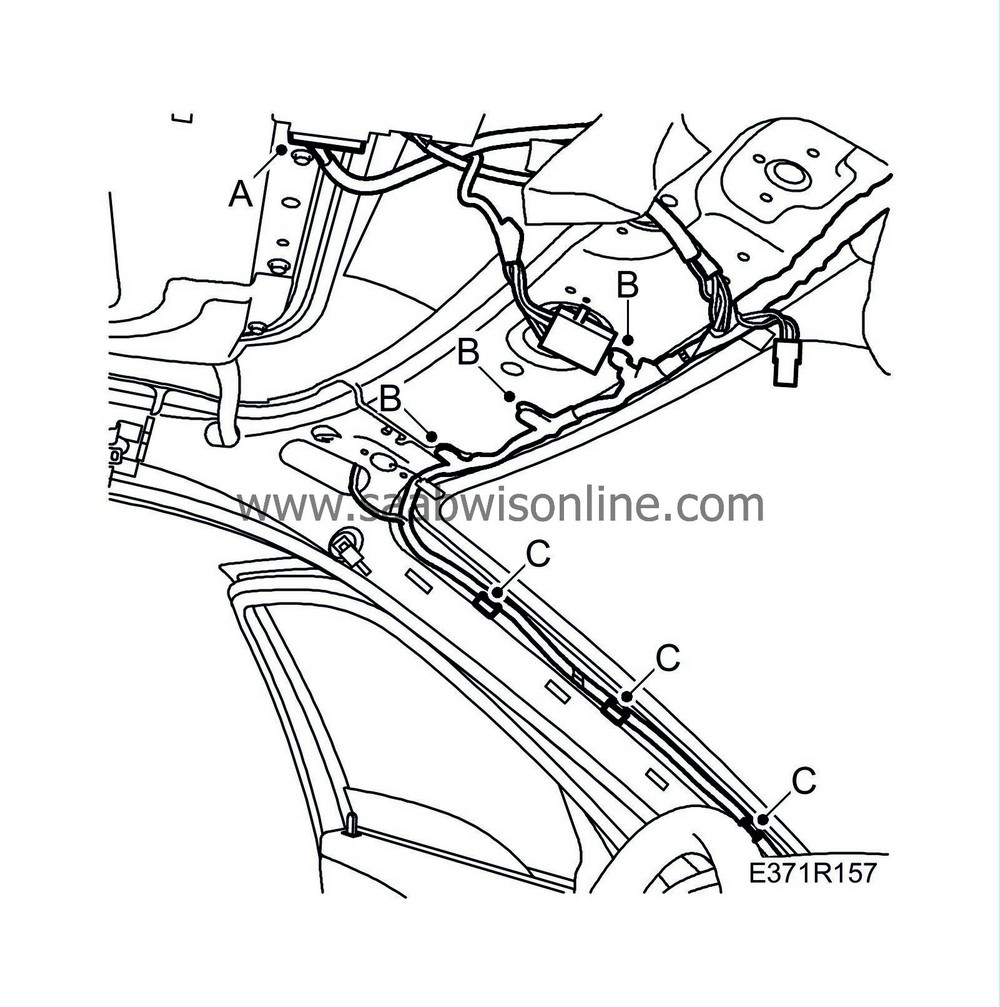
Cars with sunroof:
Unplug the connector for the sunroof motor (A).
|
|
| 42. |
Remove the wiring harness from the upper windscreen (B).
|
|
| 43. |
Remove the wiring harness from the left-hand A-pillar (C).
|
|
| 44. |
Carefully route the wiring harness down through the instrument panel.
|
|
| 45. |
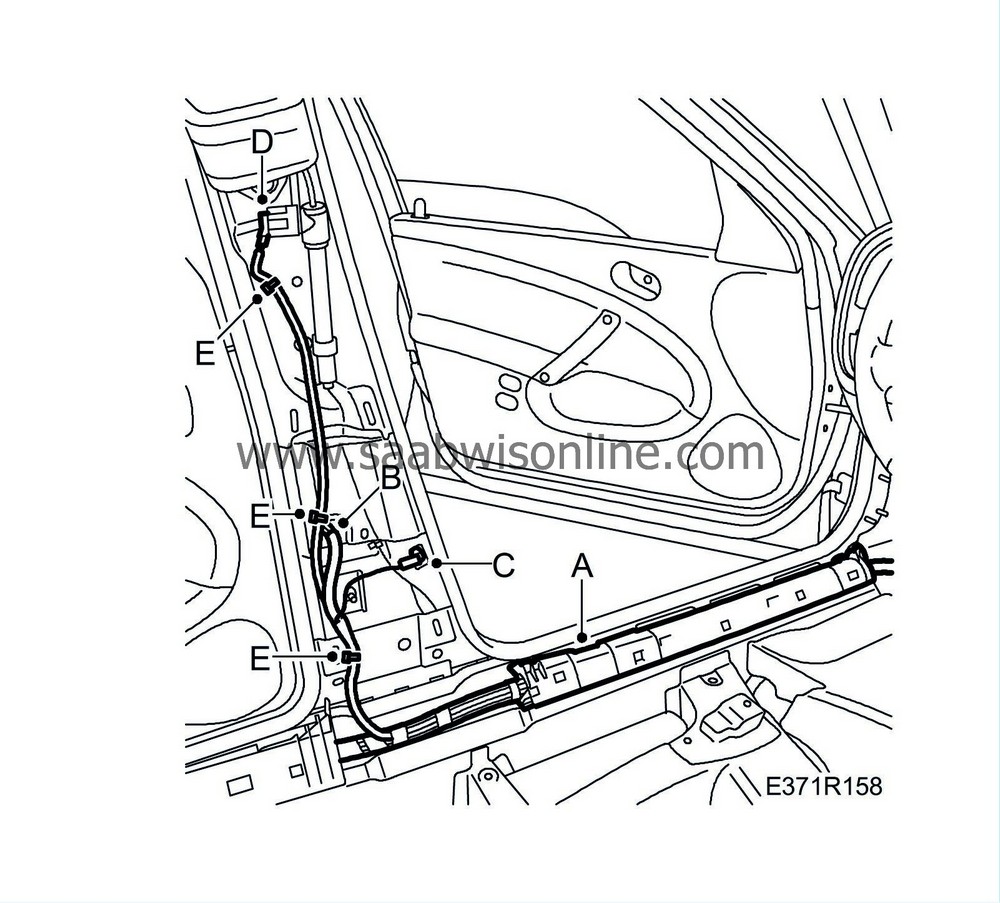
Detach the wiring harness duct from the left-hand front sill (A).
|
|
| 46. |
Detach the connector housings in the left-hand B-pillar, the door switch (B), for the rear door harness (C) and the seat-belt tensioner (D).
|
|
| 47. |
Detach the wiring harness clips from the B-pillar (E).
|
|
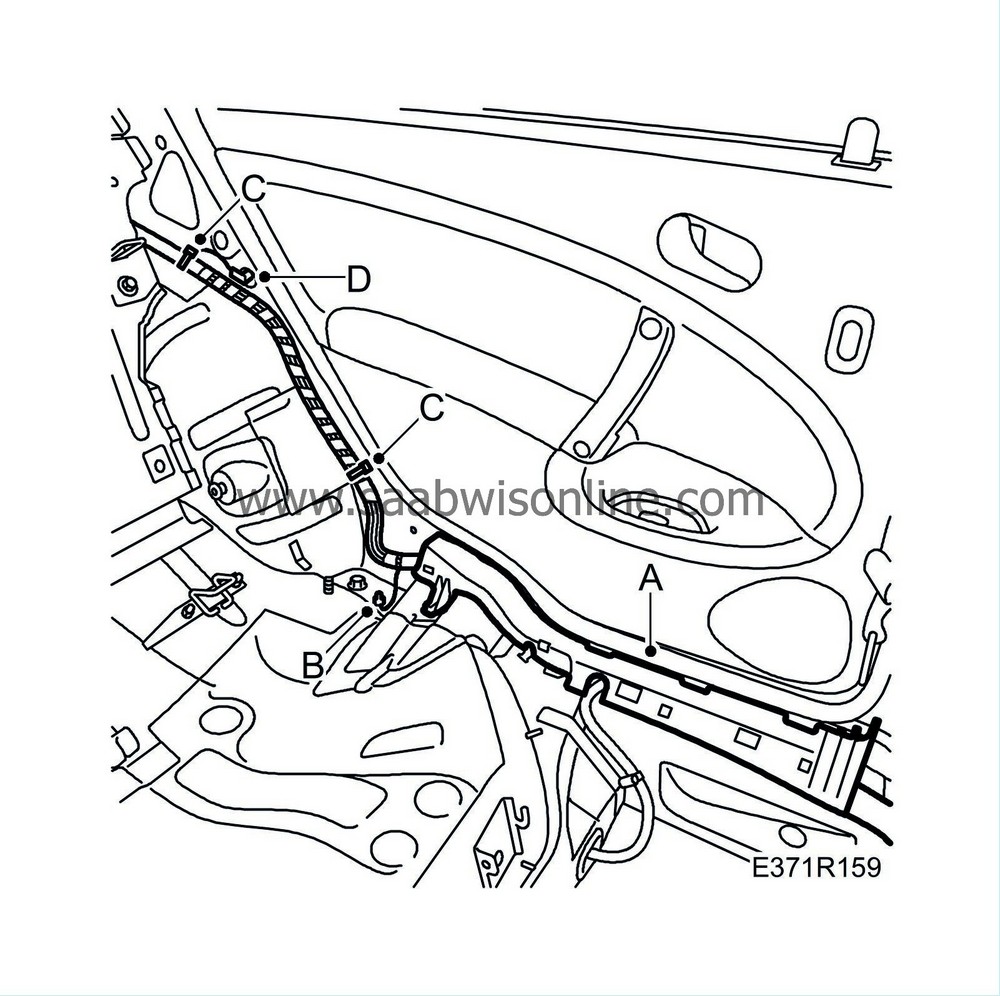
| 48. |
Detach the wiring harness duct at the left-hand rear door (A) and remove the grounding point (B) by the rear seat. Detach the fixings (C) and detach the door switch's (D) connector housing.
|
|
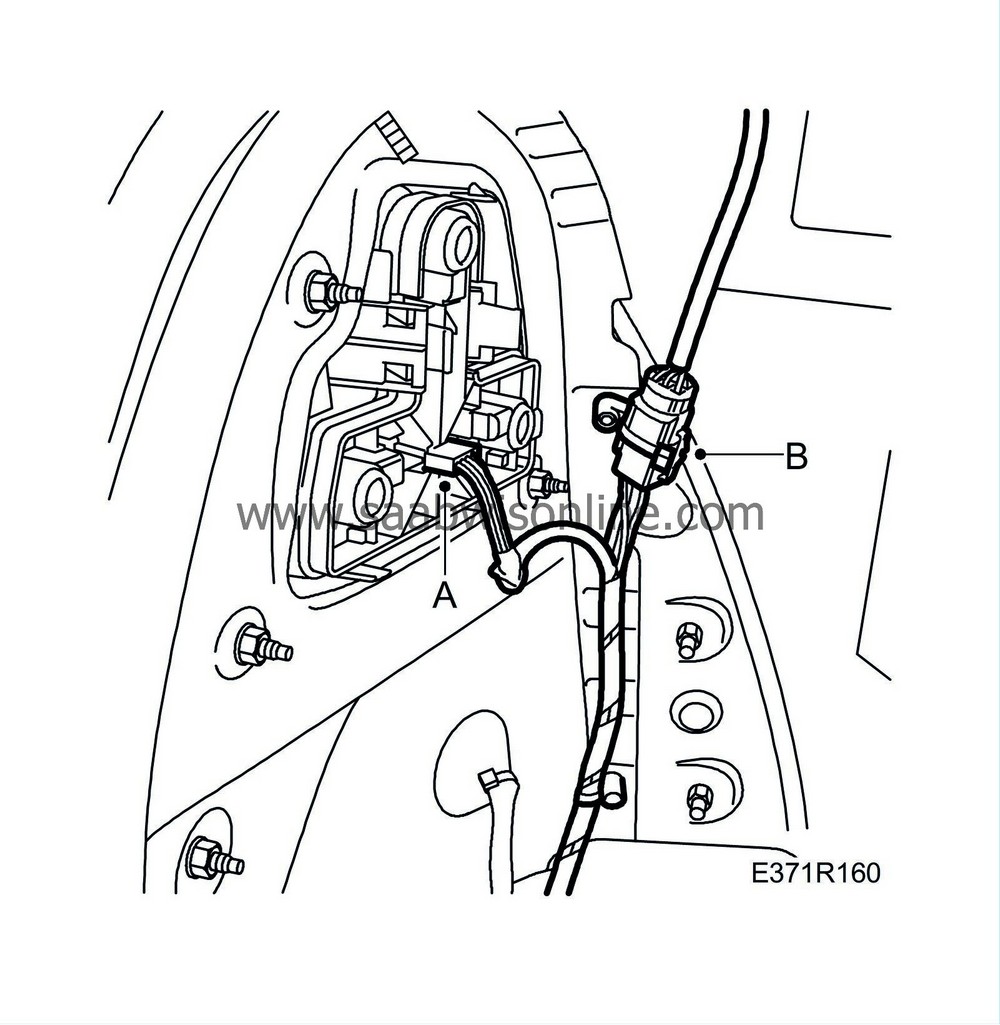
| 49. |
Detach the connector housing for the right and left-hand rear lamp (A).
|
|
| 50. |
Unplug and separate the connector for the tailgate harness (B).
|
|
| 51. |
Remove the grounding point under the left-hand rear lamp.
|
|
| 52. |
Release all wiring harness clips from the body in the luggage compartment.
|
|
| 53. |
Cars with SPA:
Remove the
Bumper, rear 4D
.
|
|
| 54. |
Cars with SPA:
Detach the rubber grommet for the wiring harness SPA (A).

|
|
| 55. |
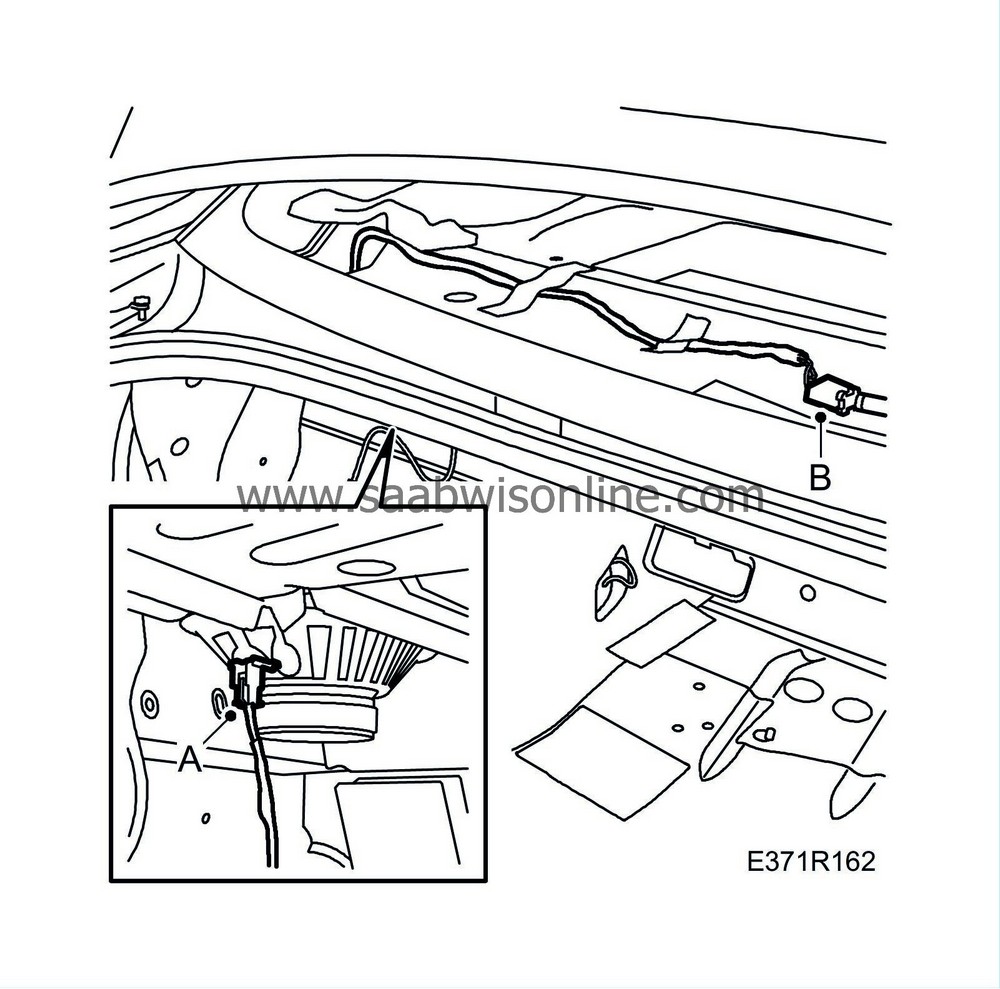
Unplug the left-hand speaker's connector (A).
|
|
| 56. |
Unplug the connector for the parcel shelf lighting (B).
|
|
| 57. |
Unplug and separate the connector for the right-hand front door (A).

|
|
| 58. |
Remove the right-hand side direction indicators.
|
|
| 59. |
Remove the rubber grommet for the side direction indicator wiring harness and route the wiring harness into the passenger compartment (A).

|
|
| 60. |
Remove the rubber grommet for the right-hand front door's wiring harness and route the wiring harness into the passenger compartment (B).
|
|
| 61. |
Cars with PMM:
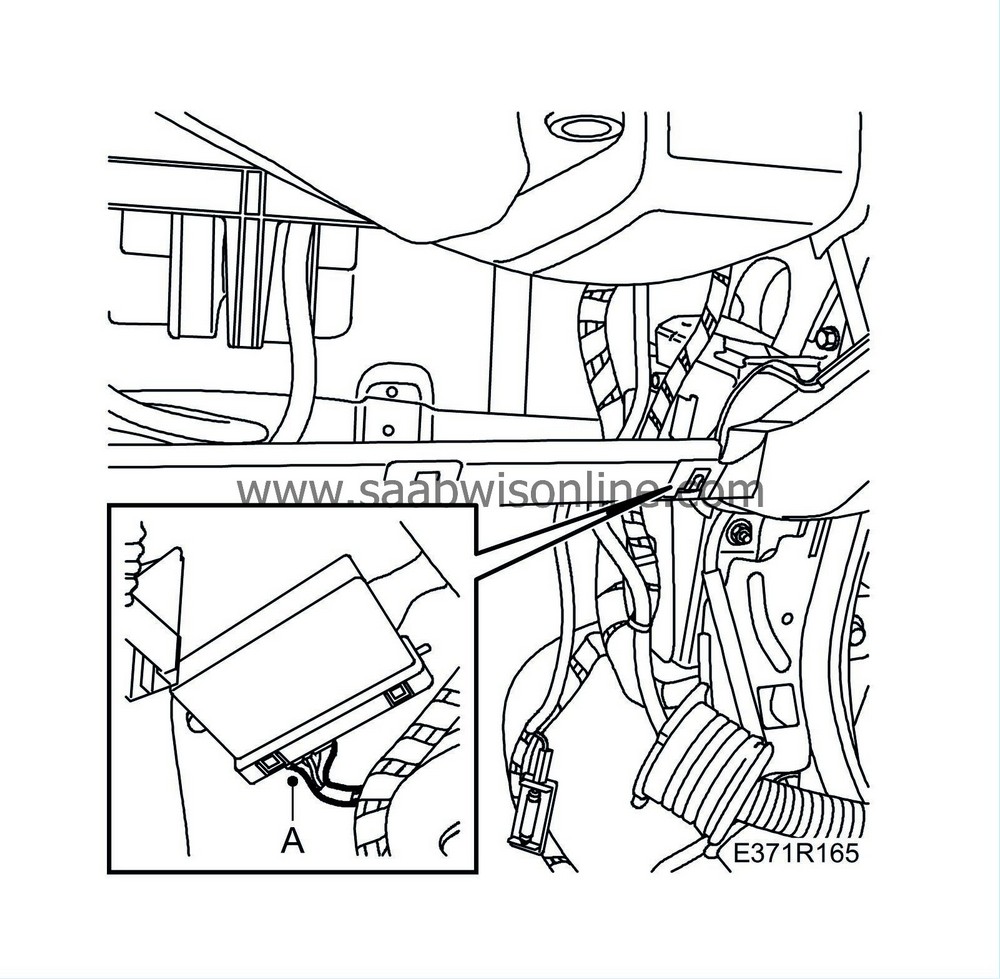
Unplug the connector for the mirror memory (A).
|
|
| 62. |
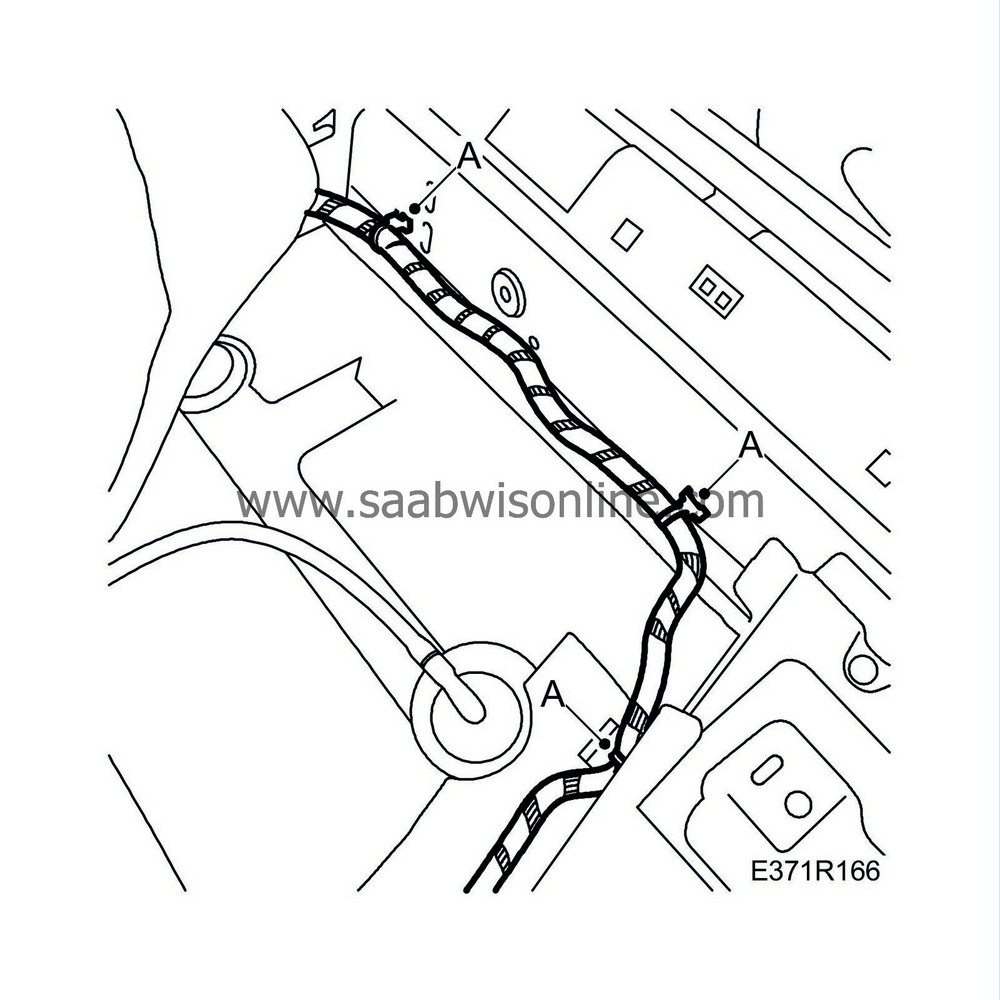
Lift up the front right-hand noise insulation panel and detach the wiring harness from its fixings (A) along the sill and seat member.
|
|
| 63. |
Detach the wiring harness fixings in the B-pillar (A) and then detach the connector housings in the right-hand B-pillar, door switch (B), for rear door harness (C) and seat-belt tensioner (D).

|
|
| 64. |
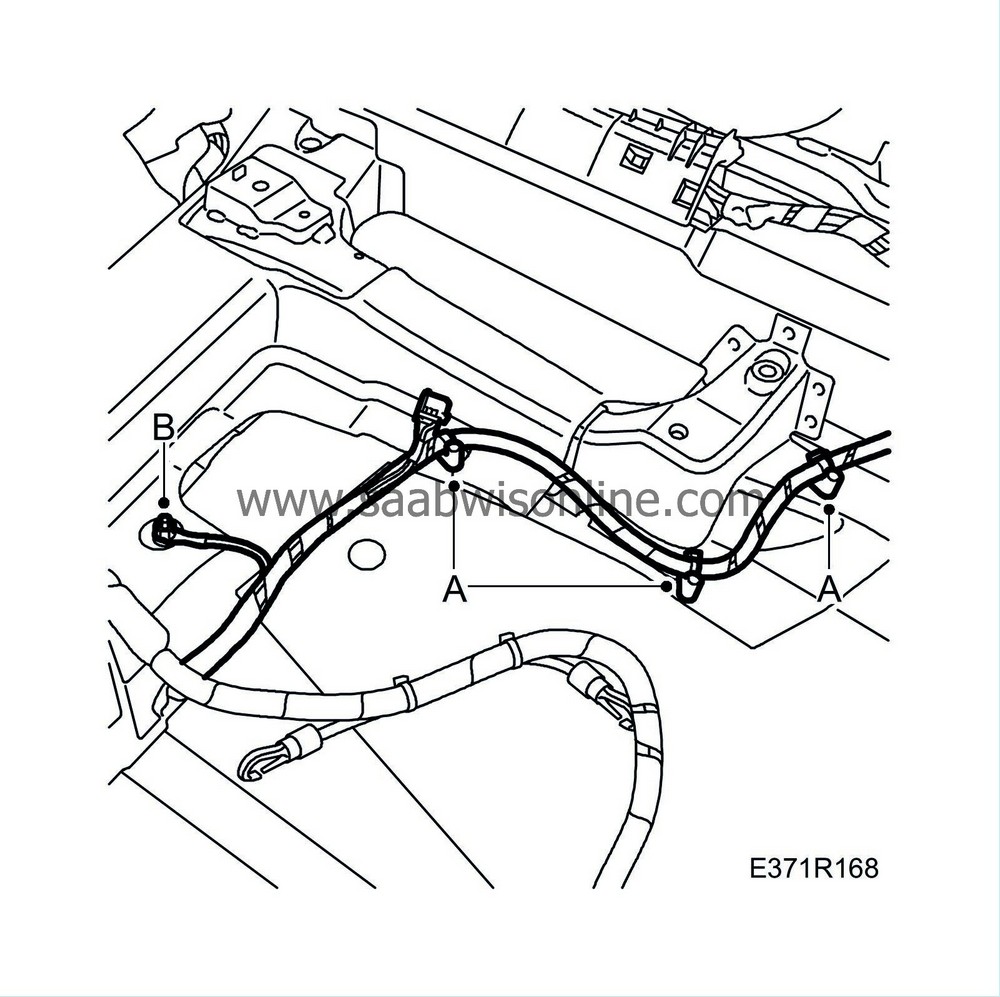
Release the wiring harness from its fixings in the floor (A).
|
|
| 65. |
Remove grounding point G24 (B).
|
|
| 66. |
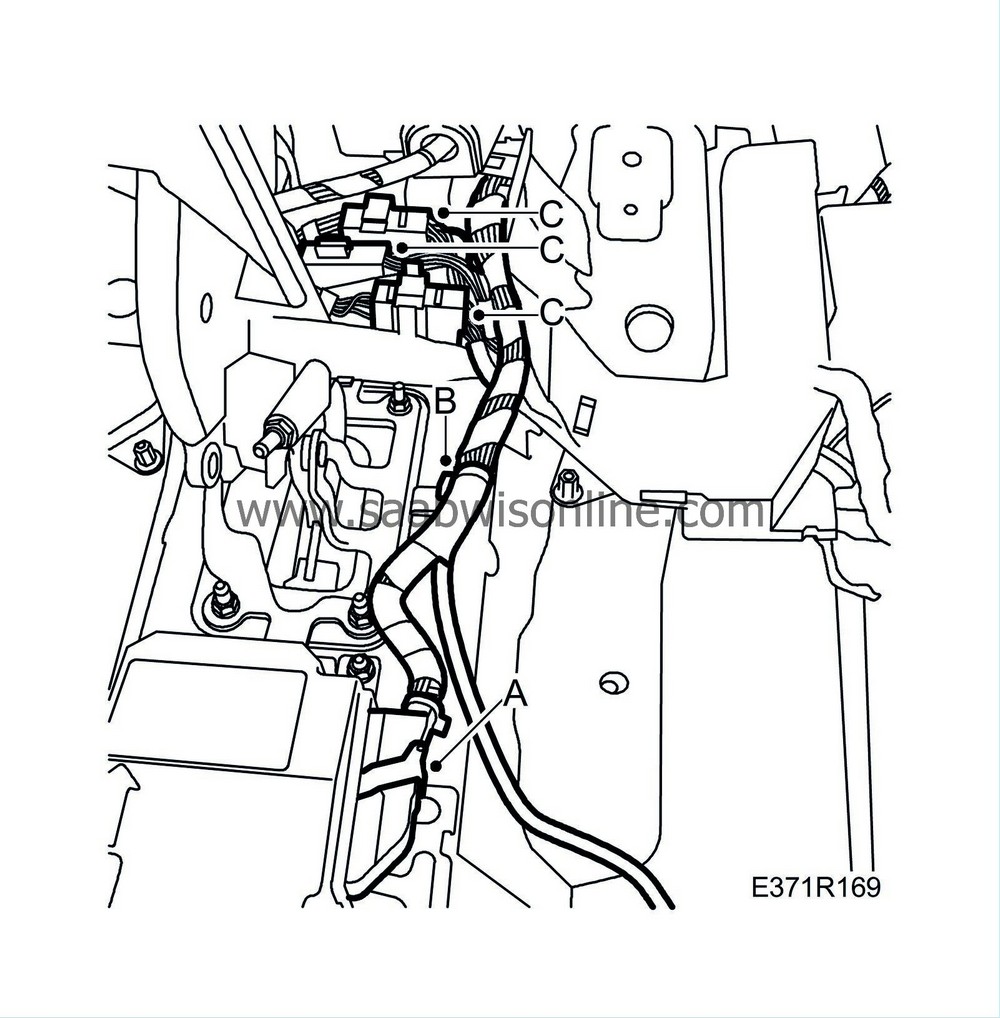
Detach the switch for the airbag control module (A), and detach the wiring harness fixing (B).
|
|
| 67. |
Detach the connector housings on the centre tunnel (C) and lift away the wiring harness for the panel.
|
|
| 68. |
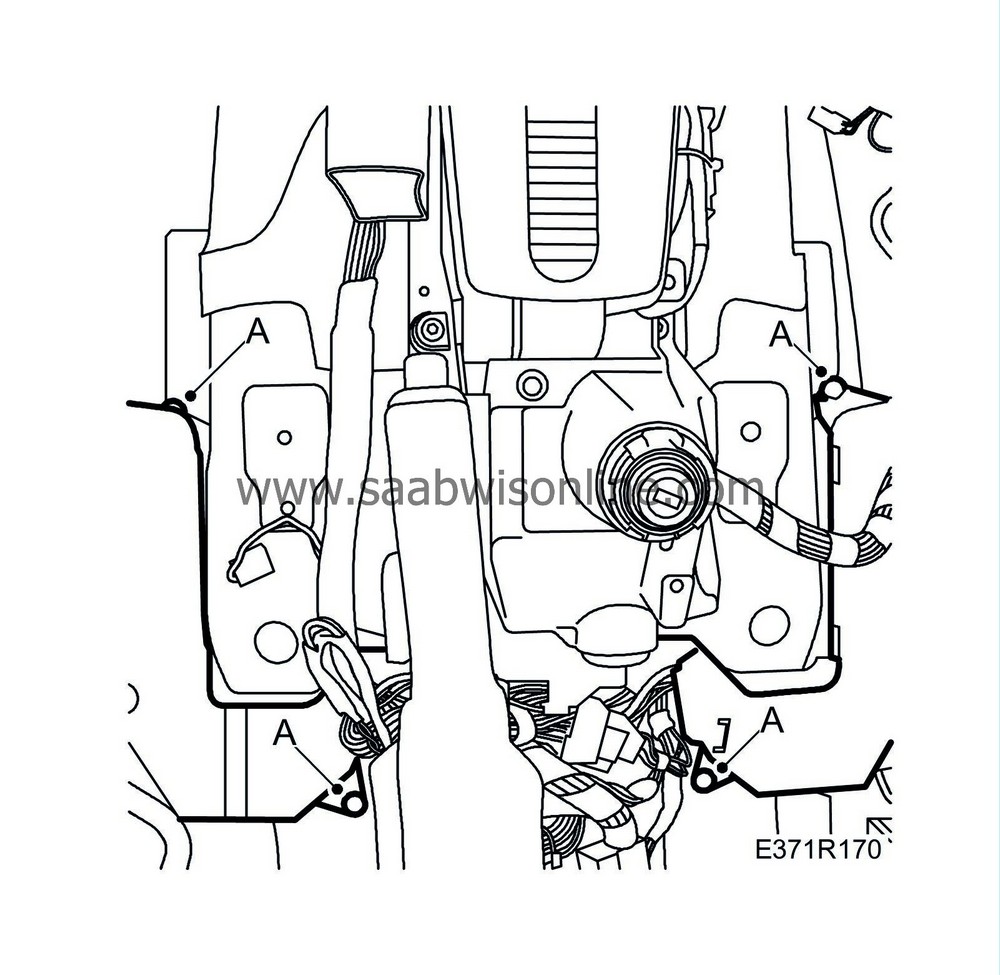
Remove the weld screw nuts (A) for the wiring harness fixings above the centre tunnel.
|
|
| 69. |
Detach the connector housing for the TWICE control module (A).

|
|
| 70. |
Remove grounding point G14 (B).
|
|
| 71. |
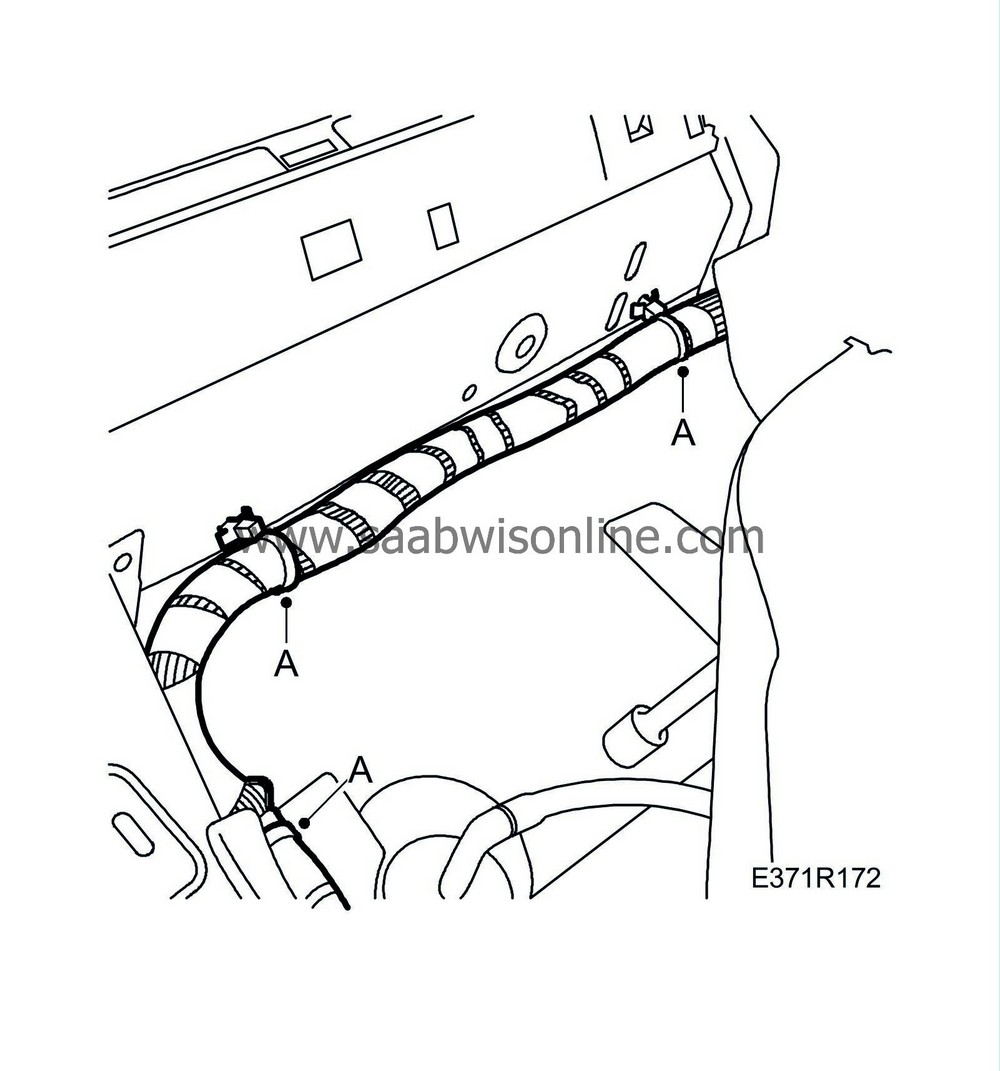
Lift up the noise insulation panel and detach the wiring harness fixings (A) along the seat member and left-hand sill.
|
|
| 72. |
Remove the fuel tank, see WIS.
|
|
| 73. |
Detach the wiring harness mountings from the body.
|
|
| 74. |
Detach the tank harness rubber grommet from the body and route the harness into the passenger compartment (A).

|
|
| 75. |
Remove the rear wiring harness from the car.
|
|
| To fit |
| 1. |
Fit the new wiring harness in the car.
|
|
| 2. |
Route the tank harness through the body and fit the tank harness rubber grommet to the body (A).

|
|
| 3. |
Fit the wiring harness mountings to the body
|
|
| 4. |
Fit the fuel tank, see WIS.
|
|
| 5. |
Lift up the noise insulation panel and attach the wiring harness (A) along the seat member and left-hand sill.

|
|
| 6. |
Fit grounding point G14 (B).

|
|
| 7. |
Plug in the connector for the TWICE control module (A).
|
|
| 8. |
Fit the weld screw nuts (A) for the wiring harness fixings above the centre tunnel.

|
|
| 9. |
Attach the connector housings on the centre tunnel (C).

|
|
| 10. |
Attach the switch for the airbag control module (A), and attach the wiring harness fixing (B).
|
|
| 11. |
Fit grounding point G24 (B).

|
|
| 12. |
Position the wiring harness on the right-hand B-pillar and attach the fixings to the floor (A).
|
|
| 13. |
Attach the wiring harness fixings to the B-pillar (A). Attach the connector housings on the B-pillar, door switch (B), for rear door harness (C) and seat-belt tensioner (D).

|
|
| 14. |
Lift up the front right-hand noise insulation panel and attach the wiring harness fixings (A) along the sill and seat member.

|
|
| 15. |
Thread through the wiring harness for the side direction indicators and fit the rubber grommet (A).

|
|
| 16. |
Thread through the wiring harness for the right-hand front door and fit the rubber grommet (B).
|
|
| 17. |
Cars with PMM:
Plug in the connector for the mirror memory (A).

|
|
| 18. |
Plug in the connector for the right-hand front door (A).

|
|
| 19. |
Fit the right-hand side direction indicators.
|
|
| 20. |
Connect the left-hand speaker (A).

|
|
| 21. |
Plug in the connector for the parcel shelf lighting (B).
|
|
| 22. |
Fit all wiring harness clips to the body in the luggage compartment.
|
|
| 23. |
Cars with SPA:
Fit the
Bumper, rear 4D
.
|
|
| 24. |
Cars with SPA:
Thread out the wiring harness for SPA and fit the rubber grommet (A).

|
|
| 25. |
Plug in the connector for the right and left-hand rear lamp (A).

|
|
| 26. |
Plug in the connector for the tailgate harness (B).
|
|
| 27. |
Fit the grounding point under the left-hand rear lamp.
|
|
| 28. |
Attach the wiring harness duct for the left-hand rear door (A), fit the grounding point (B) by the rear seat. Attach the wiring harness fixings (C) and fit the door switch (D).

|
|
| 29. |
Fit the wiring harness duct to the left-hand sill (A).

|
|
| 30. |
Attach the connector housings to the left-hand B-pillar, the door switch (B), for the rear door harness (C) and the seat-belt tensioner (D).
|
|
| 31. |
Attach the wiring harness clips to the B-pillar (E).
|
|
| 32. |
Carefully route the wiring harness up through the instrument panel.
|
|
| 33. |
Fit the wiring harness to the left-hand A-pillar (C)

|
|
| 34. |
Fit the wiring harness along the windscreen (B).
|
|
| 35. |
Plug in the connector for the sunroof motor (A).
|
|
| 36. |
Plug in the connector (B), and fit the sunroof switch (C) and the roof console (A).

|
|
| 37. |
Fit the parcel shelf trim.
|
|
| 38. |
Fit the
Headlining, 4D
.
|
|
| 39. |
Fit the
C-pillar trim, 4D
on both sides.
|
|
| 40. |
Fit the front left-hand speaker grille.
|
|
| 41. |
Thread through the wiring harness for the side direction indicators (B) and fit the rubber grommet.

|
|
| 42. |
Thread through the wiring harness to the left-hand front door and fit the rubber grommet for the wiring harness (A).
|
|
| 43. |
Fit the left-hand side direction indicators.
|
|
| 44. |
Plug in the connector for the left-hand front door.

|
|
| 45. |
Connect the ground cable for grounding point G-33 (A).

|
|
| 46. |
LHD:
Fit the fuse holder panel in place. Route the wiring harness up to the switch.
|
|
| 47. |
LHD:
Fit the switches (A).

|
|
| 48. |
Fit the fuse holder (B).
|
|
| 49. |
Plug in the connector and fit the control module for DICE (A).

|
|
| 50. |
Plug in connector H-33 (B) and fit the bracket for the DICE control module.
|
|
| 51. |
Attach the white connector (A) from the front harness to the bracket.

|
|
| 52. |
Fit the bracket (B) for connector housings H-80, H43-1 and H43-2.

|
|
| 53. |
Attach the connector housings H-80, H43-1 and H43-2 (C).
|
|
| 54. |
Fit the mounting plate for the sill scuff plate (A).
|
|
| 55. |
Fit the rear floor mat.
|
|
| 56. |
Fit the floor air duct on both sides.
|
|
| 57. |
Fit the nut for the floor air duct on both sides.
|
|
| 58. |
Fit the front floor mat on both sides.
|
|
| 59. |
Fit the two-stage rivet (D) on the passenger side.

|
|
| 60. |
Fit the weld screw nut (C) on the passenger side.
|
|
| 61. |
Fit the two-stage rivets (B) on the driver's side.

|
|
| 62. |
Fit the weld screw nut (A) on the driver's side.
|
|
| 63. |
Fit the
Luggage compartment trim, side trim, 4D
on both sides.
|
|
| 64. |
Fit the
Luggage compartment trim, floor panel, 4D
.
|
|
| 65. |
Fit the
Scuff plate, luggage compartment, 4D
.
|
|
| 66. |
Fit the nut (A) for the lower rear seat-belt anchorage point on both sides.
Tightening torque: 45 Nm (33 lbf ft). 
|
|
| 67. |
Fit the
Backrest, rear seat, 4D
.
|
|
| 68. |
Fit the
Seat cushion, rear seat
.
|
|
| 69. |
Fit the floor lighting in the lower panel on the driver's side.
|
|
| 70. |
Fit the data link connector to the lower panel (A).

|
|
| 71. |
Fit the lower section of the dashboard with air duct on the driver's side.
|
|
| 72. |
Fit the
Glove box
.
|
|
| 73. |
Fit the
Centre console
.
|
|
| 74. |
Fit both
Front seats
.
|
|
| 75. |
Fit all
Side sill scuff plates
.
|
|


