Timing Belt Replacement
| Timing Belt Replacement |
Special Tools
| • |
CH-49290
Centering Fixture Subframe - Engine
|
|
| • |
EN-956-1
Extension
|
|
| • |
EN-46788
Crankshaft Fixing tool
|
|
| • |
EN-46789
Camshaft Fixer
|
|
| • |
EN-49826
Extension Tool High-Pressure Pump Sprocket
|
|
For equivalent regional tools, refer to Special Tools .
| Removal Procedure |
| 1. |
Protect the wings with covers.
|
|
| 2. |
Remove the battery cover and the negative battery cable. Refer to
Battery Negative Cable Disconnection and Connection
.
|
|
| 3. |
Raise and support the vehicle. Refer to
Lifting and Jacking the Vehicle
.
|
|
| 4. |
Remove the front right wheel. Refer to
Tire and Wheel Removal and Installation
.
|
|
| 5. |
Remove the front wheelhouse front liner. Refer to
Front Wheelhouse Front Liner Replacement
.
|
|
| 6. |
Remove the engine shield. Refer to
Engine Shield Replacement
.
|
|
| 7. |
Install
CH-49290
centering fixture to support the engine to the subframe. Take the strain off the engine bracket by adjusting the fixture.
Refer to Engine Support Fixture (Mounting Engine/Transmission) Engine Support Fixture (Centering Adapter) Engine Support Fixture (Engine Bridge, Retainer Frame) . |
|
| 8. |
Remove the drive belt for the auxiliaries. Refer to
Drive Belt Replacement
.
|
|
| 9. |
Remove the crankshaft pulley. Refer to
Crankshaft Balancer Replacement
.
|
|||||||
| 10. |
Remove the idler pulley center bolt on the lower timing cover. Use, for example, 2 screwdrivers to carefully pry off from two directions.
|
|
| 11. |
Lower the vehicle.
|
|
| 12. |
Remove the engine cover. Refer to
Engine Cover Replacement
.
|
|
| 13. |
Remove the air cleaner casing. Refer to
Air Cleaner Assembly Replacement
.
|
|
| 14. |
Remove the right hand engine mounting. Refer to
Engine Mount Replacement - Right Side
.
|
|
| 15. |
Remove the upper and lower timing covers. Refer to
Timing Belt Upper Front Cover Replacement
and
Timing Belt Lower Front Cover Replacement
.
|
|
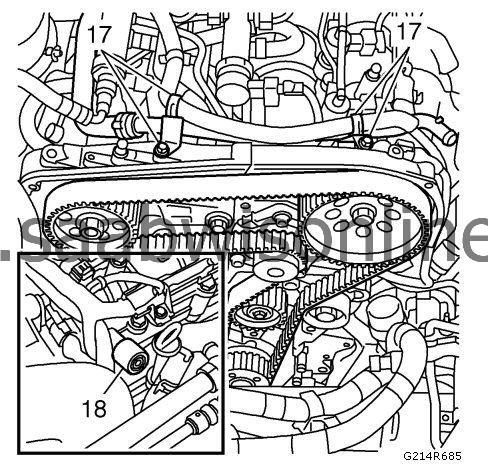
| 16. |
Remove the crankcase ventilation pipe (17) and hose (17) from the camshaft housing. 
|
|||||||
| 17. |
Zero the engine by removing the plug and fitting
EN-46789
camshaft fixing tool (18).
|
|
| 18. |
Turn round the engine until the tool engages and locks the exhaust camshaft.
|
|
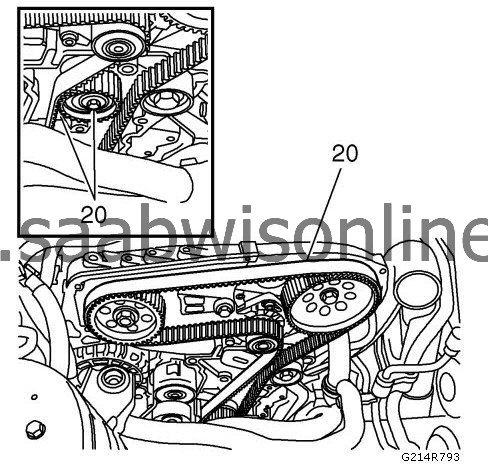
| 19. |
Relieve the belt tensioner (20) and remove the timing belt.

|
|
| Installation Procedure |
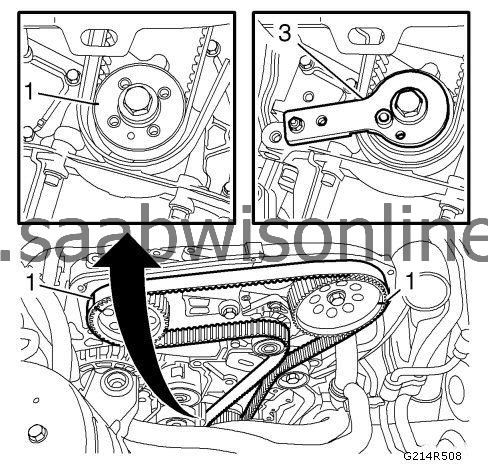
| 1. |
Install the timing belt so that the marks on the belt agree with the marks on the crankshaft (1), exhaust camshaft (1) and fuel pump sprockets (1).

|
|
| 2. |
Raise and support the vehicle. Refer to
Lifting and Jacking the Vehicle
.
|
|
| 3. |
Remove the bolt from the oil pump and fit
EN-46788
crankshaft fixing tool (3) to the crankshaft sprocket.
|
|
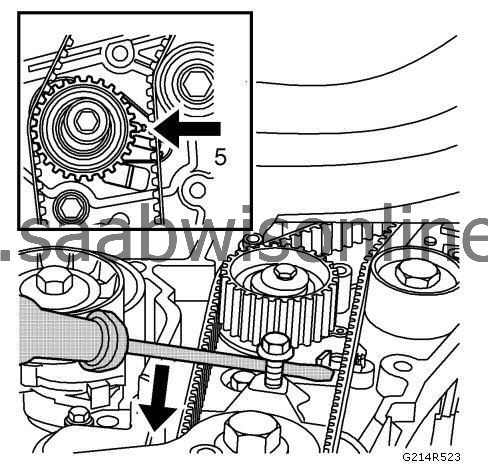
| 4. |
Install the belt tensioner without tightening the bolt.
|
|
| 6. |
Remove the adjustment tool and turn the crankshaft 2 turns.
|
|
| 7. |
Refit
EN-46788
crankshaft fixing tool and
EN-46789
camshaft fixing tool. Check that the belt is fitted correctly and that the tension roller setting arrow is in front of the mark.
|
|
| 8. |
Remove the tool and fit the plug on the camshaft cover and the bolt to the oil pump.
|
|
| 9. |
Install the crankcase ventilation pipe and hose on the camshaft housing.
|
|
| 10. |
Install the lower timing cover. Refer to
Timing Belt Lower Front Cover Replacement
.
|
|
| 11. |
Install the upper timing cover. Refer to
Timing Belt Upper Front Cover Replacement
.
|
|
| 12. |
Install the right hand engine mounting. Refer to
Engine Mount Replacement - Right Side
.
TightenFasteners to body 58 Nm (43 lb ft)TightenFasteners to engine 50 Nm + 65° (37 lb ft + 65°) |
|
| 13. |
Install the air filter housing with cover and the connector on the intake hose. Refer to
Air Cleaner Assembly Replacement
.
|
|
| 14. |
Install the insulation and the engine cover. Refer to
Engine Cover Replacement
.
|
|
| 15. |
Raise and support the vehicle. Refer to
Lifting and Jacking the Vehicle
.
|
|
| 16. |
Install the idler pulley center bolt on the lower timing cover.
Tighten25 Nm (18 lb ft) |
|
| 17. |
Install the crankshaft pulley. Refer to
Crankshaft Balancer Replacement
.
|
|||||||
| 18. |
Install the drive belt for the auxiliaries. Refer to
Drive Belt Replacement
.
|
|
| 19. |
Remove the engine fixing tool from the subframe.
|
|
| 20. |
Install the engine sight shield. Refer to
Engine Shield Replacement
.
|
|
| 21. |
Refit the front wheelhouse liner. Refer to
Front Wheelhouse Front Liner Replacement
.
|
|
| 22. |
Install the right front wheel. Refer to
Tire and Wheel Removal and Installation
.
|
|
| 23. |
Lower the vehicle.
|
|
| 24. |
Connect the negative battery cable and install the battery cover. Refer to
Battery Negative Cable Disconnection and Connection
.
|
|
| 25. |
Start the engine and turn it off.
|
|
| 26. |
Remove the wing cover.
|
|


