Body Wiring Harness Replacement
| Body Wiring Harness Replacement |
Special Tools
BO-569-A Plug LifterFor equivalent regional tools, refer to Special Tools .
| Removal Procedure |
| Note | ||
|
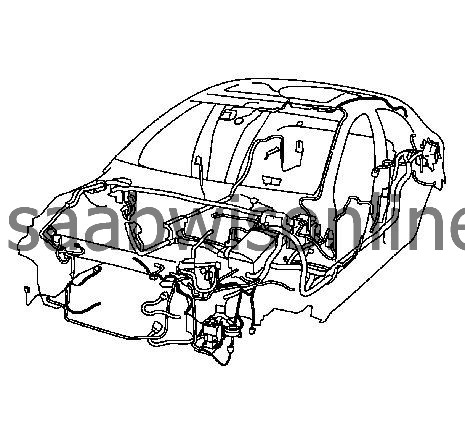
For a better description the following graphic shows the vehicle without attaching parts. |
| Note | ||
|
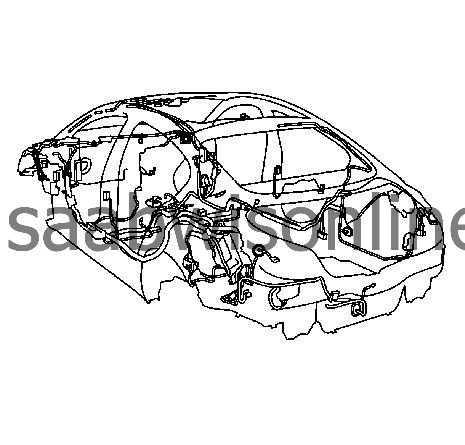
For a better description the following graphic shows the vehicle without attaching parts. |
| Note | ||
|
Arrange a place to embed the removed parts. |
| 1. |
Install the MDI, turn on the ignition and read out the trouble codes.
Delete them and read out the trouble codes again. If there are any trouble codes notice them. |
|
| 2. |
Lift up the vehicle. Refer to
Lifting and Jacking the Vehicle
.
|
|
| 3. |
Open the hood and remove the battery and the battery tray. Refer to
Battery Replacement
and
Battery Tray Replacement (Diesel)
Battery Tray Replacement (LDK/A20NHT)
|
|
| 4. |
Remove the underhood electrical center. Refer to
Underhood Electrical Center or Junction Block Replacement
|
|
| 5. |
Remove the front compartment fuse block housing. Refer to
Front Compartment Fuse Block Housing Replacement
.
|
|
| 6. |
Remove the radiator surge tank. Refer to
Radiator Surge Tank Replacement (Diesel)
Radiator Surge Tank Replacement (LAU/A28NER)
.
|
|
| 7. |
Remove the power vacuum brake booster. Refer to
Power Vacuum Brake Booster Replacement (Left Hand Drive)
Power Vacuum Brake Booster Replacement (Right Hand Drive)
|
|
| 8. |
Remove the electronic brake control module. Refer to
Electronic Brake Control Module Replacement
.
|
|
| 9. |
Raise the vehicle half its high.
|
|
| 10. |
Remove the front bumper fascia. Refer to
Front Bumper Fascia Replacement
.
|
|
| 11. |
Remove the rear bumper. Refer to
Rear Bumper Fascia Replacement
.
|
|
| 12. |
Remove all of the wheelhouse covers. Refer to
Front Wheelhouse Front Liner Replacement
and
Rear Wheelhouse Panel Liner Replacement
.
|
|
| 13. |
Disconnect all of the electrical connectors in all wheelhouses.
|
|
| 14. |
Lower the vehicle and remove the headlamp left side. Refer to
Headlamp Replacement
.
|
|
| 15. |
Remove both rear lamps. Refer to
Tail Lamp Replacement
.
|
|
| 16. |
Release the body wiring harness from the cross car beam. Make pictures for the correct routing.
|
|
| 17. |
Remove the driver and passenger seat. Refer to
Driver or Passenger Seat Replacement (2/4/6-Way Hybrid, 6-Way Hybrid Sport)
Driver or Passenger Seat Replacement (8-Way-Power)
.
|
|
| 18. |
Remove the rear seat and rear seat back. Refer to
Rear Seat Replacement (Back 60 Percent)
Rear Seat Replacement (Back 40 Percent)
|
|
| 19. |
Remove the rear window trim finish panel. Refer to
Rear Window Trim Finish Panel Replacement
.
|
|
| 20. |
Remove the roof headliner. Refer to
Headlining Trim Panel Replacement (With Sunroof)
Headlining Trim Panel Replacement (Without Sunroof)
.
|
|
| 21. |
Remove the front floor console. Refer to
Front Floor Console Replacement
.
|
|
| 22. |
Release the 4 shift control lever fasteners.
|
|
| 23. |
Remove the front and rear carpet. Refer to
Front Floor Panel Carpet Replacement
and
Rear Floor Panel Carpet Replacement
.
|
|
| 24. |
Remove the rear compartment carpet. Refer to
Rear Compartment Floor Panel Carpet Replacement
.
|
|
| 25. |
Remove the steering column. Refer to
Steering Column Replacement
.
|
|
| 26. |
Remove the instrument panel. Refer to
Instrument Panel Assembly Replacement
.
|
|
| 27. |
Release all mass connectors of the instrument panel wiring harness and then disconnect the X1 connector between the instrument and body wiring harness.
|
|
| • |
Make pictures for correct orientation.
|
| • |
Remove the instrument panel wiring harness.
|
| 28. |
Remove the instrument panel tie bar. Refer to
Instrument Panel Tie Bar Replacement
.
Secure the HVAC module at the body. |
|
| 29. |
Remove the pedal module. Refer to
Brake, Accelerator, and Clutch Pedal Replacement (Left Hand Drive)
Brake, Accelerator, and Clutch Pedal Replacement (Right Hand Drive)
.
|
|
| 30. |
Make pictures from the routing and fixing points of the body wiring harness for the orientation.
|
|
| 31. |
Disconnect all electrical connectors and unscrew the ground cables.
|
|
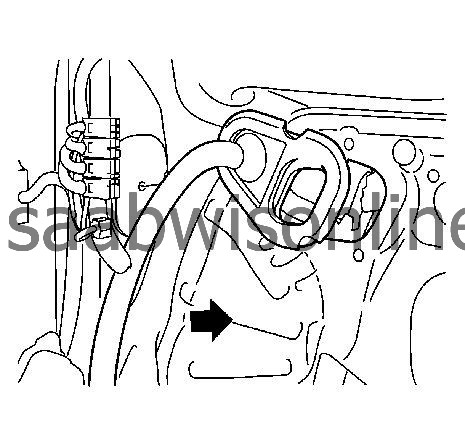
| 32. |
Release the X1 plug connector (1) from the a-pillar using the
BO-569-A
plug lifter.

|
|
| 33. |
Release all fixations.
|
|
| 34. |
Take care about destroyed cable straps and harness guidance regarding noises and rattle.
|
|
| 35. |
Remove the body wiring harness guidance in the firewall and draw-out the body wiring harness from the engine compartment through the passenger compartment.
|
|
| 36. |
Remove the old body wiring harness and lay it on the floor.
|
|
| 37. |
Unpack the new body wiring harness and compare the old with the new harness concerning quantity of fixing points, cable straps, guides, part numbers and pin assignments.
|
|
| Installation Procedure |
| 1. |
After compare the new with the old harness lay the new body wiring harness into the passenger compartment and carry the new harness through the firewall into the engine compartment.
|
|
| 2. |
Then install the wiring harness guidance in the firewall. |
|||||||
| 3. |
Now check that there is no rotation and fix the new body wiring harness.
|
|
| 4. |
Connect all electrical connectors. |
|||||||
| 5. |
Refer to
Fastener Caution
.
Tighten all ground cables on the grounding studs to 9 Nm (80 lb in) . |
|
| 6. |
Install the pedal module. Refer to
Brake, Accelerator, and Clutch Pedal Replacement (Left Hand Drive)
Brake, Accelerator, and Clutch Pedal Replacement (Right Hand Drive)
.
|
|
| 7. |
Install the instrument panel tie bar. Refer to Instrument Panel Tie Bar Replacement . |
|||||||
| 8. |
Install the instrument panel wiring harness. |
|||||||
| 9. |
Install the instrument panel. Refer to
Instrument Panel Assembly Replacement
.
|
|
| 10. |
Install the steering column. Refer to
Steering Column Replacement
.
|
|
| 11. |
Previous to the installation of the front and rear carpet, clean the car inside and remove all used tools.
|
|
| 12. |
Install the rear compartment carpet. Refer to
Rear Compartment Floor Panel Carpet Replacement
.
|
|
| 13. |
Install the front and rear carpet. Refer to
Front Floor Panel Carpet Replacement
and
Rear Floor Panel Carpet Replacement
.
|
|
| 14. |
Tighten the 4 shift control lever fasteners to
15 Nm (11 lb ft)
.
|
|
| 15. |
Install the front floor console. Refer to
Front Floor Console Replacement
.
|
|
| 16. |
Install the headlining. Refer to
Headlining Trim Panel Replacement (With Sunroof)
Headlining Trim Panel Replacement (Without Sunroof)
.
|
|
| 17. |
Install the rear window trim finish panel. Refer to
Rear Window Trim Finish Panel Replacement
.
|
|
| 18. |
Install the rear seat and rear seat back. Refer to
Rear Seat Replacement (Back 60 Percent)
Rear Seat Replacement (Back 40 Percent)
|
|
| 19. |
Install the driver and passenger seat. Refer to
Driver or Passenger Seat Replacement (2/4/6-Way Hybrid, 6-Way Hybrid Sport)
Driver or Passenger Seat Replacement (8-Way-Power)
.
|
|
| 20. |
Lift up the vehicle. Refer to
Lifting and Jacking the Vehicle
.
|
|
| 21. |
Install the body wiring harness on the cross car beam. |
|||||||
| 22. |
Install both rear lamps. Refer to
Tail Lamp Replacement
.
|
|
| 23. |
Install the headlamp left side. Refer to
Headlamp Replacement
.
|
|
| 24. |
Raise the vehicle half its high and connect all the electrical connectors in all wheelhouses. |
|||||||
| 25. |
Install all wheelhouse covers. Refer to
Front Wheelhouse Front Liner Replacement
and
Rear Wheelhouse Panel Liner Replacement
.
|
|
| 26. |
Install the rear bumper. Refer to
Rear Bumper Fascia Replacement
.
|
|
| 27. |
Install the front bumper fascia. Refer to
Front Bumper Fascia Replacement
.
|
|
| 28. |
Lower the vehicle and install the electronic brake control module. Refer to
Electronic Brake Control Module Replacement
.
|
|
| 29. |
Install the power vacuum brake booster. Refer to Power Vacuum Brake Booster Replacement (Left Hand Drive) Power Vacuum Brake Booster Replacement (Right Hand Drive) |
|||||||
| 30. |
Install the radiator surge tank. Refer to
Radiator Surge Tank Replacement (Diesel)
Radiator Surge Tank Replacement (LAU/A28NER)
.
|
|
| 31. |
Install the front compartment fuse block housing. Refer to
Front Compartment Fuse Block Housing Replacement
.
|
|
| 32. |
Install the underhood electrical center. Refer to
Underhood Electrical Center or Junction Block Replacement
|
|
| 33. |
Install the battery tray and the battery. Refer to
Battery Tray Replacement (Diesel)
Battery Tray Replacement (LDK/A20NHT)
and
Battery Replacement
.
|
|
| 34. |
Install the MDI, turn on the ignition and read out the trouble codes.
If there are any stored DTC s delete them and read out the trouble codes again. |
|
| 35. |
Aim the headlamps. Refer to
Headlamp Aiming (Base)
Headlamp Aiming (Check and Adjust)
.
|
|
| 36. |
Program the volatile memory and then check all electrical functions and make a test run.
|
|
| 37. |
Clean the car outside and inside.
|
|
This project is supported by memberships and donations. If you use this site, please consider Joining SCNA and/or making a donation.
Our Friends
